Cool pencil drawings for baths (23 photos)
The bathhouse is a phenomenon of Russian culture that no foreigner has ever experienced!
Pictures about the bathhouse partly help to understand the culture of light steam. But a bathhouse is not just a separate building where you can wash yourself! Firstly, the bathhouse is a place of ritual for cleansing the soul and body. And also a kind of health resort, where existing ailments were expelled, the body was warmed up, preventing diseases. Light steam is inhalation and a way to remove toxins through the pores on the body. Pouring cold water, rubbing with snow or swimming in an ice hole is a boost of energy for the coming week and the best method of hardening the body. And birch brooms are an excellent massager! Next, we suggest you look at cool drawings about a bathhouse. Source
Methods of burning drawings
Sketches are preliminary drawings with clear contour lines, along which master burners apply the image to the base. They reflect the main idea and concept of work:
Stencils are also used, the main function of which is to apply complex compositions to a wooden surface. The more carefully the sketch or template is worked out, the better and more professional the result will be.
Unfortunately, not all pyrographers are high-class artists - mostly they are lovers of creating something with their own hands, people who gravitate toward beauty and grace, but are far from perfect in using a pencil.
Beginners just starting to dive into this fascinating field of study can be advised to use the following methods:
The last two options require some financial costs, but the first one is quite economical and affordable. Needlewomen and craftsmen often resort to it in a variety of handmade areas. Even without the necessary equipment - a printer, it will not be difficult to implement your idea by using photocopying services in any photo printing salon or office supply store.
The variety of topics and wide range of applications in various household areas place pyrography on a par with the most popular types of crafts.
If we look back at the times of the Soviet past, we can remember that burning was one of the popular activities for schoolchildren. Club activities in pioneer homes and labor lessons in schools were often devoted to this applied type of creativity. Boys and girls enjoyed burning out a variety of pictures for their mothers, fathers, and friends.
Now this direction, gaining strength, is being born anew, adapting to modern realities. New interesting topics are appearing, tools and imaging technologies have been modernized. With their help, professionals create masterpieces of wood art.
Burning set
There are two types of pyrographs: a device with a solid tip and a constant temperature, similar to a soldering iron, and a device with a wire pen and an adjustable temperature (loop burner). What are their pros and cons?
The soldering iron-type burning set has a number of advantages, thanks to the brass nozzles included in the set. This is a universal attachment, handwriting (for writing text), linear (drawing contour lines), and dotted (applying dots).
There is also an attachment for graphic work, with which individual areas are shaded and shaded. Also interesting are the stamp attachments.
The soldering iron takes a long time to heat up and takes a long time to cool down. The patterns are rougher than with a wire nozzle, but for beginners this is the best option. But the main disadvantage is that if the soldering iron breaks, you have to buy a new one.
The second type pyrograph has a box with a thermostat and a handle with a nichrome wire loop, up to 0.3 to 1.5 mm thick.
The advantages are obvious: you can regulate the temperature, and also change the wire loops as they burn out. Used to apply thinner, curved lines, frequent raster (background in the form of hatching).
Popular stories
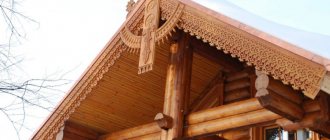
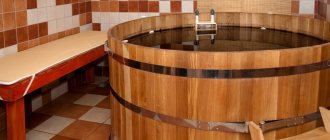
Perhaps the most acceptable place where the pyrography technique fits harmoniously into the interior was, is and remains the sauna.
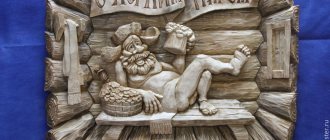
This is facilitated by the excellent combination and uniformity of the material - wood, which, by the way, is often left over after the construction of a steam room and can be successfully used as a raw material for wood burning. There are many sketches for a bath, as well as original ideas for decorating bath accessories and supplies. These include story panels, shelves, hangers, and signs with inscriptions. After all, there is nothing better for a bathhouse than a comfortable environment that sets visitors up for rest and relaxation. For example, signs with slogans of invitation and wishes for light steam would be good to hang on the doors. Decorate the walls with funny plot paintings that correspond to the spirit of the steam room and, of course, place a panel depicting the owner of the establishment himself - Bannik. The transformed steam room will delight its regulars and attract new steam lovers to visit.
Bath furniture is also decorated with burning, using for these purposes cliches of plant ornaments, depicting mainly oak and birch leaves, as elements of the main attributes of the steam room’s health-improving procedures.
Beautiful openwork frames - frames - are also made with ornamental patterns. You can find a wide variety of wood burning designs.
Main types of signs
There are several main types, which differ in the material from which they are made and the method of applying inscriptions and drawings. Let's look at the main types and take a closer look at the optimal options.
Plastic signs
This type has the following features:
- Low price and ease of manufacture.
- A variety of types: inscriptions can be pasted on, can be appliques, it is possible to apply the inscription by engraving.
Plastic is good for public baths
But there are also a number of disadvantages:
- Plastic is not very suitable for rooms with high temperatures; it should never be used in steam rooms: in addition to losing its shape, the sign will emit harmful fumes.
- Such signs look quite cheap and do not fit well into wooden interiors. They can be used in public baths as information signs on plastic doors.
Glass signs
This type is distinguished by the fact that glass products do not cover the texture of the base and seem to float in the air; in addition, you can create original lighting, and the sign will serve as an additional light source.
Thanks to such holders, signs look more impressive.
Plexiglas is often used, which is more flexible and reliable than its conventional counterpart. With its help, you can create three-dimensional products of various shapes.
The disadvantages of this type are the following:
- Poor compatibility with the interior: a glass sign in a bathhouse looks alien and does not fit well into the decor.
- The fragility of the material, of course, there is tempered glass and plexiglass, but still such elements create the illusion of unreliability.
As one of the options, you can note engraving on mirrors and glass doors, if available - these elements look much more attractive.
Metal signs
This type does not need any special introduction; the products can be an engraved plate, or can be made using artistic forging.
Due to the characteristics of the material, this type has the following features:
- Metal sauna signs are most often used outside the building; for the durability of these elements, it is best to use stainless steel; it is durable and resistant to atmospheric influences.
Metal is only justified on the street
- The presence of metal elements in the steam room is strictly prohibited. You can get burned on metal; in addition, constant adverse effects significantly accelerate the corrosion processes of metal, so you should not use such signs even in the shower.
- Metal does not go well with wooden rooms.
Wooden signs
Wood products deservedly enjoy the highest popularity due to a number of reasons:
- Wood fits perfectly into the interior of the bathhouse and gives it a feeling of warmth and comfort; the material emphasizes a healthy atmosphere due to its natural origin.
- The excellent properties of wooden signs allow them to be used in all rooms: steam room, shower room, relaxation room and dressing room. They do not evaporate harmful substances when exposed to high temperatures, tolerate humidity well and do not heat up too much.
- To order, you can make products of any size and with any pattern - such an element will become a truly unique decoration for your bathhouse.
In the photo: a drawing made by laser engraving
Most often, wooden signs for a bathhouse are made in the following ways:
- Applying inscriptions and images using laser engraving. This method is used by large companies that have the necessary equipment. Any design can be applied according to an individual sketch, the price is quite high.
- Making a sign using a milling machine. This image is more prominent, which has a positive effect on the appearance. Quite a common method.
Using milling you can get excellent products
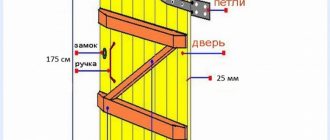
- Making by burning is the easiest way; you can make such signs with your own hands. To do this, you need a burning device and a board, onto which you must first apply any design you like.
Drawings of patterns for frames
Ornaments contain the following elements:
The component that unites them is the rhythm of the pattern.
Any framed images always have a completed, laconic appearance. Elegantly decorated, they are used to frame mirrors, photographs, portraits, panels, congratulatory texts, and kitchen cutting boards.
It is important to know that the art of pyrography is a very painstaking task. Applying such complex, ornate, repeating patterns requires increased attention and effort. You can look at a small example of how you can burn out an ornamental frame yourself.
Tools and materials:
Step-by-step work:
Thus, by faithfully fulfilling all wishes, you can achieve great success and become a real master of wood burning.
Animal sketches
Which artist or child doesn’t like to draw animals and birds? These are unlikely to be found. Children, for the most part, when choosing a drawing on a free theme, prefer to depict animals, especially characters from their favorite cartoons.
There is a great artist in every child, which is why it is so easy to get children interested in drawing. Instilling a love for pyrography will also not be difficult - all you have to do is give a gift in the form of a pyrography kit for a birthday or New Year's holiday.
A child's first creation will be a wonderful decoration for a child's room. It could be some cute dog or kitten, a bird or a butterfly - it doesn’t matter. Another thing is valuable: the child chooses a living creature. He gives his love to his pet - he takes care of it, plays with it, and captures it in a graphic image. Boys especially love horses, dogs, and predators - lions, tigers, wolves, bears. From fantastic characters - dragons and dinosaurs. Girls, on the other hand, are characterized by more delicate creatures: foxes, hedgehogs, deer.
Animal patterns are varied both in appearance and in the style of execution - from primitive schematic and silhouette forms to three-dimensional, picturesque highly artistic figures.
Also, fairy-tale images are of interest to young people: the Gray Wolf, the Firebird and the Serpent-Gorynych, Kikimoras, Leshy and many others.
Our little brothers often have beautiful landscape views as their backdrop—their natural habitat. Therefore, burning out sketches of nature in paintings is not in last place. The presence of a landscape creates a special flavor and gives vitality to the work. This is especially evident when, having completed the main part of the work, they begin the most interesting part - applying color. After all, scorched paintings do not always remain in black and white; sometimes they are supplemented with color shades.
Nature theme
The beauty of nature can inspire any creative person, and pyrograph artists are no exception. Drawing their ideological ideas from the vast naturalistic ocean, they boldly embody them in decorating not only the walls of the room, but also furniture, dishes, and household items. Modern advanced tools allow us to talk about such a direction as miniature pyrography.
This kind of decoration will look great in a country house or in the interior of wooden houses. Adherents of a natural lifestyle and lovers of eco-style are sure to find many interesting and original crafts, both for themselves and for adding additional charm to their home.
With such a gift you can surprise the most demanding beauty connoisseur. In addition, a hobby can become a source of additional income if the hobby develops into a serious occupation.
On the vastness of the World Wide Web, you can create a mini-site offering your products or a page on the famous “Masters Fair”, posting new items there.
Everything will depend on desire, skill, and most importantly, patience in mastering the art of “drawing with fire.”
Conclusion
Signs are a pleasant addition to the interior; they create a good mood and serve as a kind of highlight that makes your bathhouse stand out from the rest. You can order products or make them yourself using one of the above methods (see also the article “Sauna technology: choosing the appropriate option”).
The video in this article will help you understand the intricacies of manufacturing.
“Write with fire” - this is how the word “pyrography” is literally translated, denoting one of the areas of decorative and applied art. Sketches for burning are applied not with a pencil or a brush, but with a special soldering device with nozzles of different diameters. Such a network-powered device is called a pyrograph. In order for the desired image to appear on the title, in addition to sketch drawings, stencils and templates are used.
Image Transfer Methods
There are still disputes among woodburners about applying a design to a piece of wood. Most people lean towards the old, time-tested method - the copy method. It is more suitable for beginners and children. But professionals prefer an alternative method - shading on the wrong side. It has very weak, barely outlined contours, which subsequently merge with the scorched strokes and do not create a delineation that betrays the amateurism of the performer.
It's done this way:
Another simple method is pressing along the contour:
Craftsmen who master the skill of graphic representation prefer to make a sketch directly on the basis, without additional linear markings, being content with only weak outlines of the compositional arrangement.
Those who want to master the art of pyrography can try any technique. And even if it doesn’t turn out at all as expected, diligence and self-confidence will lead to decent results over time.
Pyrography is the burning of designs on wood with a special soldering iron. This type of craft art has existed for many years and still does not lose its relevance. To learn how to burn out drawings, all you need is a small set of tools and desire . This is quite enough to get a good result.
To burn an image on wood from a photo or a ready-made template, you need to select a pattern in advance; often craftsmen use ornaments from books and even fabric.
To burn an image on wood from a photo or a ready-made template, you need to select a pattern in advance; often craftsmen use ornaments from books and even fabric.
The drawing must be transferred to paper in any convenient way (download and print, photocopy, transfer to paper, sketch against light) and cut out the shape along the contour.
You also need to prepare tools and materials:
- Soldering iron of your choice: with replaceable tips, wire, with changeable temperature conditions.
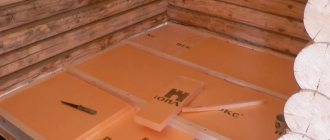
Fine sanded board.
DIY sauna signs
I would like to present to you my “project” and the sequence of carving in my style.
1. Step one. Start of action
To start implementing my plan, I liked this board - a piece of coniferous wood and a standard size in the well-known Leroy Merlin store. I will be working with this material for the next 4 hours)
2. Step two. Marking, cutting
Visually, I divided the length of the board into three parts, necessary and corresponding to the products.
Made the cut according to the planned drawings.
3. Step three. Drawing.
The Internet is very rich in the selection of necessary images... and, having decided on the choice, I transfer the necessary part of the drawing to my object. This is done by hand by me, which creatively excludes copyright, because... in the process, the drawing becomes not an exact copy, but only a part of a part of an image, while the author’s idea acquires its original outline.
An oak leaf can be copied from a tree or from a herbarium
4. Step four. Carving .
Now you can start carving. In this process I use three types of cutters: Tatyanka chisels and one Swiss chisel.
Using a joint, I make cuts along the outlined contours of the design, and with a chisel I cut to fit the contour, thereby highlighting the design above the background.
After giving the product a decorative volume, it is necessary to sand the carved surface (sandpaper No. 180, No. 220 is used)
I add pairs in the form of clouds to the main design, which are subsequently cut out with a joint and a chisel, and I sand the clouds.
At this stage, the carving work on the tablet is completed and you can begin the final steps, namely coating and giving the product a noble appearance.
5. Step five. Stain, varnish.
I apply the stain with a brush in one layer over the entire surface and shade the recesses with a second layer of stain. After drying, I erase the protrusions of the design with sandpaper, resulting in a three-dimensional image effect.
After applying the varnish with a balloon at a distance of 10-15cm. from the drawing (I use a polyurethane spray bottle with furniture varnish) the plate acquires a shiny surface that is pleasant to the touch and look. At this point, the “Bathhouse” sign will be ready for use after the varnish has dried (12 hours). And we are moving on to the second part of the Leroy Marlin board, on which we will cut out an equally original sign in addition.
6. Step six. Decree!
I gradually transfer the desired image onto the board. To translate a drawing, a picture is used that is printed on a printer to fit the size of the board and translated directly using carbon paper. After which I cut out the applied design as well as the “bathhouse in step four” with a joint and a chisel. Then sand it with sandpaper.
But the inscription under the word “decree” is cut out with a pointer with a triangular tip, the result is an in-depth text that you don’t have to sand and go straight to stain-varnish coatings.
6. Step seven. The third part of the board.
I use the burner on the third part.
But initially the design is cut into the depth of the surface using a jamb by trimming each cut.
After cutting the inscription inside the surface with a jamb cutter, an original font was obtained, which is burned with a “stayer” burner as if it were a pencil.
Three signs for your favorite bathhouse are ready!
Enjoy Your Bath!