Reads: 1,486
Reading time: 5 min.
no comments
Felting is the modern name for the art of wool felting. With its help you can create bright and original accessories, toys, clothing and shoes. It’s easy to master this technology, as a small master class on felting a hat will prove.
All felting techniques are divided into dry and wet felting. The first uses special needles of varying thicknesses, with the help of which the material is given an overall shape and small details are created.
Basic felting hat pattern for beginners
The pattern is not difficult. Even beginners can handle this, but it will be much better if you watch a special training video before doing so.
The first thing you need to do when cutting a hat for felting is to measure the circumference of your head.
Let's look at how to make a template step by step:
- First you need to make a calculation. For this we need the size of the head. We measure the circumference of the head and the length from the crown to the neck. We divide the resulting values in half and allocate a percentage for the shrinkage of the material.
- We determine the intersection point and withdraw the resulting amount from it. We get 4 points (half of the whole).
- We connect these points with a dotted line, maintaining a bell shape.
- Add the shrinkage percentage. 30% is enough. The percentage is calculated from the original data.
- We connect the resulting pattern with lines. When determining the percentage, pay attention to the type of wool. Its thickness directly affects the shrinkage of the material. The denser the material, the less it will settle.
This pattern is a help for beginners.
DIY women's knitted beret
Berets add something unusual and even mysterious to the image. Perfect for cool weather and will complement your look. A good combination would be a coat and a pencil skirt.
Knitted beret pattern for women
To create a pattern you will need: paper, a ruler and a pencil. To begin, draw a diagram that consists of the bottom, sides and cache. All sizes and shapes are selected individually for each person.
Sew a knitted beret step by step
First of all, sew the sides of the side together (front and back), and then stitch the bottom to the side base. Finally, sew on a cache-pin that will hold on the head and should correspond to its size. In the final stage, go over all seams with an iron. The stylish beret is ready.
Step-by-step felting of a bathhouse cap: master class from professionals
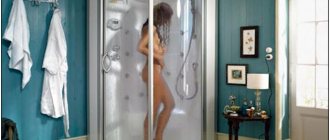
For bath lovers, an original cap will be an excellent attribute in a hot sauna. Wet felting is great for wardrobe items. Consider a master class on making a bath cap.
To work you need:
- Material for pattern;
- Wool;
- Polyethylene;
- Nylon fabric;
- Warm soapy liquid;
- Sanding machine, if available;
- Gloves for work.
We make a pattern on paper. The hat will be in the shape of a bell. We focus on size 56. Based on this, the width is 44 cm and the height is 28 plus 6 cm to create a semicircle. Let's make another pattern on polyethylene.
We put the polyethylene under the paper and begin to lay out the wool. Let's choose the main shade and start working from the top of the head. Thin strands will make approximately 6 rows.
The next step is to wet press the pattern. Place a nylon cloth on top of the felt ball and moisten it with a soap solution. It will be convenient to use a spray bottle.
We begin to wipe the future hat, moving from the central part to the sides. When the wool lies evenly, you can begin to make circular movements, lifting the nylon fabric. These manipulations must be performed until the felt stops stretching.
We apply a film pattern to the product. It is necessary to press down the template well. Carefully tuck any protruding fibers behind the film.
Next you need to place the second ball. Now starting from the bottom and moving to the top. Next you need to carry out the same manipulations as with the first layer. Cover with a nylon cloth, moisten and smooth out a little. Then the hat blank must be turned over. Carefully tuck any protruding fibers behind the film.
Now you need to make a cross layer of wool. On the sides the villi can boldly protrude, while at the top and parallel to it a straight line should form.
The bath cap can be of any design, the main thing is to follow the instructions, then the result will not be long in coming
The thickness of the wool layer should be the same in both balls.
Then we again cover the cross layer with a cloth, spray it with soapy water, and rub it. Turn over and remove any protruding fibers.
On the other side the process is similar. Then repeat the cross layer on both sides. Total of 4 layers in total on each side.
The wool needs to be pressed. To do this, you can use a special machine or work manually. There is no need to process the edges.
Monitor the moisture content of the product. In case of high humidity, remove excess water with a towel.
Next you need to roll the hat onto a stick and roll it on a bamboo mat. The procedure will take 5 minutes, after which the product is straightened and the felting side is changed. You need to allocate 20 minutes for this. During surgery, smooth out any creases. After this, the cap must be turned out and the procedure repeated. The product resembles a cap.
It’s time to add a soap solution to well-felted wool. It is better to work with gloves. You need to crush the product thoroughly.
While felting, straighten the craft on both sides.
When the product begins to shrink, you need to put the hat in hot water and wrinkle it a little. Next, lower the product into cold water. Repeat this contrast again. This is an important measure so that the hat gets used to changes in temperature in the bathhouse. When finished, rinse the product in warm water and dry with a towel.
The still wet hat must be put on the workpiece and given the desired shape.
If desired, you can create a woolen decor. You can also make the lining on silk.
How to calculate the size
The first is measurements for the template. Templates for felting hats are a kind of skeleton of the product. They are easy to make, but under the influence of hot water the material shrinks, and therefore, when making a hat from wool, there is a risk of getting something that will then be impossible to use.
How to correctly calculate the size of a hat when wet felting? Wool shrinks by a third, so the measurement results are multiplied by 1.3. You will need two measurements: the volume of your head plus the distance from the back of your head to the bridge of your nose.
Eg:
Head volume – 54 cm.
(To measure the volume of the head, we run a centimeter tape in front along the line of the eyebrows, and in the back along the occipital protuberance).
Height – 42 cm.
The numbers are divided in half.
A pattern is drawn with a width of 27 cm (54/2), a height of 21 cm (42/2). The upper part is rounded, and 10 cm is added from below for the future lapel. Half the head volume is multiplied by the shrinkage factor and rounded up. It turns out 35 cm. The difference between 35 and 27 is added for insurance. 35-27 = 8. The allowance on all sides is 4 cm (8/2) and on top 8-10 cm to decorate the crown.
Ready-made patterns for felting hats can be found on the Internet and you can choose the design you like.
A template is cut out of the substrate or plastic film. An untouched train remains at the bottom so that the fields of the future accessory do not fall into one.
An interesting idea - felting a hat with ears
The felting technique can be used when creating a hat with earflaps. You can also create children's versions of the product with cat ears.
Let's consider an interesting option for hats with ears. For work we will need:
- Wool is the main material;
- Material for pattern;
- Soapy water;
- Polyethylene;
- Sanding machine (if available).
The system for felting a hat with ears is no different from a regular hat: we apply several layers of wool, thoroughly wetting and compacting the pattern on both sides
The usual pattern involves a circle in the shape of the head. For hats with ears, you need to cut out an ellipse. We take head circumference data, but stretch the circle. The correctness of the calculation can be easily checked using a thread. Use it to measure the circumference of your head and compare it with the drawn ellipse.
The most important part of the pattern is drawing the ears. We draw them in a circle, taking into account that the ear deviates from the center if you look at the head profile drawing.
At the end of intensive felting, we give the product a contrasting bath, after which we rinse the hat and allow it to dry on the workpiece. Malachai is ready to use.
Let's emphasize individuality
But there are even cooler examples. This is already handmade. Below are the original works of Elena Fedoriv (if you wish, you can order such a wonderful thing from her). If you want to pleasantly surprise a person, this is your option.
Author's works by Elena Fedoriv
Well, what man wouldn’t be flattered if you gave him a hat with a bear or an eagle? Some people will be more pleased with a tiger or a wolf. It all depends on the character. And in the bathhouse wearing such a hat you will be in a better mood than ever.
Flatter your man by giving him such a hat.
For serious or dangerous...
By the way, there are also options for bath hats for women. You can't always joke with them and you can't guess how they'll react, but no one will be against such beauty. So as a gift for a girl, this is a win-win option.
Ladies' version of a bath cap
Felting a men's hat for everyday wear
Wool hats retain heat well and regulate humidity. For a fisherman husband, such a gift will be a real salvation on winter fishing.
In the appropriate store you need to buy wool of the desired color and density.
For felting a men's hat, it is better to choose practical dark or gray wool options
The set of tools remains the same. We will need:
- Wool;
- Polyethylene;
- Soapy liquid;
- Felting machine (if available);
- Pattern paper;
- Nylon fabric.
The sequence of work and technique is maintained. We measure the circumference of the head and make a pattern. Next, we place the felt in several balls and knead it thoroughly, spraying it with soapy water.
After repeating the manipulations on both sides, we begin felting. The process will take about an hour. After this, we wash the product and leave it to dry on the workpiece.
In Georgia, woolen hats are considered a traditional headdress for men. This wardrobe item can be found in every Georgian.
Fashion trends
A felted hat is a unique handmade product. Possessing it is a great and warm happiness, and making it yourself is a skill worthy of praise. Fashion influences felted hats, and now classic hats acquire a youth style, become modern and very fashionable.
Georgian felt hat
The Georgian or Svan hat personifies the rich flavor of Georgia. In this country they are sure that such a hat is a talisman, a priceless gift and simply a universal thing.
The svanka has a round shape and sits loosely on the head, thanks to which it is not hot and, as Georgians say, headaches and the stress of a hard day go away.
Fashion trends have adopted the classic style of the Georgian national hat. Today this original model is complemented by a felt visor, flowers, horns and other decorations.
Hat Rose
Among modern models, a hat with delicate draperies in the shape of a rose stands out clearly. The process of its manufacture includes the technique of wet felting. At the last stage, the crown of the cap is twisted, creating “rose petals”. On the reverse side, the petals are securely reinforced with stitches, so the model will not lose its presentable appearance for a long time.
Felting a hat at home (photo of the process)
Similar articles
- Felting felt boots: for a doll, video master class from dry wool, at home, souvenir template, pattern for wet felting, for children for beginners
Felt boots can be not only shoes, but also an original decorative element. Today the situation has changed radically and anyone can work with wool... - Hydrangea from foamiran: how to make a master class, photos of flower templates, video, how you can replace the pattern and molds, with your own hands
Hydrangea from foamiran is one of the most popular flowers among florists. If a flower from foamiran falls, it will remain intact, will not wrinkle or break off,… - Do-it-yourself patchwork blanket: patchwork quilts, photos, master class for beginners, patterns from squares, how to sew a double-sided blanket, video instructions
Each patchwork product is unique: it is simply impossible to repeat it exactly. If you look at numerous photos or videos depicting patchwork…
Features and benefits of the technology
Felting is a technique for creating clothes, toys and home decoration from unspun wool. What used to be the basis of survival and protection from the cold has now become a subject of art and unlimited scope for creativity. It’s worth saying that the technology hasn’t changed much between now and then, except that felting tools have become more convenient.
Today, as many years ago, there are two types of felting:
- dry - to create a three-dimensional product, for example, toys, jewelry and jewelry;
- wet - for creating clothes, shoes, hats, blankets, panels.
Each type is based on the property of fibers to entangle with each other, forming a dense single fabric. In dry felting, balls of wool are held together by repeated piercing with special needles. It is worth saying that this method is also used to decorate finished products, for example, hats, with various designs and ornaments.
Felt products are created by wet felting. This technique requires wool, soap, a special felting machine, or a stick or rolling pin, just like in the days of our grandmothers.
Surprisingly, felting technology was first described in the legend of Noah's Ark. According to the legends of that time, when it rained, the wool from the sheep fell, became wet and was knocked together by the hooves. Doesn't it really resemble wet felting?
So, a felted hat is the work of wet felting masters. Let's note its advantages:
- You can put a felted hat in a bag without fear of denting it and ruining its appearance. Any crease will straighten out easily if you pat the crooked area with wet palms;
- it doesn’t get hot in a felt hat, thanks to its loose fit to the head;
- easy change of hat shape. Tired of wide fields? Cut them off. Add a visor, flowers or any other accessory;
- durability;
- even a hat that has gone out of fashion or out of your preference can retain its beneficial properties if you turn it into warm shoe insoles, jewelry and much more.
Do I need to fold the edges of kitchen towels?
The shape of the finished towel may vary. For convenience, women sew such products with loops or “purses” with a clasp at the top, on which an unusual towel is hung. The edge of the canvas can be folded (twice), then stitched so that it does not fray. You can simply cover it with a special tape for finishing the edges. The bottom, top and sides of the product are also trimmed with a zigzag or trimmed with other fabric in the form of ruffles, frills, etc.
How to process the edges of a towel?
When processing the edges, so that the corners do not turn out too thick, it is advisable to cut off small pieces of fabric in these places with scissors, then all the folds will come out extremely neat.
If you decide to trim the edge with a special ribbon for this type of work, then choose the color of the ribbon to match the towel itself. Then everything will be in harmony.
Diversity
Living in an era of enormous choice, we sometimes get lost in front of a colossal assortment of goods. We are ready to spend hours selecting the accessories we like that can diversify our life and enrich our vacation with bright, unforgettable moments. Even such a seemingly insignificant thing as a bath hat has been decorated by modern life in such a way that by wearing it, you will not only protect yourself from overheating in the steam room, but you will also be able to transform yourself into an original, cheerful character.
For example, the “Budenovka” bathhouse hat is very popular; you can also be offered hats in the form of a cocked hat, papakha, or kokoshnik. However, the classic bell hat remains traditional and especially popular. If desired, it is quite possible to make it yourself, for example, sew it from ready-made material or felt it from wool fibers. Let's consider both options.
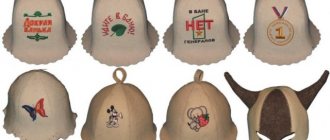
Unusual hats
At the moment, there are a lot of interesting ideas in the design of bath caps. Factories are engaged in the production of products, there are original works. So, for example, football fans can purchase items in the shape of a ball, and dandies who prefer jeans and wide-brimmed hats will like the “a la cowboy” style. An interesting option would be a product in the form of a knight's helmet. Or maybe caps, caps with pilot’s goggles. Textile production offers options for every taste: tankman, Creole lady and pirate.
Handmade models will be a cool item. A man will be flattered by the gift of a bear, eagle, or wolf hat. Such products lift your spirits. You can also choose styles for the fair sex, symbolizing fish, the depths of the sea, etc.
This type of recreation can be traditional and elite entertainment. Holding business meetings in a steam room is a smart gesture indicating a hint of a fruitful relationship. The business nature of the meeting will be emphasized by products with the company logo that meet the image and stylistic requirements of the company.
Handmade
Market offers are varied regarding the styles of such products. They are presented in the form of a watermelon, budenovka and other fancy shapes. Needlewomen will be able to sew a product that suits their tastes. Exclusive clothing will attract the attention of those present and will become a reason for praise. Original hats will be the best present for family and friends.
Help! When sewing a product, it is better to choose felt or felt. These materials are preferable because they are dense and can provide good thermoregulation of the head.
- it is necessary to make a pattern;
- To do this, measure the head circumference;
- the resulting numbers are divided by 4 and 1 cm is added, which is the width of the wedge. There are only four of them;
- height is taken as desired;
- the rounding of the wedge is done by eye;
- the pattern is transferred to the fabric;
- the wedges are sewn end to end. If sewn outside, then this is done with a decorative seam;
- a loop is made at the top of the product so that you can use a hanger;
- A braid is sewn along the edge or treated with a decorative seam.
Embroidery or applique will look good on the product.
Women's
When choosing a hat for a bath, a woman should decide on the design and color. In this matter, it is worth remembering that the product is an original component of the image. To this end, it should have a bright color palette and a witty message. Thus, the headdress will emphasize the individuality of the owner.
Experts recommend that the fair sex purchase a felt hat. This material helps to style long hair.
Models made on the basis of felt and rabbit fluff are in demand. They are pleasant to the touch while wearing and do not shrink. It is worth purchasing when a corporate event is planned at the bathhouse complex.
A product that is characterized by brightness and originality will allow you to have a fun event. In addition, such hats are quite unique and look very bright.
Children's
When choosing a bath cap for a child, you should adhere to certain rules. It should cover the ears and the back of the head. A prerequisite is natural fabric. This will prevent burning of the skin. The product is able to keep your head at a comfortable temperature.
A child in a bathhouse needs to create an atmosphere of play, which will arouse interest and create a good mood. To do this, he should choose a product from a special children's collection. The choice on the market is varied, represented by the following models: “Little Princess”, “Panda”, “Mademoiselle”. Children will love hats with images of popular cartoon characters.