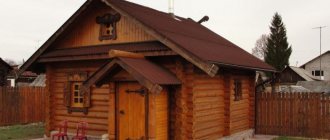
The steam room in the bathhouse and the heater require special attention.
The healing effect and softness of the steam depends on its type and quality. The expected effect depends on the correct choice of stone and full filling of the heater. Professionals know exactly what effect a heated mineral has on people when interacting with water. Below we will try to understand in more detail how to choose stones for a bath and how best to use them. And what’s most interesting is what stones for a bath can be collected completely free of charge in your area. Beginners will find it extremely useful, and professionals may pick up a couple of interesting ideas.
How much can you earn from this?
To grow high-quality raw materials, it is necessary to follow the agricultural techniques for growing sorghum. Thickened plantings will produce thin twigs that are not suitable for knitting: they will break when pulled with wire or the bark of a young tree. For high-quality brooms with a thin handle and a fluffy base, you need to choose varieties of millet of the spreading group.
Sorghum is sown in the first half of May, when the ground is still wet. 15-20 cm are left between plants; row spacing should allow free passage in order to promptly weed seedlings and remove weeds (this is about 35 cm). Sow to a depth of 4-5 centimeters. With this method of planting, one hundred square meters of land produces raw materials for the production of 25-30 ready-made lush brooms. To make the twigs flexible and not break, they are steamed in salt water before binding. Sorghum is harvested in September, and mating begins in free time, when the main crop is harvested in the fields.
They are usually knitted from three parts-bundles, connecting them into a common one. To do this, use main wire or bast strips cut from young tree branches. The quality and durability of the product depends on the strength of the ligaments. Here you should try to ensure that buyers come back next season.
Show Control Panel
Chimney cleaning equipment
Over the long period of operation of fireplaces and stoves, humanity has accumulated enough experience to combat soot in pipes. Most devices do not have a complex design and can be made with your own hands.
- A brush is the most proven, and, oddly enough, one of the most effective ways to clean a pipe.
- Peeling with potato peels (old-fashioned method). This method is quite simple: you need to pour half a bucket of potato peels into the chimney and turn on the heating device. When heated, the potatoes will begin to release starch, which decomposes the soot.
- Aspen firewood is a simple and dangerous method. To clean a metal pipe you will need aspen logs. Place them in the stove and light the logs. After a while you will hear a strange hum, this means that the soot in the chimney has caught fire and after a while the metal pipe will clean itself. When using this cleaning method, you endanger the roof and neighboring buildings - hot particles can accidentally fly onto the insulating layer and lead to a fire.
- Aluminum cans. Simply burn aluminum cans while firing the stove. Aluminum particles have the same charge as soot. As a result, black smoke will not settle on the protected metal pipe.
- Dry cleaning is the most unpopular and unpleasant process. After dry cleaning, the soot partially peels off. This process is accompanied by an unpleasant odor and the formation of soot, which settles on interior items.
Chimney cleaning equipment
What are floor brooms made of?
Throughout its centuries-old history, the broom has remained virtually unchanged in appearance - only the materials from which it is made have changed. You can make this cleaning device out of almost anything. Basically, brooms are made from stems and branches of bushes and herbs, and twigs. Most often they are created from a special plant - sorghum, but we will talk about it a little lower.
One of the modern broom options
Brooms are also knitted from common wolfberry, a shrub popularly called “wolf berry.” By the way, this is the plant that produces the popular goji berries. But a soft broom can be made from St. John's wort, wormwood, and oregano. If you sweep the floor with such a product, the house will smell fragrant, and moths and other insects will not appear. Spiders could be expelled from a home by sweeping it with a broom made of reed stems. In villages they still use brooms made from nettles and linden branches.
The Slavs often used millet stems to create brooms. But now such products have practically sunk into oblivion - they have been replaced by softer brooms made from broom sorghum.
You can even make good money making brooms
Triple knitting
The method in which an additional belt is made in the middle - between the main upper and lower ones - is used in the case when the broom handle is quite thick and needs to be reduced in diameter. Thus, this is a simple tightening harness performed with a regular knot.
Sometimes they completely wrap the broom handle. Its knitting begins, as usual, with a simple tightening harness, and then turns are evenly applied along the entire length of the handle. Thanks to this winding, the broom fits very firmly and comfortably in your hand, and the likelihood of getting hurt is minimized. This method also gives some advantage in that you don’t have to remove the foliage from the branches in the area of the handle. Full winding will be indispensable in the manufacture of coniferous brooms. However, it should be taken into account that if such a broom is prepared for future use, the turns of the winding material should not be applied too tightly to each other in order to avoid molding of branches and leaves (if they are not removed) under the winding.
Separately, it is worth mentioning the materials for tying bath brooms. Without a doubt, natural linen or hemp twine is considered the best, but nowadays their synthetic analogues, which are more durable and cheaper, are often used. Many sauna lovers use plastic electrical clamps to tie brooms, eliminating the need to tie knots and allowing, if necessary, to easily and quickly tighten them.
Contraindications
Next, according to our plan, we will independently extract stones for a bath in nature. Therefore, first you need to say which ones you can’t take. Firstly, granite. The main components of any granite (on the left in the figure) are quartz, which has already been mentioned, feldspar and mica. There is always iron in granite, even if it does not have the slightest red, brown or yellow tint, as well as quite a lot of water of crystallization. All this together, reacting when heated, releases volatile iron compounds into the air. Anyone who has ever tried “iron” steam, which leaves a sour taste in the mouth, and after a bath a headache and general fatigue, is unlikely to want to repeat it. All bathhouse attendants know very well that when supplying/adding water, it should not come into contact with iron or ordinary steel.
Natural stones and ceramic surrogate, unsuitable for baths
In addition, granite is a rock with increased natural radioactivity. It most often complies with sanitary standards for construction, but in a granite bathhouse, a decay product of radionuclides, radioactive gas radon, can be released. Which is very bad even outside the bathhouse.
In some places you can find beautiful inclusions in the rock or whole stones with a shine of gold leaf, often misleading inexperienced amateur geologists, in the center in Fig. This is pyrite, a compound of iron and sulfur. When heated, pyrite releases sulfur dioxide. Natural pyrite is a raw material for the production of sulfuric acid. It follows that in a bathhouse pyrite is no more desirable than a plague-ridden rat.
Finally, bath lovers sometimes try to fill the heater with electric porcelain products. Walnut insulators for antennas are attractive in size and shape (on the right in the figure), but the result is disappointing. Electric porcelain does not breathe at all, but with a heater the glaze on it quickly cracks, and pieces of porcelain begin to become very dusty.
Comments
Galim Muratov
Wild Bee
Where is the machine? The most important thing is to connect, and dialing is the tenth thing. Dislike!
The method of knitting a bath broom is an important point that affects the convenience and safety of using the broom during steam procedures, and also ensures its strength and stability of shape during preparation and storage. Depending on the type of broom and its purpose, the methods may differ significantly.
Business concept
Visiting the bathhouse has become an extremely fashionable activity. People pay more attention to health, resorting to the experience of their ancestors. Earnings from the sale of bath brooms are based on the sale of simple, but correctly made bundles of birch and oak branches. Oak brooms are more valuable, although making products from this type of wood is easier.
You can do the preparation of brooms yourself, or you can hire staff consisting of rural residents. To hire employees, you will need start-up capital, but in the absence of free finance, you must take on all the work yourself.
Double knitting
With it, two strapping belts are made; it is the most traditional and universal. It provides very high strength to the broom and allows you to make a handle that is rigid and easy to grip. A special feature of double knitting is the use of the so-called cross broom knitting method and the use of different knots for the upper and lower belt.
With the cross method, the bottom strap is performed first.
There are two ways to do it:
In the first option, the branches collected in a bundle are tied closer to the end with a strong cord, thread or twine, but so that the tie is not too tight. After this, the beam is divided in half and these halves are rotated relative to each other by 360 degrees.
In this way, the strapping self-tightens, and it will securely hold the branches. The operation requires some physical effort
It is important that the first tie is not too tight, otherwise you will either not be able to twist the halves of the bundle, or you will break the branches
The second method is that the branches collected in a bundle are immediately divided in half, and these two parts are crossed over each other at an angle of 90 degrees, after which a harness is applied and then the halves are twisted until they are connected into a single bundle.
The top binding is made with a simple tightening knot, as in the case of the simple single knitting described at the very beginning. It is also necessary for additional subsequent tightening when the broom dries out. In some cases, for the top dressing, a special wedging technique is used, in which, after several turns, the ends of the twine are passed through the bundle and the turns are applied again. Wedging dressing significantly increases the strength of the broom, but does not provide the possibility of additional tightening. The cross method is very good for knitting reusable brooms (for example, oak or birch). It is impossible to break such a broom even with the most intense steaming.
However, double knitting of a broom can be done in a simple way (as in the case of single knitting, see above). In this case, both strapping belts are made with a regular tightening knot, and the sequence of applying the belts is not of fundamental importance.
Knitting and production equipment
Next comes knitting and production of finished products from raw materials. It is worth noting that the production of brooms can be either manual or mechanized. In the first case, you will have to hire labor. As practice shows, one worker can knit about 15 brooms in a day.
how to cover plywood joints on walls
However, large enterprises have long entrusted this task to specialized equipment. Machines for knitting brooms are capable of producing up to 15 brooms per hour, that is, up to 120-150 units of the finished product are produced per day. The cost of such instruments is about 300 thousand rubles.
The machines operate on a 220 Volt network, so the warehouse you rent must be connected to the power grid.
Rules for cleaning a chimney with a brush
Since the pipe can only be accessed from the roof, special attention must be paid to safety measures. The worker must use a safety line; it is advisable to set up a temporary barrier
When cleaning the chimney with a brush, it is recommended to follow these rules:
- Before starting cleaning, tightly close the firebox and vent.
- Check the tool for serviceability. Test all parts for strength.
- After passing each meter of pipe, remove the crumbled soot from the firebox.
- After completing the passage of the pipe, use a hard brush to replace it with a soft one for final polishing of its walls.
Sales market
The hardest part of making brooms is finding buyers who will be interested in buying such large quantities of goods. After all, you can sell such a large number of brooms at retail forever. In this regard, even during weeding and harvesting sorghum, you need to find wholesalers who will buy your products in whole quantities. Otherwise, the entire warehouse will be overflowing with unsold brooms, and the business will lose money.
That is why in the price category we have reduced the price of products by more than 3 times. If you don’t do this, then in pursuit of big money you will be left without profit. Therefore, as they say, a bird in the hand is better than a pie in the sky (especially since the annual net profit even with 60-ruble brooms will be several hundred thousand rubles, and sometimes a million).
About household equipment
For sowing and harvesting, of course, you need at least one piece of equipment. Yes, for such a business as the production of brooms, there is no point in purchasing an expensive tractor. A more reasonable solution would be to rent it, and together with the employee.
Almost every small village has its own farm. You ask: “What does it have to do with brooms?” The answer is very simple - instead of buying special equipment for your own fleet, you can borrow it from a local farmer. At the same time, you need to take care of the work team. It can also be assembled in a short time, because the work will not take place all year round, but seasonally.
By the way, if this is the production of plastic brooms, you won't even have to grow sorghum. But you can’t get by with just one machine. The raw materials for their production will have to be purchased from larger manufacturers, and this is much more expensive than growing your own raw materials.
Sorghum broom - how to tie a sorghum broom | Eco bath
Everyone in the house, in addition to a new invention, such as a vacuum cleaner or a broom, also has an irreplaceable one in the household - a sorghum broom. Major cleaning is not always required, so with its help you can sweep the apartment quickly and without much difficulty. We don’t change them very often, since most often it is capitally made and there is no need to buy it often.
Growing sorghum for broom
But still, those who live in a suburban house or have their own plot can try growing sorghum, the plant from which broom is made. Since the plant ripens in the fall, it should be planted in the spring. The seeds are soaked in water, the unusable grains float to the surface and are thrown away. Then they are planted (May), and in August the stems grow about 2 meters, they are mowed and left to dry in the sun, soon it will be a broom. Afterwards, the sorghum is cleared of leaves and seeds. View other information about bath brooms here.
How to knit a sorghum broom
Let's move on to how to knit a broom from sorghum. For greater convenience, we will show you in the form of a list of actions.
1. To begin with, we make a U-shaped device 2-3 meters long.
2. We tie bunches of sorghum in the form of panicles.
3. We tie a strong thread to the crossbar of the arch, and at the base there is a piece of wood for weighting, on which we stand when tying the so-called “dolls”, soon it will be a broom.
You will also need ribbons of brushwood (thin ribbons are cut with a knife), and in order to make them more elastic, we soak them in water and dry them slightly. And they are needed to use them and threads to pull together the bunches into the future sorghum broom. More about bath brooms here.
4. After all the preparations, take 8-9 stalks of sorghum and combine the panicles with each other, intertwining them with a brushwood ribbon.
Making sorghum brooms may seem difficult, but try it once and you will have only a product from your own manufacturer in your house!
Bath brooms for baths find out more.
Juniper broom
Juniper broom has a rich composition of essential oils, which helps with rheumatic diseases, gout, swelling and some skin diseases.
The aroma of juniper also helps well with inflammatory processes in the upper respiratory tract. However, such a broom is hard and prickly, so not all bath lovers can use it as a broom. However, experts on the medicinal properties of juniper get out of the situation by using branches for flooring on steam room benches or using a broom to stroke the body, as well as to obtain steam from juniper infusion. Juniper broom is not prepared in advance, but is used immediately after cutting, since dried leaves lose their beneficial properties. Source
Number of stones
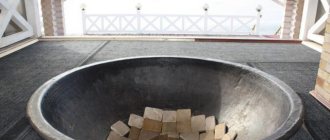
Of course, to obtain a healing effect, you need to know how many stones you need to put in the heater. This issue can be easily resolved. You need to read the instructions carefully.
For a self-made stove, a calculation is made, which is based on the volume of the steam room. 20 kg of minerals will correspond to one meter. Volume is calculated by multiplying the height by the length and width of the room.
Before putting stones into the heater, they are first washed and dried. Laying dry boulders is carried out in the following sequence:
- The largest ones are placed downwards;
- Small, creating a top layer.
When laying, you don’t have to make a very dense layer. When they are round in shape, it is very easy to place in the heater.
Chipped, poorly processed, laid leaving gaps. They are needed to create good air circulation.
Oblong ones are placed only in a vertical position. This makes it possible to create good circulation and uniform heating.
Electric ovens require special installation. If they are placed between heating elements, be sure to leave a gap. In case of thermal expansion, they will not be able to damage the heating elements. In electric ovens, it is very important to prevent water from getting on the surface of the heating elements. Therefore, only small stones are placed in such a stove, which will block water from entering this section of the stove.
How to knit brooms for a bath
What types of bath brooms are there?
When to prepare brooms for the bath
Knitting brooms for a bath
Storing and preparing brooms for the bath
Finished products are hung on a rope in the shade or dark room, which must be ventilated. But often this method of storing brooms gives them, due to gradual deformation, the shape of an ordinary broom. To avoid this effect, the harvested branches are stored in hay, and the broom is tied before going to the bathhouse. A new bath broom needs preparation for its use. This is how it is done. The day before going to the bathhouse, the broom should be soaked overnight in cool water, and before visiting the steam room - in hot water. This procedure is performed in a wooden cage. Avoid getting the broom too wet as the leaves may become sticky.
Preparing the broom can be done in an accelerated way. To do this, it is kept in water for several minutes, and then, slowly rotating, it is heated over the hot stones of the oven. A broom that has dried out during storage is doused with boiling water in a bathhouse a couple of times, and then kept covered in a bowl of hot water for 10-15 minutes. How to knit brooms for a bath - watch the video: However, every experienced steam lover has his own secrets for the correct use of brooms for a bath and their preparation. After all, a good broom is always the focus of bath procedures. Author: editors of TutKnow.ru
Types of stones
Online stores and specialized outlets offer various types of bath stones. Don't focus only on price. Each has its own peculiarity.
Diabase for baths
Never sold whole. Its price is affordable. The high density of diabase does not allow for its processing. The stone can withstand 300 cycles of heating and rapid cooling. Another certified variety is gabbro-diabase.
Raspberry quartzite
The cost of this mineral is slightly higher. After heating, it begins to radiate a soft, pleasant warmth. The use of crimson quartzite has the following advantages:
- Increases immunity;
- Improves blood circulation;
- Normalizes metabolism;
- Relieves back pain;
- Normalizes blood pressure.
The stone is distinguished by its beautiful appearance and is designed for long-term use.
Jadeite in the bath
This is the most expensive mineral, considered the best for baths. In Eastern countries it was given the name “stone of health.” It is used for a variety of purposes:
- Treatments;
- Massage;
- Treatment of nervous diseases;
- Improved well-being.
When this rock begins to heat up, it begins to release large amounts of trace elements. After they enter the human body, the functioning of all vital systems is normalized.
When placing heater stones in a sauna, there is no prohibition on combining several types. For example, the bottom can be covered with a cheaper rock, and on top you can create a layer of beautiful and expensive ones.
When buying stones for a bath, it is difficult to answer which ones are better, without knowing what operating conditions you will have.
Preparing brooms for a bath: when to collect and how to knit
There is nothing complicated in preparing brooms for a bath, but, as in every business, there are some nuances: you need to know when it is better to knit brooms for a bath, which branches to choose, how long they should be, how to preserve brooms for the whole year without losing quality .
When to knit brooms for a bath
Our ancestors prepared raw materials for bath brooms in the first half of June - on Trinity Day after Green Christmastide. If you are far from church calendars and rituals, collect branches in early June, when the foliage has already grown and become stronger, but has not yet become faded and withered.
You can knit brooms for a bath yourself
For church holidays or calendar dates, you can only focus on regions: our country is large. In some places it’s almost summer on Trinity Sunday, and in others the leaves have barely sprung. So it’s better to focus on the condition of the foliage.
When are birch brooms harvested?
Not much time is allotted for harvesting birch brooms: a week at most. You need to have time to prepare birch branches when the leaf has already turned green, and not light green, but before the earrings bloom. If time is missed, the foliage becomes very hard and falls off greatly in the bathhouse. So the harvesting period for birch brooms is very short.
But time is not the only criterion. When choosing branches for a birch broom, you need to be guided by the appearance of the leaf. It should have a deep green color, the plate should be smooth. There should be no aphids or other pests or diseases. But, most importantly, there should be no earrings on the branches. And for greater effect, you need to cut birch branches with a broom during the specified period, but after a rain. Only the birch must already be dry, otherwise when steaming the leaf will darken and curl.
More advice from the older generation: cut a broom when the leaf on the birch tree is no larger than an old five-kopeck coin, and it should feel slightly sticky to the touch.
For birch brooms, choose young trees growing in the sun on a hillock or near a pond
But with sticky leaves you get a “soapy broom”. It has an excellent effect on the skin: it becomes silky and soft. But at the same time, leave the steam room with your skin covered in mucus. Not everyone likes this feeling. So here you have to choose: either more comfortable sensations with more “mature” foliage or elastic skin.
Birch brooms harvested in May smell differently than summer ones: they add a smell very similar to the smell of propolis. At this time, there are light stripes on the skin of the twigs, which release this aroma. Such stripes are not found on all branches; they need to be selected separately. When you run your hand along such a branch, you feel the tubercles - these are the same resinous, odorous secretions. If anyone hasn't tried it, try it. Very pleasant sensations, although the sheet is sticky at this time.
door opening service 89543453
Some bathhouse lovers especially appreciate birch brooms that grew near water - a river or lake (but not in a swamp). Such plants have long, elastic and flexible branches. Twigs, growing roots or stumps of birch trees are good. They are flexible, elastic and tender.
Branches for a broom should have two or three branches
On trees, the lower climbing shoots are considered the best. They are cut for a broom. It is better not to cut single young ones without side branches, even despite the large, beautiful and dense leaf: it turns out to be a whip. And this is not at all what is required from a bath broom.
If you don’t need to cut more than two or three pieces of a young tree, you can harm the plant. Know your limits - take care of nature!
Old people who love baths say that even in a birch grove you can’t take branches for a broom from every tree. But only from those whose birch bark on the trunk seems to shine a little. Moreover, the spots on the birch bark are not gray, but rather brownish in color. There are not very many such trees, but they exist. Try to find at least a few and stack the branches separately. Then evaluate the difference and next time you won’t regret it.
When preparing brooms, birch foliage should be dense and smooth. Some people recommend trying a birch leaf with your tongue. If it is rough, the branch is not suitable, if it is smooth and velvety, it is an excellent raw material.
Separately growing young trees are an excellent choice
You can navigate by the stem of a young birch leaf. If it has already turned reddish, you can cut it, but if it is green, it’s too early.
The video shows how to choose birch branches and correctly knit brooms from them.
We prepare oak brooms
The harvesting period for oak brooms is longer: starting from the end of June, and some are harvested in August and early September. Depends on the year and region. But even in the same region, it differs greatly from year to year. In some areas you have to hurry: later the foliage is affected by diseases and becomes lethargic or spotted. But sometimes, after disease damage in August-September, the foliage on the oak tree grows back. Then you can also get excellent brooms.
When harvesting an oak broom in the summer, pay attention to the condition of the leaf: it should be an even, dense green color, without spots. The main rule: there should not be an acorn yet. As when harvesting birch, branched shoots with large leaves are taken.
But there are lovers who harvest oak brooms in September. In this case, the leaf turns yellow or yellow. They say it also “works” very well.
For gourmet bathhouses, oak brooms, made from tree branches near which burdock grew, are highly prized. Their shoots are considered the most durable and flexible. Trees should grow in shady corners of the forest and be young: on old ones it is difficult to find non-knotted branches of sufficient length. The foliage should be large and abundant.
Chopped oak branches should lie a little in the shade
The preparation of oak brooms has its own specifics:
When to cut linden brooms
If you want a linden broom with color, you have a week and a half to prepare it. And that’s due to different species blooming at different times. In general, the best period is considered to be when most of the flowers have already opened. The aroma in the bathhouse is amazing.
Linden with flowers smells amazing, but they won’t be able to “work” properly - the leaf is soft
There is a linden broom and a later preparation. He also has a period of two weeks - from August 15 to September 1. This is what experts say, who claim that previously collected linden branches contain, of course, more useful substances, but the leaf on them is too soft and, when steamed, curls and wrinkles so that it is absolutely impossible to steam with it.
Preparation of coniferous brooms: spruce, juniper
The “widest collection range” is found in coniferous species. There are no restrictions here. In Siberia, coniferous brooms are made both in the most severe frosts and in the summer...
Choose a warm, fine, dry day for harvesting. The branches begin to be cut after the dew has dried. They choose the young and flexible. There are no other recommendations.
It looks scary, but they say that with proper processing it is tolerated even by delicate skin
How to make nettle brooms
Despite the “terrible” sting, you just need to try the nettle broom. Then you will really enjoy steaming with it. Harvesting them for the winter is problematic, except perhaps inserting a few branches into birch and oak trees. No other way. But you can steam fresh all summer long.
Young shoots without color, about 40-50 cm long, are cut off. They are made short and fluffy. It’s better to work with gloves: it stings. It turns out to be quite soft: only for one person.
Nettle broom. It sounds even scarier than spruce. But the benefits are endless
There are quite a few ways to steam a nettle broom. Basically, they dip into hot (not boiling water) water for 3-5 seconds, then into cold water. All.
The second option is to dip it in cold water, then after steaming, trample on it in the steam room with your feet, hold it over the steam, adding a ladle of water.
Regardless of how you prepare the broom, they need to “work” on the already steamed body. That is, you first need to steam with birch.
There is one thing about using a nettle broom: it strongly stains the wood. Therefore, it is better not to put it on the shelves. Bring a rug and place it on it.
All other brooms (and what they are like and how they affect the body, read the article “How to steam a broom for a bath”) are collected in the same time frame as birch brooms until August 2.
If you want to knit a broom from herbs, you need to know the timing of its flowering - at this time they have the highest concentration of useful substances.
Brooms made from medicinal plants spread a magical aroma even in dry form
How to choose branches for a bath broom
Branches are cut from young trees that grow in sunny, non-wetlands, away from roads and enterprises with harmful emissions.
The length of the branches is selected depending on the selected broom size. Usually it is from 40 to 70-80 cm. Whichever is convenient for you. The thickness of the handle is selected in the same way. The diameter rarely exceeds 5 cm - it is difficult to swing too large and heavy, although it is a matter of taste and habit.
The diameter of a convenient broom does not exceed 5 cm
The branches should be smooth, free of diseases and dried parts. The foliage is thick and juicy, not too tough. It is advisable to choose branches with two or three branches - the broom will not only be more magnificent and beautiful, it will also be denser and will “capture” steam well. When you walk over your body with such a broom, you do not whip it, but massage it.
How to knit brooms for a bath correctly
Having selected suitable branches, you can immediately collect them into brooms. Some bath lovers advise pre-soaking them for several days in an unlit, well-ventilated place. They say the branches need to be “withered.” It's easier to work with them then.
The shoots are thicker on the inside and thinner on the outside. If there is a bend on the branches (and most often this happens), then the bend should point inward. Also make sure that the matte surface of the sheet is directed inward, and the shiny surface is directed outward. It should turn out that their shiny side is directed in one direction. When folding, give it the shape of a fan or a “bouquet” - they do it in different ways. The fan broom is more common: it seems to hug the body. The feeling is pleasant.
The easiest way is to tie the broom tightly with natural twine at the butt and at the beginning of the foliage
For the handle, remove the foliage from the bottom. Its length is selected individually, but the most optimal, established experimentally, is two palm widths. It is also necessary to expose the butts of the branches so that the brooms are better preserved during use. If everything is done correctly, then one broom can be enough for two trips to the steam room.
When folding the branches, they are turned over and shaken several times so that they are distributed more evenly. For knitting, it is better to use natural materials: thick twine, hemp rope, medical bandage or other similar materials. It is better not to use metal wire: it heats up in the bathhouse and such a broom is very uncomfortable to hold in your hands.
There are several knitting techniques:
How many people, so many opinions. Choose which shape of the “crown” and handle is more convenient for you and do it that way
Used for knitting and clamps. Some are plastic, some are metal. They quickly tighten the handle and hold it tightly. Moreover, after drying, it will be possible to tighten it. To prevent all these puffs from rubbing your hand, then wrap the handle with thick cotton tape: sold in hardware stores, sometimes in hardware stores or haberdashery stores. You can wrap the handle with thick cotton rope (after using the broom, you can remove it and tie the next one).
There are still many ways to knit brooms. Some people use nautical knots, which make it possible to tighten the rope after drying, others place two parts of the branches crosswise with the butts, then tie them not very tightly, then forcefully connect the two parts and tie them finally at the butt and higher. Almost every master has his own secrets. But they are very reluctant to share them. Try simple methods first, then adjust as you like. There will be your personal method of knitting a bath broom.
tulle for children's room photo
Proper drying
No matter how you knit the brooms, they still need to be dried. They are immediately piled up, one on top of the other. They stay like that for a day or two. They become flat under their own weight. Then they can be tied in pairs and hung on a rope or pole in a dark, well-ventilated room.
If there is no attic, you can dry it in the corridor: sunlight should not fall on the foliage. But this method is available even to city residents
Dry brooms hanging on a pole or rope in pairs
With any drying method, the brooms should not be placed close to one another - there should be free space between them. At first, in order for the branches and foliage to dry evenly, they need to be turned over once or twice a day. When they are completely dry, they can be stored.
How to store bath brooms
Dried brooms can be stacked on a bookcase or shelf (the room again should be dry and well ventilated). But from time to time, the brooms need to be rearranged so that those located at the bottom are in the middle or at the top. Moreover, the brooms should not be exposed to light: the leaf will turn yellow.
Brooms wrapped in film can be frozen. Good for those who have a freezer at home
If you have your own hayloft, you can stack the brooms on dry hay, placing them loosely next to each other. Cover the top with dry hay. This is how our ancestors kept them.
For apartment dwellers, there is also a storage method: make small holes in a cardboard box, put brooms into it without crushing it, alternating the handle and the crown. In this case, you also need to periodically shift them, lifting the bottom ones up.
You can also store brooms in the refrigerator: they are packed in a plastic bag or wrapped in cling film, placed on the bottom shelf, in a dark, dry corner.
As you can see, tying a bath broom yourself is not difficult. But this is just the beginning. Brooms, even the most wonderful ones, can be ruined by steaming them incorrectly. Read here how to avoid such trouble. Don’t forget to read the article, “How to take a steam bath properly.”
Cleaning the chimney pipe with a brush
If you have seen photos and videos of chimney sweeps, you will have noticed that they are “armed” with a brush, like those we use for washing bottles. Today these brushes are made of metal and plastic. Metal ones are good for brick pipes, plastic ones are good for sandwiches and metal pipes. Why can't you use a metal brush for metal pipes? It is highly likely to scratch the metal. Soot will more actively settle on scratches, so it is better to use plastic. It is hard enough to knock off plaque, but will not leave scratches. Its service life is not nearly as long as that of metal brushes, but nothing can be done about it.
Mechanical cleaning of the chimney from soot: tools
There are a considerable number of chimney cleaning kits with a brush on sale. It’s clear how to choose the brush bristle material (see above). There is also such a parameter as diameter. For round chimneys there are no problems - take it according to the diameter of the inner part of the pipe. If there is no finished size, cut it to the required size. With square chimneys it is somewhat more difficult. If you take a big one, you won’t be able to clean the corners; if you take a small one, you’ll have to clean it for a long time. For convenience, you can use two - a large one for cleaning the main area, a small one for the corners.
Now about what the ruff is attached to. There are different options:
- Rope. Not the best, but a compact option. So that the projectile can be lowered, a weight is tied to the lower part of the brush.
- Metal wire. Diameter from 3 mm. Everything is fine, but the wire is too stiff and difficult to handle.
- Plastic rod. In fact, it is a plastic wire. The diameter is also from 3 mm. It is several times lighter than metal, more elastic and, at the same time, not hard enough to damage the inner surface.
- Telescopic handle. It is a piece of plastic or metal rod, at the ends of which the possibility of connection is provided. Most often the connection is “with a lock”. The handle can be extended as needed.
- Chimney cleaning attachment for drill. Also called a rotary nozzle. A piece of plastic rod with a brush made of plastic fibers. Inserts into the chuck of a standard drill. Inserted into the smoke channel, the drill is turned on at low speed.
Cleaning the chimney mechanically is irreplaceable. Very rarely does anyone go without this event. You can clean it from below or from above, depending on ease of access. Sometimes it is necessary both from below and from above. But even this method does not always help. If the deposits are caked on, you can’t even break them with a brush. And the weight is no help here either. In this case, disassemble the chimney completely or partially. If possible, remove deposits. The worst case scenario is to replace the pipe.
How to make a broom for a bath - technology of preparation, knitting and drying
Do you like a real bathing holiday and have decided to try making brooms with your own hands for the next season? Then this article will be very useful to you, because it will talk about how to make this original Russian invention yourself.
Here you will learn what brooms can be knitted from, how to properly prepare, dry, store and steam them.
“In a bathhouse, a broom is more valuable than money!”
Raw materials for brooms
The starting material for these miracle devices can be branches/stems of a wide variety of trees and plants! We will mention only a few and briefly talk about their unique properties.
So, what do our compatriots make bath brooms from?
In the photo - fresh birch “massagers” on drying
In addition to all of the above, birch leaves and buds contain a valuable complex of vitamins, essential oils and tannins.
And this is a product made from nettles
For your information! The only disadvantage of such brooms is that they are only suitable for one trip to the bathhouse, but this disadvantage is fully compensated by the easy preparation and knitting of nettle products.
Note! The branches are harvested in early June: young shoots and root shoots are cut off. There is no need to go far for raw materials, especially if you live in a private house.
Fragrant broom made of cherry twigs
Juniper "massager". By the way, the price of brooms today varies from 60 to 200 rubles! Why pay when you can easily do it yourself?
Interesting to know! It is not for nothing that not so long ago surgeons sterilized threads for suturing wounds in juniper oil.
You can stock up and use juniper branches all year round, since this shrub is evergreen. Remember that you need to cut off the “prickly raw materials” carefully, because juniper grows slowly and its thickets are poorly restored.
The process of preparing branches, knitting and drying in detail
Well, having learned a little about the variety of raw materials for homemade “massagers,” let’s move directly to the answer to the main question - how to properly make brooms for a bath?
The general time for collecting raw materials, regardless of the chosen type of tree (be it birch, oak, maple, linden, etc.), is when the leaf has already matured. In other words, the season for harvesting branches is from early July to mid-August. Collecting raw materials at this time is completely justified, because the leaves of the trees are already becoming large, but they still have enough essential oil glands.
The general rules for choosing a tree for collecting raw materials boil down to the fact that you need to look for young trees/shrubs with straight flexible branches, at a distance of at least 3-4 kilometers from a residential area.
Proper harvesting of birch branches
So, in this article we decided to describe how to correctly collect branches for birch brooms so that they turn out to be of high quality and as useful as possible.
Despite the fact that we will be talking about a specific type of raw material, these collection instructions, in principle, apply to other trees/shrubs:
Important! Many folk knitters recommend, on the contrary, choosing young birch trees that have never bloomed, explaining this by the fact that they have the most delicate leaves. Of course, we cannot disagree. However, you still need to look at these sheets and even try with your tongue: if the upper side is rough, then you can safely look for another tree. The leaves should be velvety on top.
Leaves are what you need!
Attention! To prevent trees from suffering, cut only a few branches from each.
Raw materials for creating bath “massagers”
Knitting brooms
How to make a bath broom correctly - where to start knitting it?
Below is a step-by-step technology for this simple, but requiring special skills and abilities:
Knitting brooms is not difficult!
Visual knitting technology
Drying and storing brooms
First of all, we warn you - you cannot dry them in the sun or use various artificial drying methods. The brooms dry out on their own, the main thing is to properly organize a place for them to do this.
It should be in the shade (for example, a barn, garage, attic, haystack, etc.) with moderate humidity. An increased concentration of moisture can cause mold to appear on the leaves, and then the brooms will have to be thrown away.
It is best when the products take the shape of a fan rather than a panicle. To achieve this result, fresh brooms are laid out on the floor and turned over every day. When they dry (not dry!) you will need to stack them on top of each other, periodically changing places - this way they will gradually flatten.
It is important not to dry them out! After drying, all the leaves on the broom should have a concentrated matte green color, and the aroma of balsam birch oil should emanate from the broom itself. After steaming the product, this pleasant smell will sharply intensify, which will have a beneficial effect on the health of the entire body.
For your information! After drying the products, the second knitting may become loose and will need to be re-tied.
After about a week, the finished brooms can be stacked tightly in a dry, dark and well-ventilated area. And to prevent them from getting dusty, you can wrap them in cellophane or paper, but not tightly, so that there is little air access.
Storage of dried products
A good option for storing bath whisks is in a haystack. In winter, you can also store simply prepared branches in the form of one sheaf, and, as necessary, knit healing “massagers” from them. In wallpaper cases, the leaves are preserved better.
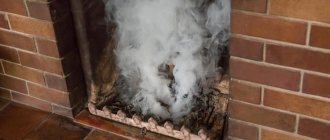
Causes of chimney contamination
Boilers and stoves are installed in almost all private houses and cottages, bathhouses and garages. As a rule, firewood or coal is used to fire them. But, quite often, fireplaces are used to dispose of old tires, household items and construction waste. These objects emit thick smoke, which settles in the form of solid particles on the inner walls of the exhaust pipe. Gradually thickening, the soot completely blocks the exhaust duct.
In addition, chimneys become clogged for the following reasons:
- ingress of branches, leaves, small animals and bird nests;
- partial or complete destruction of the channel due to wear or improper assembly;
- the formation of condensate, which, upon contact with combustion products, forms a viscous and sticky substance.