The key element of a gas heating unit is the burner nozzle. Create a mixture of fuel and air to support combustion. If you made a gas burner for a sauna stove with your own hands, this fact gives you confidence in the reliability of the design. And this, you see, is a rather weighty argument in favor of homemade products.
From scrap materials you can make an attachment for a sauna stove. Empty gas cylinders, sewer pipes, and parts of old equipment will be used. Before commissioning, the finished product is checked by Rostechnadzor specialists.
We'll tell you how to do everything right. We will show you how to obtain a certificate of conformity for a homemade gas burner. Confirms the safety of the device and allows connection to the tank heating system.
Operating principle and differences of gas equipment
It is impossible to objectively judge the quality of the purchased injector. Do not disassemble the finished product in search of possible defects. So there is a chance of damaging the expensive device rather than operating it.
By assembling each element of the burner yourself, you will not only receive pleasant satisfaction from the work done, but also save money. At the same time, the operation and repair of gas bath equipment will become safe and conscious.
A gas heating unit is a sauna stove body with a gas supply device located inside. Here are the main elements of the control mechanism, with the help of which the fuel supply is regulated.
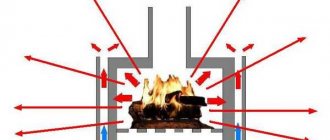
The burner heats the air in the firebox. The thermal energy of the nozzle is transferred through the body to the bowl with stones
For a thermal stove with a gas nozzle, special attention is required to the chimney, which must be cleaned periodically.
The advantages of water heating and laying a bathroom with a gas burner include:
- Ease of work process. To heat, simply turn the valve and light the gas in the burner. After an hour, the steam room in the bathhouse will warm up sufficiently.
- Environmental compatibility. When operating a gas device, harmful emissions from gas combustion are the smallest in volume compared to other types of fuel.
- Easy maintenance of the burner and the oven itself. There is no need to deal with soot on the walls and remove debris like coal or firewood.
It is possible to equip the furnace with special sensors that are triggered at a critically low discharge rate. In this case, the gas supply is automatically turned off.
The fuel-efficient gas stove allows you to not limit the number of bath procedures. Even with daily heating of the bathtub, it becomes very easy to clean
Such a disadvantage of a homemade burner, such as additional registration of permits and technical documents, pays off due to high productivity. Using a gas injector saves up to 30% of costs compared to solid fuel. Heating a bathroom with gas is half the price of heating with an electric boiler.
Gas-burners
And finally, we will give drawings of several burners for gas forges.
They are quite suitable for artistic forging, and, whatever you say, it is the most in demand among blacksmith works. All these burners are direct-flow injection burners. The much more efficient and versatile vortex ones are too complex to make on your own. The first one, in the figure, is the most difficult. To make it, you need to be a turner-miller of at least 5 real rank. But it works on any gas (except acetylene, see below!), gasoline-air mixture and produces a very powerful boost: it can also blow out a large stationary forge, described above.
drawings of gas burners for a forge
The next one (see figure) is simpler and contains fewer details, although here too you need to accurately sharpen the shallow cones. It blows great too, but only runs on propane. For butane, a very narrow nozzle is required, and butane is rarely used.
You need to grind the outer surface of the D1 injector clean and drill the nozzle in one installation. The nozzle is drilled with a carbide drill and goes through cleanly with a reamer. This is the main drawback of the design: it requires small precision tools, which are not available everywhere or always.
Below in Fig. two burners are simpler. On the left is a machined universal one for household gas or propane. At most, a small mobile forge can blow the air, but an average turner can turn out the parts. You just need to master the technology of fitting parts into hot tension. Which, however, is not difficult.
On the right is a homemade burner. Most of the parts, including the nipple, are from a bicycle. Using a lathe, you only need to turn the smallest sprocket from a bicycle gearbox to size. This burner is omnivorous: propane, butane, household gas cocktail, gas air. But it can only be used to heat small brick closed furnaces, shown at the beginning.
What is necessary?
Working tools and material for the future design - this is what needs to be prepared before creating the device itself.
- Handle material. There are no strict criteria for its selection, so everything depends on the ingenuity and capabilities of the manufacturer. The handle should be comfortable and not warm up during operation. It is most reasonable to take a ready-made handle - a handle from a broken boiler or soldering station will do.
- Conducting tube. It must be steel, so the manufacturer chooses a steel tube with a diameter of no more than 1 cm and a wall thickness of 2.5 cm.
- Burner body. And it must be steel, and the divider is made of a brass rod.
- Nozzle. It is made from a metal rod.
Tools you will need: grinder, semi-automatic welding machine, file, drill press or drill, tap, drill bit, blade, hammer, pliers, stripping and cutting wheels, metal brush, protective equipment. You don't always need everything from the list, but it is included in the standard set.
Which one is better to choose?
Any buyer thinking about converting their wood stove to gas fuel must carefully weigh the many parameters and factors that will ultimately influence the choice of a specific solution. Atmospheric burners are cheaper - they can be purchased for as little as $100 and do not rely on electricity - but you will likely need some modifications to the fuel chamber. Blast (pressurized) burners are more advanced, easy to use, but expensive - their average price is about 250-300 dollars. The operation of such burners will require a minimum of attention and personal participation from the bathhouse owner.
However, in any case - if you are just planning to build your own bathhouse and are thinking about purchasing a heater stove - it is better to buy a ready-made gas stove with a built-in burner. The design of such a stove and the configuration of its fuel chamber will be adapted to the type of burner you have chosen, and it will be equipped with all the necessary automation and safety systems. And believe me, after you try a gas oven, you will not regret your choice.
How to achieve safety
Here the matter is in the so-called. Reynolds number Re, showing the relationship between flow speed, density, viscosity of the flowing medium and the characteristic size of the region in which it moves, for example. cross-sectional diameter of the pipe. From Re one can judge the presence of turbulence in the flow and its nature. If, for example, the pipe is not round and both of its characteristic sizes are greater than a certain critical value, then vortices of the 2nd and higher orders will appear. There may not be physically distinguished “pipe” walls, for example, in sea currents, but many of their “tricks” are explained precisely by the transition of Re through critical values.
Not all homemade gas burners are accurately calculated according to the laws of gas dynamics. But, if you arbitrarily change the dimensions of the parts of a successful design, then the Re of fuel or sucked air may jump beyond the limits that it adhered to in the author’s product, and the burner will become, at best, smoky and voracious, and, quite possibly, dangerous.
Injector diameter
The determining parameter for the quality of a gas burner is the cross-sectional diameter of its fuel injector (gas nozzle, nozzle, nozzle - synonyms). For propane-butane burners at normal temperatures (1000-1300 degrees), it can be approximately taken as follows:
- For thermal power up to 100 W – 0.15-0.2 mm.
- For a power of 100-300 W - 0.25-0.35 mm.
- For a power of 300-500 W - 0.35-0.45 mm.
- For a power of 500-1000 W - 0.45-0.6 mm.
- For a power of 1-3 kW - 0.6-0.7 mm.
- For a power of 3-7 kW - 0.7-0.9 mm.
- For power 7-10 kW – 0.9-1.1 mm.
In high-temperature burners, the injectors are made narrower, 0.06-0.15 mm. An excellent material for the injector would be a piece of needle for a medical syringe or dropper; from them you can select a nozzle for any of the indicated diameters. Needles for inflating balls are worse; they are not heat resistant. They are used more like air ducts in supercharged microburners, see below. It is sealed into the injector cage (capsule) with hard solder or glued with heat-resistant glue (cold welding).
Power
Under no circumstances should you make a gas burner with a power exceeding 10 kW. Why? Let's say the burner efficiency is 95%; for an amateur design this is a very good indicator. If the burner power is 1 kW, then it will take 50 W to self-heat the burner. A 50 W soldering iron can get burned, but it does not threaten an accident. But if you make a 20 kW burner, then 1 kW will be superfluous; this is an iron or electric stove left unattended. The danger is aggravated by the fact that its manifestation, like Reynolds numbers, is threshold - either simply hot, or flares up, melts, explodes. Therefore, it is better not to look for drawings of a homemade burner for more than 7-8 kW.
Armature
The third factor that determines the safety of the burner is the composition of its fittings and the procedure for using it. In general the scheme is as follows:
- Under no circumstances should the burner be extinguished using the control valve; the fuel supply is stopped using the valve on the cylinder;
- For burners with a power of up to 500-700 W and high-temperature ones (with a narrow injector, excluding the transition of Re gas flow beyond the critical value), powered by propane or isobutane from a cylinder up to 5 liters at an external temperature of up to 30 degrees, it is permissible to combine control and shut-off valves in one - standard on the cylinder;
- In burners with a power of more than 3 kW (with a wide injector), or powered from a cylinder of more than 5 liters, the probability of “overshooting” Re beyond 2000 is very high. Therefore, in such burners, between the shut-off and control valves, a reducer is required to maintain the pressure in the supply gas pipeline within certain limits.
The most efficient devices of 2021
The most efficient certified boilers and gas burners this year:
- Bosch Greenstar series. The boiler is small, very quiet, environmentally friendly and uses economical condensing technology providing an AFUE rating of 95%. Greenstar is available in two models - combi for spatial and point-less water heating or space heating, which can be used with domestic hot water tanks. It is equipped with a heat exchanger with a 5-year warranty.
- Bradford White Brute Elite Series. The boiler with 95% efficiency has a condensing multi-pass stainless steel heat exchanger with an advanced modulation system. Innovative design features make Brute Elite easy to install in both new and existing heating systems.
Bradford White Brute Elite 125 Series. Customizable combi based heating only models are 95% efficient with a combi unit providing heating and hot water from one unit. Requires only one gas connection, one ventilation system and built-in expansion tank and boiler pump, and is easily accessible for repairs.- Buderus GB142 series. Condensing gas boiler. Using state-of-the-art condensing technology with 95% AFUE, the Boer Buderus GB142 wall-mounted condenser maximizes the heating value of every m3 of natural gas or liquefied propane.
- Boiler Alpine Series. This is a natural or liquefied gas condensing hot water boiler with a stainless steel heat exchanger. Equipped with Sage2 boiler control system. 1 TM, which supports multiple firing speeds, is also equipped with an external reset and a touch interface.
- Carrier BMW Performance Series. 95% AFUE. Stainless steel. The modulating condensing boiler is equipped with a unique vertically oriented stainless steel heat exchanger, 5 to 1 ratio, compact design with light weight, compact wall mounting, primary and secondary piping, with a 15-year warranty.
Having familiarized yourself with the design and operating principle of gas burners and popular models, you can easily choose exactly what suits your needs.
- Author: admin
Rate this article:
- 5
- 4
- 3
- 2
- 1
(0 votes, average: 0 out of 5)
Share with your friends!
Advantages and disadvantages
The use of gas heat generators in a bathhouse has many advantages:
- efficiency. You just need to open the valve and light the nozzle, and in an hour the steam room will be ready. There is no need to prepare and store firewood/coal, load the firebox, control the work process,
- high efficiency. The productivity of gas equipment is significantly higher compared to TT units,
- environmental friendliness. During operation, gas burners for sauna stoves provide a low level of emissions harmful to the environment,
- ease of maintenance and care. There is no need to remove ash, as is the case with solid fuel. All that is required is timely cleaning of the chimney,
- efficiency. This figure is almost 30% higher than that of TT boilers, and more than 100% higher than that of electric heat generators.
The main disadvantage of gas burners for sauna stoves is the need to obtain permits for installation.
Classification of species
Manufacturers offer two types of gas burners for sauna stoves:
- atmospheric;
- supercharged.
Models vary in design characteristics and have different advantages and disadvantages.
Atmospheric burner for sauna stove
Atmospheric burners
Atmospheric devices are sold in an affordable segment, are non-volatile, and provide a minimum of automation. The design consists of one or more hollow tubular elements for supplying gas under pressure. To operate atmospheric burners for sauna stoves, good air circulation in the room is required.
Pros:
- autonomy;
- simplicity of design;
- compactness;
- quiet operation;
- availability.
Minuses:
- relatively low power;
- low level of efficiency.
The high traction requirements must also not be overlooked.
Pressurized gas burners for sauna stoves
Blowing devices structurally look like a block with sensors equipped with a controller. The package includes a fan for forced air supply to the firebox.
Pros:
- multi-stage security systems and high-quality automation are provided;
- 2 times more economical than the atmospheric model;
- the ability to adjust to any power in a wide range;
- possibility of conversion to liquefied gas and vice versa.
Minuses:
- energy dependence;
- high price.
To level out dependence on the electrical network, it is recommended to use a diesel generator or other alternative source.
Pressurized burner for sauna stove
Burner design
A standard homemade burner functions this way. Gas is supplied under pressure through a special hose from the cylinder. Most often, propane is used as such gas. The volume of gas supplied is changed by a regulating operating valve located on the cylinder. Therefore, installation of an additional reduction gearbox is not required.
The shut-off valve is located behind the main valve and is mounted on the gas cylinder. It is used to open or close the gas supply. All other adjustments (length and intensity of the flame) of the burner itself are carried out using the so-called working tap. The gas supply hose through which gas is supplied is connected to a special nozzle. It ends with a nipple. It allows you to set the size (length) and intensity (speed) of the flame. The nipple together with the tube is placed in a special liner (metal cup). It is in it that the creation of a combustible mixture occurs, that is, the enrichment of propane with atmospheric oxygen. The created combustible mixture under pressure flows through the nozzle into the combustion area. To ensure a continuous combustion process, special holes are structurally provided in the nozzle. They perform the function of additional ventilation.
Based on this standard design, you can develop your own design. It will consist of the following elements:
- housing (usually made of metal);
- a reducer, which is attached to the cylinder (use a ready-made device);
- nozzles (made independently);
- fuel supply regulator (optional);
- head (the shape is selected based on the tasks being solved).
The burner body is made in the shape of a glass. The material used is ordinary steel. This shape allows for reliable protection against possible blowing out of the working flame. A handle is attached to the body. It can be made of various materials. The most important thing is that it provides convenience when working. Previous experience shows that the most optimal length of such a handle is in the range from 70 to 80 centimeters.
Gas burner device
A wooden holder is attached to the top. A gas supply hose is placed in its body. This allows you to give the structure a certain strength. The flame length can be adjusted in two ways. Using a reducer located on the gas cylinder and a valve installed on the tube. The gas mixture is ignited using a special nozzle.
Automatic protection system
Unburned fuel in a sauna stove sometimes leads to an explosion of the gas-air mixture. Therefore, it is necessary to monitor the flame of a working nozzle for your own safety. This can be done visually or using automation with modern photocells that are sensitive to light emission.
The burner protection system automatically performs the following functions:
- power regulation;
- refueling with fuel and air;
- completeness of gas combustion.
it is necessary to take into account the increase in the size of the modernized structure. Especially when the size of the bath is small. If the size of the device is an important criterion for you, then for compactness all the automation can be placed outside.
You can add automatic templates to work with simple elements. Compact placement will save usable space in a small bathroom
To control the combustion process, a factory automatic installation of the SABK-8-50S type can be used. It provides a high level of security thanks to four levels of protection. The operation of the gas stove equipment with such a device will automatically stop if a dangerous emergency mode occurs.
How to properly install a chimney with a gas generator
The easiest option is to install a sandwich pipe in the bathhouse. For a gas stove and boiler, a chimney is needed in the same way as for wood burning. Carbon monoxide will form in the stove and, in the absence of a chimney and good exhaust hood, will accumulate in the steam room. The main danger is that it has neither color nor smell and it is very easy to get poisoned by it.
Modern gas furnaces are equipped with special sensors that, if the exhaust is poor, are triggered and shut off the gas supply. But in order to save money, they buy the cheapest generators for their dacha or garden plot.
A properly organized chimney should have the following components:
- Passage hole in the ceiling.
An umbrella that prevents sparks from hitting the roof of the bathhouse.
For a brick oven, you can assemble a gas pipe. But it will be more difficult to care for it, and installation work will not be cheap. It is easier to install a sandwich pipe.
The structure is easy to install; even a beginner with no prior training can handle it. The joints will be located at the outlet of the furnace, at the joints between the ceiling and the roof.
The sandwich pipe design has a heat-insulating lining, but since the temperature in the bathhouse is always high, the roof and ceiling can still burn out. To avoid this, it is necessary to insulate the ceiling and roof from asbestos fiber or metal sheets.
An umbrella is mounted on top of the pipe. You can do it yourself from an old tin can: cut out the bottom and lid, cut the walls in one place to form a rectangle, and roll it into a cone. It will prevent precipitation from getting inside.
With proper installation of the chimney and equipment, gas in the bathhouse will become a convenient and safe fuel. You can make an iron stove with your own hands. But you need to understand that any little thing can lead to dire consequences. If you are not confident in your knowledge, then it is better to seek the help of specialists.
Heating a private building is one of the main tasks
, which arises in front of people who want to live in a warm and comfortable room.
The use of a stove is still considered a very popular method, the type of which depends on the size of the building, the preferences of the owners and other factors.
.
Methods of supplying gas to the stove
There are two ways to gasify a bathhouse:
From the citywide system.
Individually using a balloon.
Gasification from the city system
For urban gasification it is necessary to carry out a number of measures:
Receive and approve a number of documents: gas supply project, agree on technical conditions and draw up an estimate.
Purchase equipment and pipes and carry out installation.
Prepare test and technical documentation and submit the work to the local gas service.
It’s difficult to do all of the above points on your own; it’s easier to call a specialist. Moreover, the city gas company itself will provide and conduct pipes to the heating device.
Individual gasification
Individual gasification is suitable for areas where there is no city line. A gas cylinder can be purchased at any specialty store. But such gas supply is quite unsafe.
Safety comes first, the cylinder should not be installed in a bathhouse, its place is outside. The place chosen is easily accessible and ventilated, that is, the cylinder cannot be filled with various objects or covered with things. A fire extinguisher is hung nearby or a small box of sand is installed.
Trouble-shooting
Having a boiler at home brings many advantages, but it also has a number of disadvantages, and the user does not always know what to do correctly. Boiler faults are common to many types
It is important to promptly determine the cause of these faults before calling emergency services. List of the most common and most likely faults
First of all, if the boiler does not start, you need to check the circuit components:
- network voltage;
- faulty boiler fan switch or motor;
- damaged boiler cables;
- false triggering contacts of automation or commissioning equipment;
- availability of water, whether the gas boiler is powered to the minimum required level specified by the equipment manufacturer.
If the boiler failure is not caused by any of these problems, the following procedure:
Pay attention to the noises made by the boiler, because they are often the first witnesses of destruction. They can also be due to hot water trapped inside the firebox or due to the presence of air in the heating system due to clogged air ducts. Pipe rupture
It usually occurs due to problems with a jammed boiler feed valve, various scale-forming deposits in the boiler, or a malfunction of the condensate drainage systems. Failures due to exceeding the pressure and temperature readings, their corresponding sensors can trigger, for example, due to a broken thermometer or, conversely, which is especially dangerous as a result of real overheating of the boiler. The heating circuits are not working, possibly due to poor quality of feed water and scale formation in the boiler pipes. A problem occurs with the burner (flame breaks, gas accumulation causes detonation and explosion).
For some of these problems, mainly pressure or temperature, the boiler monitor displays an error message, then the system shuts down and automatically restarts. If the problem persists after restarting, it is best to call a professional to troubleshoot the problem. It should be noted, however, that most of these failures can be avoided.
The best prevention is to have your boiler inspected, maintained and cleaned annually, usually by a professional. This will prevent the pipes from clogging and bursting. Prevention is better than restoration, and a simple annual inspection will protect the equipment and the health of users from possible emergency situations.
Combustion process in a boiler
The chemical reaction inside the boiler is a combustion reaction between oxygen (O2) in the air and hydrocarbons (CHyOx) in the fuel, which release energy as heat. During the combustion process, water vapor (H2O) and carbon dioxide (CO2) are formed, the latter being especially dangerous in terms of air pollution and global warming.
Other combustion products of injector gas may also appear depending on the type of fuel and combustion conditions: oxides of nitrogen (NOx) or sulfur (SOx), which are responsible for acid rain. Carbon monoxide (CO), a dangerous toxic substance, can cause death if inhaled.
Correct adjustment of the device reduces the amount of harmful combustion products. CO2 emissions are reduced when the gas is completely burned. In order to reduce NOx emissions, it is recommended to use the correct combustion technology, which is ensured by the design of the burner device.
Primary requirements
We list the signs of a high-quality gas burner:
- The fuel burns completely: this requirement is very important, since incomplete combustion of gas not only reduces the efficiency of the heater, but also pollutes the atmosphere with nitrogen oxide and carbon monoxide.
- The device has a fairly long service life.
- The design is extremely simple, installation is not difficult.
- The noise emitted by the burner does not exceed the values permitted by sanitary standards.
If the burner is a combination burner, that is, it is capable of working with different types of fuel, then it should be quickly and easily switched to one or another type of fuel.
Installation
Installation of gas equipment is a rather scrupulous undertaking that requires special skills and compliance with special conditions. During installation you must:
- Prepare the room, finish the walls with fireproof materials.
- Make a high-quality fire-resistant base that protrudes beyond the edges of the equipment by more than 10 cm.
- Maintain the distance from the walls established by construction and fire safety standards.
You can call our specialists to install the equipment. This is relevant if you want to receive: high-quality installation, long service life for equipment and a high level of fire safety.
Rules for safe operation of equipment
If used incorrectly, gas cylinder equipment can become a source of a strong explosion or fire.
When performing welding work, you should definitely use personal protective equipment: glasses, gloves, special shoes.
Before starting work, you need to thoroughly inspect the equipment for damage. If the equipment gets dirty, be sure to remove the dirt
You can work with propane cylinders only in well-ventilated areas, and the air temperature should not be below 0 °C.
Absolutely forbidden:
- Work near open flames.
- Keep the cylinder tilted when working.
- Place the vessels in the sun.
- Carry out work without a gearbox.
- Heat the gearbox over an open fire.
In addition, if you smell gas, you must immediately stop working and turn off the valve on the cylinder. We also recommend that you familiarize yourself with the main reasons for the explosion of gas cylinders.
When working without personal protective equipment, you can get burned, not only from an open flame, but also from accidentally touching hot parts.
If the considered homemade burners are not suitable for you, we recommend that you familiarize yourself with other options for making useful homemade products discussed in our articles - a burner made from a blowtorch and a burner for a sauna stove.
Supplying gas to the bath
Sauna stoves with gas nozzles have become a technological breakthrough for people living far from forested areas. Considering the low cost of gas fuel compared to firewood, the cost of heating with a burner becomes completely negligible.
Steam room lovers do not have to limit themselves and use such a bathhouse every day. Only, of course, if health allows.
An uninterrupted supply of gas fuel to a sauna stove can be ensured from:
The most time-consuming procedure will be the connection to the general gas system of a city or rural settlement. It requires the purchase, installation and registration of gas meters. You will also need to obtain permits, technical and payment documentation.
Connecting a regular gas cylinder will also require inviting a representative of the gas service and preparing technical documentation. Tanks have special placement requirements.
For example, gas cylinders cannot be installed in a bathhouse. They should be located outside in an easily accessible, ventilated place. There must be fire-fighting protective equipment nearby - a fire extinguisher, sand.
Brick gas ovens
Ovens of this design take a long time to warm up, but retain heat well. Therefore, you should start warming up early.
The appearance is not much different from the most ordinary wood stove. It will look great in a bathhouse decorated in a traditional style. The fire door serves to access the heater, which is located inside the structure. It is heated by flows of warm air that rise due to gas combustion.
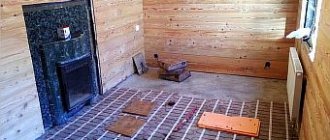
Here, directly above the burner, there is a heater, which has special requirements. The heating stones are located in a trough made of metal, which has sides along the entire perimeter (this prevents the poured water from reaching the fire).
Metal gas furnaces
A do-it-yourself gas sauna stove made of metal is characterized by a relatively thin body wall thickness and a small number of stones in the heater. This model warms up quickly, but also cools down quickly. Models of this type are quite compact; they can be used to equip a bathhouse of almost any size.
This design is low cost. If you have a small set of tools, you can make it yourself in the shortest possible time. Here we will describe the manufacture of a gas stove that is powered by a gas cylinder. Many speak positively about this design, which has a very simple structure.
The principle of operation of a gas furnace
In a separate chamber, which is located in front of the burner, gas is mixed with oxygen. Air enters the firebox and ensures normal combustion. To ensure air supply and the possibility of cleaning the burner, a door is mounted at the bottom of the oven. Gas is supplied through a tube.
If bottled gas is used for the stove, this should be taken quite seriously. Such a cylinder should be placed outside the bathhouse. Some install cylinders in the ground, a few meters from the bathhouse. It should be borne in mind that the propane mixture is more efficient for the operation of the furnace.
Materials needed
Materials must be prepared in advance.
This will allow you not to be distracted while working:
Many people write that you can use any old gas cylinder to ensure the operation of the stove.
- Any brake disc, most importantly, without cracks, will serve as a base for the heater.
- Buy two gas pipes with a diameter of 50 mm (they will supply gas and air into the chamber) and one with a diameter of 100 mm (the chimney will be made from it).
- Gas burner (preferably atmospheric type).
- Connections for connections.
Under no circumstances use connections made from silumin. They are cheap, but when heated or a slight impact they immediately burst. You should buy ones made of copper or bronze.
Furnace installation
First, we cut the balloon using a grinder and a cutting wheel. The diameter of the cutting base must correspond to the radius of the brake disc so that it can be secured without problems. When fastening, it is best to use welding, after which you should clean up any metal stains using a grinder and a grinding wheel.
- To supply air to the system, we prepare a pipe with a radius of 50 mm. We make about 10 holes in it with a diameter of about 5 mm.
- We make a hole slightly larger than the diameter of the pipe in the bottom of the cylinder. We install the pipe so that the whole end extends 20 cm from the cylinder. We weld the joint.
Cutting out the door
- This system is used to attach the gas supply pipe.
- To connect to gas, install an adapter for gas installation. We treat the joint with sealant.
- We secure the chimney at the top of the pipe.
- A hole is cut for the door. The curtains are attached to the cut piece of metal and attached to the body.
When installing a stove, it is extremely important to protect the wall from overheating and fire. To do this, an expanded clay sheet is mounted between the stove and the wall. This insulation is done in two layers
Finally, a reflective stainless steel screen should be used. It is possible to equip the furnace with an indirect heating heat exchanger
This insulation is done in two layers. Finally, a reflective stainless steel screen should be used. It is possible to equip the furnace with an indirect heating heat exchanger.
Properly selected gas sauna stoves and high-quality installation work will ensure you a comfortable and safe stay.
Modernization of heating systems
Any home craftsman can install a homemade atmospheric gas burner for a sauna stove. So, without much expense, a solid fuel boiler can be converted to a gas one.
Upgrading an existing solid fuel furnace in a bathroom to a factory gas burner unit will require some modifications. You will be faced with the need to resize both the burner and combustion chamber of your wood stove.
Converting a solid fuel sauna stove to a gas/water combination stove is within your power, but it will require precision and some effort. The flame should not touch the oven walls
To heat the oven chamber evenly, place the burner closer to the bottom of the oven and strictly in the center. It is unacceptable to place the source high and move in any direction. In this case, the camera will not warm up completely. And the burner flame can touch metal parts or the sauna stove.
Preparation for the manufacturing process. Regulatory requirements
Consider preparation for the manufacturing process
.
Understanding the device
m of gas burner and having decided on the model, you can move on to the next preliminary stage. Make a list of the necessary materials and tools. The following list can be taken as a basis:
- fuel control valve;
- welding machine, grinder.
- steel tube 100 mm long and with walls 2 mm thick;
- steel cap, piezoelectric element, rubber for handle;
Don't forget about little things like connecting elements. For example, for a valve type VK-74 you need to stock up on a cap with a conical thread.
Now let's take a closer look at the requirements of supervisory authorities
.
A burner for a sauna stove, made on your own, must have a certificate of suitability from Rostechnadzor. When using main gas as fuel, it is necessary to obtain such a document from the gas supply organization. Moreover, a special permit is required for operation.
_
Organization
— refers to legal entities under the legislation of the Russian Federation (except for banks), including organizations whose main activities are financed from the budget.
Certificate
- a written certificate certifying something. (MDS 12-9.2001)
Exploitation
— the stage of an object’s life cycle at which its quality (working state) is implemented, maintained and restored. (GOST R 51617-2000)
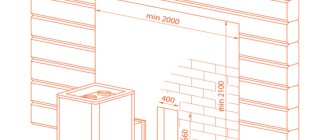
The following requirements apply to installing an atmospheric model in a bathhouse:
- compliance with fire safety measures;
- the top of the pipe is equipped with a spark arrester;
- the pipe is insulated from the ceiling and roof.
- good adjustable traction;
- availability of proper ventilation;
- minimum bath volume 12 m3;
_
Ventilation
- exchange of air in rooms to remove excess heat, moisture, harmful and other substances in order to ensure acceptable meteorological conditions and air purity in the serviced or working area with an average lack of supply of 400 hours / year - for round-the-clock work and 300 hours / year - for single-shift work during the daytime. (SNiP 2.04.05-91)
Roof
- the top element of the covering that protects the building from the penetration of atmospheric precipitation. (SNiP II-26-76); - the top element of the covering that protects the building from precipitation. (VSN 35-77)
Cylinders can be placed in a special metal cabinet separate from the bathhouse. Gas tanks are located in an underground container at a distance of more than 5 meters from the bathhouse. The connecting pipes must be checked by a specialist for leaks. They are made of steel, copper and other non-combustible materials.
It is better not to install a homemade burner without permission from the authorized bodies, as practice shows. It's too risky in terms of security.
Having received permission to operate and all instructions, you should ensure measures to comply with the normal operating mode of the homemade sauna
. If necessary, clean the chimney and strengthen the insulation. It is necessary to periodically check the joints of the burner and the pipeline for leaks.
Keep a special log to track the dynamics of changes in the condition of the equipment. When heating a bathhouse using a homemade nozzle, follow the usual fire safety rules. Write down in it the dates and operations performed to service the elements of the gas unit.
_
Fire safety rules
- a set of provisions establishing pores. compliance with fire safety requirements and standards during the construction and operation of the facility. (GOST 12.1.033-81)
Rule
- a provision describing the actions intended to be performed. (SNiP 10-01-94)
The following article will introduce you to the intricacies of making a gas burner from a regular blowtorch, which is worth reading for skilled home craftsmen.
Making a nozzle with your own hands
Before you start using a product made at home with your own hands, you need to go through the following procedures:
- The burner must undergo a quality check at the local Rostechnadzor office in accordance with the regulations established in the Federal Law on the Safety of Buildings and Structures dated December 30, 2009.
- After this check, it is necessary to obtain a certificate from Rostekhnadzor regarding the suitability of the burner for operation.
In order to start making the nozzle, you need the following materials:
- A valve that will serve to regulate the fuel supply of the device. To supply gas to the burner, you must use the valve installed on the gas source.
- Steel pipe. It is desirable that it have a thickness of up to 2 mm and a length of up to 100 mm.
- Steel cap for making a fuel dispenser. You can also use a jet from a blowtorch.
- Steel handle. It can be made from a regular fitting.
- Rubber for handle lining.
- Wire. It will be used for welding.
You will also need the following tools:
- Welding machine.
- Grinder for cutting parts.
For homemade production, an atmospheric nozzle is preferable due to the simplicity of its design. The procedure is as follows:
- First, screw the cap onto the valve. For example, if a standard VK-74 valve is used, then the cap has a conical thread.
- Then, by cutting the existing steel pipe with a grinder to the required size, the nozzle of the future nozzle is made - its basis.
- Next, the nozzle is welded to the cap using wire. In this case, the cap and nozzle should not touch.
- A piezoelectric element is installed, which is needed to activate the device.
After this, the product is ready for installation.
Attention! To install a system for supplying fuel to the stove from a central heating system, you need special equipment and experience working with gas systems
Furnace installation
When installing a finished unit in a furnace, take into account what materials it is made of:
The gas nozzle - the heart of the stove - must be of high quality and correctly installed. If this unit malfunctions, fuel-related problems may occur, which can lead to irreversible consequences.
Homemade gas burners
The main components in the manufacture of powerful gas burners are industrial valves. They may be new, but for a homemade device it is enough to use used ones if there is no gas leak. They are designed to work in tandem with a 50-liter propane gas cylinder, which has an angle valve and a reducer.
Burner with valve VK-74
The structure of this burner is shown in Fig. 1. The oxygen cylinder valve VK-74 is used as a basis. A fitting-handle machined on a lathe is installed at the outlet end, to the corrugated part of which the hose from the cylinder is connected. A cap with a prepared hole with a thread for the nozzle is screwed onto the part of the valve with a conical thread K3/4˝, with which it was connected to the gas cylinder. You can use a ready-made blowtorch or gas stove.
The nozzle is made from a piece of 1/4˝ steel pipe 100 mm long and welded to the cap on two pieces of ∅5 mm wire. A distance of 15 mm should be left between the cap and the nozzle to allow air to enter the combustion zone. The position of the nozzle is adjusted by bending the wire holders to achieve a central flame position.
Sequence of actions to ignite the burner:
- Open the cylinder valve;
- Place a lit match near the nozzle and slowly open the burner valve;
- Control gas ignition;
- Adjust the flame using the burner valve
A homemade gas burner of this design has one drawback associated with the location of the valve. The gas flow is directed in the opposite direction to the normal position. Stuffing box seals experience constant gas pressure (including when the valve is closed), so it is necessary to constantly monitor the tightness of the seals.
Burner converted from acetylene gas cutter
If you have an acetylene torch with a faulty oxygen supply valve, do not rush to throw it away. It is also suitable for making a burner (Fig. 2). The mixing chamber requires modifications, the contents of which must be removed to reduce weight. The oxygen barrel and valve will need to be removed. Solder the resulting hole with hard solder. Connect the hose coming from the gas cylinder reducer to a fitting with a left-hand thread M16 × 1.5.
Using a union nut, secure a homemade tip bent at 45° to the mixing chamber to make it more convenient to work with the burner. Screw a flange with a nozzle welded to it onto the thread of the tip.
One of the options for such a burner is to use a cap with an M22 × 1.5 thread. The design of the nozzle here is similar to the nozzle of the burner described above. The homemade gas burner is ready for use.
Gas mini burner
Mini gas burners are more suitable for working with small parts. The mini burner is based on a needle for inflating balls. It is necessary to make a cut in it, a little further than the middle of the needle. Some needles already have a similar hole, which significantly speeds up the work process. Next, you need to take the syringe needle and bend it about 45 degrees in the middle.
Mini gas burner design
It is best to sharpen the pointed end of a syringe needle so that it is straight. After this, it needs to be inserted into the ball needle so that one end comes out through the hole, and the other protrudes from the large needle by several mm. The resulting mini structure should be fixed using soldering. After this, droppers must be attached to the bases of the two needles. Clamps - dropper regulators need to be moved as close to the needles as possible. In the resulting burner they will act as gas and air supply regulators. They also need to be fastened together, and this is best done using a heat gun. All that remains is to connect a source of compressed gas to the finished device, the burner is ready for use. This homemade gas burner can heat objects up to 1000 degrees
You should work with it carefully, observing safety precautions
Service details
Maintenance of a gas burner
Maintenance of gas burners of any homemade version only involves cleaning it. This process must be annual. Doing it yourself is not recommended. After all, you will have to disassemble and reassemble the boiler. As a rule, people turn to service centers for service. Accumulated contaminants are eliminated by air blowing. The air here is compressed.
The pressure to the burners must be adjusted carefully. For example, for some current versions of burners, parameters of 8-10 atm can be detrimental.
The need for cleaning the burner can be reduced significantly if a filter is installed on the gas supply pipe. This work is performed by a gas service employee, who should be contacted with a special request.
Main stages
It is not difficult to make a burner or mini-burner according to the drawings, as already noted, without spontaneously changing the parameters.
Frame
The body is usually steel. A brass rod with a width of 2 cm is suitable for its manufacture. A divider can be made from the same rod. Then several holes are made that will help create oxygen circulation in the device. Fire, as you know, does not exist without oxygen. There should be 4 such holes: each about 1 mm in diameter. They are made in the burner divider rod. The next step is to press the divider into the device body. The internal flange is installed with a gap of 0.5 cm. This gap will subsequently slow down the powerful flow of gas that approaches the igniter.
Nozzle
This part of the device ensures the supply of fuel from the cylinder to the outside. It is made from a metal rod. At this point, the technician will need a two-millimeter drill to form a blind hole in the nozzle. And for the jumper you will need a four-millimeter drill.
Then a hose from the gearbox, made of fabric or rubber special material, is attached to the end of the tube. Fastening is carried out with a clamp using a regular screwdriver.