Metal roofing is a popular solution when building or renovating a home. Proper installation of a chimney through such a roof will preserve its appearance and protect the roof and chimney from destruction. The configuration features of metal tiles not only give the building a presentable appearance, but also complicate the passage of pipes through the roof. When installing and sealing a through hole under a chimney, it is important to ensure reliable waterproofing, protect flammable materials from overheating and ensure the aesthetic appearance of the pipe.
Arrangement of a square exit
A square or rectangular passage is installed for a classic brick pipe.
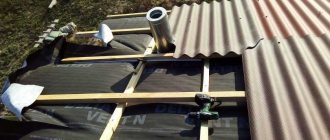
A hole in the metal tile is cut using metal scissors or a jigsaw. The second step in creating a passage for a square pipe is to install an internal metal protective apron. Work begins by marking the place where the pipe will be cut under the connecting strips of the internal apron.
The groove is made 15 mm deep. For better adhesion of the junction strips to the pipe, the groove should be sloping upward. The groove is cleaned with a stream of water to remove sand and dust.
The planks are installed as follows:
the upper, curved edge of each of the 4 planks is inserted into the hole made; The order of installation of the abutment strips is as follows: the bottom one is installed first, then the side ones, the top one is attached last; it is important to ensure sufficient overlap of the planks, about 15 cm, observing the sequence from bottom to top; The lower edge of the planks is secured with self-tapping screws to the roof sheathing.
A moisture-wicking tie is slipped under the bottom bar. This is a special iron sheet with curved edges. It is installed under metal tiles with an outlet to the edge of the roof or into the valley.
The waterproofing material is laid on top of the junction strips, with an overlap of 5 cm. After this, the metal tiles are laid in place.
The final stage of the square pipe passage is the installation of an external decorative apron. In most cases, such an assembled apron can be purchased ready-made, matching the color of the roof.
Self-tapping screws are used with special protective caps. All joints must be coated with silicone sealant.
Basic requirements and standards
The quality requirements for metal tiles are regulated by GOST R 58153-2018. It became mandatory for all domestic manufacturers from March 1, 2021. The standard defines:
- minimum thickness of bare steel sheet for metal tiles and accessory passages;
- the amount of coverage on both sides;
- amount of zinc per square meter of finished product;
- profile shape, linear dimensions, crescent, oblique.
Thus, the thickness of the sheet, excluding the polymer coating, must be at least 0.5 mm. The recommended thickness of paint with primer is 23 microns or more. The norms, rules and all technology for carrying out work on the construction of a passage are described in SNiP II-26-76.
Where should not a chimney be placed?
A bad option is to place the chimney passage next to the attic windows. Remains of combustion products can be drawn into the premises by the wind and forced ventilation when the doors are open. It is extremely undesirable to make a passage in the area of the valley - the junction of two adjacent slopes. The reasons are as follows:
- This place experiences the greatest load of snow in winter.
- Problems with tightness are likely due to the greatest accumulation of water from precipitation here.
How to organize a chimney on the roof - general diagram
Chimney passage through a wooden ceiling
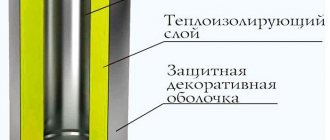
When installing a pipe, we must not forget that it is a potential cause of fire. Therefore, for its manufacture, a three-layer system is selected, which provides high-quality insulation. That is, there must be a layer of insulation between the outer and inner pipes.
The construction of a modern roof involves the use of a variety of materials, because it consists not only of roofing material. We need lumber for the construction of the supporting structure, rafters and sheathing, insulation to provide thermal insulation, as well as hydro- and vapor barrier films, which are the obligatory layers of the roofing “pie”.
Among the listed materials there are some that are quite susceptible to fire. That is why proper organization of the chimney is the key to the protection and fire safety of the house.
Advice Considering the importance of ensuring the safety of living in the house, it is recommended to buy components and materials for organizing a chimney in special stores where you can check the available quality certificates.
Sandwich pipes
Another excellent option for arranging a chimney is to use sandwich pipes. Such a chimney consists of two pipes, one in one, having different diameters, and between them there is basalt wool. Such pipes are protected from condensation accumulation and severe overheating.
Sandwich pipe
This is the simplest option for arranging a chimney; even a novice builder can handle the installation tasks. Such pipes serve for a long time and have excellent performance characteristics.
Sandwich chimney device
Calculator for calculating the internal diameter of a sandwich chimney
Go to calculations
The procedure for installing a chimney through a metal roof
Installation of a chimney from sandwich pipes through the roof
The biggest problems can arise when arranging the passage of pipes through an insulated roof. Because it consists of a certain number of layers of insulation, including roofing insulating material and roof lathing.
Watch the video: bypassing the chimney through a metal tile
The box, passing through the ceiling, must be reliably protected from contact with the furnace smoke exhaust pipe. This is achieved through the use of mineral wool, which is based on basalt or fiberglass.
The assembly of the building being constructed for the passage of the chimney comes in various shapes. It depends on the type of material used in the construction of the passage through the ceiling. As a rule, the shape of the chimney on the roof is of the following types:
- rectangular;
- square;
- round.
The first and second types are created during the construction of a building made of bricks and blocks. And through the use of metal products and cement, they create a passage for the chimney, which has a round shape.
Features of metal tiles as a roof
Metal tiles are corrugated steel coverings that are reinforced with a colored layer of anti-corrosion protection made from organic or composite materials. When laid according to technology, such a roof is designed to last for more than half a century. In this case, you will not need to additionally care for the roof, paint it or fix leaks. The steel is reliably protected, and the color coating is designed for use in outdoor conditions.
Note! The closest “relative” of metal tiles is the roofing profile. However, its appearance only reaches the economy class, while metal tiles give the building respectability and aristocracy.
Advantages of metal roofing:
- light weight;
- ease of installation;
- durability;
- environmental friendliness;
- non-flammability;
- affordable price;
- weather resistance.
The disadvantages include:
- the complexity of covering a roof with a complex configuration;
- a large amount of waste material when laying on a figured roof;
- noise from impacts on metal during rain and snow melting;
- a large number of holes for fasteners are potential sources of corrosion and leaks.
Note! The main disadvantage of covering a roof with metal tiles is unprofessional work. If the cutting and laying technology is violated, its condition will be deplorable within a few years.
How to properly install a chimney
Ventilation outlet for metal tiles, what are these elements for, and how to install them
Before bringing the pipe through the metal roof, experts determine the location of the future chimney. When searching for the location of the pipe on the roof, they are guided by the following established rules:
- The chimney unit in a metal tile structure needs to be completely connected to the roof deck. Sealing the pipe is a prerequisite for correct and successful installation.
- On the surface of the area selected on the metal roof for the chimney pipe exit, snow and other precipitation should not accumulate in significant quantities. Additional water pressure on the roof can compromise the integrity of the deck. In addition, excess moisture can cause leakage into the living areas of the house.
- A chimney through a metal tile roof is not installed next to the attic windows. When there are strong gusts of wind, it can be difficult to avoid carbon monoxide and smoke from blowing back into the building.
All these requirements, as practice shows, are met by the area on the metal tile roof located near or at the very ridge of the roof. A warm zone, free from condensate accumulation, is used for installing the chimney stove pipe. Installing the longest hood, in turn, reduces the negative impact of external atmospheric factors.
If the roof of the building is flat or the ridge ridge rises to a distance of less than one and a half meters, the brick pipe exceeds the level by 50 cm. A ridge reaching up to three meters requires installation at the same level as it. If the distance to the ridge is significant, exceeding the three-meter mark, experts draw a conditional line to the horizon at an angle of 10 degrees, determining the lifting point for installing the pipe. To construct a hood you need lumber, bricks, insulation materials, and waterproofing films.
The mouth of the chimney is covered with a special umbrella made of roofing material to prevent moisture from precipitation. The chimney connected directly to the boiler room is not covered, as this may impede the exhaust of gases.
Square roof access
Let's figure out how to make an exit for a chimney that has a square shape. After the pipe is brought to the roof, it is necessary to complete the structure. The main seal, which ensures adherence to the metal tile covering, takes the form of a special apron mounted on the roof slope using metal corners. The installation of this part begins from the bottom wall of the exhaust system; the strips are attached with an overlap of 10-15 cm, filling the elements with a sealing compound.
A metal plane is placed underneath, along which water flows either into the valley or to the very end of the eaves strip. A metal tie is made with bends at the edges.
The metal tiles are mounted on top of the internal apron, then they begin to construct a decorative finish called an external apron, the part consists of abutment strips. The tightness is ensured by a self-expanding insulating film. To prevent cracking, specialists wrap the brick with a sheet of iron coated with a polymer composition.
Arrangement of a round exit
The main thing in installing a pipe with a round cross-section is the use of an additional element - a penetration for the roof. It is a sheet of metal on which a rubber or silicone cap is attached.
The use of modern technologies has made it possible to obtain a universal part that can reliably serve under extraordinary temperature conditions. Certain types of materials can withstand temperatures up to - 70 and + 275 degrees Celsius.
The round pipe passes through a cap on the penetration, which is tightened by selecting the desired part, with the hole of the ring 20% narrower than the cross-section of the chimney pipe. The apron is then secured to the roof structure.
Chimney passage options
For high-quality organization of smoke removal, when the load of atmospheric factors on the pipe and the place where it passes through the roof is minimal, it is important to correctly determine the location of the through hole for the pipe. The optimal solution, from the point of view of protection from rain and snow, would be to pass the pipe through a gable roof made of metal tiles through the ridge. However, such a conclusion implies a violation of the integrity of the ridge beam and the installation of additional supports, which is undesirable.
We recommend that you familiarize yourself with: Sewer corrugated pipes for arranging an external sewer system
When determining the location of the chimney, the following considerations are used:
- a straight chimney draws better than one with several bends or a long horizontally oriented section;
- the pipe should not go out near the attic windows or onto the windows of a nearby building, since combustion products will be blown into them by the wind;
- in the valleys (the junction of two slopes on a complex roof) the maximum amount of snow accumulates; through holes are not made in the roof here;
- The closer the pipe is to the ridge, the less condensate will form in it.
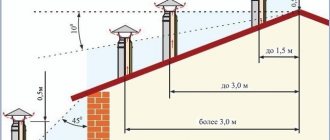
For a gable roof, there are the following standards for the dependence of the height of the pipe on its location relative to the ridge:
- for a zone 1.5 meters from the ridge, a height of 50 cm is sufficient;
- for a zone from 1.5 to 3 meters, the end of the pipe coincides with the height of the roof;
- beyond the 3-meter zone, the height of the chimney can be lower than the ridge, but no more than an angle of 10 degrees between the highest points.
In a residential building, steam and waterproofing are installed under a metal tile roof, which also serves as a noise absorber, eliminating one of the main disadvantages of such a roof. It is very important to protect the junction of the roof and the pipe from leaks and cold air.
To protect flammable roof elements from the high temperature of the chimney, a special passage unit is installed to seal the penetration tightly. It is a box that is built into a through passage. The pipe itself is routed through the center of this box. On the outer and inner sides of the roof, the box is decorated with protective aprons.
Note! The distance from the wall of the brick pipe to the roofing pie cannot be less than 13 cm. If the pipe is ceramic, then this distance increases to 25 cm (SNiP 41-01-2003).
The passage through the metal tile roof is determined by the shape of the chimney pipe. It can be round, square or rectangular.
We recommend that you read: Types of ball valves and features of choosing a device
Chimney passage with a square or rectangular cross-section
In order for the passage of a chimney with a square cross-section to be as airtight as possible, it is necessary to make external and internal aprons (thin sheet metal is often used for this). Usually, the internal one is installed first, and then the external one, installed directly on the surface of the roofing pie. When creating a lower apron, markings are made on a brick pipe that correspond to the location of all the parts of the apron. Then the groove is made along the intended lines - the groove is done with a grinder to a depth of at least 1.5 cm. It needs to be cleaned of dust and dried.
Roofing apron made of steel with polymer coating
Next, all the apron strips are mounted, with their edges inserted into the groove made and secured with sealant. Fixation to the pipe itself is carried out using roofing screws
If there is a need for joining somewhere, then it is important to remember that the overlap of individual elements on each other should be approximately 15 cm - only in this case will it be possible to achieve the recommended level of tightness. A special tie is mounted at the bottom of the apron to drain water
It is directed towards the valley or cornice.
Diagram of the connection between the chimney and the roof
Afterwards you can move on to arranging the outer apron. It must be remembered that at this moment the metal tiles should already be laid on the roof. The parts of this apron no longer have to be inserted into the groove - just screw it to the pipe itself with roofing screws
It is important to ensure a good connection between the apron and metal tiles and not forget about waterproofing. By the way, the waterproofing coating should be placed on the chimney by about 5 cm
You can secure it with construction tape.
Sealing rectangular and square pipes
To ensure the reliability of the roof in the areas of valleys and junctions, a tie made of metal parts (junction strips), which are inserted 150-200 mm under the covering, will help.
Before applying corrugated sheeting, it is necessary to seal the passage of the riser with a membrane.
- A cross-shaped cut is made in the material and glued to the walls of the chimney at a height of more than 5 cm.
- Self-adhesive “Vakaflex” tape is attached under the upper junction bar: from below, from the side, then from above.
- Sometimes a chimney is installed in a finished roof, cutting a hole in the corrugated sheeting with a margin of 1.5-2 cm. To do this, the metal sheet at the junction of the rectangular pipe is bent, a waterproofing membrane is glued and a lower and then an upper sheathing is installed, tightly pressed against the roofing pie and the chimney.
Safety precautions when installing a chimney must be strictly observed
Plastering a pipe
To avoid the formation of a thick layer of plaster, you should know how to properly insulate pipes:
- First, seal all existing irregularities in the pipe with cement mortar;
- Then cover the walls with reinforcing mesh;
- The final stage is applying plaster.
The reinforcing mesh will allow the plaster to adhere well to the pipe and not crack when drying
Strengthening the pipe with asbestos cement
Lining a chimney with asbestos cement requires the use of a cement-lime mixture applied to the surface of the slabs.
- The chimney is reinforced with mesh and the first layer of solution is sprayed.
- A new layer of the mixture is applied to the insulation sections and attached to the surface of the chimney.
Sheet iron cladding
When insulating a metal pipe, you should maintain a distance of 60 cm from the chimney to flammable materials.
- The structure is wrapped in mineral wool 5 cm thick, overlapping, and clamped with steel wire. The top is wrapped with a metal sheet.
- Rivets are inserted into the previously prepared gaps, and the heads of the clamps are closed with a special tool.
What is the goal?
When preparing drawings, it is important to provide for the direct location of the pipe coming from the furnace.
- The maximum heating temperature of the outer wall of the chimney should not exceed 50 degrees.
- Waterproofing a brick chimney on the roof allows you to comply with established standards, and metal elements will require additional insulation to prevent the formation of condensation.
After installing the pipe, it is enough to carry out plastering followed by laying millite silica, thermal insulation wool MKRR-130 or rolled felt MKRF-100.
If the outer part of the pipe is 2 meters or more in height, it is strengthened with additional braces
Junction location
The SNiP standards relating to the installation of chimneys do not clearly regulate the location of the chimney pipe.
Only the parameters for determining the height of the chimney are specifically indicated:
- the chimney should rise above the ridge by at least 50 cm, if the pipe itself is located at a distance of up to 150 cm from it;
- if the chimney is located at a distance of 150-300 cm from the ridge, then its height can be equal to or higher than the level of the ridge;
- if the chimney is located more than 300 cm from the ridge, then the pipe on the chimney is placed level with the ridge or not lower than a line drawn from the ridge at an angle of 10 degrees relative to the horizon.
Condensation may fall inside the pipe or on the inside surface of the protective umbrella. The main danger of the resulting moisture is that at subzero temperatures it forms ice, which negatively affects traction. In addition, condensate flows down into the walls of the chimney, thereby promoting the development of corrosion processes and reducing the service life of the chimney.
It is better to route the chimney through the roof as close to the ridge as possible. There are two reasons for this:
- in this place it is much easier to organize the connection of the pipe to the roof;
- Due to the small area of the slope above the pipe, the formation of snow pockets, which lead to leaks, is minimized.
Sealing round multi-layer chimneys
It is much easier to install sealing on modern round chimneys. The simplicity of the process is due to the fact that no additional equipment is required, since the pipe is already equipped with everything necessary. Installation takes place in three stages:
Prime the edge of the pipe
where the waterproofing will be attached.
Make a hole in the waterproofing
, and then glue it to the pipe using mastic.
The sheet must be attached to the sheathing
. The pipe is passed through a cap, between which a clamp with a heat-resistant gasket must be located.
Round metal chimneys
If there are no caps, then flexible elastic seals for pipes are used instead. The sealant can also be used anywhere else where roof insulation needs to be improved.
This might be interesting!
In the article at the following link, read about waterproofing flat roofs.
Strengthening the rafter system
Often when installing a chimney, the question arises about strengthening and strengthening the rafter system, because it is necessary to form a hole in the roof pie for the pipe. That is, you will need to install a couple of spacers. When creating a roof made of metal tiles, the pitch between the rafters is rare, and the formed opening or the distance between the rafters may be too large. Therefore, it is necessary to install vertical spacers.
Pipe outlet box arrangement
Sometimes you have to break the integrity of the rafter leg, that is, cut it. Then, in certain situations, purlins or crossbars are also sawn. In this case, at the place where the rafter leg was cut, it must be fastened to adjacent, undamaged ones. For this, additional spacers are also used, between which bars are inserted vertically. Their function is to replace the rafter leg at the chimney passage.
What can result from poor installation?
Often, the list of works of a stove maker or installer of a gas or electric heating boiler does not include work on installing a chimney. It is assumed that the passage of the chimney pipe through the roof is laid at the construction stage, or the homeowner will install the chimney on his own. The apparent simplicity of such work provokes owners to refuse to use professional roofers. They don’t think about what serious negative consequences a poor-quality chimney outlet to the roof can lead to. Frequently encountered problems:
- through a poorly sealed pipe passage, dampness can enter the masonry, eventually destroying bricks and cement joints;
- increased humidity of the chimney pipe itself or the elements in contact with it provokes an increased spread of various microorganisms, mold, and mildew. The spores of some of them can pose a danger to human health and even human life. If traces of infection are visible on the pipe, it is not recommended to use it, and in special cases it is necessary to completely replace the entire smoke exhaust system;
- water seepage in places where the chimney passes through the roof elements leads to a reduction in the thermal insulation properties of the insulation by half. You need to understand that after such a layer dries, the insulation characteristics will no longer be able to return to their previous level;
- a poorly installed chimney affects the durability of the materials of the roofing elements and rafter system. Penetrating moisture accelerates the process of wood rotting, which will lead to the destruction of the power frame;
- large gaps near the passage of pipes lead to the cessation of normal circulation of warm and cold air in the room under the roof. This leads to additional energy losses, and hence to unnecessary heating costs;
- Poor-quality chimney lining significantly spoils the appearance of the entire building.
Not only chimneys from stoves, fireplaces and other solid fuel devices are raised above the roof. Exhaust pipes from gas heaters, as well as ventilation pipes, are also discharged there. When installing them, exactly the same methods are used as for chimneys.
How to route a pipe through a metal roof
It is worth thinking about venting the pipe through the roof at the stage of installing a fireplace or stove. The chimney must be safe, efficient and, preferably, aesthetically pleasing. Reliable waterproofing and correct selection of the outlet location are the key to long service life of heating equipment.
The technology for installing the pipe depends on the roofing material. How should the passage through metal tiles be organized? To prevent leaks from occurring, the chimney to become dirty less often, and fire hazards to avoid occurring, the installation process is carried out using strict technology.
Where should the chimney be installed on the roof?
The area where the pipe meets the roof is a potential leak point. The design of the roof opening must meet 2 requirements:
To solve these problems, special building materials are used.
From the point of view of opening design, the ideal choice of location is the ridge of the roof. There are no snow pockets formed here and the likelihood of condensation inside the pipe is reduced. Located mostly in a warm zone, it will always be warm.
Also, if the pipe is positioned “through the ridge”, it is easy to bypass it with metal tiles. The disadvantage of such a passage is the need to create a ridge rafter system “with a gap.” And these are additional supports that interfere with the operation of the attic space.
Often the heating device is not installed in the center of the building, so the optimal location for the chimney is near the roof top. In this case, the pipe will effectively cope with its functions.
You should not install the pipe in the following places:
In such places, it is extremely rare to avoid leaks due to the design difficulties of installation. You should not create a passage near the attic windows - smoke and combustion products will enter the room with gusts of wind.
How to remove a square pipe correctly?
The method of designing the passage greatly depends on the shape of the chimney. The pipe can have a round or square cross-section. In both cases, special training is carried out.
When installing a square or rectangular pipe, an apron is installed even before laying the main coating. Installation procedure:
- an internal connection strip is applied to the pipe wall and a mark is placed on the position of its upper edge;
- The chimney wall is grooved along the drawn line;
- The first to install the strip is from the side of the cornice;
- all strips are sealed with silicone;
- a tie is formed - a sheet of metal is placed under the lower part of the apron, and the outlet chute is directed towards the eaves overhang;
- The main covering is laid and the outer apron is installed.
For a round pipe there is its own installation technology. When performing this procedure, it is recommended to use special passage elements.
They are able to reliably isolate the roof opening. The element is made up of a metal base and an elastic cap equipped with transition diameters.
Round pipe installation procedure:
- to begin with, select a ring of the passage element, which is 20% smaller than the cross-section of the chimney;
- the element is trimmed at the selected level;
- a hole is cut in the roof that matches the diameter of the pipe;
- using liquid soap, the element is pulled onto the chimney;
- the base of the sealing element is given the shape of the roof (by pressing);
- Sealant is applied under its edges, and the element itself is screwed with self-tapping screws.
When scoring a brick pipe, you should make sure that the edge goes along the brick and not along the masonry seam.
Methods for sealing a pipe outlet
In addition to constructing an apron, several options are used to seal the chimney opening: creating a special box, installing an umbrella, using self-adhesive tapes.
The box is designed to separate the pipe from the roof and effectively remove moisture. It is created using rafters. The box is located 15 cm from the chimney.
It should be filled with special stone wool. With such material, there is no need for vapor and waterproofing. In this case, metal tiles are insulated in the traditional way - using film. The junction of the box and the film is fixed with a sealant.
The installation of the umbrella is carried out when installing a metal chimney. The layout is made of cardboard. After determining the dimensions, the sheets are tightened on the pipe with a clamp. The gaps are sealed with sealant.
It is important to approach the installation of the pipe as responsibly as possible. This will protect the opening from leakage and prevent rotting of the rafter system.
Installation of a square and round chimney has its own characteristics. You can seal the pipe using a box, an umbrella, a transition element and special construction tapes.
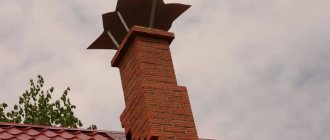
Bypassing a chimney made of a brick pipe, installing an apron
To arrange the junction, two problems must be eliminated. The first is to transfer the water that flows from the slope, redirect it on both sides of the structure being built. After this, she is released onto the ramp under the building. The second is to prevent water from entering the home, and direct the liquid that flows down the walls of the chimney to the roof.
To solve all this, you should build an apron made of metal. It must stand on the surface of the roof and on the pipe (at a distance of 15 - 20 cm above the plane).
Before work begins, the chimney is plastered. After that, waterproofing protection is placed on its sides. From the rear side of the edge, no more than 80 cm, a gutter is built into the waterproofing to drain water.
Before asbestos or other chimney pipes are removed through a metal-covered chimney, a sheathing is installed and a lower apron is installed on it. For this task, the left and right sheets are cut along the contour and then cut to width. The length is maintained at 5 cm from the place where the first wave begins, which will pass from above the chimney in the house or in the bathhouse.
Watch the video: brick chimney - how to go through a metal tile roof
How to pass a roof with a brick pipe
Lines are drawn on the sides, which are located 15 cm above the surface part of the roof. Then they are connected along the entire length of the contour. Using this marking, grooves with a width of 2 mm are made.
The grooves need to be drawn along the brick, and not along the masonry. After treatment, the area is cleaned of contamination and thoroughly washed with water. When it dries, the grooves are filled with silicone-based sealant.
Afterwards, prepare the abutment strip and the necessary elements of the apron. Next, the outermost part of the strip is inserted into the sealant and attached to the metal tile using self-tapping screws.
Round and square chimney passage
The problem of how to correctly route the passage of a round pipe through a metal tile is becoming quite urgent. If the round pipe blank is already equipped with insulation, then the roofing cake must be protected from fire.
If, when installing through the ceiling, materials that are easily flammable are used, then they should be at a distance of no less than 20 cm from the chimney. In this case, a passage opening is made in the form of a wooden box. And the empty space is filled with thermal insulation material.
When equipping a passage channel for a round pipe blank, the following technological sequence is used:
- the waterproofing is cut in the shape of an envelope;
- the extreme parts of the canvas are brought to the rafters and fixed to the building, which plays a load-bearing role, with staples;
- then the waterproofing film is pressed against the bars included in the sheathing, and the vapor barrier layer is pressed against the base for installing the finishing material;
- in order to protect the insulating material as much as possible, the abutment zones are taped with a special tape;
- at the end, the surface where the work was done is covered with metal tiles.
How to pass a steel pipe blank through a roof
Actions with such a construction do not like to be rushed. The master who took up this task must clearly understand the features of each ceiling. For example, the passage of a brick structure through a wooden ceiling, as well as through any other, must be carried out without losing the integrity of the roof.
Otherwise, after the first rains the ceiling will leak. It is also important to take into account that the waterproofing of a steel chimney on a slate floor will not be the same as on a wooden floor and metal tiles.
How to make an exit for a pipe on a roof made of metal profiles / metal tiles
Single-layer steel pipe becomes very hot. Therefore, a ceiling opening where wood is used for construction must be equipped with a thermal insulation barrier or a special box. Thus, they work not only on wooden floors, but also on any other.
Performing a pass without fluffing
The brick chimney is designed to provide protection for combustible materials from overheating. The part of the structure that is carried through the ceiling covering becomes a cutting, and has the name “fluff”. This element plays the role of the necessary thickening of the pipe walls, which protects against overheating.
Recently, expanded clay or vermiculite have been used to pass a brick chimney structure through the ceiling without fluffing. These materials have good thermal insulation characteristics.
Plain sand is extremely rarely used for such a task. The whole problem is that the sand has too fine a fraction and a large mass. For such a “fluffing” function, the thermal conductivity of this material is too high.
An easier and simpler solution to this issue is to use a box filled with heat-resistant basalt wool. When installing mineral wool, the building from the attic side is equipped with free access to it.
In cases where the building is located on the second floor, the opening in the floor with insulation is covered with a sheet of metal.
Ventilation passage
Exiting ventilation to the roof is a prerequisite for construction. A fully equipped roof ventilation system is the key to long-term use of housing. Circulated warm air from inside the room causes condensation to appear on cold surfaces.
The conclusion from this is simple. Being under such influence, the erected structures quickly lose their integrity. For this reason, forced ventilation is installed.
It is not difficult to purchase ventilation of any type in hardware stores. It doesn’t take a lot of time and effort to reach its conclusion. This installation is carried out in this way.
- The passage element is laid on a tile base and its outline is traced. This is how the place where it will take place is determined.
- The metal tiles are cut according to the applied markings.
- The rubber seal is fixed to the metal profile with self-tapping screws. Next, it is carefully treated with silicone.
- The passage part of the ventilation duct is fastened with a rubber seal and attached to the roof with screws.
How to install asbestos and sandwich chimneys
In many situations, connecting a sandwich pipe to the roof through a metal tile becomes an excellent alternative to a brick chimney for a stove. This type of construction is easy to install. Since the main elements are two pipes of different diameters, between which a thermal insulation layer of basalt wool is placed.
Making a passage for a sandwich building on a metal roof can be done even by a person who does not have much construction experience.
And the ease of installation in this case is complemented by excellent performance and a long service life.
Experts say that for removing flammable substances, there is a better option than a sandwich - a pipe is difficult to find. After all, such material is excellently protected from strong overheating of the walls from the outside. The same applies to the formation of condensation.
To these advantages it must be added that this building looks very presentable.
To sum it up briefly, we can come to a conclusion. This entire process does not contain any highly complex actions. The main thing when working step by step is to comply with the requirements established by SNIP, maintain all dimensions and follow the recommendations.
If everything is done according to the rules, then the operation of the heating device will become absolutely safe, and there will be no problems with the inspection authorities.
How to choose a cut
There are two types of roof trims - for chimneys with a round and rectangular cross-section. In the latter case, the sealed apron is assembled manually from roofing iron. Despite the complexity, this option is considered the most reliable. Cuttings for a round pipe are made at the factory; they look like a corrugated cuff with a wide brim. For a high-quality and hermetically sealed connection, the pipe passage must be insulated with two aprons: an internal and an external decorative one.
To pass round pipes through metal tiles, flexible grooves made of heat-resistant synthetic rubber are used. A more exotic option, mainly made in Europe, is composite aluminum trims. In both cases, the essence of their work is that they repeat the complex profile of the metal tile and are attached to it both mechanically and with a sealing adhesive connection.
Making cuts yourself requires a certain skill and a simple set of tools for roofing work - a mallet and a right-angle mandrel. Both the bottom and top aprons consist of four Z-shaped strips. At the corners, the planks are joined either with a hem or with folds, which is preferable. Cutting strips of roofing steel must be done without overheating the edges; in addition, the edges adjacent to the chimney and roof must have a fold, that is, single rolling.
Sealing by arranging a box
There is a method of sealing by arranging a box.
- Leave a distance between the edge of the cut roof and the pipe in accordance with fire safety standards.
- Treat the adjacent edge of the roof to the chimney and the chimney itself with heat-protective material.
- A box made of galvanized steel or corrugated sheeting is installed in this area. Cut strips up to 40 cm must be sheathed around the perimeter and the angle of inclination of the slope.
- The elements of the box (collar) are overlapped and soldered.
- When the roof slopes at an angle of more than 30 degrees, a metal outlet is installed to drain rainwater around the chimney.
- Fill the space between the pipe and the box with thermal insulation material. You can use basalt wool.
The principle of arranging a passage with thermal insulation materials is applicable to a chimney on a slope and a ridge with minor differences. The installation of a chimney along the ridge involves changes to the design of the rafter system.
The roofing deck is covered with roofing felt, overlapping the pipe walls, and the apron is installed, followed by filling the gaps between the apron and the wall with polymer sealants.
External apron system at the junction area
Experts highlight the connection of the chimney to the metal tile as a very important factor. To ensure the tightness necessary in this situation, an apron is built outside. Installation work begins with the installation of the internal apron. In this case, they place a bar or steel sheet at the top and bottom and the same elements on the sides.
The bar at the bottom is applied to the walls and a line is drawn with a marker.
The remaining parts are also used as a template for subsequent marking. When the line around the perimeter is completed, they begin to make grooves. It is better to make them with a grinder, going deeper by 15 cm.
At the end, they are washed with water, the brick dust is washed off, and they wait until everything dries.
In order not to break the tightness when connecting the smoke exhaust structure to the metal tile floor, it is important to ensure that the grooves pass exactly where the brick is laid
When installing the outer apron of a smoke exhaust structure through a soft roof, heat-resistant waterproofing protection is used. It is inserted onto the pipe blank by 5 cm.
The cut itself is glued to the pipe product using construction tape. And the place where the pipe extends beyond the soft roof is wrapped with film. To securely adhere to a soft roof, it is recommended to use Ecobit.
Sealing a square pipe on a slate roof
A slate roof adds its own nuances when it comes to creating a sealed pipe. Because of the slate, it is impossible to use any other parts for insulation, so the protection effect was achieved through a cement-sand apron, which was created as follows:
All gaps must be covered with collar guards
made of galvanized steel. This material does not corrode and can last a long time.
Cement-sand mortar is poured
so that it is above the roof level. If a cardboard cylinder was used in the process, then the procedure will be easier and simpler.
Water drainage
should be carried out using an inclined ledge, which must be located on the side of the ridge.
When sealing a chimney, do not forget about water outlets
If, for convenience, when pouring, a cardboard cylinder with plastic film or a plastic side was used, then these parts must be removed after the mass has hardened. Despite its appearance, this method of sealing is in no way inferior to alternative ones, which cannot be used on a slate roof.
The process of eliminating cracks in a corrugated roof
As a rule, when installing a chimney through a corrugated roof, a ready-made Master Flash pipe cutting is used. Another advantage is that this set is very convenient to use; it can be used for roofing made of almost any material.
In essence, Master Flash is an apron cap made of silicone or rubber, placed on an aluminum base.
As for operating temperatures, for the silicone version of products it is significantly wider - in the range from -50 to 130 ℃.
The process of sealing cracks on a profile roof includes the following manipulations:
- A gap is cut in the cap, the diameter of which is slightly smaller than the cross-section of the chimney.
- The Master Flush is put on the chimney.
- A gasket is placed at the base of the chimney.
- The joints between the material are sealed with silicone sealant.
- The base of the chimney is fixed to the profile roof using screws.
Often the described manipulations do not provide sufficient tightness on the profile roof, so that during rainfall water leaks into the cracks. In such cases, the best option is to use self-adhesive tape reinforced with aluminum. It is very convenient to use such material, since it does not require pre-heating before use.
Thus, the fact how well a corrugated roof will be sealed at the exit point of the chimney depends largely on the choice of material and the quality of the work performed. However, we are confident that by following our instructions exactly and working responsibly, you will be able to protect your home from any surprises associated with roof leaks.
Materials used
The materials used for sealing are divided into three types, each of which has its own advantages and disadvantages.
It is a roll or shortened fibers. Positive qualities of cotton wool
:
adheres tightly to surfaces;
resistance to physical impact (shock, vibration);
resistance to chemical attack;
Cotton wool is the most common material for insulation
Roll filters
They are a mullite-siliceous composition that is included in the fibers of the composition. Positive qualities of roll filters
:
it is permissible to use inorganic glue;
the mechanical fastening can be firmly fixed.
On our website you can find contacts of construction companies that offer country house design services. You can communicate directly with representatives by visiting the “Low-Rise Country” exhibition of houses.
Asbestos and kaolin boards
In production, mullite-siliceous fiber is used. The disadvantage of the plates is their immunity to alkalis and acids at high temperatures. To eliminate the deficiency, additional insulation will need to be installed. Positive qualities of slabs
:
low density, but higher than that of cotton wool;
resistance to physical impacts, such as vibrations;
resistance to steam, water and oils;
resistance to melting non-ferrous metals;
electrical insulating properties will be maintained at temperatures up to 800 degrees Celsius.
Making an opening for the chimney
Fire safety requirements provide for an indentation from the chimney body to the elements of the rafter system and roof pie, made of combustible or subject to melting materials. The size of the gap is determined by the presence of non-combustible insulation in the chimney duct, the thermal conductivity of which does not exceed 0.3 m2*°C/W. Thus, for brick and ceramic wells the indentation should be at least 250 mm, while for a certified sandwich pipe 130 mm is sufficient.
Taking into account the dimensions of the chimney duct, determining the size of the opening is quite simple. Next comes the application of markings to the parts of the internal cladding and sheathing. Vapor barrier and waterproofing materials are cut into an envelope and wrapped inside the cake. Next, the internal surfaces of the opening should be finished with a waterproofing material that is not sensitive to heat; as a rule, aluminum or copper foil is used for this purpose.
Please note that by this time the metal tiles must be dismantled around the passage area. The best option is to dismantle starting from the ridge and remove one sheet in each direction from the opening
Thus, the passage in the roof must be completely free at the time of installation of the chimney pipe. For roofs under metal tiles, the following procedure is typical: first, the rafter system is prepared at the place where the pipe passes, then the roof pie is arranged according to the general scheme, after which the opening is filled and the covering is installed with cutting.
Where does waterproofing begin?
Heating devices will operate in a safe mode only if the waterproofing is carried out correctly and taking into account all existing rules and recommendations. Waterproofing is carried out taking into account:
A certain distance must be maintained between the rafter system and the roof
, which depends on the materials used. Flammable – 150-300 mm, non-flammable – 100-250 mm.
Sequence of layers
in the roofing pie must not be disturbed. It is necessary to block the possibility of moisture penetrating inside the prepared cake, since any liquid will cause rapid destruction of the layers. The insulation must be separated from the pipe by a gap. Otherwise, there is a risk of fire, since most insulation materials are flammable.
Box
- This is the required device for separating the roof from the pipe. The distance should be approximately 150 mm. Inside, the created box is filled with any heat-insulating material that has non-flammable properties.
Films that perform insulation tasks must be cut “envelope”, and then pulled to the cross beam so that it can be attached with nails. Waterproofing must be fixed with lathing, vapor barrier - with a special frame. All joints of the box and insulation layers must be edged with special tapes.
Sealing a chimney is a complex process and requires certain skills and knowledge
Strengthening the rafter system
In the simplest case, the opening is limited by two spacers installed between the rafters. Thus, a square is formed in the roofing pie, the walls of which are spaced at a distance no less than the standard one. Light metal roofs are characterized by a sparse rafter pitch, so usually the horizontal dimension of the opening turns out to be excessively large. It can be shortened by inserting a couple more vertical struts between the horizontal struts. This is desirable not only from the point of view of reducing the gap in thermal insulation: even in a cold roof, an opening of the minimum permissible size will cause fewer difficulties with the installation of non-combustible sheathing and fastening the metal tiles in place.
In difficult cases, the rafter leg has to be cut. Depending on the height of the passage, a tightening, a crossbar, or several purlins are also dismantled. The general method of strengthening the rafter system is as follows: at the cut site, the rafter leg at the top and bottom is fastened to its neighbors by means of horizontal struts. Next, vertical beams are inserted between these spacers, replacing the rafter leg at the passage point. The same method can be applied to other elements of the supporting system located in parallel: purlins or, for example, high puffs.
Reinforcement with the help of supporting posts is rarely practiced. This is mainly advisable when the slope is above 35°, when it is necessary to cut out fairly long fragments of the rafter system. In such cases, the opening is equipped with its own supporting system, often of a hanging type. To ensure sufficient strength, it is customary to connect the opposite legs with ties on which the racks will rest.
Possible ways to eliminate gaps
There are three ways to eliminate gaps between the pipe and the roof:
Special apron
, which performs protective properties. It can be purchased at a specialty store or built.
Stainless steel passage
. It is thrown over the pipe itself, after which the joint that appears must be closed with a clamp.
The joint is covered with a rubber clamp
Silicone sealant
. Best suited in cases where the gap is small.
Depending on the materials, sealing methods also change. For example, sealing a pipe on a metal roof is only possible with the installation of an apron. In some cases, depending on the roofing material, individual sealing methods may be used.
This might be interesting!
In the article at the following link, read about waterproofing under metal tiles.
How to arrange a pipe outlet
Let's consider how the pipe should be routed through the metal tile so that the risk of leaks at the junction areas is minimized.
Rectangular outlet
The organization of rectangular, in particular, and square output is carried out in two stages:
- installation of the internal apron before installation of the coating begins;
- installation of an external decorative and protective element after completion of the roof covering.
Schematically, installation of the output can be reduced to the sequential implementation of the following steps.
- Find out the location of the upper edge of the inner junction strip by attaching it to the chimney wall.
- Along the marked marking line, for example, using a grinder, make a groove with a depth of at least 150 mm. The groove should have a slight upward slope. At the end, it is cleaned well, it is advisable to even rinse it with water.
Attention It is imperative to inspect the rafter system, since due to a leak, the wood may begin to rot or fungus may form on it, but, say, the new roofing material will weigh quite a lot.
- The connection strip is first installed on the side of the chimney, on the eaves side, then the other three are mounted: on the sides and at the top.
- The planks are laid with an overlap of 150 mm and the edges are filled with silicone sealant. They are fixed using roofing screws.
- To form a “tie” through which water will flow, a metal sheet is placed under the bottom of the apron. It is directed either directly into the gutter or into the valley.
- Remove the waterproofing and, lifting it approximately 50 mm onto the chimney wall, secure it with special heat-resistant tape. This ensures additional reliability of the junction unit.
- After installing the coating, an external apron is installed, which is more necessary for decoration than protection.
- It is installed in the same way as the internal one, only the pipe walls are not tapped to secure the outer planks. In fact, the lower apron, bypassing the pipe with metal tiles, is sandwiched between its layers, preventing moisture from getting under the roof.
Round (oval) outlet
Providing reliable junction protection for a round exit is a more difficult task. Therefore, a special element was developed - the chimney passage. This is a combined element, which includes a flat steel base and an elastic cap on the chimney pipe. Transitional diameters are marked on it. The passage components are hermetically connected to each other.
Additionally, we recommend studying: The passage of a chimney through a wall.
The caps are made from EPDM rubber or silicone, which have increased heat resistance. Silicone can be used at temperatures from minus 75°C to plus 260°C, from EPDM - minus 55°C to plus 135°C. Thanks to their elasticity, the junction is reliably insulated. For greater effect, it is recommended to select a ring on the passage hood that is smaller than the cross-sectional diameter of the pipe by about 20%, and cut it at this level.
Advice Pass-through elements are also suitable for arranging any part of a circular cross-section that is exposed to the roof, say, ventilation.
The process of installing the passage is performed in the following order:
- It is necessary to cut a hole of the appropriate diameter on the roofing.
- After wetting the element with liquid soap, it is pulled onto the pipe.
- The sealing element is given the shape of a metal tile by pressing against the base.
- To fix the element, use self-tapping screws, after applying sealant under its edges. The screws are placed at a distance of 35 cm from each other.
Advice
If desired, you can make a passage element for metal tiles yourself. However, it must be taken into account that the roof cutting performed in this way must comply with all building codes and regulations
Chimney removal technology
Despite the fact that metal tiles are successfully used today on both ventilated and non-ventilated roofs, in order to correctly understand all the intricacies of installation, it is better to consider the most complex case of chimney outlet equipment. In this case, the chimney exits through an insulated roof with a layer of steam and waterproofing.
Arranging the passage of a steel pipe through a steel roof
Modern chimney designs today practically do not use simple thick-walled pipes. Steel pipes, to which thermal insulation is attached manually and secured with wire or metal ties from the outside, have been replaced by sandwich structures with fire-resistant insulation between the outer and inner metal parts.
Such pipes are much more efficient than simple steel pipes. They are lighter, they have standard fastenings and are easily connected to each other. In addition, the multi-layer insulation design does not allow condensation to form, which significantly extends the life of the chimney.
Installation of such a chimney is carried out in the following sequence:
- Markings are made at the intended installation point of the chimney pipe;
- A hole with a diameter of 4-6 mm is drilled, and the accuracy of the selected installation location is determined using a metal probe;
- If necessary, adjustments are made and the installation location is specified;
- Using a jigsaw or grinder, a hole is made in the metal tile that is 3-5 mm larger than the diameter of the pipe;
- The insulation layer is disassembled, a hole is carefully cut out in the waterproofing, it is made exactly according to the diameter of the pipe;
- A cut is made in the OSB layer of the board or sheathing boards;
- The next step is to install a silicone cap under the insulation with a cut hole that is 2-3 mm smaller than the pipe diameter;
- A metal pipe with a sandwich filler is being installed;
- The membrane is removed from under the metal covering so that it extends 1-2 mm out between the pipe and the tile;
- Using heat-resistant tape, the membrane is glued to the outer plane of the pipe;
- A silicone cap with a cut hole for the pipe is placed on top of the pipe (it is recommended to moisten the outer surface with liquid soap before this, this will improve the sliding of the silicone on the metal);
- Before you start fixing it on the metal tiles, it is fixed to all surfaces using silicone;
- Using a flexible metal rail and self-tapping screws, the cap is fixed to the profile.
When arranging a chimney pipe during construction work, it is recommended to calculate the material so that the chimney pipe is located at the junction of two profile sheets. This option makes it possible to better install all structural elements from the membrane around the pipe to the metal rim of the cap.
Passage of a brick pipe through a metal tile
Unlike a metal pipe, brickwork has a slightly different output equipment technology. Here the pipe must be erected before the construction of the truss structure begins. At the passage point, the rafters are fixed at a distance of 20-30 cm from the brickwork. To avoid fire, the pipe is wrapped in foiled basalt wool.
After installing the insulation on the rafters and covering it with a membrane, an internal apron from the kit for lining the roofing material is installed on the masonry. After this, a cut is made in the brickwork at a height of 100-150 mm above the level of the coating surface with a grinder along the entire perimeter to a depth of 100-150 mm. The surface of the masonry is treated with a water repellent.
Passage of a brick pipe through a metal tile
Attention: the groove must be as level as possible and at an angle, this is done so that the metal plate goes into the brickwork and the water flows down.
Next, the work algorithm is as follows:
- The junction strips are marked, cuts are made on them and the strips are bent to the size of the brick pipe;
- The bottom bar is installed first, then the side bars, and lastly the top bar. The installation is done in such a way that the bend extends as far into the masonry as possible;
- Before fixing the slats, the groove is filled with silicone;
- The planks are fixed with roofing screws;
- A metal screen is installed on top to drain water;
- Next, thermal insulation of the roof and waterproofing material are laid, which is fixed to the brick with silicone or liquid nails;
- Next, the covering is installed, while the lower and side parts of the contour should be above the metal tile, and the upper segment below it;
- After laying the metal tile sheet, the upper edge is installed. Its main task is to protect the brick from the influence of the snow cap and cover the joint between the brick and the metal.
Chimney apron for metal tiles
For lining rectangular structures, and even round and even oval standard sizes, manufacturers offer entire sets of elements that allow you to easily design a chimney.
As such additional parts, both solid elements and prefabricated elements consisting of several parts are used. Solid elements exactly repeat the profile of the chimney, so that the exiting pipe or masonry is tightly fixed in the hole. Prefabricated elements allow you to select elements and make a contour based on the individual dimensions of the chimney.
For round elements, it is most effective to use a metal apron with a silicone cap. This makes it possible to reliably seal the joint between the cap and the pipe by pressing soft silicone between two metal plates.
Bypassing the pipe with metal tiles
The easiest way to bypass a chimney pipe with metal tiles is to start roofing work from the pipe itself. Using several sheets of small metal tiles will help make the work easier. This option can be used when the pipe passes through one of the roof slopes. The roof around the chimney is arranged in small sheets, and the rest of the surface is covered with sheets of longer length.
Before cutting the sheets, it is recommended to make markings from sheets of cardboard, this will make it possible to ensure the accuracy of the cut and the tight fit of the metal to the brickwork.
It is recommended to proceed similarly with a round or oval pipe. Before placing a round pipe under the metal tile, it is worth calculating the waveform at the junction of the metal tile sheets in order to correctly fix the apron and cap.
Output location
The reliability and tightness of the roofing pie depends on the correct choice of the outlet of the chimney and ventilation ducts through the roof. The finishing of the joint depends on the location of the passage. If the roof is made of profiled sheets, the pipes are installed in the following places:
- On a ridge. The ridge of the structure is considered the most advantageous place for the pipes to exit. This arrangement eliminates the formation of snow pockets and condensation, reduces the likelihood of leaks, however, it violates the integrity of the ridge beam. If a chimney or ventilation duct is discharged through a ridge, then the joint between them and the roofing material is sufficient to fill it with silicone-based sealant and then cover it with a decorative apron.
- At a distance of 50-70 cm from the ridge. This arrangement is considered advantageous, as it minimizes the formation of snow pockets and prevents leaks. When the chimney is brought out at such a distance from the ridge, the rafter structures are not disturbed. To protect the joint between the pipe and the roofing material, elastic penetrations and additional elements are used to assemble the apron.
There is a simple rule: the lower the pipes are located along the roof slope, the more effort it takes to waterproof the joint between it and the roofing pie.
Source
Connection of corrugated sheeting to a chimney pipe with a rectangular cross-section
Currently, manufacturers have made sure that the junctions and joints between some elements of the roofing structure are reliably protected from the penetration of precipitation. For this purpose, additional elements are produced for the valley, ridge and abutment areas. The same additional materials are also available for sealing the gap between pipes passing through corrugated sheeting. And this element is called an apron.
The main purpose of the apron is to collect all the water flowing down the stove chimney and along the roof slopes, and divert it to the eaves into the drainage system. But there is one very important point in the installation process of installing an apron. It is necessary to carry out waterproofing correctly
Everyone knows that a waterproofing film must be installed under the corrugated sheeting, and it does not matter whether the roof is insulated or not. So, in the place where the pipe passes through the roofing structure, it is necessary to make a cut for the installed chimney, leaving the edges of the cut 50-100 mm wide, which will subsequently be fixed to the pipe itself
But that is not all. A reinforced waterproofing layer is required at the junction points. Therefore, most often a special waterproofing tape is installed under the apron. In addition, it should be located under the upper strips of the apron and lie partially on the corrugated sheet. In essence, you get double protection. The waterproofing installation scheme is as follows:
- First it is applied to the lower edge of the chimney.
- Then the abutment joints on the sides of the pipe structure are sealed.
- And the last one is the upper edge closest to the ridge of the roof.
Situations often arise when it becomes necessary to install a stove chimney through an already erected corrugated roof. It’s not difficult to do this today, but there is one caveat. It is necessary to make the hole (passage) in the corrugated sheet smaller than the size of the pipe by approximately 1.5-2.0 cm. It is clear that the chimney will not fit into such a passage, so the edge at the corners of the hole is cut and bent. After installing the chimney, these edges are tightly applied to it and secured. This is another protective barrier against leaks. In this case, under the corrugated sheeting itself, be sure to lay the lower strip of the apron and a waterproofing tape on top of it.
Let us add that the complexity of constructing a waterproofing barrier depends mainly on where the pipe is installed.
Sealing by arranging a box
There is a method of sealing by arranging a box.
- Leave a distance between the edge of the cut roof and the pipe in accordance with fire safety standards.
- Treat the adjacent edge of the roof to the chimney and the chimney itself with heat-protective material.
- A box made of galvanized steel or corrugated sheeting is installed in this area. Cut strips up to 40 cm must be sheathed around the perimeter and the angle of inclination of the slope.
- The elements of the box (collar) are overlapped and soldered.
- When the roof slopes at an angle of more than 30 degrees, a metal outlet is installed to drain rainwater around the chimney.
- Fill the space between the pipe and the box with thermal insulation material. You can use basalt wool.
The principle of arranging a passage with thermal insulation materials is applicable to a chimney on a slope and a ridge with minor differences. The installation of a chimney along the ridge involves changes to the design of the rafter system.
The roofing deck is covered with roofing felt, overlapping the pipe walls, and the apron is installed, followed by filling the gaps between the apron and the wall with polymer sealants.
Connecting the roof to a round pipe
In the private sector, ventilation or chimney outlets are also common using round pipes. Most often this concerns a sandwich (insulated) heating pipe. It would seem that a solution with a hermetically sealed connection to a round pipe is much simpler and does not require professional installation skills. In addition, in any construction market there are ready-made materials for insulating the joint between the chimney pipe and the roof. The most popular and almost the only ones are Master Flash roofing penetrations with a wide range of sizes and colors. Simplicity of installation, versatility (suitable for different types of roofing) and affordable price have long made this material “national”.
The Master Flash seal consists of heat-resistant corrugated EPDM rubber and an aluminum base. Another advantage of the material is the ability to install it on already installed pipes, which is very convenient in case of quick roof repairs (for example, when fixing a leak or replacing roofing material).
Installation is as simple as the material itself.
Installation Master Flash
It is necessary to lubricate the junction of the Master Flash base with the roof with roofing sealant, and then secure the sealant to the surface using roofing screws. However, as practice shows, after some time the tightness of the junction begins to gradually deteriorate. This is primarily due to the quality of the sealant and atmospheric phenomena (temperature changes, gusty winds, rain or snow can disrupt the tightness of the connection).
In order to maximally protect the roof from leaks in roof assemblies with a round pipe, it is recommended to partially “wind” the upper part of the penetration under the roofing material or ridge strip.
Installing Master Flash next to the ridge
In this way, you can reliably install the junction of the pipe and the roof.
Arrangement of an apron made of aluminum tape
The second method of sealing a pipe is done by installing an apron made of aluminum tape. You should go around two layers of aluminum tape around the perimeter of the pipe, so that part of the tape is buried in the gap between the pipe wall and the roofing. What can I cover it with? It should be covered with bitumen mastic followed by gluing the tape. The lines connecting the apron to the pipe are fixed with a metal profile and covered with a waterproofing film.
Bypassing the pipe on the roof with corrugated sheeting can be done by arranging an apron using adjacent lower sheet strips. The installation principle boils down to organizing the first plank to the side wall of the chimney and fixing the upper level mark. A fine is made at the mark, followed by filling with sealant. The next work process is the organization of a metal tie with the arrangement of sides along the edge to drain water. Then the tie is attached to the top edge.
To ensure high-quality corrugated sheeting around the pipe, it is necessary to make a sheathing. It will ensure reliable fastening of the lower junction strip and the edge of the corrugated sheet along the walls of the chimney.