December 4, 2021 Stroyexpert Home page » Foundation » By construction project
The process of attaching joists to the foundation
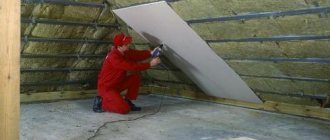
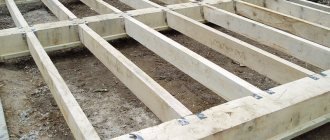
Having completed the installation of the foundation of a house of one type or another, you can begin installing the floors of the first floor. They are based on wooden beams or rounded logs laid horizontally directly on the base of the house. It is possible to do such work with your own hands only after carefully studying all the features of the process.
Frame and floor joists in a frame house
Strapping and floor joists in a frame house
The construction of a frame house is a responsible process, each stage of which is of great importance for obtaining a positive result as a whole.
Failure to comply with certain building rules, non-compliance with technology and consistency during installation can lead to big problems and significant financial costs in the subsequent operation of the entire structure. The correct sequence of installation of the piping largely depends on the type of foundation. Let's consider the process of performing the lower piping using the example of a pile (metal, reinforced concrete piles) foundation. Due to the speed of construction, long service life and affordable price, this type of foundation has become widespread.
Types of strapping, materials and design solutions
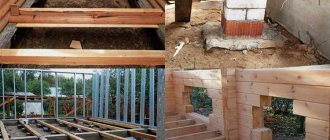
The bottom trim can be structurally made of timber, solid boards or logs. Since the wood from which the bottom frame is made will be subject to significant loads during operation, it is worth selecting high-quality material for its creation.
It is better to give preference to softwood lumber (pine, spruce, fir, larch), since the presence of natural resinous substances in the wood creates an additional barrier to the processes of decay, the formation of mold, mildew and reduces its hygroscopicity. Also, the availability and relatively low price of these wood species are an additional criterion for purchase.
Fig.1 Coniferous trees
Let's take a closer look at the types of strapping:
- When using timber, unplaned lumber of various sections is used (150x150mm, 200x150mm, 200x200mm). This lumber has strict dimensions, it is easier to install, and its large cross-section provides load-resistant support. At the same time, it is susceptible to cracking and warping.
- In plank tying, such defects are largely prevented. A solid board withstands loads well over time and provides good flatness; the shrinkage process is compensated by the multi-layer structure. The board is also suitable for various sections (150x50mm, 200x50mm).
- The use of logs as a material for strapping reduces costs, the log can withstand significant loads, and its large mass helps to increase the stability and reliability of the entire structure. The disadvantages are the incorrect geometry, the complexity of installation and fastening to the foundation. This type of strapping is practically not used.
Correct installation - reliable design
The bottom trim is a necessary element to create a reliable connection between the foundation, walls and floor joists. It is also necessary for the construction of a level platform, acceptance and uniform distribution of the entire load from the house structures.
During installation, certain rules should be followed:
- waterproofing is first laid on the foundation elements;
- the timber (board) must be calibrated with great accuracy and selected in size;
- treatment with antiseptics is required to prevent the material from rotting;
- the harness must have a strictly horizontal plane to avoid uneven load;
Step-by-step arrangement of timber strapping (150x150mm).
1) The strapping beam is cut to size in accordance with the foundation strapping plan. Then each beam ends up in its own knot.
Fig.2 Connection nodes of the strapping beam
2) Next, the beam is laid out on the foundation and the diagonal dimensions are checked.
3) All units are fastened together (nails 150-200mm).
4) And finally, the strapping is fastened to the foundation (to the pile head). Anchor bolts or threaded rods are used as fasteners.
Fig.3 Timber strapping on a pile foundation
Step-by-step arrangement of strapping made of cohesive boards (50x150mm).
1) Assembling the bottom frame from boards begins with the perimeter (outer boards). The boards are sawed down in accordance with the strapping plan, the ends are connected to each other with nails.
2) After laying the outer boards on the foundation, the diagonal dimensions are checked.
3) Next, the remaining boards are assembled. Each board is sawn to size and ends up in its own knot. All boards are connected to each other with nails.
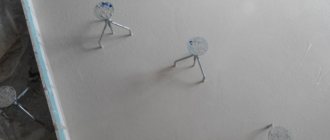
4) For greater strength, the boards are tied together with pins.
Fig. 4 The main connection points of the plank strapping
5) The strapping is fastened to the foundation (to the pile head). Anchor bolts or threaded rods are used as fasteners.
Fig.5 Plank strapping on a pile foundation
Floor joists: materials, features of work
Floor joists are used to organize and install the subfloor, finishing coating and insulation. They are longitudinal beams of a certain size, made of various materials. The most applicable are wood logs. For wooden logs when building a frame house, you can use coniferous wood (pine, spruce, fir, larch). The log wood should not have visible defects, delaminations, transverse cracks or a large number of knots.
The dimensions of the timber (50x150mm, 100x150mm, 50x200mm, etc.) and the pitch between them depend on the span of the bottom trim, the load and the size of the insulation.
If you are planning to build a house on your own, then beam calculators will help you, where you can choose the optimal dimensions, pitch and material of the beams.
A prerequisite for installing the log system is their location in the same plane, which is checked with a control rail. It is also desirable to treat with an antiseptic to prevent the material from rotting.
There are several options for attaching the log to the bottom trim:
1) Supported by a block. A block located in the lower part is attached to the harness, on which the end of the log rests. With this method, additional fastening of the log to the frame is necessary, since the block is only a support and does not create a connection with the beam.
2) Using metal plates and corners. In this case, there is a reliable connection between the end of the log and the strapping beam, but there is no support from below, the log “hangs” on the metal part.
3) Installation on top of the harness with direct support on it. This method allows you to reliably connect the log with the harness, creating high-quality support and connection. In this case, the installation of wall frame racks will require an additional tie on top of the joists.
In practice, the third method is most often used, or the first two are combined - using a support bar and metal connecting elements at the same time. This maximizes the connection between the joists and the frame, allows you to more accurately maintain the plane of the subfloor and simplifies the process of installing the joists.
Step-by-step installation of floor joists (50x200mm).
1) Based on the floor plan, installation of facade or end boards is carried out (serve for fixing the logs in a vertical position and marking the position of the logs). The boards are installed on edge and aligned along the outer edge of the trim.
Wood selection
Unplaned boards or timber made of deciduous or coniferous trees can be used under the logs.
Coniferous trees are cheaper, the most affordable are spruce and pine.
Coniferous timber
This material has sufficient strength, but is more susceptible to the destructive effects of a humid environment than hardwood. It would be justified to use pine needle material in heated, dry rooms.
Hardwood flooring is more expensive due to the higher price of the material. But a structure made from such wood has good biostability and is much better resistant to rotting processes.
The main disadvantage of this material is its low bending strength, so it is necessary to use logs made of deciduous trees with caution when large loads on the floor are planned. It is not recommended to use soft-leaved trees - linden and poplar.
Siberian larch combines all the beneficial properties for lags. This coniferous tree is not afraid of moisture and has good strength, which only increases over time. Even when building materials from Siberian larch are used in a bathhouse, the structure will last for several decades without loss of performance.
Siberian larch timber
Higher costs for such material are paid off due to its durability.
Wood moisture content
An important parameter of wood used in construction is humidity. It should not exceed 20%, the optimal value is within 12%.
There are several ways to determine the degree of saturation of wood fibers with water.
Visual method
The simplest, but not accurate, methods for determining the moisture content of a material can be:
- by sound when struck with a hammer: dry timber is louder;
- milling timber: when drilling, material that is too saturated with water leaves a wet halo around the hole, if it is overdried it smokes, but with normal humidity there are no traces left.
- removing thin shavings with a plane: the shavings of raw wood crumple, while those of dried wood, suitable for use, break and crumble.
- chemical pencil - on too wet wood, a line drawn with a pencil along a fresh cut will turn blue.
Knowing the type of wood, experienced carvers can determine the degree of its saturation with moisture by color, weight or transverse and longitudinal cracks.
Defective timber with high humidity
Calculation method
This method is based on weighing a test section of timber, before and after drying. The algorithm is as follows:
- At a distance of at least 30 cm from the end of the block, a segment up to 2 cm wide is cut out.
- The thoroughly cleaned section is weighed on an accurate scale, with an error of up to hundredths of a gram, and the resulting value is recorded.
- A piece of timber is placed in a dryer (chamber or oven) with a constant temperature within 100°C.
- After 5 hours, the sample is weighed and the result is recorded.
- Subsequent measurements are taken at intervals of 1-2 hours until there is no change in weight readings.
Next, the absolute humidity of the material under study is calculated using the formula:
W = (m – m0) × M0 × 100%,
where m and m0 are the mass of the test section before and after complete drying, respectively.
Using an electronic device
For instrumental, most accurate determination of wood moisture content, electronic moisture meters are used.
They can take measurements of any type of wood in various conditions. The principle is based on the dependence of the electrical conductivity of the material on the degree of saturation with moisture.
Needle moisture meter for wood
Contact (needle) and non-contact moisture meters are more often used in everyday life.
In the first version, the needles of the device are inserted into the wood and the moisture content is measured at this point, the readings are displayed on the indicator. Using the temperature correction table, updated wood moisture content results are determined.
Non-contact moisture meters analyze the dielectric constant of wood, based on which the percentage of moisture it contains is determined. The readings of these devices are not affected by the temperature of the wood and the surrounding air, so temperature correction is not required.
Using in practice knowledge about the moisture content of the timber from which the base for the floor is mounted is very important. Wood dried to normal values has significantly higher performance qualities:
- strength;
- resistance to decay;
- durability.
Structures made from damp wood create a greater likelihood of subsequent deformation, which can lead to damage to the flooring.
Floor deformation on wet timber
How to make a subfloor in a wooden house - instructions for creating
Every person knows that it is not possible to live fully in an apartment or house without a furnished floor. It is simply necessary. Is it worth doing it in a wooden house? This is a question that worries many. Their logic boils down to the fact that why spend money on an additional subfloor, it might be easier to just lay a finished floor right away. Everything is ambiguous here.
You can, of course, get by with a clean one, but in this case you won’t be able to get a reliable and beautiful coating. But the main thing that a floor should stand out for is reliability, strength, a flat surface, as well as some other parameters, which are extremely difficult to achieve without a subfloor. Changing the finished floor every year if there is no rough floor is an unaffordable luxury.
Secrets of each type of fastening
Sometimes metal corners are used for fastening, but they are not fastened as shown. Shown is a corner that can be attached to the vertical surface of the foundation, and logs can be placed and secured on the horizontal part of the corner. The image shows a stiffening rib, which makes the corner’s resistance to bending force on the horizontal plane more reliable.
For fastening to the foundation, the corner has a sufficient number of holes of different diameters. Fastening in this way will be reliable if the total cross-section of all fastening elements (dowels, screws, nails, etc.) can ensure their shear strength. After all, these elements will be subject to transverse force, and not a single specialist can tell by eye how many fastening elements will ensure reliability.
Before using this method of fastening, you should calculate the load acting from the corner along the wall on the fastening elements. This will be the shear load. Then it is necessary to determine the total cross-sectional area based on the permissible shear load that the metal of the fastening element (for example, a dowel) can withstand. Knowing the diameters of the dowels, we determine the cross-sectional area of one element and then their required number.
A columnar foundation is shown, and image 6 shows one of its elements in the form of a drilled pile. It consists of an asbestos-cement pipe (1), in which reinforcement (2) is walled up in concrete (3). The pipe itself is located in the well (4).
The latest versions of columnar foundations consist of columns that are directly screwed into the ground like a drill. If beams are supposed to be placed on the posts, then metal plates are placed on them. For fastening plates in pipes, you can use, for example, anchor bolts. In this way, you can connect the pipes with wooden beams, to which you can then easily attach logs.
Shown is another possible option for a columnar foundation. The columns (1) are connected by reinforced strapping (2). If the columns are connected in this way along the perimeter and inside it, for example, along the width of the structure, then nodes can be attached to them in the same way as to the strip type.
Each type of beam fastening must correspond to the type of foundation so that the foundation is a reliable and durable support for the entire building structure.
Wooden subfloor on joists
In a wooden house, the installation of a subfloor on joists is practically no different from its installation in monolithic or brick houses. The main difference is in the fastening of the lags.
Attaching the log
Floor joists should not be attached to a wooden wall, and there is no need to crash into it. It is advisable to fasten the logs to the base or grillage of the foundation, retreating from the wall a few centimeters. At the same time, the distance of the support that falls on the foundation must be maintained at least 10 cm on either side of the log.
Before laying the logs on the foundation, you need to lay the bottom frame, made of long thin boards, to which the logs will be attached using metal anchors (corners).
The logs should not be rigidly attached to the frame - they only need to be fixed so that they do not move while laying other layers of the subfloor. The created structure will have a distance of several cm from each wall, where thin insulation can be installed.
If the distance to the foundation is less than 10 cm, then it is better to crash into the walls, but you will need to first lay the logs on the foundation, and then attach a log or timber to them. Measure the contour of the cutout and then cut out the necessary grooves in the wood with the dimensions required for the support distance (for subsequent expansion of the lag, approximately 2 cm should be added).
We must not forget that the laying of beams and joists is carried out on the plinth or grillage only after laying the waterproofing layer.
The standard step between the lags is 40-60 cm. However, its choice depends on the width of the insulation, as well as the direct load. The cross section of the log is also selected from the actual load. For a light section, choose 15×10 cm, for a medium one – 15×15 cm, for a heavy one – 15×20 cm.
If the beam has a small cross-section and the load is significant, then it should be placed at a distance of 30-40 cm - this is a fairly optimal option.
Installation of subfloor on joists
Once the installation of the joists is completed, the standard installation of the floor on the joists is carried out. It looks like this:
- The cranial bars are being attached. They have a small cross-section (about 4x4 cm), they are attached to the side at the bottom of the log. Also, the skull blocks can be replaced with boards that are wider than the joists on each side; they are nailed along the joists or from below.
- Subfloor boards are laid. Laying is carried out on cranial bars, but they are not fastened, leaving them to lie freely, since their function is to hold the insulation.
- Waterproofing. It is laid over the boards and joists of the subfloor so that the waterproofing can fit around them. The waterproofing is laid in such a way that it extends onto the walls at the level of the future floor. It is advisable to use film waterproofing and fasten them using a stapler.
- Ventilation. To create a ventilation gap along the joists, counter battens are nailed on top of the vapor barrier.
- Board covering - here you can use boards, OSB and chipboard sheets. The floor, like the joists, should be limited from the wall by a gap of 2 cm, where insulation can be placed.
Location
If the thickness of the board is at least 50 mm, in this case the logs are laid at a distance of one meter from each other. However, in private housing construction, 40 mm boards are more often used; in this case, the logs are placed in increments of 70 cm. Many people are interested in the question of how to make the structure reliable and the loads accurately distributed? Here it is important to maintain the exact distance between the lags. The first board is laid no further than 25-35 cm from the wall.
Distance
The main rule that must be followed if you want to perform correct installation is location. The logs are laid perpendicular to the floor boards. If boards in two layers are used to create a structure, then the top one is laid “cross” to the bottom one.
Installation of logs in different rooms is carried out differently. If the installation is carried out in the living room, then the floor boards are installed in the direction of sunlight. In this case, the logs themselves are mounted in a transverse position. But for rooms where there is a lot of traffic, floor boards are laid in the direction of movement.
Distance table
Plywood subfloor
A plywood floor will serve reliably for a long time. It has high strength. Plywood can even be used for the final floor covering, since if it is carefully sanded and varnished, it will look quite noble. However, it is more often used as a base for covering laminate, parquet and linoleum.
Plywood can be laid:
- On a cement base, but it is necessary to ensure that the base is even and horizontal, or to use adjusting posts.
- Fastening on logs. Here the difficulty is in placing the joists to ensure that the joints of the sheets fall on them. The logs must be positioned so that their upper surface provides one horizontal plane. Utility lines are hidden in the joists, insulation and sound insulation are installed.
Some benefits
Lag installation diagram.
Laying the floor on joists has the following technical features:
- Thanks to the free space that forms the log, communication can be carried out.
- It is possible to raise the floors to the required level or level them.
- The floor finished with lag is distinguished by its structural strength. The beams can withstand up to 5 tons of weight.
- Installation does not require any special skills in the construction industry. You only need tools and accessories.
- Logs are characterized by their low cost. If you plan to do the installation yourself, you will save money.
What is lag? These are beams made of wood or polymer that are laid on a finishing surface. The versatility of such a beam is determined by the fact that it can be mounted on a wooden, reinforced concrete and earthen base.
What are the joists made of? The log is a beam that is made of metal, wood, plastic, reinforced concrete. However, wooden ones are especially popular.
Concrete subfloor
Concrete flooring is considered the most reliable and durable. It is smooth and durable, representing an ideal surface for any floor covering. In addition, in a wooden house, the concrete floor is resistant to destruction.
Among the disadvantages is that it is very cold. However, this problem can also be solved - through thermal insulation materials.
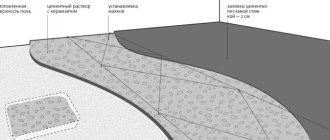
Types of concrete floors in a wooden house:
- Laying on the ground;
- Laying on joists;
- Concrete screed over wooden floor.
- We determine the floor horizon by marking it with marks (you can pull the cord).
- Pegs are driven into the ground, approximately below 10 cm, and gravel is poured over them. It must be compacted and the pegs removed.
- The next layer is filled with sand and compacted as well.
Pouring concrete over soil
Concrete flooring with joists is most often used when repairing a wooden floor and replacing it with a concrete one.
The soil between the joists is initially cleared of dirt and debris. Gravel or sand is poured into the space between the joists, after which the bulk material is thoroughly compacted. Next, an insulating layer is made, after which concrete is poured. The floor needs to sit for several weeks to dry. After this, a leveling screed is performed. In general, the pouring technology will be similar to pouring concrete on the ground floor in a wooden house.
Source: www.pol-comfort.ru
Floating screed technology
The traditional screed is poured in strict adherence to the sequence of laying each layer - this will be the key to a reliable and durable structure.
Base Layers
Stage 1: preparation
At the preparatory stage, the fertile layer, which is unsuitable for compaction, is removed. The roots of plants located inside the perimeter of the strip foundation are also removed.
The soil is removed to a depth in accordance with calculations. Then the base is compacted, on which a cushion of sand and crushed stone will be formed. Their high-quality compaction guarantees a stable base geometry and no shrinkage of the future structure.
Thickness of fertile soil layer
First, a layer of sand 10 to 15 cm thick is laid and compacted using a vibrating plate. Then the soil is spilled from a hose with a sprayer and compacted again, changing the direction of movement of the vibrating plate.
Backfilling and compacting the sand layer
To compact the base, sand and crushed stone layers, you can use a homemade device: a beam with a cross-section of 20 x 20 cm and a height of 1.5 meters or a metal pipe with a piece of channel 20 x 30 cm at the bottom, welded in a T-shape. Sand is poured inside the pipe to make the device heavier.
Homemade device for compacting sand and crushed stone
After the compacted base has dried, the next day, the sand layer is backfilled and compacted. It is advisable to step on the prepared base as little as possible. The sand is compacted thoroughly.
Stage 2: footing
Before pouring the main volume of mortar, it is advisable to make a footing. There are several options for its manufacture - it can be compacted crushed stone, spilled with bitumen or a rough screed. Waterproofing material can be laid on crushed stone, forming a kind of trough. In any case, regardless of the chosen material, the essence of the concrete base does not change.
Manufacturing of concrete footings
The purpose of this layer is as follows:
- Economical consumption of the solution is achieved due to its uniform distribution over the leveled base.
- It’s more convenient to work on a level surface - to apply markings, install beacons, assemble various structures.
- The footing creates a waterproofing layer that prevents the loss of moisture from the solution. This ensures uniform drying of the screed and prevents the formation of cracks on its surface.
- If groundwater is close, the footing does not allow moisture to pass upward into the main layers of the floor structure.
Unlike traditional and semi-dry screed, this method does not require time for the coating to dry and gain strength. The decorative coating can be laid the very next day.
Preparation is carried out as described above and consists of a cushion, a rough screed and a layer of waterproofing. Then technology changes.
Table 2. Dry screed installation technology
| Illustration | Description |
| Beacons-guides made of metal profiles are fixed on the floor surface. | |
| Expanded clay or a special thermal insulation backfill is poured between the beacons and distributed evenly using a rule. | |
| Gypsum fiber sheets are laid on top in two layers using an adhesive solution. | |
| The sheets are laid with seams staggered and additionally secured with self-tapping screws. |
Attaching joists to a concrete floor: section answers to readers' questions
Hello again and thank you very much for your detailed answer regarding puttying cracks in concrete. I have done this work, now I am starting to insulate the floor. And again I had a question: is it necessary to attach the joists to the concrete floor or can I just assemble the lattice and fasten it with rough flooring? In my case it's plywood.
If necessary, how is this done correctly, and what fasteners are best to use?
Hello, Ivan. We are glad that we helped you, we will try to help you again.
Let's see what consequences can result from a reluctance to follow technology when installing a floor along joists on a concrete base.
Beams as they are
Floor beams are currently represented by a fairly large list of different products. The simplest option is a timber beam of regular rectangular cross-section, determined based on specific construction conditions.
A more complex type of floor joist, which requires a lengthy manufacturing process, is I-beams with a cross-section in the form of the letter H, placed on one of the sides. They are made from high-quality dried and planed wooden blocks and strips of OSB or high-quality moisture-resistant premium plywood.
The operating principle of I-beams in the form of floor joists involves the distribution of the main forces in the form of bending loads along flat stiffeners. Thanks to this, with a small mass, they are able to withstand very heavy loads. In addition, manufacturing technology and strength make it possible to produce I-beams for openings with a width significantly exceeding the standard 6 meters.
Laying logs on the foundation is carried out according to certain rules, which will be discussed later. Immediately before installing lumber, it is necessary to properly prepare it for further use. You should choose high-quality bars made of oak, aspen or coniferous wood. The main requirements for them are as follows:
Why do joists need to be attached to a concrete floor?
The opinion that fixing such wooden elements to a concrete base is an optional procedure occurs quite often. It is argued that fasteners violate the strength of concrete and reduce noise insulation between floors.
In fact, none of this happens if the installation instructions are strictly followed during the work. But such a decision can very well lead to negative consequences.
Advice. If you are not sure that the moisture content of the purchased wood is less than 20%, then let the beams lie in a dry and warm room for several days. If they begin to bend, it is better not to use such material.
- If the logs are not secured, then all elements of the system will “walk”, shifting relative to each other. Such displacement is usually accompanied by knocking, creaking and other unpleasant sounds.
As a result, you either have to redo all the work or put up with what happened.
Features of carrier tape
The principle of constructing a strip foundation is to manufacture a horizontal rigid frame, the purpose of which is to distribute uneven deformations of the base.
Table 1. Method of creating a strip foundation
| Illustration | Description |
| In accordance with the building plan, on a cleared and marked site, a trench of the required depth is dug along the contour of the load-bearing walls. Sand and gravel are poured and compacted into the bottom of the trench, forming a cushion. | |
| The formwork is being placed. A thick polyethylene film is laid inside the structure to protect the cushion and formwork boards from liquid mortar. | |
| Reinforcement is laid inside the formwork. | |
| Concrete solution is poured. |
In the future, the foundation walls must be insulated, especially if the house is built of brick or aerated concrete. The soil around the house will not freeze if extruded polystyrene foam is laid under the blind area 1.5 m wide. If we compare a prefabricated strip foundation made of reinforced concrete blocks and a monolithic one, then the second option is much more resistant to loads and deformations due to soil mobility.
Prefabricated structure
One thing that can be said in favor of a prefabricated strip foundation is that its assembly is much faster than pouring a monolith. Reinforcement and cement mortar are used to connect the blocks. If the soil is sandy and the building is one-story, then cushion blocks do not need to be laid. Another advantage is that such a foundation can be built at any time of the year.
Insulation of the blind area and internal space
The advantages of a floor on the ground with a strip foundation include the following:
- High-quality backfill and waterproofing reliably protect the premises from the penetration of subsoil gas.
- The absence of an underground floor does not require work to organize ventilation.
- The concrete slab and soil can accumulate heat. This is especially true if the house is built using frame technology and has a small wall thickness.
- Concrete screed allows you to install a “warm floor” system.
- Communications laid in such a floor require minimal insulation.
How to fix joists correctly
Before attaching the elements, it is necessary to install waterproofing using either dense film materials or special hydrophobic mastics.
Advice. It is also advisable to treat the logs themselves with antifungal impregnations and fire retardants.
Grill assembly
In addition to the tools that you will need for DIY installation, we advise you to immediately stock up on substrates for leveling. These are plates made of hard material that will not sag over time due to the weight of the floor.
You can use thin wooden planks, pieces of plywood and fiberboard. But it is better to purchase special plastic wedges.
Now about how to lay joists on a concrete floor:
Source: concrete-house.com
BEAMS AS THEY ARE
Floor beams are currently represented by a fairly large list of different products. The simplest option is a timber beam of regular rectangular cross-section, determined based on specific construction conditions.
A more complex type of floor joist, which requires a lengthy manufacturing process, is I-beams with a cross-section in the form of the letter H, placed on one of the sides. They are made from high-quality dried and planed wooden blocks and strips of OSB or high-quality moisture-resistant premium plywood.
The operating principle of I-beams in the form of floor joists involves the distribution of the main forces in the form of bending loads along flat stiffeners. Thanks to this, with a small mass, they are able to withstand very heavy loads. In addition, manufacturing technology and strength make it possible to produce I-beams for openings with a width significantly exceeding the standard 6 meters.
Floor beams
Laying logs on the foundation is carried out according to certain rules, which will be discussed later. Immediately before installing lumber, it is necessary to properly prepare it for further use. You should choose high-quality bars made of oak, aspen or coniferous wood. The main requirements for them are as follows:
Logs and their types by purpose
The beams that are laid on the foundation serve to secure the rough and finished floors to them.
These are usually hewn logs on three sides that do not have horizontal surfaces that are not even enough to directly lay the floor on. Therefore, before laying the floor on them, it is necessary to attach even beams to their sides, which are actually lags. It is to them that the floors should be attached.
Strip foundation diagram.
Not only wooden logs and beams, but also metal beams can be used as support for floors. They mainly focus on timber, keeping in mind that they will have to spend time and money to treat it with an antiseptic, although metal structures will also have to be protected from dampness by priming and painting them well.
Laying and processing
Before purchasing, be sure to measure the dimensions of the room and compare them with the maximum possible length of the joists and boards. It is ideal when the materials are laid in one piece, without joints. If you still have to splice them, then do it with an offset (the connection should be made alternately from left to right in each row). Be sure to lay the seam on the post. Buy materials with a reserve of at least 15 percent.
Before installation, treat the logs with special chemicals that will protect them from mold, pests and fungus. It is possible to treat the logs with old machine oil - it is perfectly absorbed into the wood and protects the material from rotting. It is also mandatory to treat the bottom layer of boards with various antiseptics. It is recommended to impregnate all load-bearing parts at least twice, waiting until the previous layer has completely dried. Additionally, all wooden surfaces can be treated with fire retardants, which protect the material from open fire.
Types of foundations and their features
What are the features of the two types of foundations, strip and columnar? Screw types differ from columnar ones only in the method of fastening their elements in the ground.
Image 2 shows a fragment of a tape type for a separate room. It is possible that some walls of the room are load-bearing, and the width of the foundation for them will be slightly larger than for non-load-bearing walls. For the reliability of the entire floor structure, with a significant width of the room, supports in the form of columns are installed under the beams or joists, which are shown in image 3. Everything that is required for such a brick support is clear from the image. We will indicate only some sizes. The pit for the support is a cube 40?40?40 cm, at the bottom of which there is a compacted layer of sand (10 cm), a compacted layer of crushed stone (10 cm) and then the base for the brick is filled with mortar so that the beams rest securely on the brick.
Connection diagram of horizontal and vertical waterproofing.
Materials for fastening floorboards are not particularly demanding on the quality of wood. Pine, spruce or fir will do. In addition to table No. 2, it should be noted that the height of the rectangular section of the log should be 1.5-2 times the width. But special attention should be paid to the moisture content of the wood. It should not exceed 20%.
In addition to what was said above about the distance between the lags, it should be added that it can be determined by the size of the insulation package if it is laid on a subfloor.
Image 2 shows an option for attaching the frame and joist to the foundation, on which floorboards can be laid. This option is called fastening to anchors, which are pre-embedded in the base. This is the simplest option, since the joists do not require special fastening strength. However, it should be borne in mind that, taking into account possible thermal expansion, the distance from the ends of the beams to the walls should be at least 2-3 cm, and to protect the wood from moisture, roofing felt should be placed on the foundation. It doesn’t hurt to put roofing felt in two rows.
Fastening the beam to the foundation with rigid fixation
If there is no confidence in the reliability of the overhead installation, use rigid fixation to secure the beam.
How to attach timber to a strip foundation
If the foundation is strip or slab, you need to make a decision in advance, because in this case, special bolts (studs for attaching the timber) must be poured into the grillage, and the crown will subsequently be attached to them.
Holes are made in the beams according to the location of the bolts. The foundation is covered with waterproofing. All unevenness in the concrete must be eliminated in advance. Then a wooden structure is placed on top so that the studs fall into the prepared holes and secured with locknuts.
Attaching timber to piles
To install the crown on a pile foundation, U-shaped brackets are used. First, the timber is cut and laid on piles to determine the size of the brackets. For accuracy, the latter are welded from corners and installed on the pile heads.
Waterproofing is laid, and a wooden crown is placed on top. It is worth taking a responsible approach to the issue of connecting corners. The staples are connected to the wood using self-tapping screws. Then you can proceed to the construction of walls.
The essence of the problem: I bought a plot with a ready-made foundation on piles with a grillage. Last year I installed a box - 1st floor brick, 2nd beam under the brick. The inside walls are flush with the foundation. The question has arisen: how to secure the logs? It is advised to put support posts on the posts - it turns out 64 posts from 70cm to 120cm in height (with a depth of 50 cm). But I’m afraid that the floor, separate from the house, will move. They also advise that the ends of the logs be secured to the foundation, but they don’t know how. That's the problem.
You're wasting your time with wooden beams, pour a monolithic floor, you'll need posts of course, the number depends on the size of the perimeter.
1. foundation 2. brick wall 3. support angle (for example, 100) 4. anchor 5. joists