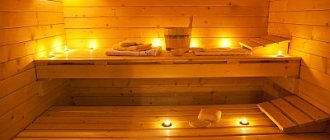
A bathhouse on a country plot of land is the dream of almost every person. Deciding on the design, materials and appearance of this structure is not difficult even for an inexperienced craftsman. But the question of what can be used to paint the inside of the bathhouse remains open until the very end of the work. Let's look at this in more detail.
A bathhouse outside the city is the dream of every summer resident
Whitewash the walls in the bathhouse with lime
The question of whether it is possible to whitewash the inside of a bathhouse with lime requires some clarification.
If we talk about the Russian stove, then the answer is specific and unambiguous: “Yes, it is possible and even necessary!” At the same time, whitewashing the walls in a bathhouse with lime is already a controversial topic. In the sense that there are both supporters and opponents of performing such internal work using this material.
If we talk about the arguments against, they are as follows: the walls of a steam room whitened in this way from the inside due to intense exposure to 100% humidity will lose their “marketable appearance” quite quickly. Evenly applied whitewash will simply “float”. In a word, there will be no sense from such processing.
Prices for whitewashing
Using whitewash is considered the most inexpensive repair option. Construction crews also charge minimal amounts for whitewashing. Typically, whitewashing walls with an area of one square meter and using one layer starts from 50 rubles.
Naturally, the cost varies greatly and depends on many factors - surface contamination, cleaning application, application of lime in several layers. If you know your square footage, then it will not be difficult for you to calculate the approximate cost of all the work.
Competent approach
Despite the above disadvantages, a wall in a bathhouse covered with lime whitewash is not such a utopia. However, there are certain nuances that need to be known and, more importantly, effectively applied in practice. With this approach, the required positive result will not take long to arrive.
As you know, baths are built mainly from wood, which, along with its beauty and environmental friendliness, has certain disadvantages. These include the tendency of this material to easily ignite, as well as susceptibility to the negative influence of a variety of fungi, insects and microorganisms.
Currently, there are many ways to protect wooden buildings. One of the simplest and safest for health is the treatment of external and internal walls, as well as the floor and ceiling, with lime. This ensures optimal protective and antiseptic properties.
And now special attention! To ensure that lime whitewash does not “float”, but at the same time provides the necessary benefits, it must be used in doses. That is, do not cover all the surfaces of the room with it, but treat only those wooden parts of the building that are mostly hidden. We are talking mainly about floor beams, rafters, floor joists, etc. Numerous practice shows that boards treated in this way, even after many years, retain their original characteristics, both aesthetic and practical.
Source
Whitewashing with lime or chalk: what to choose?
Whitewashing as a method of finishing residential surfaces is becoming less and less popular. Modern materials are increasingly appearing in our apartments, and there is no longer any desire to tinker with bleaching solution. But, nevertheless, there is still a demand for lime and chalk whitewash. This finishing method is widely used in educational and medical institutions, utility rooms, etc.
In apartments you can also find whitewash, for example, on the ceiling in the kitchen or bathroom. Quite often, bleach solution is used to finish garages, sheds and cellars in private areas. And if you go outside the city, in the villages you can still find neat white houses, in which, of course, the central place is occupied by the stove. Whitewashing the stove with lime is still relevant today.
If there is a need for whitewashing, then first of all you need to choose the material on the basis of which the bleaching solution will be made. The most common options are chalk and lime. Of course, each option has its own positive and not so good properties. What do you know about them? Nothing? Then meet:
Lime is a material that is obtained by burning carbonate rocks. It is used both in construction and for the production of various chemical compounds. For bleaching, slaked lime is used, which is obtained by combining lime powder with water. Has the following positive characteristics:
- affordable and low cost material;
- has bactericidal properties;
- resistant to temperature fluctuations;
- moisture resistant;
- capable of healing small cracks;
- adheres well to brick, stone, wood and plaster.
Lime whitening also has negative aspects:
- possible defects (stripes, stains, stains);
- there is a risk of getting burned.
Since lime is a sodium alkali, when working with it you must take precautions to protect your health.
Chalk is a common and familiar material of natural origin. Advantages of chalk finishing:
- affordable price;
- environmental friendliness;
- deep white color;
- easy to wash off - easy to remove a layer of white;
- simplicity and safety in operation.
- washes off easily - not suitable in a humid environment;
- possible defects (stains, stains, bubbles, etc.).
DOMOSTROYPlumbing and construction
Whitewashing the stove in the bathhouse is a special moment. I like it when it's light in the bathhouse. My stove, like many others, is in the very corner. Therefore, if it is not whitened, it will look gloomy.
Previously, I used Vitonit for whitewashing. Like all types of whitewash, it is sold in a hardware store.
It applies wonderfully, dries quickly, and shines when dry. But I think that the thick consistency of Vitonite contributes to small cracks when the oven heats up.
This time I decided to whitewash the stove... with ordinary whitewash. I bought 3 kg for 73 rubles in building materials.
To work we will need:
1) Mixing bowl 2) Paint brush 3) Broom or brush
Before whitewashing, we need to sweep our stove with a broom or brush. This way we will clean the surface of future work from dust and possible contamination. You don’t have to worry about any speck of dust or cobwebs trailing behind the brush.
Pour whitewash into a basin, add water, and knead the mixture. I add 200 grams per liter of water. whitewashing The amount of whitewashing components mixed may vary. This depends on the area of the surface being treated and on the quality of the finishing material you purchased.
Craft work is carried out on a cold stove, preferably on a warm summer day. Because the stove should dry on its own, with the doors open.
When working, constantly stir the prepared mixture, so the whitewash tends to precipitate. To avoid divorces and gaps, there is a little secret. I whitewash the stove twice. This is my first time whitening vertically. I let it dry, and the second time I whiten it horizontally with a brush.
At the end of the whitewashing, be sure to wash all the equipment. We will need it again and again.
These simple steps will give us a wonderful, beautiful stove. Beautiful things are nice to look at. Or, as they say: “Everything is pleasing to the eye.”
Don't be lazy to please yourself! Anyone can whitewash a stove in a bathhouse; there is nothing complicated here. But you know how much pride you will have from the knowledge that you created all this beauty with your own hands.
A person constantly comes up with various objects, processes, and new products to improve his life. So it was once noticed that if you dig a hole and put food there, it will last longer. Over time, technology improved and people began to make cellars and basements equipped with various shelves and stands so that food could be stored without touching each other at a certain height.
It should be remembered that lime can destroy pathogenic microbes and fungi, as well as destroy harmful insects.
If you have a cellar, then you are probably familiar with the problem of annual ventilation and disinfection. One of the most popular and simplest methods is whitewashing. An affordable means for whitewashing and disinfection at the same time is now lime.
Whitewashing the cellar means not only disinfection, but with this you also improve the appearance of your room.
Whitewashing is a fairly popular method due to its availability, simplicity and low cost.
Lime is a unique substance that can destroy pathogenic microbes and fungi, as well as destroy harmful insects that come with vegetables and settle in the basement.
Posts 1 page 30 of 45
Share109-11-2010 09:41:19
- Author: DAN
- Administrator
- From: St. Petersburg
- Posts: 1662
- Respect: +15
- Positive: +20
- Gender: Male
- Spent on the forum: 11 days 1 hour
- Last visit: 07-10-2019 16:33:45
This topic is for those who can share their experience of painting any surface (be it a wall, even a sauna stove) and for those who want to get advice on painting. The topic is important, I was convinced myself when it came to painting the bathhouse, and so that the advice would not get lost in the mass of other construction issues, I decided to stir up this topic.
Share210-11-2010 17:31:28
- Author: WIK
- Sort of a chef
- From: MOSCOW, RASSUDOVO
- Posts: 1717
- Respect: +10
- Positive: +23
- Time spent on the forum: 10 days 22 hours
- Last visit: 16-10-2019 19:30:46
I support Sergei. The question of painting is both easy (if you ran into a conscientious seller) and terrible if you imagine yourself to be a great specialist, went to the market and bought paint on the advice of the internet, and painted everything. And here. rain, snow, water, and for interior spaces - several months of “shuffling” with slippers and ultimately on the floor. Therefore, it makes sense to share our mistakes and shield our friends from them.
Share311-11-2010 02:14:01
- Author: Nikolay Prim
- Participant
- From: Nakhodka, Primorsky Krai.
- Posts: 148
- Respect: 0
- Positive: 0
- Gender: Male
- Skype: nikolai11148
- Time spent on the forum: 2 days 13 hours
- Last visit: 04/11/2012 01:41:07
Good afternoon Sergey, Victor and good mood to you. I noticed the topic. It is quite possible that she will roll. I'll take part. To begin with, I’ll just coat the stove I’ve made, but before that I’ll experiment with the chimney from the stove in the house. The temperature dropped below 0, but it’s okay, I’ll flood it, feel the pipe with my hand and blow it warm. Should dry for 1 hour. In a word, I’ll take a photo of everything and post it. Around the 15th-17th the temperature during the day will be up to 10 degrees and sunny, I will board up the windows and do everything through the pipe. Nikolay
Share415-11-2010 03:46:39
- Author: Nikolay Prim
- Participant
- From: Nakhodka, Primorsky Krai.
- Posts: 148
- Respect: 0
- Positive: 0
- Gender: Male
- Skype: nikolai11148
- Time spent on the forum: 2 days 13 hours
- Last visit: 04/11/2012 01:41:07
Good afternoon and the same mood Victor, Sergey. From my stove in the house I jumped into painting. I'll post a photo of the chimney later. Today I’ll take a close-up photo of the spray paint cans. I'm starting to like him. I simply tore the pipe away from everything with an iron brush and wiped it dry. The stove was slightly heated. The hand endures and dusted with paint. Look. I went through the stove with an iron brush, wiped it dry, then with white spirit. Well, there was a stink while it evaporated. Painted it. The view is nothing, certainly not a masterpiece. We are preparing a FAB for it. Today I will start insulating and repairing it. Along the way, I’ll warm up and see how the paint holds up, but it should hold up to 1193 degrees. Celsius. See you later, Nikolay
Share515-11-2010 10:09:01
- Author: DAN
- Administrator
- From: St. Petersburg
- Posts: 1662
- Respect: +15
- Positive: +20
- Gender: Male
- Spent on the forum: 11 days 1 hour
- Last visit: 07-10-2019 16:33:45
The stove was slightly heated. The hand endures and dusted with paint.
So did you paint on hot metal or something? Did you wash it with white spirit before the firebox?
Share616-11-2010 02:52:37
- Author: Nikolay Prim
- Participant
- From: Nakhodka, Primorsky Krai.
- Posts: 148
- Respect: 0
- Positive: 0
- Gender: Male
- Skype: nikolai11148
- Time spent on the forum: 2 days 13 hours
- Last visit: 04/11/2012 01:41:07
So did you paint on hot metal or something? Did you wash it with white spirit before the firebox?
Have a good day, Sergei, of course not. Now the stove in the house is preparing to eliminate the troubles that arose on my initiative (but good ones, it could have been worse). Electrodes have run out, etc. It was warm in the house (+3 outside). I took an iron brush and, as cleanly as possible, stripped where I could get the surface of the stove. Wipe with a rag. Looked around. You know, small shells with dust residues were discovered. The stove was a little warm. Then I had white spirit and solvent on hand. I thought that the first one was neutral to the dissolution of paints, the second one was more focused on the types of paints and you took White Spirit. With a rag, you could say, I thoroughly washed the surfaces, then wiped them thoroughly. It started to smell like spirit itself. I decided to speed up the process and lightly heated the stove. The evaporation process was in full swing. I had to open everything to the street for about 30-40 minutes, wait until it got some air. By this time, the stove had become somewhere around 60 degrees (as a mechanic I say, the bearings in the shaft line were always felt by hand). The palm does not endure for long. I waited a little longer and applied the thermometer. About 35-38 degrees. Covered with paint. The paint is light gray, it looks good (it was black, brown and gray). I wanted a red one, but there wasn’t any, and why bother organizing a corrida? It's good to gather dust. I used a little more than a can, and spent the other one on a pipe on the street. First a light layer, after 10-15 minutes a second one. Enough to spare. After all, I'm doing an experiment. The view is not bad. Yesterday my wife and I were at the dacha. The smell was still there. No problem, I fired up the stove fully (one kindling of firewood is enough to fully heat the kitchen, 2/3 of the container), 10-15 minutes, and it’s quite warm. They put a pot of water on and opened the doors for half an hour or more (I had already upholstered the front gable). The smell has become much less. The metal of the stove is not red, but the pan quickly boiled. The street was heated for about an hour. I examined everything carefully. Conclusion: 1. The paint rolls, that is, you can paint it. No swelling, rebound, peeling, bubbles, or darkening were detected. Convenient to paint in any position. The jet is finely dispersed. Painting from a distance of 25-30 cm. 2. White spirit evaporates for quite a long time, but this is understandable. Lots of micro-sinks. when we left (6 hours later) the smell was still there, but weak. My wife’s idea of wiping it with ALCOHOL before painting did not find proper understanding in my soul. All this is blasphemy. I'll be there today, let's see what's next. There is an idea to look at something for wiping the liquid, something that evaporates faster, but retains the degreasing properties. So far Sergey is like this. But I will continue the experiment until I fully understand the painting of the iron stove. I’ll paint FAB when I’m 90 percent confident, I’m convinced that this is the right way. Look, by this time I’ll read something else, or people will get into the topic and advise. I remember about the brush, but everything takes time. I'm posting pictures of the paint. I wanted the translation to be visible, but it didn’t work. And you can see what kind of paint it is. In English not strong. Along the way - what the pipe was like outside and what it became. I'll keep an eye on her. I’ll take my leave then, see you later, Nikolai.
Preparation of lime solution
Composition of lime mortar.
Whitewashing a cellar is done by applying lime mortar to the walls in the basement. For this you will need lump lime. It is necessary to lower the lumps into a tank or large bucket, divide them into small lumps, add water and stir thoroughly until all lumps are removed. The ratio of lime and water is one to three. Be careful when diluting the whitewash solution, as lime releases heat when slaked with water, and there may also be splashes. After filling the clods with water, it is best to move away to a safe distance for a while. When the lumps are wet and saturated with water, it will be easier to stir them and the whitewash will be safe. As a result of stirring, lime milk should be obtained.
concrete screed on the floor under the laminate
Whitewashing the cellar will require you to prepare the following tools and materials:
Return to contents
Best answers
Corundum:
When you bleach, don’t forget to add salt. Otherwise it will get dirty and wash off
Vadik Andreev:
You can add color to lime.
Alex Mishin:
It can be added, BUT: 1) the pigment used in lime colors must be alkali-resistant; 2) the pigment used for exterior work must be light-resistant. It seems that natural ultramarine - a natural mineral blue - satisfies both of these conditions. But if you buy bluing not for painting, but for washing, before using it you need to wash it several times with water: dissolve it in water and let it settle to the bottom. Otherwise, the sodium sulfate impurity present in it will ruin everything for you. Perhaps ocher is suitable - I’m not sure about their alkali resistance. In general, the choice of pigments that are suitable for you is small. Read Shepelev’s books “Renovating an Apartment on Your Own,” “How to Renovate a House Yourself,” etc. - they largely repeat one another.
PS The word "color" actually means "color suspension", not "substance that gives color".
Can of Raccoons:
It’s easier, more practical and more reliable to paint with façade paint.
Botan Botanovich:
Lime colored whitewash
Slaked lime is an alkali, so it can only be tinted with dry alkali-resistant pigments (liquid dyes for high-grade paints will be eaten by alkali). To do this, an alkali-resistant color is introduced into the ready-made lime mixture (how to dilute lime here): chromium oxide - green, red lead - red-brown, ocher - yellow, ultramarine - blue, umber - brown, soot - black and others. It should be taken into account that a large amount of pigment (more than 5% by weight of lime) significantly reduces the strength and service life of colored lime whitewash. Therefore, it is almost impossible to obtain a bright, saturated color without harming the performance characteristics of the coating - as a rule, these are muted shades of primary colors.
Preparation and stages of whitewashing
Scheme for removing old whitewash.
In order for the solution to lay evenly on the walls and ceiling, it is necessary to soak the brushes in water before whitewashing, since the distribution of paint depends on the condition of the brushes. If you plan to whitewash a large volume of walls, then you can use a special sprayer. It must be kept at a distance of about 30 cm from the wall, then the layer will lie flat. Before starting work, it is recommended to remove racks, shelves and everything else that is stored in your basement. It is important that the cellar is free, since the vapors of wet lime can negatively affect health and impregnate the basement equipment with harmful substances. The surface intended for whitewashing must be cleaned of grease stains, traces of fuel oil, glue and similar substances. The surface intended for whitewashing with lime must be dry and clean. Existing cracks or rust must be primed.
So, the whitewashing process should begin from top to bottom, applying a solution of lime to the walls of the cellar, leaving no dry space. After the walls are whitewashed, it is necessary to ventilate the cellar for two days. It is important to wait until the whitewashed walls are completely dry, then, when the walls are dry and the harmful fumes from the cellar have evaporated, you can safely install racks, shelves, partitions and other equipment. It is best to dilute the whitewash solution in a wooden, enamel or metal container. In this case, the lime will not react with the vessel. For strength, various impurities are added to the solution, and to change color - tints and other dyes.
Whitewashing the cellar must be done carefully, given that contact with lime on the skin can cause burns, irritation or allergies. Therefore, for whitewashing it is necessary to use special protective clothing and a mask that will protect the respiratory tract.
In addition, you can not use lime in its pure form, but use, for example, paints that contain lime. Such paints are quite suitable for cellars; they also use lime as a binding element between the components of the solution. The big advantage of such paints is that they can be safely applied to a damp surface and in a cold room, which is important if the cellar is poorly ventilated or has a very low temperature.
Return to contents
DIY artistic painting
To process the desired surfaces with lime, no special skills are required; even using this material for the first time, you can easily learn during the work process. But it is still necessary to take into account some nuances and then the repair will be fast, safe and of sufficient quality.
Whitewashing the walls
Walls can be whitewashed with lime both indoors and outdoors. Whitewashing the outside of a house is most quickly done with a spray gun. In order for the lime to adhere well, not change its color and not swell, it is necessary to first prepare the walls.
Rust stains, dirt, and greasy areas are removed from surfaces. If there are cracks, they need to be treated with a primer; good adhesion of the lime to the walls is ensured by treating them with a metal brush. Lime does not adhere to paint, so the layer of old paint must be removed.
Whitewashing is best done in cloudy weather; bright sunlight distorts perception and does not allow you to achieve even strokes. When using a spray gun, you need to hold it at an angle of 90 degrees to the wall, this will ensure less consumption of the solution and evenness of its application.
Whitewashing the cellar
Using lime to treat all surfaces in a cellar intended for storing food is considered the best option. Lime destroys all microorganisms, disinfects the room, prevents the appearance of fungus, due to these factors the shelf life of products increases, vegetables do not rot. Lime is resistant to moisture, so it protects the walls of the cellar from moisture.
The cellar is whitewashed with a fairly thick solution of lime; you can use both spray guns and brushes. Spraying devices are usually used in large areas, but when using them, safety precautions must be observed.
The spray gun creates clouds of tiny lime particles; in a closed space, such as a cellar, this cloud negatively affects the mucous tissue of the respiratory organs and eyes. To avoid harm to the body, you need to wear glasses and a respirator that fit tightly to your face.
If the cellar is being whitewashed for the first time, then it is advisable to apply a second coat after applying the first layer and drying it.
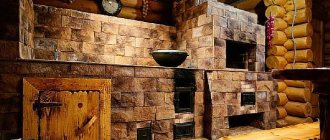
Whitewashing the stove
Some private houses, dressing rooms and other premises have brick walls. Whitewashing with lime is the most practical option for quickly repairing them. The surfaces of the stove quickly become dirty with soot and grease and therefore require regular updating.
Lime can be used at any time, especially since a brush can also be used for small surfaces. In order for the solution to be smooth and easy, the oven must be cooled and all greasy stains must be removed with sandpaper or a scraper.
How to whitewash and decorate a stove with lime can be seen in the photo below
Oven No. 1 Oven No. 2 Oven No. 3 Oven No. 4 Oven No. 5
Whitewashing the facade
The easiest way to whitewash the facades of buildings and houses is to use spray guns. Windows, doors, decorative elements need to be closed, and whitening should begin from the highest points, moving down. It is advisable to whitewash external walls in calm, cloudy weather.
Whitewashing the ceiling
Separately, whitewashing the ceiling with lime is carried out if the remaining walls have wallpaper or other finishing material. If you plan to change the wallpaper, you must first remove the old ones, then whitewash the ceiling and only then re-paste the walls. All old coverings need to be removed from the ceiling, cracks must be repaired, and dirt must be cleaned. Rust and mold can be easily removed with a solution of copper sulfate.
Lime milk applies most easily and evenly to a wetted surface, so it is advisable to moisten the ceiling. After preparing the ceiling, you need to cover the floor, furniture, and windows with waterproof materials, since lime splashes well and is difficult to wipe off when dried.
The ceiling is whitewashed in two layers. The first layer begins to be applied from the window, making strokes perpendicular to the light. The second layer is applied to the still wet first, strokes are made parallel to the sun's rays. This whitewashing technology ensures the adhesion strength of the lime and the absence of streaks.
Tree processing
Whitewashing tree trunks with lime solves several problems at once and is carried out in the spring and autumn. Treating trees in the spring protects the wood from pests and prevents the sun's rays from burning the bark. In autumn, lime is used to reduce the impact of temperature changes in winter.
Grown trees are whitewashed; young plants are not treated, since lime clogs the pores of the bark and thereby disrupts the growth processes. Before processing, you need to remove all dried parts and clean areas with rotting bark.
For whitewashing, lime is used in combination with copper sulfate. Two kilograms of lime are diluted with 10 liters of water, after preparation, 400 grams of vitriol are added to the solution.
Chicken coop treatment
Whitewashing the chicken coop with slaked lime allows you to disinfect the room. It’s even better if the lime slaking is carried out in the chicken coop itself, naturally without its inhabitants. The vapors released when lumps of lime are dissolved penetrate well into all cracks and destroy bedbugs, ants and other small insects.
In a chicken coop, you need to whitewash both the ceiling and walls, and it is advisable to do this several times a year. In the spring, whitewashing is done to prepare the room for the summer; before the onset of cold weather, lime helps remove all parasites.
In summer, it is advisable to whitewash the walls in the chicken coop at least twice, this will interrupt the breeding chain of many insects. Additionally, before whitewashing, walls can be treated with a weak bleach solution. The practicality of using lime for treating animal premises is rated 5 points; it is an inexpensive material, environmentally friendly and has the most optimal disinfection properties.
Consumption for whitewashing
Lime milk is usually used to whitewash walls and ceilings in a house. The consumption of lime for every 2.5 square meters is approximately 0.5 kg of lumps of lime, diluted in the appropriate proportion with water.
If the classic white stove seems boring, it makes sense to decorate it with artistic painting. One should not think that only natural artists can do such work. As a basis, you can take ready-made stencils intended for painting walls, or transfer the image you like onto thick paper.
If the stencil does not have a self-adhesive base, it is first secured to the surface of the oven with tape. The outline is carefully transferred with a simple pencil and the missing lines are completed. For beginners, it is better to choose simple ornaments and patterns with large elements that do not require artistic skills.
Simple patterns for beginners
For coloring, you can use the same whitewash, giving it the desired shades using gouache. Heat-resistant acrylic or water-dispersion paints are also suitable - they are not afraid of high temperatures and do not emit harmful substances when heated.
The most convenient way to apply the design is with artistic brushes of various thicknesses. Some patterns allow you to use spray paint. For decorative stripes, you can use a roller. After painting, the stove cannot be heated for at least 1-2 days.
To get a professional result from whitewashing or painting, it is better to call on experienced craftsmen for help. In this case, you will not need to worry about the strength and durability of the finish.
Recommendations for improving the color and quality of whitewash
If you use lime milk to whitewash the cellar, then you can use linen blue to give it a bluish or snow-white color. A little trick used by specialists for whitewashing a cellar is to add table salt, no more than 100 g per 10 liters, then the solution will be strong, and the lime will not stain your hands and clothes while you are in the basement. Before adding salt, it must be dissolved in water and then gradually poured into the lime mortar. In addition, you can add a few grams of drying oil, the same effect will be achieved. To preserve the color and composition on the walls of the cellar for a longer time, you can add skim milk to the whitewash solution in a one-to-one ratio with water. That is, 5 liters of water and skim milk and the required amount of lime. And to ensure that the plastered surface of the cellar does not fall off after whitewashing, you can add wallpaper glue or latex paint to the solution.
If you used paint that contains lime, then to change the color or strength properties you need to add only those components that contain alkali. Otherwise, the solution may separate. It is recommended to dampen the walls before applying lime paint. It’s good if the cellar air is highly humidified - this condition is favorable for painting. Those surfaces that were previously painted with glue-based paints should be cleaned of old paint. If after this the surface is uneven, it should be plastered.
Some experts recommend applying the lime mortar in two layers. In this case, the first layer will act as a base, and the second layer will add cosmetic aesthetics. If you constantly ventilate the cellar or basement well, whitewash it every year, then no harmful organisms will settle there, the appearance will be pleasing, and the products stored in the cellar will not acquire foreign odors and will be well stored.
How to increase the stability of the solution
Soap will give the solution durability
In order to whitewash walls with not only a high-quality but also durable solution, you will need to add some special additives to it. You can use regular laundry soap or wallpaper glue. Whitewashing lime is used for application to façade walls.
In this case, it is necessary to protect the composition from the negative effects of precipitation and rapid rinsing. This can be done by introducing drying oil into the solution, which will repel moisture and help the whitewash to remain on the walls as long as possible.
Surfaces whitened with lime tend to stain everything that touches them. This can be avoided by adding ordinary table salt to the solution.
Knowing the proportions allows you to achieve the desired effect:
- lime and salt - 1 kg per 10 liters of solution; salt will help make the surface snow-white;
- drying oil - 100 ml per bucket of whitewash;
- Laundry soap, grated on a coarse grater, is poured with hot water, and then during the preparation of the bleach mixture, a soap solution is added instead of water.
Traditionally, lime or chalk mortar is used to whitewash the stove. In old recipes for stove makers, there are options based on milk and egg whites. Modern craftsmen do not neglect new generation products. There are plenty to choose from!
Mortar
Lime is an accessible material in all respects. Lime solutions have bactericidal properties, and after drying they are absolutely harmless and do not cause irritation of the mucous membranes. Properly prepared lime mortar adheres well to plaster, stone and brick, is not afraid of temperature changes and can be used outdoors and in wet rooms, including baths.
Slaked lime is less dangerous to work with
To prepare the solution, it is better to buy slaked lime in the form of a dry powder. To whitewash oven equipment, it is recommended to use a ten percent salt solution instead of water. Salt makes the coating strong and prevents the formation of cracks.
Lime powder should be diluted in one third of salt water, thoroughly stirring the mass until smooth. If the solution is prepared from lime dough, then it is also diluted with salt water to the consistency of liquid sour cream. To neutralize possible yellowness, it is recommended to add diluted blue.
One liter of lime mortar is enough for about two square meters of area. Accidentally stained floors can be easily washed with clean water, but this must be done immediately, before the lime has time to dry.
Chalk is an inexpensive natural material that is easy not only to apply, but also to wash off. Using chalk you can get a rich white color, but every time you touch the stove it will leave white marks on your clothes. For whitewashing, chalk is used in powder form, which is sold in hardware and construction stores. When diluting chalk, do not be afraid of the gray tint of the solution - after drying, the stove will become crystal white!
The chalk solution may have a gray tint, but the dry oven will be snow-white
To prepare the solution per liter of water, take 800 grams of dry chalk, but stove makers advise using skim milk instead of water, and adding natural laundry soap and wood glue for strength.
First, one and a half kilograms of sifted chalk are diluted in 3 liters of milk, after which the mixture is heated and a piece of grated soap and 100 grams of wood glue are added, continuing heating until the ingredients are completely dissolved. It is important to prevent the liquid from boiling! Before whitewashing the stove, the solution is filtered through cheesecloth and applied to the surface while warm.
This recipe cannot be called the cheapest, but it has many admirers who claim that the finish does not get dirty and retains its original appearance for a long time, and the stove can be lit on the very first day after painting.
To prepare the solution, take 4 packages of tooth powder, 4 egg whites, and a glass of milk. All ingredients are mixed and allowed to brew for 10-15 minutes. The consistency of the composition should be similar to oil paint. This mixture is applied to a heated oven so that the milk and eggs “set” and gain strength. As the product is consumed, a new portion is prepared.
Plaster mortar for stoves.
Below are three recipes for preparing plaster solutions suitable for plastering ovens
Clay plaster mortar for stoves.
Lime-clay plaster mortar for stoves.
Lime plaster mortar for stoves.
Kaolin wool (fire-resistant wool) is supplied in almost all large construction stores. Technical alumina with a 99% Al2O3 concentration, as well as pure quartz sand, are used as the main raw materials for the production of kaolin wool.
Since clay is a poor conductor of heat, in order to improve the thermal conductivity of the plaster layer, non-ferrous metal sawdust (copper, aluminum) can be added to the plaster mixtures listed above, 0.3-0.5 parts at a time.
To plaster the hottest surfaces, table salt must be added to the plaster solution. Add 120 g of salt to a bucket of solution and mix thoroughly.
Plastering of stoves is carried out only after the stove has completely dried, when its complete shrinkage has already occurred. For better adhesion to the plaster, the surface of the stove is cleaned of dust and clay, it is best to wash it with a foam sponge; it is also necessary to unstitch the masonry seams to a depth of 5-10 mm. Plastering is carried out on the heated (hot) surface of the oven in two or three layers, with a total thickness of no more than 10 mm. For plastering, the solution is made liquid. Plaster as follows. A thin layer of solution no more than 2-3 mm is sprayed onto the hot surface. It is better to spray with a sponge brush or a washbrush, since the solution dries instantly; the surface is sanded with a grater with an abrasive mesh. This process is repeated two to three times until the surface of the furnace is completely leveled. The best results and quality are obtained by the following method of plastering stoves. A thin wire mesh with cells measuring 5x5 mm is fixed to the surface of the furnace. The mesh is secured using metal dowel plugs. Holes are drilled in the brickwork at intervals of 200-300 mm horizontally and vertically, and the mesh is secured to the stove with dowels.
Is it possible to park a car near a private house
You need to know that plastering stoves is not a very practical method. The plastered surface needs to be regularly repaired 2-3 times during the heating season - whitening cracks in the plaster with lime. Large cracks and peeling plaster on particularly hot surfaces should be filled with plaster mortar. Good, high-quality fireplaces have to be repaired at least once before the heating season. Due to improper operation of the furnaces and severe overheating of the furnace surfaces, repairs will have to be made more often. It should also be remembered that plastered stoves consume more fuel.
Whitewashing the stove with lime.
Three ways to whitewash stoves with “non-staining” whitewash.
Source
Features of painting and putty on lime
If you apply lime milk directly to a layer of water-based paint, it may happen that the quality of the repair will not satisfy you.
The lime adheres to the paint and runs with it, and once it dries, it is likely to cause blistering.
To prevent this, you must first wash the surfaces with paint with soap and water and a brush and then treat them with a stiff brush for better adhesion of the compounds.
Putty is used during repairs to ensure a good leveling of the surface. If you plan to putty on walls covered with lime, you must first remove the old layer. Alternatively, you can remove all swollen areas with a scraper and apply a primer, after which the lime can be easily removed.
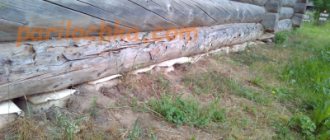
How to paint a log inside a bathhouse
Constructing a bathhouse from timber is not a difficult process; much more difficulties will arise in the future during its maintenance and maintenance in excellent condition. After all, the beam of the bathhouse will be in constant contact with moisture and hot steam, which quickly leads to its wear and tear. There is no point in abandoning the construction of a bathhouse from environmentally friendly timber material because of these inevitable difficulties; it is better to arm yourself with knowledge about the protective treatment of wood to prevent its damage.
Popular formulations
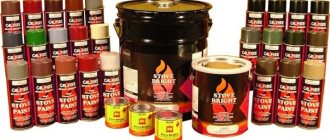
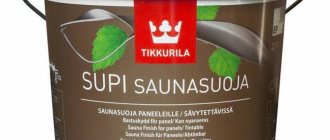
Finnish "Tikkurila"
Tikkurila is a well-known company not only in its homeland, whose products are often chosen by Russian residents. With all the wealth of choice of its other products, Tikkuril sauna and bath impregnations are quite few in number, and it would not be difficult to list them:
- Supi Laudesuoja is the same paraffin oil mentioned above. It is intended to cover only the shelves with them.
- Supi Saunavaha - the composition is not fully indicated, but the manufacturer says that it contains natural wax. Can be used not only for shelves, but also for walls, ceilings, doors and window frames.
Sauna impregnation Tikkurila Supi Saunavaha for baths and saunas, colorless 0.9 l. Photo Petrovich
There are also a couple of acrylate compounds - these are water-based varnishes, which already contain antiseptics, although only against mold and blue stains. The names are: Supi Arctic and Supi Saunasuoja. Both are suitable for walls and ceilings and should not be used for floors.
ATTENTION! Finnish impregnations for baths and saunas do not differ in variety at all. If you look at Teknos products, it turns out that they are the same, only the serial name Supi must be replaced with Satu.
"Neomid"
is also familiar to many thanks to its advertising. She has a variety of antiseptics that are suitable for internal and external work, as well as for protecting wood used in particularly difficult conditions (we are talking about contact with water and soil).
But these are antiseptics that are suitable for use in residential and non-residential premises, not only in the bathhouse. Among the specialized products, there is such impregnation for baths as “Neomid 200” and “Oil for baths and saunas”.
"Neomid 200" is an antiseptic that can be used anywhere inside the bathhouse, including on the shelves.
Water antiseptic for baths and saunas Neomid 200 Proff 1 l. Photo by Leroy Merlin
“Oil for baths and saunas Neomid” is an impregnation for baths against moisture and rotting at the same time. Let us explain: usually they exist separately and are applied in different layers. First, the wood is impregnated with an antiseptic, and only water-soluble ones are used inside the bath, and then it is coated with oil or paint. Here it’s “two in one” – both oil and antiseptic. In any case, this is what we understood from the characteristics given on the manufacturer’s website.
There is also a wood bleach “Neomid 500” - it can also be called an impregnation. It is used when the surface of the wood has darkened or become stained with mushrooms. In this case, the treatment leads to an almost instantaneous change in color to the original one.
: "Aquatex" and "Eurotex"
Those who are hearing about these impregnations for the first time may want to watch the video we found. It describes their properties and scope of application:
GOL sauna
Many people know Palizh tinting materials and paints from the Udmurt company “New House”. She also has a GOL series, one of the directions of which is impregnation for baths and saunas GOL Sauna. There is everything you need for a bath - impregnation for the shelf, another impregnation for walls, ceilings, doors and windows, and a third for the floor.
The manufacturer claims that all formulations simultaneously protect against moisture and fungi. Impregnation for baths and saunas is an acrylic coating. The one intended for the floor is already an alkyd composition, that is, paint based on organic solvents. Well, the one for the shelves is some kind of secret product containing “natural wood softener.”
The readers have the same request - if anyone has used it, tell us about your impressions.
"Estate 409"
A very budget option for acrylic coating with an antiseptic included in it is impregnation for baths and saunas “Usadba 409”. That is, you don’t even need a primer - fungicides and insecticides are already included in the composition. In addition, it contains a tannin inhibitor, a substance that causes wood to darken over time.
In general, we can say that this is cheap acrylic paint or varnish (and cheapness here, by the way, is not at all an indicator of poor quality, rather an indicator of mass and therefore cheap production), to which everything possible has been added.
It's supposed to be usable everywhere except shelves and floors (that's what we think). Moreover, it is specially designed for wet rooms, therefore the steam room and washing room are the main candidates for painting with “Usadba 409”.
In our opinion, this is a very competitive option. The Finns also calmly add antiseptics to their acrylates. Another question: do their compositions match? But here you can trust the manufacturer’s certificates, if he has them and demonstrates them to the buyer.
As for color, the impregnation is colorless and there are no colors for it. Maybe it's for the better
Protective compounds for external treatment of baths
Before purchasing various impregnations for treating the exterior of a log bathhouse, it is advisable to take into account that the resulting layer does not hide the external characteristics of the wood and preserves its properties. Also, the film must allow fresh air to pass through to the wooden material so as not to interfere with the necessary breathing of the timber.
The bathhouse must be provided with comprehensive protection to protect it from the influence of all existing pests. Impregnations should protect the wooden material from fire, insects and other pests. The decorative properties of the products are also important for a timber bath. To ensure all this, the external walls of a wooden structure should be purchased:
How to dilute lime
There are two ways to dilute slaked lime for whitewashing surfaces.
Method No.1: take 400 g of powder, add 6 liters of water, 5 g of salt and a teaspoon of drying oil. All this is thoroughly mixed and filtered through a sieve. If you want a bluish tint, add 25 g of ultramarine.
Method No2: For 3 kg of dough, use 10 liters of water and 100 g of table salt. Further, the process becomes a little more complicated: the dough is diluted in only half the water to obtain lime milk, the salt is mixed separately in 1 liter of hot water and added to the milk. All this is thoroughly mixed and then increased to a volume of 10 liters by adding water.
How to whiten? You can do it manually with a special brush or roller, or you can use a sprayer, but in any case, you must first prepare the walls for whitewashing.
The process occurs in two stages: applying the first layer, and after it dries, the second. It is preferable to carry out work in the evening or in cloudy weather. This is done so that the liquid does not evaporate so quickly and the layer is more durable.
– choose what you want, but with all this, the good old whitewash does not lose popularity
. Among the main reasons are low cost, ease of application and environmental friendliness. These qualities are sometimes enough to turn a blind eye to the low durability of the coating. Let's figure out how to whitewash the ceiling and walls with lime and chalk, decide whether water-based paint is a whitewash, and which material performs better.
Master's secrets: how to properly prepare a stove for whitewashing
A new stove should be plastered or coated with clay before decorative finishing. If the old plaster does not hold up well, is cracked or is falling off, you will have to completely remove it and apply a new layer. For plastering, special heat-resistant mixtures or self-prepared solutions are used. A stove coated with clay, ready for whitewashing
If there is no need for new plaster, you can limit yourself to cleaning the surface from soot and removing the old whitewash. It is convenient to remove a layer of lime and soot stains with a steel wool for cleaning dishes or a metal brush. You must work carefully, otherwise gouges and scratches will appear. It is possible not to remove the old whitewash only if it is clean and holds well, and the goal of the repair is to give the hearth a fresh look.
To clean the kitchen stove from greasy stains, use a two percent solution of soda ash. Rust can be removed with a solution of copper sulfate prepared from 100 grams of powder and a liter of boiled water.
Minor cracks formed during operation or after cleaning must be covered with putty. It is recommended to apply the putty not only with a spatula, but also with a brush, carefully eliminating unevenness.
The whitewash solution is applied to the pre-moistened surface of a cold stove. There is no point in wetting the entire structure at once; it is better to treat small areas with water, taking into account the speed of work. It is recommended to whitewash with a wide paint brush or roller.
Whitewash brush
To avoid streaks, the first layer should be applied in horizontal lines. When working with lime mortars, you should begin applying the second layer without waiting for the first to completely dry. This time the movements should be vertical. It is advisable that the stove is not exposed to sunlight during operation.
Before painting the door, the oven must be covered with paper.
It is best to purchase lime for planned repairs in the form of lumps. Such raw materials are preserved for quite a long time, and they can be prepared for use in a short time. In order for the dilution to result in a solution that will suit the concentration and homogeneity, you need to know the basic rules for preparing it from quicklime and be sure to follow safety precautions when working.
Rules for extinguishing lumps of lime at home:
If the solution turns out to be thick, then it can be diluted with water to the required proportions. Tint dyes are introduced in dissolved form; in order to give the lime an exceptionally snow-white appearance, it is recommended to add a little blue.
Requirements for decorative coating
When choosing paint for decorating the interior of a bathhouse, you should take into account that this material must meet the following requirements:
- protect the wood surface from the effects of aggressive environments that occur in the steam room and dressing room;
- withstand exposure to high air temperatures;
- maintain the integrity of wood and extend its service life;
- provide treated surfaces with an attractive appearance.
Remember that the time during which you can use the bathhouse without major repairs depends on what you paint the inside of the bathhouse with.
Advice! When painting a bathhouse with your own hands, you should choose a paint that is distinguished not by its low price compared to its analogues, but by its higher technical characteristics.
In addition, the following factors must be taken into account:
- the type of wood used;
- the ability to perform additional coloring;
- surface condition before treatment.
Special materials should be used for surface treatment
For those craftsmen who have not yet decided how to paint the inside of the bathhouse, it should be noted that most often special varnishes with special properties are used for this purpose:
- High coefficient of vapor permeability . This allows you to avoid the appearance of mold, prevents the appearance of fungi and bacteria, and prevents the formation of condensation.
- The ability to apply a new layer without cleaning the surface from the previous one.
- The presence of pigments that emphasize and highlight the natural texture of the wood with which the steam room and dressing room are decorated.
If you are not satisfied with varnish, acrylic bath paint is an alternative: you can use water-based mixtures inside. Considering the resistance of acrylates to low temperatures, this same type of decorative finish can also be used for facade work (the instructions for use confirm this).
Photo of a steam room whose walls are varnished
The advantages of paint over varnish include a large range of colors and a long service life of the decorative coating.
Wood bleaches
If black or blue spots begin to be visible on the walls of the bathhouse, this most likely indicates the appearance of mold or mildew. To return the timber to its original appearance and at the same time get rid of biological pests, special chlorine-based bleaches are made. If the wooden material is not severely affected by fungi and mold, then you can use the composition Neomid 500 or Prosept 50. If the condition of the timber is neglected, then everything can be corrected with the more powerful League BioShield. All these domestic whitening compositions are effective and act for a short period of time.
Why are the trunks of fruit-bearing trees whitened?
Whitewashing of trees is carried out in late autumn (November) and early spring (March). Gardeners do this not for beauty. Bark is a protective barrier for trees: it protects them from environmental influences. Therefore, it is the material that is primarily exposed to temperature changes: it dries out, flakes, cracks from the heat, freezes in the cold, and is damaged by bark beetles.
If it is not strengthened and taken care of, the wood becomes exposed and begins to deteriorate and rot. This greatly weakens the plants, which ultimately leads to their death. What does the whitewash layer protect against?
- White color has reflective properties, so it does not allow the sun's rays to overheat and burn the shell of the plant and its branches.
- Autumn whitewashing protects the trunk shell in winter from the formation of ice during the period of alternating thaws and frosts.
- The smell of lime repels animals gnawing on the bark of the trunk.
- A layer of white will protect the plant from insect pests crawling out of the soil and destroy those that have hidden in the cracks of the shell for the winter.
It is obvious that whitewashing plays the role of strong protection of the plant from external destructive factors.
It is necessary to whitewash trunks in spring and autumn in dry weather, otherwise the whitewash layer will be washed away by rain.
After drying, the lime layer will become more resistant to precipitation; some gardeners sometimes even add glue to the solution to make the paint more moisture-resistant.
How to prepare lime whitewash
You can purchase a ready-made primer composition or prepare it yourself.
Stir slaked lime in warm tap water (water - half a portion).
Pour salt (coarse, rock) into the liquid.
Add the remaining water.
Separately, mix and grind a small amount of wood glue and sifted chalk powder. You should get a paste similar to cream.
Dissolve the chalk-glue mass in liquid with lime.
Proportions of ingredients for preparing the primer:
We cook wood glue in granules with the addition of water in a water bath.
Instead of wood glue, you can add PVA wood glue to the primer for lime whitewash. Sometimes a strong soap solution is added to it (rub a piece of laundry soap on a grater and dissolve the shavings in hot water). But a primer with soap is weaker than one that contains wood glue - the whitewash can get dirty and crumble.
Lime whitewash can be done with brushes
I want more articles:
Painting a brick oven
Preparatory stage: If there are minor defects (depressions, bumps, potholes), first plaster and level, and cover the seams with a clay solution. You can learn how to prepare a good clay solution from the corresponding article, which is on the blog...
Plaster is made from clay and crushed asbestos. The resulting mixture is carefully applied to a well-heated stove.
How to paint: The two most popular proven folk methods are lime or chalk. The third method is again heat-resistant paint, which is also used for iron sauna stoves.
Cooking and painting with chalk
- Pour the pieces of chalk into a container (bucket, basin), fill with slightly warm water so as to cover the surface and leave for at least one hour;
- In another container, mix animal glue with warm water in a ratio of 25:1. Animal glues include gelatin, casein, albumin, and bone.
- Mix both solutions and bring to a homogeneous consistency. “To check the quality of the solution, drop it on a piece of glass or mirror placed vertically. If the density is normal, then the droplet will slide down by 2-3 cm.”
- Apply two or three layers. Each subsequent one, only after the previous one has dried. “For a more “clean” whiteness, you can add a tablespoon of blue to a bucket of the finished solution. It will remove some of the yellowness.”
Cooking and painting with lime
- Solution proportions: 1 kg of lime / 1.5 liters of water at room temperature / 1 tbsp. spoon of drying oil / 25-30 grams of blue / 1 tbsp. spoon of salt. Mix. “The most durable whitewash is made from freshly slaked lime, and salt is added to make the lime coating less dirty.”
- Apply in two or three layers. Unlike whitewashing with chalk, each subsequent layer of lime whitewash is applied to the wet previous one. “If the stove in the bathhouse was previously painted with chalk, and you intend to use lime (and vice versa), the surface must be thoroughly cleaned of old paint.”
Fire retardants
Treating a bathhouse made of timber using fire retardants must be carried out without fail, because this building has a high probability of a sudden fire. For fire protection of the external walls of the bathhouse, you can use the compositions Neomid 450-1 and Prosept Ognebio Prof1. They are well absorbed into the wooden material, but when exposed to high temperatures they protrude out, creating a barrier between the flame and the wood. And also preventing access of oxygen to the wood and protecting it from fire. After applying the composition, the timber walls of the bathhouse will acquire the highest degree of protection from fire. In addition, they will be additionally protected from biological pests of wood, thanks to the antiseptic components included in their composition.
methods of controlling fleas in an apartment
What types of paints are there?
Universal fire protection products, as the name suggests, perform the functions of an antiseptic and a fire retardant at the same time.
Some compositions have a tinting property, or require subsequent painting and act as a primer. Along with impregnations, there are varnishes and paints that perform the functions of fire protection and protection against insects.
The purpose of the primer is to strengthen the wood structure and enhance adhesion (“sticking” of paint to the surface being painted). Some primers contain bioprotective components. When choosing a primer, you must follow the paint manufacturer's recommendations: the compositions must be compatible.
The process of painting a room
The process of painting the inside of a bathhouse begins with thoroughly sanding all surfaces to be treated - these are walls, floors and furniture, if necessary. After this stage, all construction dust or shavings must be removed from the room, as they will interfere with the quality of the painting process. You can wipe the surfaces with a cloth; it is better to leave it dry or vacuum it.
Paint can be applied with a roller or brush
Before applying colored paint, it is best to treat the wood with compounds that will protect against fire and mold. After they dry, you can decorate the room with the chosen color of the dye. Work is best carried out in a well-ventilated area with a constant air temperature.
Related article: Floor-standing gas boiler: do-it-yourself installation
Whitewashing equipment
Whitewashing can be done in different ways. Previously, there was only one way to distribute lime over surfaces - using brushes. Modern technologies make it possible to reduce the time spent on renovations using lime milk; a brush is now most often used if you need to whiten small surfaces.
https://www.youtube.com/watch?v=2d1jNkyNQEo
You can make your work easier using the following devices:
- The spray gun can be manual, electric or pneumatic. If you are not going to process large surfaces, then the most economical option would be to buy a manual type of spray gun. The principle of operation of the devices is similar: one hose of the device is immersed in the solution, through it the lime is taken and fed through the accumulator into the other hose. At the end of this hose there is a nozzle, it is through it that the lime is released. The size and speed of the jet can be adjusted. You can buy a manual spray gun from about one and a half thousand rubles; electric versions of the device cost an order of magnitude more. Using a spray gun simplifies painting work; whitewashing with its help is carried out much faster, while the supplied jet easily penetrates hard-to-reach places.
- The lime whitening machine is used to treat large surfaces. Its operating principle is the same as that of a spray gun; its capacity can be up to 100 liters.
- A spray bottle for whitewashing can be used the same one that is used for spraying plants. Only its capacity should be in the range from 5 to 15 liters.
Any devices for mechanizing the whitewashing process can reduce repair time and ensure uniformity of lime layers. The labor intensity when using them is minimal, any person can understand the structure of the device and its principle, and it becomes possible to paint high ceilings without using a stepladder.
When using spray guns, lime consumption is also reduced, since large drops do not fall on the floor and furniture. The only condition is to use a high-quality solution without impurities or lumps, otherwise the device may clog and fail.
This is what the equipment listed above looks like
Manual spray gun Electric spray gun Spray gun for whitewashing Apparatus for whitewashing
When should the outer walls of a timber bath be treated?
It is advisable to process wooden material before construction begins, because it may already be infected with various pests. And in this case, most likely, before the construction is fully completed, its strength characteristics will already be damaged. And many companies carry out the initial processing of wood only so that it can be stored and delivered to the customer without incident.
After the log house of the bathhouse has already been erected, all walls should be treated with antiseptic impregnations, outside and inside. It is imperative to impregnate the ends of the timber with special protective agents, which will ensure uniform drying of the material, reducing the degree of cracking. Then the log house must be left at rest for a period of six months. During this time, the timber will dry thoroughly and the bathhouse will shrink completely. And after six months, you can begin to fully treat the log walls with other protective compounds.
conclusions
Do not forget that the new, just installed lining must be treated with fire retardants that increase the fire resistance of wood - Biopiren "Pirilax"-Terma or Terma Lux-D (branded products produced by various manufacturers in Russia). The photo shows products from Siberian manufacturers, but in your region the product may look different.
The key word on the labels is “fire protection”
It is useless to treat a previously varnished surface with an antiseptic. The varnish needs to be removed - cleaned with sandpaper or a scraper. In conclusion, we suggest watching the video to reinforce what you have read.
Materials for decorative finishing
When performing painting work, you can use several types of materials, each of which has its own advantages and disadvantages.
Figure 2 – Large quantities of wood coatings
Figure 3 – Treatment of a wooden frame with a varnished protective coating
To paint a wooden bathhouse, you should not use paint and varnish products that are intended for other purposes, for example, metal paints or electrically conductive coatings. Despite their high quality, in the case of wood they will not give the required result.
Video description
You can learn more about wood processing oils from the video:
Regardless of the material chosen, it is important to carefully follow the recommendations from the manufacturer. Thus, to apply the first layer, it is often permissible to dilute the composition, which improves the quality of finishing and reduces consumption
Some products need to be preheated before use, dissolved or simply stirred. The climatic conditions of use are also different, as is the condition of the prepared surface. And also, rarely, but there is weak adhesion of the finishing coating with antiseptics, an additional layer of primer is required.
Varnish for use in the bath Source saunaexpo.com
How to properly process a log bathhouse from the outside
Correct processing of a log bathhouse built from timber is carried out as follows:
You can use rollers, brushes and spray guns to treat the walls of the bathhouse from the outside. The highest quality application will be achieved using a brush; such treatment will take longer, but it will be more effective and lasting.
The opinion that there is no need to treat a timber bathhouse with various impregnations, and that it will last for hundreds of years without them, is erroneous. Untreated timber will darken soon after construction, and wood-staining fungi will form on its surface, covering the frame with black and blue spots. In the future, they will not disappear, but will provoke the development of more dangerous biological agents that will rapidly begin to destroy the wooden material. And proper and comprehensive treatment of the walls will allow the bathhouse to last for many years, during which the log house will be beautiful, environmentally friendly and very durable.
How to remove lime from floors and walls
During the process of whitewashing surfaces with lime, stains inevitably remain on all surfaces. The easiest way to remove them is while they are still fresh; this will require water and a sponge; treatment with water is carried out several times, this allows you to remove all the white stains.
If a layer of old lime needs to be removed to apply other materials during repairs, then the following points must be adhered to:
- Wet all desired surfaces with water using a brush or spray gun.
- Wait until thoroughly wet, then remove the lime with a hard, metal sponge or scraper. If there are several layers of lime, you will have to wet it several times and also use paper clips several times.
- If you are not afraid of dust in the room, then the process can be speeded up by using an angle grinder with a special attachment.
- It is imperative to use goggles and a respirator, since dust during work can negatively affect the eyes and the condition of the respiratory tract.
The removal of old lime can be facilitated by the use of special liquid products, under the influence of which the whitewash layer dissolves and easily comes off from surfaces.
These include:
- Guard Industry product
- Decap' Sols Plus Guard.
- Tool Space.
All products contain acid, so you need to protect your hands and eyes. Some people also use diluted hydrochloric acid, but since it is hazardous to health, it is not recommended for use.
Painting inside depending on the purpose of the room
Everything is simple here. You most likely already understand the principle: coatings that can evaporate harmful organic compounds when the temperature rises can only be used where they are not threatened by temperatures of this kind.
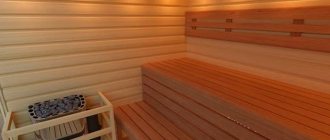
Steam room
However, this principle can be considered too general, but specifically - how to paint the walls in the steam room of a bathhouse?
In fact, there is a whole range of coatings on sale, designed separately for the ceiling and floor, walls, steam room shelves and stove painting.
The company guarantees that the film formed on the surface will not only repel water and dirt, but will also be able to resist the appearance of mold and blue stains on wooden surfaces. By the way, they can also be used on concrete.
By themselves, these compositions do not provide color, but Tikkurila offers a variety of colors that will suit any design.
We are not advertising to anyone, we simply assume that you can build on what is described and look for similar acrylate compositions from other companies. The Finns passed temperature tests and found them safe.
Criterias of choice
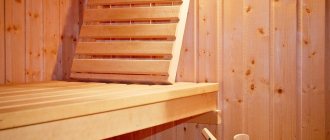
For all its advantages, wood is susceptible to moisture. Over time, it dries out, darkens and begins to rot. Mold and microorganisms may appear on it. All this is true for normal external conditions. And in the steam room the conditions are extreme. Even in the dressing room there are no such impacts on the walls and floor. The influence of sudden changes in temperature and humidity in the steam room accelerates the destruction of wood. When exposed to high temperatures, conventional protective coatings can release harmful substances.
In addition, a steam room is not just a room in which a person is located. He remains there naked, his body in contact with wooden surfaces. And on some it even lies. This means that for shelves and benches you need to choose wood protection that will not be unpleasant upon contact.
Most often in the steam room they try to preserve the natural color of the wood, selecting species that look beautiful. But if you want to paint part of the steam room, then you need to take this into account when choosing an impregnation. Not every impregnation is suitable for subsequent painting.
Wood color after different impregnationsSource elka-palka.ru
It is clear that it will not be possible to find the same impregnation for a bathhouse outside and inside. Even different parts of the steam room may require different protective equipment. Wood treatment in a steam room should be carried out with compounds adapted to its conditions. And the choice must be based on the following criteria:
- Which part of the steam room is the product intended for?
- Will it be primary impregnation of wood, or re-coating of a previously protected surface?
- Method of applying a protective substance to a wooden surface - with a brush, roller or spray
- Are there plans to further paint the impregnated wood?
Features of using whitewash for different rooms
Whitewashing in the bathroom
You already know what you can use to whiten a ceiling, now let’s look at some of the features of choosing popular materials. Use chalk whitewash to repair ceilings in living rooms and bedrooms. And remember that this finish is “afraid” of moisture.
But lime solution, due to its moisture resistance and disinfectant properties, is well suited for bathrooms, baths, showers and swimming pools. Use lime milk for whitewashing basements, garages, closets and sheds.
Ceiling finishing methods
When choosing what you can use to whiten the ceiling, take into account the volume of work, the condition of its surface, taking into account design ideas.
Tools
- Brush.
- Roller.
- Sprinkler (spray gun).
- Vacuum cleaner.
Whitening the ceiling with a brush is the simplest and most common method . However, if the surface area is large, then hand tools will not be the most effective solution - use a sprayer.
You can use a regular home vacuum cleaner for this. Just attach a special sprinkler to it, which can be included in the kit or purchase it separately.
How to whitewash a ceiling with a sprayer? Pour whitewash into a jar (from 0.5 to 2 liters) and put this simple device on top. Next, you need to look at the design features of your vacuum cleaner.
If you have a model that simply turns the knob to change the direction of air supply from suction to blowing, that’s good. For other options, you need to connect the end of the vacuum cleaner hose to the hole from which the air comes out.
Before starting work, you must first clean off the old whitewash, and then carefully cover all parts of the room’s interior. It is best to attach a protective film from the ceiling itself, then you will not have to clean the room for a long time.