Today, the flooring market provides a wide range of materials. In order for modern flooring to last for a long time, the floor must be perfectly level.
To level the surface of an existing floor or fill its base on the ground, it is necessary to perform a screed. You can make a high-quality screed with your own hands if you carefully select the material and implementation technology.
The materials for the screed and the technology used directly depend on the type of surface, its condition, the need to lay hydro- and heat-insulating or sound-absorbing materials or the placement of additional structures (communications) in it.
Calculation of the number of beacons
To purchase the required number of beacons, you need to calculate the required number for the floor. The calculations are easy to do.
Installation of beacons is carried out from the door to the opposite side of the room, guides are placed parallel to each other. The floor screed along the beacons is done with a certain step; it should be 10 centimeters less in length than the rule used. If the length of the room is 6.4 meters, and the rule is 1.5 meters long.
Then the calculations will look like this:
- 6.4-(1.3 * 2)= 3.8. 0.8 is the length of the rule minus the part of its length that goes to the adjacent section when aligned;
- 3.8 / 1.3 = 2.9, the result is the number of beacons that are needed for installation without taking into account the outer guides taking up 0.3 m;
- (6-0.6)/5= 1.08 m. At this distance, parallel profiles will have to be installed, placed after the first guides installed from the wall in increments of 30 centimeters. The number five means the required number of all beacons, including guides.
Installation of beacons is carried out from the door to the opposite side of the room, guides are placed parallel to each other.
General practical advice
Despite the existence of a large number of methods for installing beacons under floor screed, professional builders have developed general tips for all cases.
Tip #1
Before starting work, it is recommended to check the condition of the base using an ordinary lath or a long rule. Apply the tool along the diagonals of the room, then at several points around the perimeter. As a rule, install a long bubble level; with its help, try to hold the tool in a horizontal position and measure the gap between it and the plane of the base. The purpose of the preliminary inspection is to detect the area of the floor with the maximum protrusion. If it is small in area, then it is much more effective to cut off the protrusion with a hammer drill than to increase the thickness of the screed by several centimeters. This not only speeds up the work process, but also reduces the estimated cost of floor installation.
Bubble level for construction
Tip #2
If you don’t have a laser device, you can set the level of the beacons using an old water level. By the way, this is the most accurate instrument in nature. No modern laser can compare with water in these indicators. A water level is an ordinary flexible transparent hose filled with water; it can be painted in different colors to improve visibility. The water level works according to the fundamental law of physics - the law of connected vessels. This means that the liquid level in such vessels will always be the same; it is leveled by gravity.
Water level
You need to make marks using this level in the following sequence. You need to work with an assistant; you cannot complete the markings alone.
- Place a mark on the wall at a distance of about a meter from the floor, the specific height does not matter.
- Place one end of the water level to this mark, the other end should be located against the opposite wall. Achieve a position so that the water level on the wall coincides with the zero mark on the hose; in this state, make a mark for the location of the water level at the second end of the hose. Both lines will be strictly horizontal.
- Using the same pattern, make marks around the entire perimeter of the room and connect them with lines using upholstery rope.
- Now you have a horizon throughout the room, use it when placing beacons.
How to use a water level
At first glance, it seems that working with a water level is much more difficult than working with a laser level. This is not true, it all depends on the practical skills of the performers. Of course, a laser device has many significant advantages; you need to know them and use them in practice. But the ability to use traditional measuring instruments will always be useful in life.
Tip #3
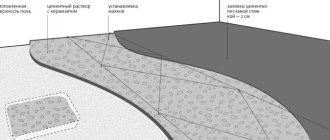
There is a method for installing beacons on a line made of cement-sand mortar. In essence, it is not much different from those described above, only under the metal profiles, not individual buns are made, but continuous tubercles of the appropriate height. Professionals try to use this method whenever possible. Its disadvantages are fully compensated by its advantages.
Lighthouses are installed on a line made of cement-sand mortar
There are two disadvantages: an increased amount of solution is required to install beacons and its preparation requires additional time. But when laying the screed, significant time savings are achieved. The fact is that it is necessary to push a mass under the freely sagging beacon profiles; this takes a relatively long time and is very inconvenient. If the beacons have a solid base, then there is no need to push anything anywhere; the screed is made faster and easier.
Tip #4
The accuracy of the beacons depends on the parameters of the finishing coatings. If the screed for joists may have deviations of up to 1–2 centimeters in the corners of the room, then for linoleum the tolerance range is reduced to several millimeters. Keep this in mind and, in accordance with technological requirements, adjust the screed tolerances. There is no point in wasting time on excessive screed precision if the quality of the floor finish does not depend on it.
The accuracy of the beacons depends on the parameters of the finishing coatings
Tip #5
Never rush, the time required to re-check the position of the beacons is always much less than the time required to redo the tie. There is no need to talk about the price of the work. If you have absolutely no experience in performing this type of work, then it is better to practice in utility or technical rooms, and only then work on living rooms.
Beacons for screeds are checked
Preparing the floor for installation of beacons
Pouring floors on lighthouses with your own hands begins with preparatory work. First, the condition of the floor covering is assessed. If there is an old screed on the floor, it should be removed. The old coating can ruin the new one over time.
If the floors of the house are made of concrete material, then all holes and joints are covered and covered with a cement composition. A good option for this purpose would be to use tile adhesive, whose adhesion to different materials is high.
It is necessary to get rid of any flaws, all cracks are sealed. And also skirting boards and other structures that may interfere with the floor screed are removed. Next, the surface is cleaned from all types of contaminants. If necessary, insulation and reinforcement of the surface can be carried out.
For better adhesion, the floor surface should be coated with a primer layer.
For better adhesion, the floor surface should be coated with a primer layer.
Do I need to clean up after?
Since metal profiles or plaster beacons are made of metal, over time they tend to rust. Even in a dry environment, the material can oxidize and form rusty stains or cracks. Therefore, it is best to remove thin profiled beacons after pouring, when the mixture has not yet had time to dry and become extremely strong. For T-shaped beacons, their upper edge is clearly visible above the screed; you can pull them out with the corner of a spatula. If the floor is already dry enough and the mortar has set, then you will have to remove the beacon using a pick or chisel with a hammer.
After removing the plaster beacons, grooves remain in the flat floor, which can be easily leveled using the same solution that was used for the screed. You can also seal cracks after removing the profiles with gypsum plaster. Pointed beacons-benchmarks in the form of metal tripods are easy to remove from a fresh screed thanks to sharp legs with a smooth surface. Also, immediately after pouring, you need to remove the plastic markers.
It is quite difficult to remove tubular beacons from a poured screed. Typically, such thick guides are left in the finished floor, plus they additionally reinforce the concrete layer.
Required tools and materials
To carry out the work you will need a number of tools and materials, in order to successfully cope with this task you need to prepare:
- The solution with which the coating will be poured;
- Construction level or laser;
- Rule;
- Graters, graters;
- Drill with mixing attachment;
- Knife;
- Chalk or pencil;
- Roulette and ruler;
- Containers for mixing the solution.
To carry out the work you will need a number of tools and materials.
Reviews
Konstantin Vasilchenko, 45 years old, Yalta
I once had to renovate and build floors. Having read this article, I, of course, won’t tell you anything new about technology. But I can share two little tricks that I have always used in my work. First: for the fixing mixture for beacons, you need one additive - 5 drops of washing liquid. This substance prevents sand from settling in the mixture. The second nuance that I would like to share: very little alabaster is added to the solution so that it sets faster. In just 10-15 minutes, you can continue working. These two tips will help both save time and improve the quality of the screed. I would also like to say a few words about the sand that is used in the screed solution. I recommend using washed sand, since the clay contained in quarry sand will not provide proper adhesion.
Artem Troitsky, 32 years old, Ruza
Self-repair is not always successful. I can say this with full responsibility, since I have my own construction team that has been doing such work for more than 7 years. For many, this seems like a simple pour of liquid concrete and a finishing coat. But that's not true. In order for the floor covering to be attractive, the subfloor must be perfect. It is the guiding elements (beacons) that play a decisive role in this matter. It is important to understand that the installation of such beacons should be done using a building level and a ruler, and not “by eye,” as many home “craftsmen” believe. It is these guides that make it possible to determine at what level the finishing floor covering will be installed.
Anatoly Mitrofanov, 37 years old, Rostov-on-Don
One day we decided to renovate the floors in our apartment. I inherited it from my parents, so the coverage there has not been so great for a long time. Having removed all the previous layers, we decided to lay laminate flooring. To be honest, I didn’t have much experience in such repair work. But after reading several articles on the Internet, I decided that I could handle it. In fact, I was very mistaken, and already at the very beginning. Having removed all the baseboards and old covering, including joists (we had wooden floors), I did not pay attention to the resulting small chips and cracks. As a result, our new floor did not last even six months. At first the laminate came apart in the corners, then even the middle began to bulge. In general, I had to invite professionals and observe how the floors were repaired correctly. It turns out that when they removed all the layers, they putty all the cracks, but I neglected this, for which I paid with money.
Selection and installation of beacons for semi-dry and wet screeds
To fill the floor screed using beacons, you can choose several types of these products. Beacons can use those used for drywall. They are laid with the sides facing down and secured with the applied mortar.
Special metal profiles are also attached to the solution itself; it is convenient to cut them into the required sizes. It is better to choose gypsum as a solution; it dries much faster than the cement-lime composition. Also, profiles can be attached to self-tapping screws; their level can be easily adjusted by screwing in and out. They are twisted into dowels, which are installed at intervals of 20-30 centimeters.
You can combine two methods: several self-tapping screws are screwed in, and a mortar composition is carefully applied between them. The self-tapping screws should be screwed in at a distance of about a meter; their caps will indicate how high the mortar fixer should be.
Beacons can be made from the mortar itself, then a rope is pulled along the measured level under the screed onto self-tapping screws. Cement is laid along its height in the form of a lighthouse. The distance between such profiles is also approximately 100-120 cm. With a semi-dry screed, the mixture is poured out in two places and evenly distributed along the pouring level. The room is divided into small zones in order to gradually cover these areas with the mixture.
The step of the platforms is no longer than the rule.
Special metal profiles are also attached to the solution itself; it is convenient to cut them into the required sizes.
Self-tapping screws as beacons
When creating a self-leveling floor, self-tapping screws can be used instead of guides. The technology consists of screwing screws into the base, they are connected using a thread and serve as a guide when pouring the self-leveling solution. When the work is completely completed, the screws are simply unscrewed from the base.
When creating a self-leveling floor, self-tapping screws can be used instead of guides.
Which ones are better to choose?
It is quite advisable to pour a floor with minor differences of up to 3 cm under profile perforated plaster beacons, those that are used for walls. Their advantages are that they are cheaper than metal profiles for gypsum boards or profile tubes, they are very lightweight and can be easily cut with metal scissors. Their standard cross-sectional dimensions are 10x26 or 6x21 mm, the most common length is 3 m.
Plaster perforated beacons can be secured to a quick-hardening gypsum mixture, metal or plastic fasteners. The best of them are “ears,” which are thin metal plates with a hole in the middle and small curved ears. Such fasteners are mounted to the floor using ordinary dowel screws. The advantage of fastenings for beacons with “ears” is that there is practically no gap left between the floor and the beacon, this allows you to save on screed mortar.
To perform screeds with high differences, when a layer of more than 3 cm is needed, it is best to use metal profiles for gypsum plasterboard. The required length and width of the guides are selected, then they are cut and mounted under the level using mortar or screws. Their surface is smooth enough to guide along them with a rule.
If the width of the floor being poured is large and requires several layers of thermal insulation, protection from steam and moisture, then the best option is profile pipes installed on cement or gypsum putty mixtures. The design is strong, rigid, and allows you to pour a floor screed on top of penoplex, mineral wool, polyurethane foam, polystyrene foam and other insulating materials.
How to fill the screed with beacons yourself
Before pouring the floor screed along the beacons, you need to prepare the solution itself, and only then proceed to introducing it onto the surface.
Preparing the solution manually
This process includes the following steps:
- First, cement and sand are mixed in the selected proportions; it is difficult to do this mixing manually; you need to ensure that the components are thoroughly mixed. You can use a drill or mixer for this purpose.
- In another container, the plasticizer is mixed with water, in the instructions for the plasticizer you can see the required ratio, you can add reinforcing fiber there.
- The dry mixture is added to the liquid components and they are gradually mixed together. Water cannot be added directly to the dry mixture.
The dry mixture is added to the liquid components and they are gradually mixed together.
Pouring technology
You need to start pouring the screed from the corner opposite the door. The solution is poured between the beacons, the filling is done just above them, the rule is kept at a slight slope, moving in a zigzag manner, leveling is done, and the excess is removed. A solution is added to the existing unevenness. This works over the entire surface.
The screed must be carried out in one room of the apartment in one day, then the formation of cracks and joints can be avoided.
You need to start pouring the screed from the corner opposite the door.
Zero level
The zero level is a horizontal line along the entire room, which is decisive when calculating the fill height. Correctly set zero level is the key to the success of arranging any screed. The sequence of work is as follows:
- we step back up from the floor, say, 1 meter and set the starting point;
- using a level (laser or water), from this point we draw the initial level along all the walls of the room;
- Using a staff and a marker, we take measurements and determine the largest and smallest distance from the original level to the surface of the base;
- we calculate the difference between these two values and, based on this, determine the type of screed (whether it will be made with self-leveling mixtures, or using a concrete mixture, with or without reinforcement, and so on);
- the point with the shortest distance from the original level to the surface of the base is the starting point for the zero level, which we draw along the entire perimeter;
- Having determined the type of screed, select the thickness of the fill; we set this value upward from the zero level and draw another line along which the landmarks will be set (that is, the upper part of the beacons should be at the same height as the markings on the wall).
Floor screed care
On average, it takes 4 weeks for the surface to dry completely. The surface should be covered with film for about 7 days. For the first 4-5 days, it is necessary to moisten the screed, but you should not add too much water.
After a week, the surface should dry naturally, the temperature should not be lower than +5 degrees.
You can walk on the floor after 24 hours, but the weight is above 100 kg. can create a load only after 5 days.
On average, it takes 4 weeks for the surface to dry completely.
Carrying out this type of work is suitable for beginners as well. It is important to carefully prepare the solution and monitor the level so that the surface is smooth. If the beacons are installed correctly, then filling will be easy.
What are they needed for?
In order to install a modern coating efficiently, you must first level the surface with your own hands. After all, reinforced concrete slabs, which often serve as the base of the floor and are installed on the ceiling, have too many irregularities and differences . Moreover, for their manufacture, some manufacturers use concrete with high-frequency filler, which also does not contribute to the smoothness of the floor. It is the screed that helps to remove such flaws, which can be:
- semi-dry;
- wet;
- dry.
The main goal when leveling the base for the finishing coating is to create a smooth and reliable surface. Beacons installed strictly according to the level will help achieve this. For the master, such guide rails act as a guide, facilitating the process of screeding the floor.
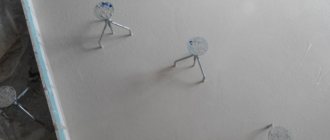
Benchmarks
These are professional-type pin beacons that are used when installing self-leveling floors. They are small structures with three “legs” and a metal rod in the center. Thus, they resemble a tripod. The height of the central pin can be adjusted as needed.
Benchmark
Installation of such beacons is carried out in 1 m increments in a checkerboard pattern. They are not as easy to use as they seem and are professional type equipment. They are recommended for use only by experienced craftsmen. As a rule, such beacons are removed as soon as the base has been leveled to the desired level.
The benchmark is considered an original and professional beacon, which is used under self-leveling floors
Construction thread can serve well when installing benchmarks. It is stretched along the wall - this creates a special guideline that will help set the desired height of the beacons. The thread will help to achieve a perfectly even finished base, since it will not cause errors caused by micro-irregularities of the rough base, because it is in a suspended state.