When constructing any facility for economic purposes, there are features inherent only to this type of structure. The bathhouse is no exception. High levels of humidity, huge temperature changes of up to hundreds of degrees - all this requires its own approach, fortunately, the capabilities of modern building and insulating materials have now been added to the accumulated experience of generations of carpenters.
Special mention must be made about the ceilings of bathhouses: it is on them that the extreme thermal load falls when the washable ones “steam.” According to all the laws of physics, the hot air, which at this moment escapes from the heater, all tends to the ceiling. And if it is made without taking into account such periodic exposure to heat and moisture, the ceiling itself, the space above it, and the roof will soon become unusable. Therefore, special attention should be paid to the ceiling of the bathhouse, and in our material we will consider three main ways of arranging it.
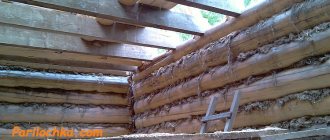
Measurements and diagram
When starting work, you need to decide on the height of the ceiling. This parameter can be chosen at your own discretion, but you need to take into account such points as:
- The timber bathhouse will shrink over time. The ceiling height may decrease by several centimeters. Therefore, it would be useful to make a height reserve of about 10 cm.
- The height of the expected visitors must be taken into account. The usual guideline is 180–185 cm.
- The height of the ceiling should allow the shelves to be placed in such a way that the steaming person can freely swing the broom.
Based on this, the optimal height can be considered 240–250 cm.
How to line a bathhouse from the inside: popular finishing materials, installation instructions
The bathhouse premises have a special microclimate, which differs from the conditions in residential premises. Therefore, materials for wall decoration require the right approach to their selection. When deciding how to line the inside of a bathhouse, take into account that the finishing will be used in conditions of high temperature, hot steam and high humidity.
The decoration of each room should be functional
Installation and design
Ceiling insulation
As in any construction, the floor is built first, then the walls, and then the ceilings. In the case of the most popular false ceiling, it is necessary to follow the sequence of layers.
What fits in at the beginning and what at the end - let's take a closer look.
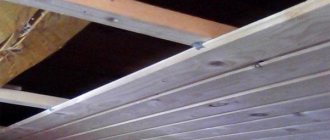
- The top layer consists of boards facing the attic space.
- The next layer below is moisture insulation. This may be a waterproofing film specifically designed for such purposes.
- Even lower is a layer of insulation. Preferably mineral wool or glass wool. The insulation sheets are lightweight and easy to install. This is much more practical than filling the top with sawdust or heavy expanded clay.
- A vapor barrier layer is laid under the insulation. This is either a special membrane or foil reinforced with glass mesh.
- The penultimate layer is slats of small cross-section (from 30×50 mm). They are necessary for subsequent fastening of the final lining for the bathhouse.
- The last layer that you will see above your head is the final lining from the inside of the room. As a rule, eurolining is used. Buy the lining from non-resinous wood, otherwise the resin, melting from the hot air, will drip in fairly large quantities.
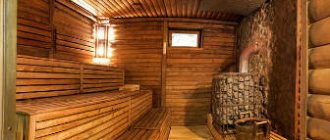
The ceiling in a Russian bathhouse of a hemmed type is also convenient because, thanks to its strength and reliability, it can even be used in an attic. You can safely walk on it and even use it for household needs. (see also the article Features of a bath font)
With proper selection of materials, the height of the ceilings in the bathhouse will not be much lower than planned. However, it is necessary to take into account the total thickness of this entire multi-layer cake before installation.
If you plan to use the attic, provide a hatch in the ceiling in advance for access to the outside.
Possible difficulties when performing work
Foil vapor barrier
If the vapor barrier is not properly insulated, mold may appear in the bathhouse.
Inexperienced builders most often make the following mistakes:
- They do not take into account the shrinkage of the log house, which causes a ventilation gap of 2.5 cm to form on the ceiling. To eliminate it, the cladding is completely removed.
- Install insulation under the floors in the steam room and sink. If these rooms are insulated, the boards may rot.
- They do not select insulation materials for the main one. Aluminum foil is suitable for wood cladding. If you have a dry steam room, it is better to use expanded clay.
- Mount hollow ceiling partitions. Mineral wool without vapor barrier will lead to the formation of fungus and mold.
- Use mineral wool or basalt slabs in very heated rooms. When heated to 66 degrees in an unventilated room, materials release harmful formaldehyde.
Depending on the type of room - washing room or steam room, insulation material is selected in the bathhouse. Under conditions of high-quality installation in compliance with expert recommendations, the building retains heat and creates comfortable conditions for relaxation and water procedures.
Ceiling installation in the bathhouse
To make an effective ceiling in a bathhouse with your own hands, even before starting work and purchasing materials, you need to know exactly what components it consists of:
- Overlap. Concrete floor slabs can be laid on cinder block and brick buildings. However, most often baths are built of wood. The ceiling is made of a similar material. The laid beams form the frame of the structure.
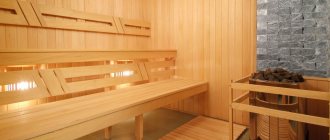
- Facing. On the inside of the bathhouse, the ceiling is lined with clapboard. Inside the steam room, only a wooden board is used. Plastic is suitable for cladding other rooms.
- Vapor barrier. The canvas is laid under the cladding to protect the thermal insulation from steam.
- Insulation. A thick layer of thermal insulation material is laid between the floor beams under the sheathing.
- Waterproofing. Moisture-proof material protects the insulation on the attic side.
None of the listed layers can be excluded from the ceiling of the bath.
The fabric removes steam from the thermal insulation, but does not allow it to escape in the opposite direction. Such membranes must be positioned correctly in relation to the insulation.
Insulation for a bath: insulation of a bath outside and inside
The first thing you should pay attention to when planning work on insulating the walls of a bathhouse is whether you want to place a thermal insulation layer on the inside or outside. Both options are acceptable, however, the first is used extremely rarely for a number of reasons:
- Insulating the inside of garages, bathhouses and modest-sized houses is an irrational use of the small space that is available. Obviously, laying all the necessary layers will make the room smaller, which in some cases is not ergonomic;
- the humidity in the bathhouse can be so high that even if all the necessary conditions are met and the vapor and heat insulation layers are installed, it is almost impossible to guarantee that the heat insulator will not be exposed to moisture sooner or later;
- Insulating the walls in a bathhouse from the inside with your own hands allows you to retain heat inside the room, but is not able to protect the walls from freezing from the outside. This temperature difference often has a negative impact on the condition of the building.
Depending on the size and type of structure of the bathhouse, insulation and insulation can be carried out both from the inside and from the outside, or from both sides
Let's consider the features of wall insulation depending on the material that was used to construct the building.
Features of insulation in a wooden bath: log steam room
At first glance, it may seem that log buildings do not particularly require thermal insulation, since the wall looks quite airtight, and the wood does a good job of retaining heat. But in fact, the problem lies in the fact that the timber is highly susceptible to shrinkage and cracks form over time. They become the main sources of cold.
The most effective way to seal the resulting gaps is to lay insulation between the logs during the construction stage. Then, using a hammer and caulk, all remaining cracks, even the smallest ones, are clogged and treated with sealant.
Interesting fact! To this day, fans of environmentally friendly materials continue to use plants such as moss or cuckoo flax to fill cracks in walls.
Thermal insulation of a bathhouse made of timber occurs at the construction stage, when inter-crown insulation is laid between the logs
Do-it-yourself insulation of a bathhouse from the inside: brick, block and frame buildings
Perhaps one of the most labor-intensive processes is insulating the inside of a bathhouse from expanded clay concrete blocks, bricks or other materials to which it is not so easy to attach, and you also have to carefully select the material, taking into account its weight and size. For example, if we are talking about insulating a frame structure that is not capable of withstanding heavy loads, it is simply impossible to do without careful preliminary calculations
As an expensive, but ideal option for this purpose, you can consider spraying polyurethane foam. This method can be used both for insulating a bathhouse made of foam blocks from the inside, and for buildings made of almost any material.
For example, if we are talking about insulating a frame structure that is not capable of withstanding heavy loads, it is simply impossible to do without careful preliminary calculations. As an expensive, but ideal option for this purpose, you can consider spraying polyurethane foam. This method can be used both for insulating a bathhouse made of foam blocks from the inside, and for buildings made of almost any material.
In some cases, extruded polystyrene foam boards are used. For internal insulation this is not a very suitable option, as it takes up a significant amount of space, but for external cladding there is no better solution.
In the case of a small bath area, to save space, you can consider the option of spraying polyurethane foam as insulation for the building
Helpful advice! Insulation by spraying polyurethane foam must be carried out by professionals and in compliance with all technological requirements and standards. Also, high-quality specialized equipment is required.
Ceiling in the bathhouse: device
In principle, there is no difference between a house or a bathhouse - the types of ceilings themselves are the same for any construction, and do not take into account the purpose of the building. Therefore, you can easily watch videos and read specialized literature on construction, which talk about the construction of houses.
However, we will always not be talking about multi-apartment buildings, there are slab ceilings, and in the bathhouse only three types are possible:
- grazing;
- hemmed;
- panel.
Flooring differs from hemming in the support points - in the first they are only on the walls, in the second - on the ceiling beams. As a result, there are various possibilities for maintaining weight: both your own and additional.
The panel ceiling is a simplification and a semi-hybrid of the previous two, and it still has more of a floor ceiling than a hemmed one.
IMPORTANT! You make the decision about what the ceiling will be during the period when the bathhouse is just being designed.
what kind of attic do you want? Panel
As for the device, the correct ceiling in a bathhouse consists of: boards, vapor barrier, insulation, waterproofing and, possibly, boards again. This is a standard scheme that applies to all varieties. The nuances regarding the ceiling in a bathhouse with a cold roof can be read here.
As for the ceiling height, it (as usual in a bathhouse) is a subject of fierce debate. However, rational arguments also exist. All of them are discussed in this article.
The ceiling in the bathhouse inside the steam room
For more information on using foil, see this page.
The steam room is the only place that has no analogue in a residential building. This is a combination of high temperature and humidity that affects all the materials inside. Therefore, the ceiling in the bathhouse inside the steam room may have some differences from other rooms.
The main difference between the steam room will be two layers of vapor barrier, which is done most often. Ceiling boards and beams on the attic side are usually covered with any suitable material - kraft paper, polymer film (capable of withstanding high temperatures).
However, at the same time they are exposed to steam from inside the steam room. And if it’s not difficult to change the boards, then you definitely need to spare the beams. So, partly out of pity, partly out of a desire to prevent the heat from evaporating outside the steam room, people line the steam room with foil. It shields IR radiation and is a reliable vapor barrier, so it is quite suitable for covering the ceiling in a bathhouse.
You can read about how the ceiling structure in the steam room works here.
Finishing and roughing: materials
Let's briefly go over the materials that are suitable for finishing and rough ceilings in a bathhouse.
Lumber differs in wood species, grades (quality), and type. If these are boards, then they can be edged or unedged, the latter being the result of the initial cutting of the trunk, without trimming the ends.
Regarding varieties, just in case, we suggest not using conifers above the steam room, but in other rooms conifers are quite suitable.
Pine is practically the cheapest type of wood. And its characteristics are suitable for all parts of the ceiling - for beams, and for boards, and for lining.
As for the grade, we should proceed from the fact that second-grade wood may not only have many knots, but also be infected with a fungus (blue fungus, for example)
For a rough ceiling in a bathhouse, both grade A and grade B would be suitable, but B with caution. Still, the evenness of the rough base will affect the evenness of the finish. ADVICE! It is advisable to treat all wood that will not encounter high temperatures in the steam room with ready-made antiseptics
This will extend its service life. Additionally: boric acid protects against mold; bleach eliminates its variety, called “blue”
ADVICE! It is advisable to treat all wood that will not encounter high temperatures in the steam room with ready-made antiseptics. This will extend its service life. Additionally: boric acid protects against mold; bleach eliminates its variety, called “blue acid.”
Also, a completely unedged board is suitable for rough coating, which is used solely for the purpose of reducing costs; it has no other advantages at this stage.
The finished ceiling is made from wood of a higher grade - highest or A. Moreover, the type of lumber can be either edged or unedged. However, the quality of the surface finish of the finishing boards must be very high.
For the finished ceiling, lining, tongue-and-groove floorboards, and polished regular edged and unedged boards are used. The choice is up to the owner.
The thickness of the roughing board is 25 mm. Finishing – depends on the selected material.
Finishing
Since we briefly mentioned above the different options for finishing the ceiling in a bathhouse, we will correct this by talking about long-popular or recently fashionable solutions for this finishing.
How to hem, what to sheathe with
Let's start with the fact that there is an option when no finishing is carried out at all. You immediately lay or hem the sanded boards and nothing else underneath. The option is normal if everything else is done efficiently.
In general, it’s worth talking about three more options - tongue-and-groove boards, lining and unedged boards.
Tongue and tongue boards are expensive, usually used for floors, provide good grip through a tongue and groove joint that does not allow water to pass through, and look just great. But it all comes down to price; after all, this is not the most budget option.
Lining is the most common method of covering floors, long chosen by bathhouse owners. It is advisable to attach the lining to the ceiling in a bathhouse using lathing - slats packed onto the previous layer of boards in order to create a ventilation gap between them and the lining. In this case, the necessary ventilation is provided, which dries out those water vapors that inevitably penetrate through the thin profiled boards, which are the lining.
The ceiling in the bathhouse is lined with clapboard
Unedged boards are a fashionable solution today for bathhouses built in ethnic style. The principle is simple - take an unedged board, clean it, polish it, but the edge remains uneven, and even often its unevenness is artificially enhanced with the help of a tool. The result is something that looks authentic to the ethnic style.
Since the edges of the boards are uneven, it will not be possible to ensure a fit. Hence the decision to hem such boards in two layers with a shift that covers the joints of the previous layer. Accordingly, below you see beautiful uneven edges, between which you can see a narrow strip of the layer above.
How to fasten the lining
For those who would like to learn more about the technology of installing lining, we recommend that you read our article on lining the steam room.
Installation
Now we get to the step-by-step instructions. However, it is worth noting that no instruction will be complete enough to reveal all the nuances of the work ahead, so it remains advisable that the builder have at least basic experience with tools and construction in general.
Construction instructions, installation step by step
Grazing
Take all necessary measurements. If you are working in a log house, draw a line along the level where the deck boards will lie. If you have walls made of a different material, check the horizontality of the mauerlat or strapping beam. If it deviates from the horizontal, prepare the necessary tabs.
Boards can be very different - edged, unedged, tongue and groove. But whatever they are, they need to be cut taking into account the approach to the wall of at least 5 cm (more is possible).
In the ceiling crown, as we said above, you need to cut out a “shelf” on which the boards will lie. To do this, you can use an ax or chainsaw. “Shelves” are cut out on two opposite walls only.
The boards are laid out on the mauerlat in the same way, only there is no need to make a ledge.
Fastening can be done with self-tapping screws or nails.
Then bars or boards placed on the end are laid out on top - all this across the length of the flooring board. From below they are attached through and through with self-tapping screws. This is a necessary measure to ensure that the boards do not “play” in the future.
Next, we cut and lay the vapor barrier, securing it to the base with a stapler.
We lay the selected insulation on the vapor barrier.
We cover everything with waterproofing (some do not cover it).
From below, we adhere to the chosen design solution - either we leave the existing one as a finished ceiling, or we fill unedged boards with a shift, or we make a sheathing and cover everything with clapboard.
In the steam room, of course, some owners will stuff the bottom with foil, put the sheathing on top of it and cover it with clapboard. This is done to reflect infrared radiation back into the steam room.
Hemmed
As agreed, we believe that we already have the ceiling beams. We take measurements and set the horizontal lines exactly to the level on the wall. We stretch the construction threads.
We fill the cranial beams in accordance with the horizontal lines (this is one of the options, there are others). The skull beam provides a ledge on which the boards will rest between the beams.
We cut the boards and lay them in the transverse direction of the beams on the skull beam. Secure with self-tapping screws or nails.
On top, without covering the beams, we lay a vapor barrier. This means that the upper section of the beam remains open, the vapor barrier fills only the formed “containers”. This is necessary so that the wood of the beam can release moisture.
We lay insulation on the vapor barrier secured with a stapler.
We cover it with waterproofing (vapor barrier does not breathe, but hydro - breathes, releases steam from the insulation).
On top of the beams, either a subfloor or a finished floor is laid.
The bottom trim remains. Here too it depends only on the design decision. See a similar point on the floor ceiling above.
You will find a step-by-step guide on how to make a steam room ceiling in a bathhouse with your own hands on this page.
Peculiarities
This type of floor arrangement is a fairly simple task that even not the most experienced craftsman can handle.
You can assemble a floor ceiling in a bathhouse with your own hands, the main thing is to pay due attention to even small details and do everything very carefully
The simplicity of the design is due to the fact that all load-bearing and subsequent fragments will not be laid using a frame or beam system, but directly on the upper frame of the walls. There is no power frame here and this is the second feature - the strength of such structures is very low. Accordingly, the loads on the floor type floors should be minimal.
The span width should not exceed two and a half meters and therefore such solutions are suitable only for small baths. The steam room in such buildings can only accommodate two people at a time, although in most cases this is enough.
The last important feature of the flooring is that its outer layer will be thermally insulating. That is, the insulation on the upper side is not sheathed with anything and it is impossible to walk on such a floor. Therefore, in this case, the attic space can only be used for storing light bath equipment or drying brooms
Therefore, in this case, the attic space can only be used for storing light bath equipment or drying brooms.
Thermal insulation
Since warm air particles rush upward and remain there until they find a way out, an important part in the improvement of the bathhouse is the thermal insulation of the ceiling. It is reproduced using available materials, such as expanded clay, earth with sand, dry earth, sawdust mixed with cement, as well as more modern material - mineral wool
A more expensive material such as perlite would be an excellent option. It is one of the environmentally friendly
It is reproduced using available materials, such as expanded clay, earth with sand, dry earth, sawdust mixed with cement, as well as a more modern material - mineral wool. A more expensive material such as perlite would be an excellent option. It is one of the environmentally friendly.
Attention! In order to check whether the thermal insulation is carried out correctly, pay attention to the presence of condensation. If the latter is present and flows down the walls in dense drops, this is a clear sign that the insulating layer was laid incorrectly and it is necessary to increase its thickness. The thickness of the insulating layer can be increased using wood chips mixed with cement or other insulating materials
You can increase the thickness of the insulating layer using wood chips mixed with cement or other insulating materials.
Useful tips and tricks
In conclusion, here are some tips for properly arranging a ceiling structure in a bathhouse:
- If the bathhouse design includes an attic space, then when installing the ceiling, it is additionally worth considering an entrance hatch with a retractable ladder.
- Decorative finishing of the ceiling surface is carried out after preparing the floor base. The final stage is wall cladding.
- To reduce or prevent possible heat loss in the room, it is necessary to take care of high-quality and reliable thermal insulation of the ceiling structure.
- To obtain a perfectly flat ceiling surface, the first floor boards must be laid level. Otherwise, this will lead to deformation of the finished structure.
- For the construction and finishing of the ceiling, it is recommended to use environmentally friendly materials that do not emit hazardous substances when exposed to high temperatures.
https://youtube.com/watch?v=Xbn0i3smn0A
It is quite easy to erect a reliable and durable ceiling in a bathhouse building. To do this, you need to decide on a suitable ceiling design, assortment of building and finishing materials. Due to their increased strength, durability and practicality, suspended and flat ceilings are the most popular.
Optimal height
There are no strict requirements for the height of the ceiling structures in the bathhouse; it is enough to take your own feelings as a basis.
The main thing for bath rooms is a feeling of comfort, since the atmosphere in them should be aimed at relaxation. Taking into account the above, we will build on the following indicators:
- Average height of bathhouse visitors;
- Number of shelves in the room;
- Swing the broom in a standing position; it should not touch the ceiling.
Next, by adding up all the listed indicators, you can get the approximate height. Usually this is 2.4-2.5 m, since this height will be quite enough even for visitors over 180 cm tall.
Grazing
Flat ceilings are suitable only for small baths. It is a flooring made of boards that fit tightly to each other. The boards are attached to the edges of the upper part of the walls, due to which the walls are subjected to quite a large load.
Important! It is not recommended to install flat ceilings in bathhouses where the distance between two load-bearing walls is more than 250 cm, since in this case the ceiling will sag.
The undeniable advantages of this type include the low cost of materials and the shortest time required for construction.
It is worth noting that the thickness of the decking boards used must be at least 50 mm.
However, with such very seductive advantages, there are also disadvantages that represent a number of limitations. For example, when choosing a floor type of structure, you will have to give up the attic space.
Even if it does exist, it can only be used for storing small utensils, such as bath brooms or other accessories.
Also, as mentioned earlier, this type is applicable exclusively for small baths with a span of no more than 250 cm. In order to avoid unpleasant consequences, it is recommended to adhere to this rule.
Among other things, it is important that the insulating layers on the attic side are not covered by anything, so any manipulations in that area can damage them and lead to the need for replacement.
Important! When carrying out repair work related to floor coverings, the insulating layers are completely replaced.
The material for the thermal insulation layer can be, for example, stone wool, as well as a mixture of clay with wood shavings, peat, or leaves with soil. The insulation is laid on top of the vapor barrier layer, which is usually foil or polyethylene film located directly on the top of the flooring.
Types of insulating materials
To decide which insulation to choose for a bathhouse ceiling, it is worth understanding the features and types of thermal insulation materials.
The most popular and widespread material is mineral or basalt wool. It is woven from many basalt fibers, with air in the voids between them. It is this that prevents heat from escaping from the room. True, this insulation is very sensitive to humidity and loses its properties when wet.
It is worth noting that when insulating the ceiling of a bathhouse with mineral wool, it is necessary to lay a layer of waterproofing film on top of the thermal insulation. This will protect the insulation from getting wet if water may leak through the roof. In addition, there must be a gap between the insulating material and the waterproofing.
No less often, the choice of insulating the ceiling of a bathhouse from the outside falls on foamed polypropylene, or penotherm. This is a lightweight foil material that was specially created for insulating saunas and baths. Penotherm not only prevents the leakage of warm air from the room, but also reflects it back into the bathhouse, that is, it works like a mirror. Thanks to the use of this material for the ceiling in the bathhouse, you can speed up the heating of the steam room by two to three times.
Some consumers, when choosing which insulation is best for a bathhouse on the ceiling, settle on the so-called folk method of thermal insulation. It involves the presence of several layers. The first component is crumpled clay - the layer thickness is 2 cm. If there is no clay, you can use a mixture of peat with chernozem, a combination of sawdust, sand and clay, or wood shavings covered with a cement solution on top. Next, a layer of oak leaves or dry sawdust is laid. The last layer is 15 cm of dry soil.
As one of the options for insulating the ceiling in a bathhouse with an attic, you can use growing aerated concrete. Before pouring it, a simple formwork is required.
It is difficult to say definitely which insulation for the ceiling in a bathhouse is better, as well as to accurately indicate the thickness of the insulating layer. It all depends on the technical parameters of a particular room, its size, materials used, climate zone and a number of other factors. Therefore, if, when using one or another type of insulation, condensation accumulates on the ceiling, then the thickness of the layer is not enough for high-quality thermal insulation of the room. The solution in this situation is to increase the layer of insulating material.
Passage of a brick pipe through the ceiling
A brick chimney is usually designed to protect the surrounding combustible materials from overheating. The section of the pipe that is laid out as it passes through the ceiling is itself a cutting and is called “fluff”.
This chimney design is traditional, long tested, and most often chosen by stove makers.
The “fluff” begins right at the ceiling in the living room (three to four rows of bricks before it) and passes through the entire thickness of the attic floor. Sometimes the fluff is raised to the clean floor of the attic, in other cases it is made flush with the subfloor. Both options can cause quibbles from inspectors - let’s remember the notorious “70 millimeters” already discussed above.
This structural element acts as the necessary thickening of the pipe walls, protecting the flammable materials of the ceiling from overheating.
In fact, the design of the “fluff” is directly influenced by precisely those SNiP requirements that were discussed in the first section of the publication. In order not to repeat ourselves, we can provide a diagram that clearly shows what dimensions must be observed and where:
The diagram graphically displays the basic requirements of SNiP for the location of the stove and chimney, to ensure the safe passage of the pipe through the ceiling
Arranging the passage of a brick pipe through the attic floor without laying out the “fluff”
The hole in the ceiling can be covered with a metal sheet or a fiber cement slab. In the middle of the thermal insulation panel, a window is marked through which the chimney will pass. The length and width of this opening should exceed the similar parameters of the pipe by literally 3–5 mm.
When laying a chimney, approximately three or four rows up to the ceiling, a sheet with a prepared opening is placed on it, and then the laying is carried out further up to the height of the finished attic floor.
The next step is to lift the sheet placed on the pipe, press it and fix it to the ceiling in a way convenient for a particular case - with self-tapping screws or dowels.
Further, the work is carried out from the attic or second floor. Along the walls of the opening cut out for excavation, strips of basalt wool, pieces of asbestos or fiber cement boards are laid. This “frame” should cover the entire thickness of the attic floor. If necessary, the material can be fixed to the floor beams.
Thanks to these operations, a kind of box is created around the neck of the pipe, which will be filled with heat-resistant material. You can use basalt wool as it, which tightly fills the entire volume. If cotton wool with a foil layer is used, then it is turned towards the walls of the oven.
It is quite possible to perform similar thermal insulation of a pipe with expanded clay or vermiculite, but before backfilling it is necessary to seal the remaining gaps between the pipe and the edges of the opening, especially if fine-grained material is used.
Of course, you can do exactly the same as with a metal pipe, by putting a ready-made penetration made from a steel sheet onto a brick chimney. This option will probably be more reliable and convenient both in terms of its installation and reliable fixation, and when filling the box with thermal insulation material. True, such a box will cost significantly more. Whether it makes sense - decide for yourself.
Having filled the penetration with insulation, it is also covered with a metal or fiber cement sheet on top.
At this point, work on arranging a safe passage of the chimney through the ceiling can be considered completed.
Having familiarized yourself with the details of the arrangement of this area of the chimney pipe, you can come to the following conclusion:
Types of premises
Fortunately, there are not many rooms in the bathhouse (in a standard one). Therefore, we will quickly go through the options of what paint to paint the inside of the bathhouse.
Steam room
This is the most problematic room. Many people believe that there is no need to paint anything there at all, but the price for such a decision is rapid darkening of the wood (and almost everyone has a steam room traditionally made of wood or lined with wood), cracking of the wood (this happens more often from poor ventilation during drying), susceptibility to rotting and mold damage (linden and aspen are very unstable species).
So the absence of any protective coatings, on the one hand, should be considered environmentally friendly, and on the other, costly in terms of future repairs.
We believe that a compromise is possible: there are absolutely safe impregnations that protect wood, preventing moisture and dirt from being absorbed. If you have any doubts about whether you should use drying oils, take paraffin oil or another ready-made product designed specifically for the steam room.
You can paint the inside of the steam room with both paints and varnishes, but let them be water-soluble paints. And it would be nice if the label mentioning GOST standards stated that this composition is applicable in the steam room.
Washing
Both silicone and acrylic paints are suitable here. In general, everything that patiently endures the effects of moisture.
Other paints will crack and peel off in pieces under constant exposure to water.
ADVICE! Water dispersions do not tolerate frost well: if the water in the paint freezes, then after defrosting it will lose its quality. Therefore, buy them in the warm season, produced recently.
Impregnations and varnishes are also suitable for painting washing areas.
Again we draw your attention to scuba gear
What paint to paint the rest room and dressing room
These rooms are the least demanding on the composition of paints, so it is best to proceed from budgetary considerations. If it doesn’t run out, you can give yourself a gift and use water-soluble paints again, otherwise, choose a paint that is suitable in color, dullness and durability of the coating from cheaper ones.
Of course, in the second case, it is better to paint when it is possible to ensure the best ventilation and the absence of people. Don't forget to use respiratory protection.
IMPORTANT! Remember that enamels and alkyd paints are fire hazards, but water-soluble paints are not.
Bathroom ceiling: what is best to make it from?
When installing a ceiling in a bathhouse, the owner is concerned with the question of what materials will be needed. For an accurate answer, we must return to the layer-by-layer structure:
- Floor frame. Create a rough ceiling in a bathhouse from coniferous wood. Pine is considered a budget-friendly and easily accessible material. Cedar or larch has an extended service life.
- Facing. The ceiling in the steam room can only be covered with wooden paneling. The board is used from wood that does not transmit heat well: linden, aspen or alder. In other rooms of the bathhouse, pine lining is suitable. It can be lined with plastic, which is especially good for a shower room.
When covering the ceiling, all elements of the pie will need to be secured. Nails and hardware are used only with galvanized coating. Inside the steam room, the casing is sometimes nailed with copper-plated nails.
Rating of the best funds
Let's look at several factory-made products for impregnating bath shelves.
Tikkurila Supi Arctic
Composition from a well-known manufacturer of paints and varnishes from Finland. The main ingredient is acrylate resin. It forms a thin protective layer on the tree that does not allow moisture to pass through and ensures the safety of the wood.
When dry, acrylate resin is very flammable, so the product can be considered fireproof.
The drug is suitable for both Russian baths and saunas.
The main disadvantage of Supi Arctic is that it does not allow the tree to release essential oils into the steam room air.
The cost of a 0.9 liter can is about 500 rubles.
Sauna Natura Saunasuoja
The composition is based on a polymer substance that is absorbed deep into the wood and tightens its fibers, thereby creating reliable protection against moisture. It also contains antiseptics that prevent the proliferation of pathogens, fungi and mold.
A 2.7 liter bucket of product costs approximately 4,000 rubles. The price is high, but quite justified - Sauna Natura Saunasuoja has a long service life and good wood protection.
The impregnation will have to be changed only after 5–6 years. At the same time, rotting and mold are practically eliminated.
Tikkurila Supi Lattiaoljy
An emulsion that consists of linseed oil and tar oil with a small amount of polymer additives. The components also include antiseptic agents that prevent the development of bacteria, fungi and mold.
Suitable not only for protecting shelves, but also for treating walls, floors and ceilings in a steam room.
A 0.9 liter jar of emulsion costs about 1,000 rubles.
Zhivitsa BioGrunt
Domestic protective agent for impregnating shelves in a bathhouse.
Consists of the following ingredients:
- natural linseed oil;
- pine resin;
- turpentine;
- silver.
Linseed oil and turpentine provide reliable protection of wood from moisture, silver prevents the development of microorganisms, and oleoresin gives the shelves a pleasant pine aroma, which becomes even richer when the steam room is heated.
A 0.4 liter container of the composition costs about 700 – 800 rubles.
Neomid Sauna Oil
It is an oil emulsion for treating shelves, walls and ceilings in a bathhouse. Unlike most other formulations, it is made not from natural, but from synthetic oils.
Thanks to this, it is cheaper than analogues. Provides reliable protection against moisture. Absolutely safe for the human body. A 0.25 liter bottle of the product costs about 200 - 300 rubles.
Pinotex Lacker Sauna 20
Water-soluble acrylic emulsion varnish. When dry it becomes moisture resistant. Tolerates exposure to high temperatures well. The composition includes antiseptic agents that prevent the development of fungi and bacteria. The cost of a 1 liter can is 500 – 600 rubles.
Biotex
This product is a mixture of antiseptics that prevent the development of bacteria that cause rotting. The composition protects against water and high temperature due to the presence of wax and paraffin among the components. A 0.9 liter jar of the product costs 300 – 400 rubles.
VGT
The product is an acrylic varnish with special additives that make it moisture and heat resistant
It contains wax, which makes the surface coated with the product more pleasant to the touch, which is especially important for bath shelves. A 2.2 liter container costs 700 – 800 rubles
Teknos SATU SAUNAVAHA
Finnish product based on natural beeswax. It also contains antibacterial agents and substances that promote the absorption of the composition into the wood. The cost of a 0.9 liter can is about 700 rubles.
The right ceiling in the bathhouse: choosing which one is better
What is the best material to make a bathhouse ceiling from? The wording itself suggests that we are talking about a material that would be preferable to use for this purpose.
Resin leaks from heat
There is a certain set of wood types that are usually recommended for interior decoration of a bathhouse. These are mainly deciduous species; among conifers, which are unpleasant due to the release of resin (we will discuss this below), only larch and cedar are recommended.
Of the deciduous trees, linden and aspen are most often used for finishing. One of the reasons is that it is a fairly budget option.
As for the structures, it is impossible to say which ceilings in the bathhouse are better - hemmed or floored. It all depends on other factors - the construction budget, the purpose of the attic space. If money is short, the bathhouse is one-story with a cold attic, then it would be better to make a floor option.
If the construction is thorough, the attic space is of sufficient size to serve as a warehouse or room, then in this case the best ceiling for a bathhouse is definitely a false ceiling.
Those who do it themselves and are not used to working under the ceiling or at heights may find the panel option the most preferable.
Bathroom ceiling: what is best to make it from?
As already mentioned, the components of the ceiling are boards, beams, insulation and insulation.
We personally consider the following to be the best insulation options:
- vermiculite;
- expanded clay;
- ecowool;
- mineral wool for saunas.
mineral wool,
- health safety;
- non-flammability;
- tolerance of high temperatures without melting, etc.
- high thermal insulation properties;
- ease of installation;
- durability.
Styrofoam and fiberglass are not suitable. However, we have described everything about insulation for bath ceilings in this article.
As for the types of vapor barriers, among them there are also those that are more or less suitable for use in baths. What types of vapor barrier materials there are, which of them are suitable for our purposes, and which are better not to use, is discussed here.
It remains to be said about the boards for the bathhouse ceiling. What kind of wood is the most on the market? The correct answer is coniferous. That's why it's cheaper. This means that nothing prevents us from purchasing cheaper beams made from coniferous wood.
These beams will be sewn up, the temperature, of course, will reach them in any case, but this is not so significant, because the main temperature is in the steam room, and there everything is not only sewn up with boards, but also with an additional vapor barrier made of foil. So there should be no resin dripping from the beams.
So, beams can also be made of coniferous wood. The lining of at least the steam room should be from the species that we mentioned above. In the remaining rooms of the bathhouse, you can hem the ceiling with anything.
Details about external insulation
Such insulation can be called external only conditionally, since the insulation is located inside the attic. This option optimally solves the problem of heat loss. In this case, the materials that make up the insulation system are not subject to the aggressive effects of steam and hot air, and the danger of condensation formation both on the surface of the ceiling and between the layers of the thermal insulation system is eliminated.
External insulation of the bathhouse ceiling is carried out from the attic side
Before you begin insulating the ceiling from the outside, thoroughly clean the attic floor of debris and dirt. Inspect the ceiling structure for damage, carry out repair work if necessary and replace damaged elements.
Be sure to treat the base surfaces with a primer and antiseptic (if necessary, mastic) to protect them from the effects of fungus, mold and harmful insects.
There are several ways to insulate a bath ceiling.
Wet method
Pre-prepare the attic floor, which is the outer side of the ceiling, and fill it with the so-called warm mixture. You can purchase it ready-made in specialized stores or prepare it yourself. The components included in this mixture provide high thermal insulation properties:
- expanded clay;
- foam chips;
- wood waste – sawdust, wood chips, shavings;
- slag.
Begin installing the insulation by treating the junction areas. These are gables, rafter system, chimney. After the mixture has hardened, cover it with a moisture-proof material - mastic, special liquid, film coating.
If you use membrane sheets, take care to protect them from mechanical damage.
This kind of work is very easy to do yourself, this is its advantage. The disadvantages include the fact that if it is necessary to repair the floors, it is very difficult to carry out dismantling work.
Dry method
This option is considered the simplest. You just need to cover the surface of the attic with any bulk materials: slag, vermiculite, expanded clay, wood waste. Using wood waste means that you need to carefully treat the chimney junction areas with materials that are resistant to moisture.
Sawdust and expanded clay can be poured directly onto the base of the floor or between joists previously laid on the surface. The joists are needed to make it easier to later plan the laying of sheet material on top if you plan to lay it.
- The advantages of this method are its simplicity, low cost and the possibility of reusing the material. If the sawdust settles during operation, you can add expanded clay or any other “bulk”.
- Disadvantages: replenishment of material may be required very often. In addition, when repair work is required, you will have to try to clean the area to the desired condition.
Using this method, you can also insulate the bathhouse ceiling with mineral wool in slabs or rolls. If you use glass wool for insulation, then keep in mind that you need to provide yourself with personal protective equipment: gloves, overalls, goggles and a respirator or mask. In addition, mineral wool can be left open, but glass wool must be closed.
Mixed option
By combining dry and wet technology for installing thermal insulation, you will significantly expand the possibilities of using building materials.
Pre-level the surface, cover it with mineral wool or fill it with expanded clay. Make a moisture-proof screed on top. It can also be mounted on soft or loose insulating material.
When using this material, do not skimp on reinforcement, even if you do not plan to use the attic later.
Modern technologies
In modern construction technologies, fundamentally new materials are used for work:
- ecowool;
- polyurethane foam spraying;
- ceramic thermal insulation;
- polymer thermal insulation.
Experts consider the last two materials to be insufficiently effective.
Insulation materials in liquid form can be very demanding in terms of storage conditions. If they, for example, freeze, their thermal insulation properties will be lost.
To insulate the ceiling of a bathhouse using polyurethane foam spraying, you will need special equipment, so it is quite difficult to cope with such work on your own. In addition, the resulting monolithic structure will be inconvenient if repair work and dismantling are required.
Choosing the type of ceiling
Currently, several options are widely practiced, each of which has its own technological features and specific purpose. If you want to make a ceiling in a bathhouse, but do not know what type of ceiling surface to choose, it will be useful for you to take a closer look at them.
Hemmed
- suitable for both large and modest-sized bath rooms;
- guarantees good thermal insulation and long-term operation;
- has increased strength;
- requires the mandatory construction of floor beams, which are laid on the erected crown of the log house.
Probably the most common option, loved by many for its strength and safety. The selected wood material is hemmed to the already mounted beams from below, and the free space between them is generously filled with insulation with the obligatory layers of hydro and vapor barrier (read more about this in the article: “How to insulate the ceiling in a bathhouse - choosing a material”).
Grazing
- most often used in small baths without an attic space;
- represents a cheaper and more accessible option for organizing a ceiling base;
- eliminates the possibility of laying a layer of insulation.
If you don’t have an attic in your bathhouse, or you do, but you don’t plan to use it, then this option is for you. In terms of operational characteristics, it is not much inferior to other design solutions, but it allows you to cope with all the details of the repair quite quickly and without special technical knowledge.
Panel
- universal;
- complex installation;
- extremely rigid and durable design;
- massive, requires mandatory sealing of numerous cracks and joints.
Types of insulation with foil for baths
Foil insulation is usually divided into three categories, which have significant differences among themselves.
- Foamed polyethylene covered with a thin aluminum film. It is mainly used for finishing ventilation systems (for example, a chimney in a bathhouse) and enclosing structures.
- Mineral wool (mostly basalt) covered with a foil layer. It is produced mainly in rolls. This tandem provides maximum room insulation. This variety was developed specifically for baths.
- Foiled polystyrene foam. It is made in the form of silver-colored layers. For use on floors only.
Basalt wattle with thermal insulation layer
Depending on the purpose and performance characteristics, the following types of materials are distinguished:
- Rolled foil insulation. Available in different widths. The thickness of the foil layer is from 30 to 300 microns, and the heat-insulating material is from 2 to 40 mm. The price is from 30 rubles per square meter.
Fabric base or kraft paper coated with foil. The material is heat resistant up to 300 degrees. It retains heat perfectly and eliminates the possibility of dampness and mold. Cost - from 700 rubles per roll. Basalt heat insulator with a layer of foil. High fire safety. Heat resistance - up to 160 degrees. Price - about 2 thousand rubles per roll.
Foam insulation with foil layer
In order to make the most effective use of the heat-saving properties of insulation with foil, it must not only be installed correctly, but also correctly selected in accordance with the expected operating conditions and calculate the required amount of material for the work.
When purchasing foil insulation for baths and saunas, you should give preference to materials with a high ignition threshold, since fire safety in a steam room is the main criterion.
In addition, you need to stock up in advance with metallized tape for gluing joints and galvanized fasteners.
Insulation of panel ceilings
If the question arises of how to make a ceiling in a bathhouse that will last a long time, you should opt for the panel type. Such ceilings are made from pre-prepared wooden panels, which are assembled according to a certain algorithm.
First, at a distance of half a meter from one another, two beams are laid on a flat surface, their front edges are leveled with a lath. Then the boards are nailed on top so that their edges protrude beyond the ends of the beams by 5 centimeters. When installing the ceiling, thermal insulation materials will be laid in these gaps. After the boards have been attached, the panel is turned over, and its inner surface is covered with a vapor barrier material and secured with thin slats.
These operations need to be performed outside the walls of the bathhouse, so you will need help to move the wooden panels - you won’t be able to do it yourself. To avoid deformation of the panels during transportation, they must be secured with two jibs, which are subsequently removed.
When laying finished panels on beams, a sealant must be used (usually jute). There should be at least 10 centimeters between the outer surface of the wall and the edge of the panel - this distance will make it possible to install the rafters without cuts at the required angle.
After laying the panels, you can begin to create thermal insulation. If fibrous thermal insulation material is used, its width should be slightly larger than the distance between the panels. In the case of foam insulation, its sheets must be cut exactly according to the distance between the bars.
Waterproofing should be laid on top of the thermal insulation layer - it cannot be placed on the floor beams. It is necessary to place a heat-saving seal between these two layers so that the heat does not disappear due to the joints between the panels.
If the question arises of how to make a ceiling in a bathhouse, it is better to opt for a false ceiling. It will cost more than flooring and panel, but it is strong and will last for many years.
Methods of covering the ceiling
Types of ceilings for baths
- You should know that the ceiling can be suspended; it is this version that is popular among consumers, since it is ideal for small bathhouses, and these are the types of structures that are usually created.
- The ceiling can also be flat; this option is also intended for small structures and is no less successful than the previous option.
- The panel ceiling is an alternative to the previous types of ceiling, but it is much better than the previous options. Therefore, it’s up to you to decide what you need to do to choose the right ceiling for your structure, and not regret your choice.
Panel ceiling
- You need to know that such a ceiling is associated with a prefabricated structure, it consists of a large number of load-bearing beams, you should know this.
- It is customary to install hydro and vapor barriers in a box of this design, but this is done at the request of the customer, so this must be taken into account. In general, it can be insulated using traditional mineral wool, the result is effective and of high quality.
- It is always possible to make a structure of this type outside the walls of a room such as a bathhouse.
Important: It is imperative to take into account that panel ceilings are associated with difficult installation. This means that you will definitely have to ask for help from specialists, unless, of course, you want everything to go efficiently and efficiently. To install it efficiently, at least two people are required, many people therefore refuse this ceiling option, so it’s up to you to decide it's up to you to decide what to do.
What is good about this method of construction?
The composition of the floor ceiling must include the following layers:
- thermal insulation;
- vapor barrier;
- rough ceiling (boards).
This entire structure is not laid on the floor beams, but on the wall framing. There is no supporting frame provided. The layers of the “pie” are entirely supported on the rough ceiling boards, and they, in turn, are held on the walls (load-bearing, permanent partitions). The width of the span should not exceed 2.5 m. The rough boards are selected to be strong and 4-5 cm thick.
The peculiarity of the floor ceiling is that its last top layer is heat-insulating. It is not sheathed with anything, so the thermal insulation remains open. Therefore, you cannot walk in the attic space on top of the floor ceiling - this can lead to damage to the thermal insulation. Even if wooden panels of the internal attic cladding are included in the constructive “pie”, full operation of the deck ceiling is excluded. Load-bearing boards will not be able to withstand the load from the movement of people, furniture, etc. The maximum that this space can be used for is storing brooms, gardening tools, and household items.
Which option will we build?
Thermal insulation, vapor barrier, wooden flooring - all this is included in any floor ceiling. But the layers in the “pie” may slightly change their location. We propose to consider one of the most common flooring structures. The layers are arranged as follows (starting from the top):
- thermal insulation layer - mats, roll insulation, bulk material;
- rough ceiling - boards 4-5 cm thick;
- vapor barrier - film or foil;
- ventilation gap – 2-3 cm;
- finishing cladding - lining.
To assemble such a structure you need to purchase:
- Lining for cladding. Only natural lining made from linden, larch, cedar, aspen, birch and other species is used.
- Vapor barrier material. The most popular material is aluminum foil. It will protect the inner layers of the ceiling from the accumulation of condensation and water ingress. Additionally, it reflects the infrared rays that fall on it, and accordingly, plays the role of an insulating (heat-preserving) layer. More convenient to install is aluminum foil not on its own, but on a paper base, for example, kraft paper. Polyethylene films have good vapor barrier properties; wax paper; cardboard impregnated with drying oil.
- Mounting tape. Assembly or aluminum tape will be needed to seal the joints of vapor barrier material, the sheets of which are laid overlapping.
- Thermal insulating material. to insulate the bathhouse ceiling . Basalt wool (Ursa, Rockwool, Knauf Insulation) holds the palm among such insulation materials. It is distinguished by low thermal conductivity, nonflammability, and durability. Bulk insulation materials are also popular: expanded clay, sawdust, earth, sand, clay with sawdust or straw.
If you are not sure which is better: mineral wool or basalt, we recommend reading the article
- Boards for the rough ceiling. The boards must be of good quality, without defects: cracks, rot, damage from fungi and insects. The optimal thickness is 4-5 cm.
- Bars. For lathing on a rough ceiling.
- Thin slats. Used for attaching lining to a sub-ceiling.
And, of course, don’t forget to prepare small consumables - nails, screws, etc.
What can't be used in a steam room?
It is unacceptable to decorate the walls of the steam room with coniferous species (spruce, pine). The reasons for this are as follows:
- when the walls are very hot, touching them can become unexpected and quite unpleasant;
- drops of released resins can get on the skin and burn it.
It is not recommended to use hardwoods such as oak and walnut. This is explained by their high heat capacity, which leads to the accumulation and retention of heat on their surface.
In a steam room, the walls of which are covered with clapboard made of oak or walnut, it is usually difficult to breathe. In addition, if you accidentally touch them, you can burn your skin.
You should not cover the walls in the steam room with chemical materials: varnish, stain and other similar compounds.
This is due to the harmful effects of chemicals on the human body at very high temperatures.
How to sheathe a steam room correctly
If the argument regarding horizontal laying is accepted, then this is one of the main points on how to properly line a steam room in a bathhouse with clapboard.
Because everything else concerns only the issues of preventing such expansion of wood, which will lead to a violation of the geometry of the wall.
The easiest way would be to avoid swelling of the planks by using boards made of linden wood. Linden is a material that has low expansion when moistened. That is why it is used for the manufacture of bath doors (as well as furniture) - the most sensitive to changes in dimensions.
It would also be worth leaving compensation gaps along the edges of the wall, covering them with decorative strips. These gaps could also serve as ventilation gaps if some distance is left between them and the covering strips.
In general, it’s surprising - in some cases the lining holds up perfectly even in the absence of any tricks for this, but in others it doesn’t just swell, but manages to pull out nails or screws and generally crumble. We believe that its behavior is influenced by the extent to which the tree was dried at the harvesting stage, and, of course, the type of wood as well.
Covering saunas and baths - is there a difference?
But the answer will still be negative. The only difference is that followers of the Russian tradition can use coniferous species in the steam room with less caution, because the Russian bath does not like high temperatures. Well, at least you won’t get burned by the resin if it decides to leak
Resin leaks
BY THE WAY! Since the humidity in the sauna is low, it is more acceptable to place the lining in the bathhouse vertically than in a humid Russian steam room.