A cold floor in a bathhouse is a common problem when using this room. This situation is explained by the extremely unfavorable operating conditions of the coating and, accordingly, of all building materials and architectural structures. The floor is always wet, which increases the thermal conductivity of surfaces. How to fix this problem? Read more below.
Cold floor in the bathhouse, how to fix it
Bathroom floor insulation
What factors influence the arrangement of floors in a steam room?
As mentioned above, when selecting the floor for a steam room, the developer takes into account desires and possibilities.
But professional builders do not recommend focusing only on these factors; there are several more very important points. Ventilation of the floor in the bath Ventilation of the floor in the bath
Type of foundation
- Concrete or metal pile foundations are recommended for use on sloping construction sites and waterlogged unstable soils. The peculiarity of pile structures is the large open space between the floor and the ground. This situation has positive and negative sides. The presence of a distance between the floor and the ground improves the ventilation of the underground space. This has a positive effect on the humidity regime; wooden structures dry quickly, thereby increasing the service life of the floor in the steam room. Another plus is that in most cases there is no need to make special water receivers; it is poured onto the ground, the main part is immediately absorbed, and a small amount can flow outside the perimeter of the bathhouse. The negative side is that the floors cool quickly, the surface is cold, especially in winter. It is necessary to take special construction measures to increase the comfort of staying in the steam room.
Metal pile foundation
Diagram of a metal and reinforced concrete grillage for a pile foundation
- Columnar. The cheapest options for foundations for a bathhouse. Most often, the underground space is open. The positive and negative sides are the same as for the columnar ones.
Various methods of arranging a columnar foundation
- Shallow-depth tape. More durable structures that can withstand significant forces. They make it possible to build large baths with rooms for different purposes. The disadvantages include the difficulty of arranging the floors in the steam room. The fact is that the vents provided in the tape cannot provide the same effective ventilation as a completely open space. This worsens the operating conditions of the floors in the steam room; to prevent the occurrence of negative processes, it is necessary to thoroughly impregnate all wooden elements with antiseptics. Any impregnation is a chemical composition that negatively affects living organisms. From a biological point of view, a person is an ordinary living organism, and also reacts negatively to aggressive compounds. But that's not all the problems. In such baths, under the steam rooms, sewer systems must be installed to drain water. Additional work complicates and increases the cost of flooring in a steam room and requires highly qualified specialists.
Shallow strip foundation
All sewer pipes are assembled before the screed is poured
screw pile
Soil type
The technology for constructing floors in a steam room is influenced by only two types of soil.
- Clay soils do not absorb moisture; all the water remains on their surface for a long period of time. As a result, the humidity in the underground space is high, and the processes of wood decay are accelerated. Under fallow areas on such soils, it is necessary to install a water drainage system.
- Sandy soils quickly absorb moisture and can absorb large amounts of it. Such physical parameters make it possible to simplify the installation of floors under the steam room and washing room as much as possible.
Schemes for installing floors for bath structures
Everything is simple here - the colder the climate, the warmer the floors in the steam room should be. It is strictly not recommended to install cement floors in the northern regions.
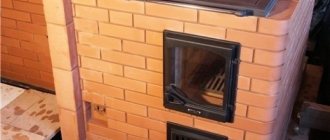
Features of installing a brick kiln
Installation of a masonry furnace requires compliance with its characteristics:
Construction of a reinforced concrete foundation.
Construction of a foundation for a stone oven. Click to enlarge.
A thick layer of mortar should not be placed between the bricks to avoid its destruction when heated and loss of the tightness of the firebox. Don't save your decision unless necessary.
During the brick laying process, the mortar must be squeezed out. Vertical seams must be covered with a top brick.
The overlap should ideally be half the length of the brick. Do not place bricks with the cut side facing the oven.
This precaution prevents the brick from collapsing. Cast iron elements must be installed with a small gap
The upper part of the firebox door must be secured with a metal clamp.
Features of gas heating
A bathhouse with installed modern gas heating has its own characteristics associated with the possibility of gas leakage and explosion hazard:
- Equipped with an automatic safety device that interrupts the gas supply when the flame goes out.
- Using a common pipeline for supplying natural gas, separate for propane and butane.
- The need to comply with general fire safety requirements.
Gas heating of a large spa complex or a classic bathroom is characterized by simplicity and a high level of comfort.
Chimney organization
Scheme of organizing a fireplace in the bath.
Bathhouses have not been heated with black for a long time, and combustion products are removed through the chimney.
You can assemble the fireplace yourself if you have the following materials and elements:
- Passage block up to the ceiling.
- Roof transition (flush).
- Umbrella.
- Sandwich tube.
We should not forget that the design feature of the sandwich pipe is the presence of a heat-insulating layer designed to prevent the ceiling from turning on.
However, this layer may not be enough.
Therefore, when installing gas heating, one should not neglect the provision of additional protection for the chimney exit points to the street.
In this article we have revealed some features of the installation and operation of stove equipment intended for installing a heating system in a bathroom.
It is important to remember that when installing and operating any type of heating equipment, it is necessary to ensure that comprehensive safety measures are taken
Difficult situation with concrete
The most difficult case is insulating a concrete floor in a bathhouse. As a rule, tiles or porcelain stoneware are already laid on the screed. At the same time, the height of the premises in such buildings is usually small. Creating a layer of heat-insulating material and then pouring a new screed or installing a coating from other materials is not always possible due to the lack of free space. Not everyone will decide to remove the existing concrete screed either - it is not an easy task.
The simplest and most logical solution here would be to install a “warm floor” system. This can be either a water circuit, if there is a permanent connection to the heating boiler, or infrared films, which can be mounted anywhere and this is easy to do. In any case, you will have to sacrifice a little the height of the walls. However, the installation of such systems will make the coating warm, and being in the building will become much more comfortable.
Damage or lack of thermal insulation
In this situation, figuring out how to insulate the floor in a bathhouse will be a little more difficult. First you need to understand what is the main source of heat loss - the lack of thermal protection or its violation. If there is a layer of insulation, but it does not perform its function, it may be exposed to moisture. Many heat-insulating materials are very sensitive to water and, when wet, almost completely lose their properties. A complete replacement of the insulation and its high-quality waterproofing will be required.
If the ceiling is assembled incorrectly, the cause of cold may be the lack of a thermal cushion - an air gap between the ground and the insulating material. It should take on the role of an additional shield against the cold and if there is no gap, then the insulation may be insufficient. The solution here is especially complicated - you need to increase the thickness of the heat-insulating layer or create the necessary gap.
Most likely causes
Before looking for a solution to your problem, you need to find out why the floor in your bathhouse is cold. The main reasons for this negative phenomenon can be considered:
- Features of the floor design.
- Lack of necessary thermal insulation pad.
- Poor insulation from moisture of the insulating material.
- Uninsulated floor base in the case of a concrete screed.
Almost all of the problems listed above can be solved relatively easily, with the exception of the case with concrete floors. In the version with a concrete screed, it will no longer be possible to lay insulation under a layer of poured concrete and the entire floor structure will have to be changed, reducing the usable volume of the premises. In other situations, figuring out how to insulate a cold floor in a bathhouse with your own hands will not be so difficult.
Conclusion
A cold floor in a bathhouse can only exist if it was built by illiterate and irresponsible builders. It is much easier, cheaper and smarter to prevent problems from occurring than to correct them later with heroic efforts. This rule, by the way, applies not only to floors, but also to all elements of a bathhouse or any structure or building.
Even in a steam room, where fragrant wood is an indispensable attribute, tiles can be found in the design of the floor and plinth under wooden through flooring. This material is not afraid of temperature changes and high humidity, it is easy to care for and is highly decorative. In a special article we will tell you how to make a floor in a bathhouse from tiles.
Video - Cold underground in the bathhouse
Cold floor sources
The culprits of such discomfort:
- First of all, the foundation may be improperly insulated or not at all insulated. The foundation is the basis of the structure and its correct laying affects not only the floor covering, but also the entire structure;
- the boards used for the flooring are not tightly fitted to each other, which causes drafts;
- installing the floor itself too close or below the foundation level;
- a thin layer of insulating material.
All this leads to the active development of these factors. You should not lose sight of any bark beetles that are not averse to feasting on wood, thereby causing irreparable damage to the wooden structure.
Defrost, but do not damage!
Removal of ice or snow crust should be as gentle as possible. Here are a number of rules, violation of which will shorten the life of the refrigerator:
- Do not sprinkle salt on the ice; salt crystals may damage the plastic parts and surfaces of the device.
- Do not use a knife to remove large chunks of ice.
- Ancient methods of defrosting using a pan of hot water are certain death for the freezer. Using boiling water won't speed up the process much, but it will certainly damage the equipment.
- Hot air from a hairdryer is also a big mistake. This leads to overheating of the plastic parts of the case, which are not designed for high temperatures. This method is no less dangerous for the internal parts of the freezer.
Cold floor in the bathhouse: how to fix it
So, you have a cold floor in your bathhouse, what should you do? Let's consider some situations.
Most often, those who have a concrete screed in their bathhouse face the problem of a cold floor. Concrete conducts heat well; even in a heated room, its temperature will remain quite low.
When thinking about a drainage system, some people leave small holes in the concrete surface to allow water to flow through them. But often they cause drafts and mold.
In this case, you can correct the situation as follows: make a regular wooden sheathing. This is a simple and budget option that is perfect for a bath. Walking on the sheathing will be more pleasant and warmer. In addition, it can be easily dried and, if necessary, replaced with a new one.
We recommend reading:
Pile foundation: advantages, disadvantages, types. DIY sauna on a pile foundation
Some try to solve the problem by laying tiles on top or laying wooden boards “tightly”, but both options will not give the desired result. In the first case, the floors will remain cold, since ceramic tiles, like concrete, conduct heat well. In the second case, it will be inconvenient to dry the wood, which will lead to its rotting.
If the bathhouse has wooden floors and they are cold, then the reason is most likely that there is insufficient distance between the layer of earth and the boards. In this case, it is necessary to make another layer of flooring with insulation.
It is important to choose the insulation wisely, because
The bathhouse has high humidity; not every material can withstand such conditions.
For insulating the floor in a bathhouse, the following are suitable:
Expanded clay is the most popular and safe material. Expanded clay is made from clay, so it has excellent moisture resistance. The material can have different fractions: the smaller the material, the less its heat loss;
penoizol – liquid polystyrene foam. It is convenient because, thanks to its structure, it can penetrate into any cracks and hard-to-reach places and, therefore, protect the room from drafts;
polystyrene foam is a cheap, lightweight material with high moisture resistance. Even if it gets wet, it retains all its properties, and its thermal insulation value is more than 20 times higher than expanded clay concrete.
If the bathhouse has wooden floors made of edged boards, without insulation and gaps are made between the boards for water drainage, then in winter cold air will flow through them.
In this case, you need to dismantle the old covering and floor joists. The beams need to be unscrewed carefully, as they will come in handy later. They must be treated with an electric plane to remove the damaged layer.
Next, you need to remove all mold from the wall finishing boards and dry the surface of the floor and walls, for example, with a heat gun.
We recommend reading:
Strip foundation and its features. How to make a strip foundation for a bathhouse? Step-by-step instruction
Afterwards, you need to drain the water into the sewer; this method will protect the floors from getting wet and eliminate the need to make cracks in the floor covering.
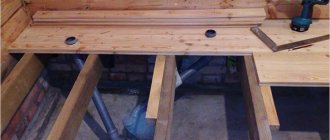
The last stage is the installation of a new floor in the bathhouse. Attach the previously prepared logs, make hydro- and thermal insulation, and install the finishing coating on top.
A fan can help make wood floors warmer. It must be installed as close to the ceiling as possible. As you know, hot air is heavier than cold air, which is why in the steam room on the bottom shelf it is always cooler than on the top. The fan will direct hot air to the floor, and the boards on the floor will heat up, and since wood retains heat well, it will not have time to become cold during steam and water procedures.
It is always easier to prevent a problem than to solve it. If you are afraid that it will be cold to walk on the floor in the bathhouse, then the best option is to make a warm floor.
A cold floor in a bathhouse always indicates that the coating was done incorrectly. In this case, the best solution would be to dismantle the old floor and install a new one, but with mandatory compliance with all requirements. If it is not possible to replace the floor right away, then you can use the methods suggested above that will help make your stay in the bathhouse more comfortable.
5
664
What to do if heat leaves a newly built bathhouse
We solve the problem: heat leaves the new bath
The very thought of a wooden bath gives us associations with something warm and hot. But here’s the paradox - sometimes, steam and heat quickly leave a newly erected structure and the task of heating the bathhouse becomes difficult to complete, especially in the cold season. Such a problem can be solved both at the construction stage and after it. Order turnkey construction of houses and bathhouses (https://ysad.ucoz.ru/index/stroitelstvo_domov_i_ban_pod_kljuch/0-22) on the website https://ysad.ucoz.ru/.
Where does it go?
Let's touch on several key elements of the bathhouse design, the thermal insulation of which determines not only the tightness, but also the speed of heating of the premises:
- Ceiling
- Doors and windows
- Floor
- Bake
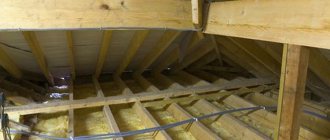
Ceiling
As you know from the initial physics course, heated air rises. And if the ceiling is poorly insulated, then all the heat easily leaves the room. To insulate it, there are both modern and traditional methods:
- Most often, the ceiling is insulated with min. cotton wool It is easy to work with, it is quite reliable and durable. The main disadvantage is that the protective properties decrease when wet.
- Penotherm laminated with foil. It is not only capable of reflecting heat with its “mirror” side, preserving it, but also speeds up the process of heating the steam room by 2-3 times.
- Expanded clay. To achieve the desired insulating effect, the ceiling is covered with a 30 cm layer of this material. Cons - it is quite heavy compared to “soft” insulators.
- Pug. A layer equal to 2 cm is a popular method of thermal insulation of bathhouse ceilings.
- Concrete called "growing". During the filling process it increases 2 times. Know-how, the subtleties of its application are not yet well known.
Doors and windows
The best way to reduce heat loss through doors and windows is to think through their design during the construction stage.
General recommendations for windows:
- Installation below standard level
- Preference for sealed double-glazed windows
- Use sealants during installation
A bathhouse, as a rule, has two main doors: the entrance door and the door to the steam room. The main source of heat leakage is cracks and gaps that gradually form in doorways due to contact of the door material (wood) with the hot and humid air of the bathhouse. The solution to the problem is to use a glass door to enter the steam room, and a metal door to enter from the street.
Floor
To prevent a draft from “walking” across the floor in the bathhouse, it must be insulated. Floorboards are dismantled and insulated the space between the finished and subfloors. To do this, two main methods are used:
- Filling the space with additional insulation (foam plastic, sawdust, mineral wool, etc.).
- Installation of a floor heating system (water, infrared or electric).
- Efficient oven
The stove in the bathhouse is its heart. The choice of furnace material, location and other technical characteristics is treated very carefully and scrupulously. If this choice is made incorrectly, then sooner or later the stove will have to be replaced or, in the case of a brick stove, rebuilt. Unfortunately, other more accessible methods are often ineffective.
Whatever the reasons for heat leakage from the bathhouse, the best solution to eliminate them is an integrated approach. By insulating doors and windows, heat can still escape through the ceiling or floor
It is important to provide for all the nuances and protect all structural elements from leakage. In this case, the room will quickly heat up and delight you with good and healthy steam for many years
Features of pre-finishing
Finishing the dressing room implies its waterproofing and insulation. Such measures make it possible to quickly warm up the room and keep it warm for a long time:
- The ceiling in the dressing room must be waterproofed.
Increased humidity penetrating the roof significantly reduces its service life. Waterproofing the ceiling in the dressing room Insulation with expanded clay or mineral wool allows you to retain heat and reduce the formation of condensation on the ceiling. The use of a foil reflector makes it possible to maintain the required temperature conditions. At the time of finishing, it is recommended to leave technical ventilation gaps; - The walls of the dressing room. Depending on the type of building: frame, log house, brick, etc., a wall waterproofing system is provided. For wooden buildings, a membrane film is used, and brick buildings require a thorough moisture protection system. Otherwise, the building will not last long. Insulation is carried out using mineral wool. It also uses foil material, but you should understand that it “does not breathe” and creates the effect of a thermos. Finishing is carried out with a technical gap; Scheme of wall decoration in the dressing room
- Floor. Taking into account the increased humidity from bathing procedures, it is waterproofed and insulated. Tile cladding has become increasingly used as a finishing touch. It not only provides moisture protection, but also allows you to install a heated floor system, which creates the most comfortable conditions for relaxation.
The question “how to insulate a dressing room?” special attention is paid. The level of comfort and safety of recreation and the service life of the building depend on the quality
If it's all about the overlap
Some types of floors, called “leaking”, have one feature - they have cracks through which water flows into a drainage drain or directly into the ground. From there, naturally, cold air from the street will enter the room and cool it down. Such a bathhouse has to be heated much more intensely, and it cools down faster. The solution here is not easy and will require a radical reworking of the entire ceiling.
The image above shows an example of a floor drain arrangement. After the reconstruction of the ceiling is carried out, you will forget what a cold floor in a bathhouse is and will be able to use it in much more comfortable conditions.
We suggest you familiarize yourself with How to install a door closer on a gate with your own hands
Stage one. Organization of water drainage
These works can be considered preparatory work, but without them you cannot start pouring the floor. We chose the most difficult option - the bathhouse was placed on a strip foundation.
Step 1. Draw up a sewer plan taking into account the placement of the steam room, locker room and other premises. At the same time, carefully consider the installation location of the water receiver, if one is planned to be installed. The receiver can be made from an ordinary metal or plastic barrel with a volume of approximately 100–200 liters; holes should be cut on the sides and bottom of the container using a grinder.
DIY septic tank from barrels
Step 2. Dig trenches according to the diagram. Observe the slope; the difference in height per linear meter should be approximately 1–2 cm. There is no need to use special instruments; the slope can be checked by eye or using an ordinary level.
Trench
Step 3. Level the bottom and lay plastic pipes. There is no need to add sand, the depth of the trenches is insignificant, and the sewerage system will not experience much pressure. If we take the drainage level in the steam room as zero, then the maximum depth of the trench at the exit from a 6 m wide bathhouse will be approximately 25–30 cm. There is no need to be afraid that the water will freeze in the winter. First of all, it's warm. Secondly, the slope ensures complete drainage, the pipes are always empty, and there is nothing to freeze.
Pipe slope control by level
How to use a bubble level to control the slope of pipes?
- Place the device on a flat surface, take a ruler and place it on a level at a distance of 50 cm from the beginning.
- Raise the device until the clearance between it and the plane is equal to a centimeter.
- Visually remember the position of the bubble on the scale or make a mark with a marker. In the future, when checking the slope of the pipes, use the mark you made.
Step 4: Assemble the drain inlet and attach it to the pipe. To facilitate the assembly process, you can use soap, soapy water or sunflower oil. Wet rubber seals with these liquids. It is strictly forbidden to use automobile oil for these purposes - the rubber in the seals is ordinary, automobile oil will ruin it and will have to be completely changed.
Assembled elements of internal sewerage
Seals should be moistened with oil or soapy water.
If necessary, make holes in the foundation strip
Sewage installation
The pipe is laid on a bed of crushed stone to create a slope
Step 5. Check the functionality and serviceability of the drain. To do this, fill a liter jar with water and place an empty container of the same volume at the outlet of the sewer pipe. Pour water into the receiver and see how much comes out of the sewer. If the volume is much less than the filled volume, this means that the pipe is laid with differences in height, water is retained in uneven areas.
Everything is normal - fill the trench, carefully compact it every 10 cm of soil height. For compaction, you can use any convenient means at hand.
Manual tamping
It is advisable to slightly moisten the soil before compacting. Keep in mind that subsidence under a layer of concrete can cause major problems. After installing the drain, further construction work can continue.
What to do with the finished floor
The resulting coating is quite smooth. The final stage may be processing with a grinding machine. After this, it will be pleasant to walk on such a floor, but it is better to make a beautiful finish.
Hand grinder
Today, ceramic tiles are often installed in bathhouses. You can use special types - for example, glass. It has the highest strength and abrasion resistance. In addition, the tiles are not afraid of strong temperature changes.
There are entire collections on sale, created specifically for bath conditions. There are mosaic coverings in the form of sea pebbles on the bottom or entire ceramic paintings. In short, you can find a finishing option to suit every taste.
Glass mosaic tiles for floor
Finding a solution
After all, a metal stove in a bathhouse is red-hot, especially if it is heated with coal, it is impossible to approach it, and the floor is cold and in the far corners of the bathhouse the temperature is much lower.
This happens because the zone of maximum heating of the oven is 40-50 cm above the floor level, from this level the air begins to circulate intensively, and directly above and below the floor there is practically no convection, so the floor heats up much less.
Read here how to “make” the stove heat the floor in the bathhouse
Conclusion:
it is necessary to “force” the air to circulate, starting from the underground space.
How to do it?
There are two ways.
- Lower the stove below the floor level by 60-70 cm. But in this case, servicing the stove will become difficult and more space will be required for it.
- Make a screen around the stove from a fireproof material, such as metal or brick. With this method, the space occupied by the stove will increase slightly, but the risk of getting burned from a hot stove will be significantly reduced, and the screen will also serve as a heat accumulator. And its main purpose is to change the direction of the convection flow, which in this case will start from underground.
According to theory, the conclusions are correct; all that remains is to implement them and confirm them in practice.
The main areas in the bathhouse and the features of using the floors in them
The bathhouse is divided into several thematic areas:
- Steam room.
- Washing room.
- Waiting room.
- Rest room.
There can be even more zones, for example, sometimes a shower and sauna are added. Conversely, some sectors can be combined and reduced to two - an area for direct procedures and a locker room/rest room. Therefore, the whole question of how to cover the floor in a steam room of a bathhouse comes down, first of all, to the degree of exposure to harmful factors in a particular place.
The most extreme conditions for the floor are created in areas of high humidity and temperature, as well as from exposure to detergents. At the same time, in the waiting room these destructive factors are practically excluded. However, the proximity to the bathhouse and the street always carries excess moisture. Therefore, even here it is necessary to use special processing tools.
The main factors of material destruction are:
- Heat.
- High humidity.
- Water.
- Formation of mold and mildew.
- Detergents.
- Temperature changes during the cold season.
Destruction of a wooden floor in a bathhouse by rotSource ytimg.com
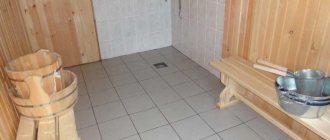
Bathhouse, steam room, washing room
Premises in direct contact with water and heat are exposed to the most destructive factors. Therefore, first of all, you need to know how to cover the floor in the bathhouse and steam room. As a rule, there is a special antiseptic for this. However, the effectiveness of the products used depends not only on the composition, but also on the structure and material of the floor surface.
In the steam room and washing area, the floor is made of wood or concrete. The first option has two varieties:
- Pouring. It is lined with boards located at a short distance from each other. Water naturally drains down into the gaps that form during bathing procedures.
- Solid. It also has a wood base, but unlike the version described above, water does not pass through the surface, but goes into the sewer system through specially equipped drains.
Shower floor in the bathhouseSource ytimg.com
The concrete floor in the bathhouse is continuous and sloped to facilitate water removal. A wooden sheathing is usually placed on top of the screed. A metal flat bowl for catchment can be additionally installed at the bottom of it. In addition, tiles made from natural or artificial materials are often laid at the final stage of finishing.
Dressing room, rest room
The steam room and washing room are only half of the bath, because in many respects the effect of the procedures depends on the correct subsequent rest
Therefore, it is also important to know what the floor in the dressing room should be like - what is best to make it from in order to provide all the necessary conditions for the relaxation room and locker room
Insulation of the floor in the dressing room with expanded claySource banyabest.ru
The floor in the dressing room is made based on how the bathhouse itself is used. If it is fully used all year round, then the floor surface must be insulated. The peculiarities of the operation of this room are that steam, splashes, dampness, and temperature contrast will also be constantly present in it. They are protected by a properly selected coating and a well-assembled structure - double flooring, insulation, hydro- and vapor barrier.
Modern heated floors in the bathhouseSource pikabu.ru
How to insulate a dressing room from the inside
Probably every owner of his own house or summer cottage dreams of building a bathhouse.
You can entrust this work to specialists, but with all the variety of materials and a sufficient amount of information, it is possible to bring your plans to life on your own.
How to insulate the walls in the dressing room with your own hands, as well as the floors - these are questions that you need to think about already in the process of building a strip foundation.
Scheme of wall insulation in the dressing room
The room in the bathhouse preceding the steam room is of great importance for the functioning of the entire structure:
- eliminates the possibility of cold air entering the steam room;
- promotes long-term heat retention in the bath itself.
If we talk about a small bathhouse, its area can be approximately 6 square meters. m. or per person should be approximately 1.3 square meters. m. The dressing room should have good lighting and be warm enough. It is better to make windows small and place them higher than usual.
The process of insulating walls in the dressing room
- a fairly spacious room, equipped at the request of the owners;
- combining a shower and a swimming pool in a bathhouse;
- hydrobox.
When choosing insulation material and floor covering, you need to pay attention to the functions of the dressing room and always remember that this room is exposed to strong moisture.
The dressing room must be insulated. When insulating it, you need to take a responsible approach to the choice of insulation, with the help of which the room will maintain a suitable temperature in the winter. The material must have the following properties:
- moisture resistance;
- fire safety;
- environmental friendliness.
Often, when carrying out independent insulation, they give preference to foil-coated polyethylene, the presence of which will help equalize temperature changes.
Finishing the outside of the dressing room with eurolining or other materials will serve as additional thermal insulation.
Traditionally, the walls in the bathhouse are made of wood. This is an environmentally friendly material that gives the structure a solid appearance and good quality. It is easy to breathe in a wooden room, and the steam becomes richer.
But some still prefer to build a bathhouse from brick or foam and cinder blocks, the latter themselves being a heat-insulating material, having a porous structure.
However, in severe winters they freeze, making the room cold and causing stains on the walls. Therefore, the walls in the dressing room can be insulated:
- mineral stone wool;
- fiberglass;
- polystyrene foam.
The process of insulating a bathhouse with foam plastic
It is best to cover the top of the insulation with polystyrene foam; it is very durable, cannot be compressed, is frost-resistant, durable and does not rot.
A frame made of timber is installed on the walls, maintaining a certain distance and location depending on the material. Insulation is laid between the slats, then a layer of foil polystyrene foam is attached on top of it, which should face the inside of the dressing room.
Then everything is covered with finishing lining, which is sewn onto the sheathing. The variety of existing finishing materials allows you to decorate the interior of the bathhouse to the taste of the owners. Wooden components can be treated with bath varnish or special impregnation.
Video instructions for insulating walls and floors in a bathhouse.
Some tips
To prevent dampness in the dressing room, the door to the steam room should be small, open inside the dressing room, and ventilation must also be properly arranged. In dry, warm weather, all doors in the bathhouse are opened and the room is thoroughly dried.
Floor insulation
Is it necessary to insulate the floor in the dressing room? How to make sure that after a hot steamy foot a person does not end up in a cold environment?
Warm floors will help you quickly heat the bath to the desired temperature and maintain a suitable microclimate in the room for a long time.
There are many different solutions for this purpose.
Warm water floor
Traditionally, wooden floors are built in the bathhouse. They retain heat well and are pleasant to step on with wet feet. But if you choose a concrete slab foundation. then installing a warm water floor is suitable.
Scheme for installing a warm water floor in a dressing room
This is a completely rational and significant option, because the use of such a system is completely safe. However, you need to know that in this case it will be necessary to install the boiler and all the structures due to it.
Electric floor
Do not forget that there is increased humidity in the bathhouse and dressing room. When constructing an electric floor, enhanced waterproofing is needed, and the wooden components must be well treated with a special compound. There are the following models of electrical installations:
- cable (convection);
- film (infrared).
Cable floor
https://www.youtube.com/watch?v=hSwHNrWGAYQ
Cable floors come with a power of 250 watts per 1 sq. m. A single-core or two-core cable is laid in mat slabs. It is better to give preference to the second option.
READ MORE: Laminate flooring in the hallway, features, types and installation instructions
Diagram of a cable field for a bathhouse
The energy consumption of such a floor is higher than that of a film floor, but the system is very reliable, well adjustable and suitable for all types of coverings.
Infrared floor
Infrared (film) flooring is a rolled-up thermal film containing flexible carbon strips. This design is harmless and highly durable. Equipment for such models will not be cheap. There are budget passive types of floor insulation.
If the owner of a bathhouse has a concrete floor in the dressing room and does not want to spend his energy and money on insulating it, then you can simply cover it with boards or mats. Sometimes it is not necessary to insulate the floor here; insulation in the steam room is more important. But mostly such work is carried out in the dressing room.
Scheme for insulating a concrete floor in a dressing room
To insulate a concrete floor, you need to select a material that allows air to pass through well to avoid condensation accumulation.
This can be prepared by foaming, polystyrene foam, polystyrene foam or natural expanded perlite.
Expanded polystyrene and polystyrene tiles are laid in layers on the subfloor, and perlite is mixed with water and cement, placed on the floor, it must dry for at least 2 weeks.
There are other types of materials for insulating a concrete floor in a dressing room:
- glass wool or felt;
- expanded clay sand;
- gravel;
- boiler slag, etc.
A concrete floor will undoubtedly last a long time, but many still prefer wooden structures. And insulating them will not be difficult.
A waterproofing material, for example, roofing felt, is laid on the subfloor, and insulation is placed on it. Then another layer of waterproofing is laid, and then the plank floor is laid. All wooden structures must be treated with special agents against fungus and mold. The following materials will be suitable for insulating a wooden floor:
- glass wool or stone wool;
- Styrofoam;
- expanded polystyrene.
The option with a wooden floor in the dressing room is current. Proper insulation will significantly reduce body losses. And in the steam room, for long-term use, the floor can be made of concrete.
It has high strength and is not subject to chemical reactions. A well-decorated room in front of the steam room will allow family or friends to comfortably spend time in the bathhouse, cheer up and improve their health.
- How to make a waiting room warm
- How to make warm dressing room floors Warm dressing room walls
- Warm ceiling
Even the smallest bathhouse has two rooms: the first is the room in which they undress, the second is the steam room.
So that in the first room the temperature allows people to change clothes comfortably, and in the second the high temperature remains as long as possible, you need to think about how to insulate the dressing room and steam room before starting construction of the bathhouse. During the design work, future heat losses through windows and doors should be immediately taken into account.
The insulated dressing room does not allow cold air to enter the steam room and ensures that the temperature in the steam room remains high. You can also insulate an already built bathhouse.
Scheme of insulation of a brick bathhouse using ventilated facade technology.
The greatest flow of cold air enters the dressing room through doors and windows. In small baths, the area of the dressing room is small - on average it is 1.5 x 2.3 m. One small window is enough to illuminate such a room.
A window with a double frame is installed, and the width of the window opening is made larger than its height, the lower edge of the window is located at a distance of 1.5 m from the floor.
All gaps between the frame and the wall opening are carefully sealed, which also ensures insulation of the dressing room.
Nowadays, a bathhouse is one of the mandatory holiday attributes for many Russians.
Owners of summer cottages and residents of the private sector who have built a bathhouse on their site often encounter the phenomenon of condensation in the dressing room.
Water drips from the ceiling, the walls get wet, mold and mildew form, which, in turn, harms not only the structure itself and the things stored there, but also human health.
Condensation is the name given to moisture that settles on walls and ceilings due to temperature differences.
On the one hand, this is the warmth of the interior, on the other, the cold from the street. The steam settles on the cooler surface, forming dampness.
A number of factors can influence the formation of moisture:
- Violations during thermal insulation work. A thermal insulator, for example, polystyrene foam, does not “breathe” simply because it does not allow steam to pass through it, which results in the formation of moisture. Sometimes the reason is the dew point, which is located not outside, but inside the room, causing the walls to become damp and wet. Recall that the dew point is the temperature at which steam turns into water.
- Violations during ventilation installation. The temperature in the steam room and dressing room varies significantly and when the doors are opened, steam settles in the room and flows down the walls.
- High humidity in the room. Water evaporates in the form of steam, collects near the walls and ceiling and forms condensation.
- High air temperature, especially in winter. The temperature in the bathhouse (dressing room) is always higher than the temperature outside, and in winter this value can be tens of degrees. Steam settles on a colder surface, windows sweat, and moisture collects on the walls and ceiling.
Reasons for a cold floor in a bathhouse
There are several factors that negatively affect the floor temperature in a bathhouse:
- lack of thermal insulation or its thickness is incorrectly selected;
- violation of thermal insulation sealing;
- non-compliance with flooring technology in the bathhouse.
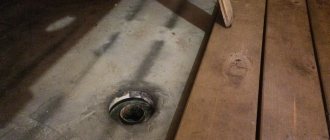
In the photo - there should always be a drain in the steam room, but often the floor is so cold that it is necessary to lay wooden walkways
These are just a few reasons, each building may have its own nuances. Before specifically considering the problem of a cold floor in a bathhouse, you need to learn a little about the specific requirements for coatings. This knowledge will allow you to avoid mistakes at the construction stage (and this is the most optimal way to solve the problem of a cold floor) or make the right decisions on insulation already during the operation of the bathhouse.
Schemes for installing floors for bath structures
Table. Specific requirements for the construction of the floor in the bathhouse.
| Name, photo | Short description |
| Maximum moisture resistance | The floors in the bathhouse have long-term direct contact with water at elevated temperatures. These conditions are the most favorable for the development of putrefactive processes and fungi. It should be borne in mind that currently there are no impregnations that can completely protect lumber for a long period of time. Only the integrated use of various construction and technological measures guarantees long-term use of the bathhouse. |
| The underground must have natural ventilation | There is no point in hoping that problems with rotting lumber can be solved only by impregnation with antiseptics or sealing; even theoretically, they cannot guarantee a long-term positive result. Natural ventilation, accordingly, cools the floors, this must be taken into account during their installation. But there is no way to do without it. |
| Water drainage issues should be addressed | To do this, it is necessary to install drainage sewer pipes, make receivers or settling tanks, etc. All these utilities make the arrangement of floors in the bathhouse even more complicated. |
Floor ventilation in the bathhouse
It is very difficult to make a high-quality, durable and at the same time warm floor in a bathhouse, even using the most modern building materials and technologies. What did our ancestors do? Very simple. For the floors, coniferous wood logs sawn in half were used; the thickness of the coating reached 15–20 cm. Due to this, they did not freeze, were not afraid of underground ventilation, and retained their strength for several decades. After 30–50 years, the frame was raised, the rotten floorboards and lower crowns were replaced with new ones. After such repairs, the bathhouse again served regularly for several decades. Currently, this technology is not used for various reasons. What to do if you need to insulate the floor of a bathhouse in use?
Insulation of floors in the bathhouse
Laying pipes in dry soil
The first thing you need to pay attention to before supplying water to the bath is the level of the groundwater table. The oldest and most proven method of laying water pipes for a steam room without unnecessary tricks and tricks requires compliance with two conditions:
When laid to a depth of at least 50 cm, the polyethylene water pipe becomes flexible and elastic enough to withstand the pressure of frozen water without damage. The only weak point in the bathroom plumbing remains the metal fittings - taps and squeegees, with the help of which individual branches of the water supply are traditionally connected.
Advice! To avoid the destruction of ice caps, a section of polyethylene water pipe laid through an unheated room is not connected with steel squeegees and joints, but is butt welded in the form of a continuous line.
If, after closing the bathroom, less internal volume remains in the pipes, you can connect the polyethylene winter water supply in any available way, but the line itself is insulated with polystyrene foam.
Insulation using traditional methods
The simplest folk method is still used today: before taking a steam bath, a large amount of boiling water is poured over the cold floor. The procedure must be carried out until the oven warms up the floorboards, joists and subfloor. The technology is simple, but too troublesome.
For stone baths on a foundation, you can insulate the floor with a mixture of grated and baked clay mixed with chopped reed stalks. To prevent the insulation from getting wet from moisture, the top was covered with larch or oak sawdust.
The most difficult option was to form channels in the underground from clay and rye straw. By passing hot air from the stove, the floor of the bathhouse warmed up and remained warm for 4-5 hours.
Bad experience
In the spring I started remodeling, the first thing that seemed most obvious to me was to insulate the walls, ceiling, and most importantly, make a wooden floor. The floor was raised by joists by 15 cm, the height of the ceiling did not allow for more, the walls were covered with planed boards, at that time there was no lining on sale, at least for us. A new winter approached and the result did not impress me, no, of course it became much warmer and the duration of the fire was reduced, but the temperature gradient along the altitude still remained significant. The floor was still quite cold; I had to pour boiling water on it before starting to wash. I will not describe in detail how I experimented in subsequent years, until I realized that the reason was not so much good insulation, although this is also important, but poor air circulation in the bathhouse.
Insulation using traditional methods
We warn you that traditional methods of floor insulation can hardly be considered effective by modern standards. In addition, they require a lot of time and physical labor. But there are developers who prefer to build baths only using ancient traditional technologies.
| Insulation | Description |
| Straw | For floor insulation, only rye straw is used; wheat straw is not suitable - it rots quickly. In addition, rodents love this kind of straw. The straw must be chopped and mixed with clay in a 1:1 ratio. The clay should be liquid. You have to mix with your feet or by hand. The minimum thickness of insulation is 20 centimeters. The liquid solution is placed on an earthen base, leveled and left to dry. |
| Sawdust | The preparation process is no different from the version with straw. Sawdust can be taken from any type of wood, but coniferous ones are better. They contain resinous natural substances that significantly slow down the decay process. |
| Bulk insulation | You can use slag, expanded clay, waste from brick factories, etc. The materials are usually poured onto the ground. A layer of clay at least ten centimeters thick is compacted on top. |
Shower floors for baths on columnar or pile foundations
For a bathhouse, a columnar or pile foundation is considered the best foundation. The advantage of the design is not only its cheapness and ease of construction. The pillars or piles are spaced at specific intervals. There is no closed ring, as is the case with a concrete strip. An ideal ventilated space is formed under the floor of the bathhouse. Even if drainage is organized on loose soil, the underground will dry out quickly. The floorboard will not withstand dampness, will last longer, and there is no risk of mold quickly spreading.
Important! With a columnar or pile foundation, a drainage underground can be organized even on clay soil that does not absorb water well.
The bathhouse is erected on a hill. Water should flow completely down the slopes and not stagnate in puddles under the pouring floor.
The logs are laid on pillars located throughout the entire area of the underground space of the bathhouse. The optimal distance between them is 80 cm. The logs can be hewn logs or a board with a section of 50x100 mm. The pillars are erected square with a side size of 400x400 mm. A hole 600 mm deep is dug under each support. Sand 200 mm thick is poured onto the bottom, filled with water, and compacted.
The pillars are erected from cinder blocks, concrete blocks, or poured monolithic from concrete mortar. All supports are checked with a level so that they rise to the same height. When leveling, the pillars are raised with a cement screed.
Attention! It is unacceptable to use red and sand-lime bricks for the construction of pillars. The material degrades quickly
Heavy bath floors will sag over time.
The laying of the logs is carried out half a month after the erection of the pillars. Between the wooden elements and the concrete surface of the support, waterproofing from a double layer of roofing material is laid. The edges of the logs are additionally fixed to the lower crown of the bathhouse frame with mounting metal corners. After laying all the elements, the pouring floor board is nailed.
The sequence of insulating a concrete floor from the inside of the room
Carrying out insulation inside has its own characteristics:
- the dew point is located inside the mounted structure;
- the room does not have frost protection;
- with this method it is necessary to create waterproofing on the cold side;
- reinforced cement screed is poured on top of the insulation;
- the insulating layer significantly reduces the height of the bathhouse room.
There are materials that have high strength and make it possible not to reinforce the screed.
Carrying out installation
To install polystyrene foam insulation you will need:
- knife for cutting insulation;
- container with polyurethane foam;
- glue;
- foil-coated polyethylene is required for insulation pairs;
- metal construction tape (for gluing polyethylene sheets).
How to properly insulate a concrete bathhouse floor?
Necessary tools for working with mineral wool:
- tool for cutting material;
- tape for gluing joints of film or membrane material;
- polyethylene film for waterproofing;
- thermal insulating membrane for vapor barrier.
The process of insulating the floor in a bathhouse is very responsible; it requires a competent approach in choosing the material, as well as in following the technological process. It is faster, easier, and more effective to insulate with polystyrene foam than with a mineral slab. The cost of the material will pay off in the process of comfortable and durable operation.
Each bathhouse room performs its own function. For example, waterproofing is most important where people wash directly. In other rooms, for example in a room, for rest or in a dressing room, it is not so important.
When carrying out work in an already built bathhouse, the ideal solution would be to create a layer of insulating material on top of the existing base. The insulation is inserted between the built-in joists.
https://youtube.com/watch?v=nH8EUT14t0Q
In the steam room, the floor should be higher for the fastest heating of the air; the smaller the steam room, the faster it heats up. Before carrying out work, the required materials are calculated. Insulation of the bath should be carried out under favorable weather conditions. Under such circumstances, work will be challenging and satisfying.
Material selection
Traditionally, when building a bathhouse, profiled timber or rounded logs are used. The tree has thermal insulation properties and is frost-resistant. Walls made of timber and logs do not require finishing. However, such materials are flammable and subject to shrinkage. To prevent cracks and deformation of load-bearing elements, it is necessary to provide temporary boxes for window frames and doorways, and leave gaps between the partitions and the ceiling. A rounded log requires special care: caulking with moss, tow or jute. The procedure should be carried out during construction or after it if you find gaps after shrinkage after 1–2 years.
Construction from a frame will cost less. The binding of the main elements of the building is made from edged boards 50x150 mm. Then the frame is insulated and covered with finishing material. This technology is suitable for miniature buildings 3x7 and quite spacious 7x8, 7x9.
Less commonly, bathhouses are built from brick and foam block. Artificial stone requires additional moisture insulation and interior finishing.
The components of the walls and ceiling of the steam room must be protected from high temperatures. The structures are covered with construction foil and mineral wool insulation. The final finishing of the walls and ceiling is lining.
Features of expanded clay
The appearance of expanded clay is oval granules. It is produced using clay firing technology at high temperatures. Insulation on the market is presented in a sand composition or in the form of gravel. Sand, whose fractions range from 0.14 to 5.0 mm, is used in the manufacture of building mixtures or as insulation for ceilings. Gravel (5.0 -14.0 mm) is used for floor insulation, including bath rooms.
Appearance of expanded clay
The advantages include the following qualities:
Along with other insulating materials, the disadvantage is the need for mandatory waterproofing equipment and long installation times. However, preliminary preparation of materials and accessories, consistent and correct organization of work minimizes the time required.
Expanded clay insulation technology
Do-it-yourself insulation of the floor in a bathhouse with expanded clay is carried out in the following sequence:
- Cement, sand, expanded clay of various fractions, and vapor barrier material are purchased in advance. Prepare accessories for marking, a tool for distributing mixtures, and a container for preparing working solutions.
- Clean the surface of the insulated bath floor from the old decorative coating. If it is missing, level the ground and carry out thorough compaction. Wooden floors are treated with antiseptic agents.
- To prevent moisture absorption into the expanded clay, waterproofing is provided. For this purpose, special materials or thick polyethylene film are used, the installation of which is carried out with an overlap on the walls of the room above the line where the insulation is placed. After the final installation of the insulation, the excess waterproofing is cut to the required length. The film joints are connected using standard tape or another method.
- They ensure the same height for laying insulation on the floor surface by placing construction beacons. The technology for their installation is standard, taking into account the filling height of expanded clay granules of at least 150.0 mm. In this case, it is necessary to provide for a slope of the coating towards the sewer drain.
- Expanded clay granules are filled to the level of the “beacons” by sequential compaction of the sections. It is allowed to lay expanded clay in packaging bags without breaking the integrity. The gaps are filled with a scattering of composition.
- In order to strengthen the insulating cushion made of expanded clay, reinforcement is carried out with a special mixture, the composition of which includes cement in a ratio of two parts to three sand with water up to 20 percent by weight. The voids between the granules are evenly filled with the finished composition. This technology provides additional protection against moisture penetration and strengthens the insulation layer, preventing subsidence. Builders call the mixture “milk.”
- After the “milk” has completely dried, they begin work on forming a concrete screed, the thickness of which is 30.0 - 40.0 mm. There are no special requirements for the screed.
- If the floor covering is made of wooden planks, then the insulation is placed in the niches between the joists with a preliminary laying of a protective polymer film in them.
Based on the above information, we can conclude that the point of view of individual owners about the optional insulation of the bathhouse from the floor side is associated with significant costs of money and time - wrong. They will more than pay for themselves with a comfortable pastime in a room with warm floors and a hot steam room. The absence of heat loss will allow you to warm up the bath faster and with less energy, and the heat will remain for a longer period. At the same time, floor insulation work does not require the owner to have any special training - household skills and tools available in a country house are sufficient.
The procedure for carrying out work by floor insulation specialists is presented in the video below.
Procedure for floor insulation.
Laying principles
To reliably protect insulation from moisture, you need to know how to properly install vapor barriers on different surfaces.
Ceiling
Stages:
- Cover the prepared rough ceiling with boards. The thickness of the coating should be 6 cm.
- Secure the foil film over the formed sheathing.
- Lay out softened clay.
- Place a vapor barrier.
- Lay out the insulation.
- Secure wooden decking or moisture barrier membrane.
Walls
Stages of vapor barrier installation:
- Stuff the frame from bars with a cross section of 50x50 mm.
- Lay insulation in individual sections of the sheathing.
- Secure vapor barrier material. Installation must begin from the far corner. The joints are taped with metal tape. It is recommended to fix the film using a construction stapler.
- Stuff the frame with slats to create a ventilated gap.
- Fasten the finishing material.
Floor
. Stages of arrangement:
- Cover the wooden flooring with a layer of coating waterproofing.
- Basalt wool is fixed on top of the dried coating.
- Cover the insulation with a vapor barrier layer.
- Place wood flooring.
If you want to make a floor covering from tiles or porcelain stoneware, you need to form a concrete screed.
Features of expanded clay
The appearance of expanded clay is oval granules. It is produced using clay firing technology at high temperatures. Insulation on the market is presented in a sand composition or in the form of gravel. Sand, whose fractions range from 0.14 to 5.0 mm, is used in the manufacture of building mixtures or as insulation for ceilings. Gravel (5.0 -14.0 mm) is used for floor insulation, including bath rooms.
Appearance of expanded clay
The advantages include the following qualities:
Along with other insulating materials, the disadvantage is the need for mandatory waterproofing equipment and long installation times. However, preliminary preparation of materials and accessories, consistent and correct organization of work minimizes the time required.
Thermal insulation of a concrete floor in a bathhouse
Another type of flooring in a bathhouse consists of a concrete base. Concrete floors must be insulated as follows:
- A layer of bitumen mastic is applied several times to the concrete for waterproofing. Properly performed waterproofing of the bathhouse floor in the washing room will help avoid many problems. When applying several layers, the previous coating must dry.
- Place insulator from rolls.
- The next layer will become insulating. You can use bulk thermal insulation materials such as expanded clay.
- Next, all this must be compacted and the floor screeded using a solution of sand and cement. The height of the screed should be at least 3 cm. The main thing at this stage is to create a very durable layer, in which the reinforcing mesh will help. Reinforcement is a must!
- The top of this floor can be covered with ceramic tiles. Only non-slip sauna floor tiles should be used, taking into account safety rules.
There is a way to fix a cold floor in a bathhouse when installed with a concrete base. You can build a so-called “warm floor” under the tiles. This will significantly increase comfortable conditions and add warmth to the room.
A large amount of water is used in the bathhouse washing room. To do this, it is necessary to create its outlet from the premises.
- The base of the floors must slope towards the drain.
- The drain hole can be one large or several small ones. It is advisable to equip a large passage with a drain mesh.
- A siphon is installed in the drain itself, which prevents drafts and disgusting odors from appearing from the drainage pit or sewer.
Conclusion
All stages of thermal insulation of wooden structural elements must be carried out in accordance with the rules for preserving wood. It is necessary to use antiseptic agents for the flooring. Such products will create a polymer heat-resistant layer that will “breathe” and be easy to clean. Some finishing compounds can give wood a beautiful shiny appearance.
To summarize, if it’s cold in the bathhouse, what should you do? First of all, check the floor and walls for cracks that create drafts. The source of the draft can be a damaged siphon in the drain in the absence of the required water level.
Signs that there really is a problem
You can make sure that the floor in the bathhouse is really cold by the following direct and indirect signs:
- Before starting the heating of the bath, the floor surface, in any of its functional zones, has a lower temperature relative to the rest, where it is more or less leveled. First of all, this concerns the washing and steam room.
- In frosty weather, you may find localized areas on the floor that are covered with frost. In conditions of warming and rising temperatures, such places simply become steadily damp.
- Bathhouse visitors with bare feet clearly feel the movement of drafts across the floor, and it is impossible to clearly localize their source, they seem to be “blurred” in space.
- The heated bathhouse quickly cools down, and this happens extremely unevenly. The walls and ceiling are warm to the touch over the entire surface. A lighted match, lighter or candle brought to them does not show the deviation of the flame caused by active air leaks. At the same time, it is tactilely felt that the lower, near-floor area of the room loses temperature most quickly.
- Walking on the floor for a long time, even in bath slippers, causes persistent discomfort in almost all bathhouse visitors, regardless of their gender, age, physical condition and level of perception of temperature stimuli.
Walls
Insulation of external walls is extremely rarely carried out separately. After all, it will then lead to improper distribution of heat throughout the material. The walls, floor and ceiling will warm up first, and only then will the air temperature begin to rise. This, of course, is not at all what is expected from a quality bath.
Formally, there is no need for a counter-lattice. But any experienced craftsmen install it to make it easier and faster to create a ventilation duct. The wood must be impregnated with an antiseptic. If installation is on a brick wall, it is advisable to use dowels; they compensate for the excessive rigidity of the structure and speed up installation. Foamed glass is technically perfect, but it turns out to be too expensive to use.
Development of a plan taking into account site conditions
You should also take into account the location standards of the bathhouse in relation to other buildings. Minimum distances from the sauna to various buildings:
- From a residential building and a separate shower room - 8 m;
- To the barn and summer kitchen – 1–4 m;
- Toilet, well - 12 m.
Remember that the shadow from the bathhouse should not fall on the neighbors’ property. To fulfill this requirement, calculate the distance from the fence to the building. It should be equal to its height. Example. A one-story bathhouse 7 by 9 will be located 4.6 meters from the fence of the neighboring site, which corresponds to the height of its roof.
You may be interested in: Nuances when planning a 6x6, 4x6, 3x6 bath: zoning the space and choosing suitable materials
Cold floor sources
The culprits of such discomfort:
- First of all, the foundation may be improperly insulated or not at all insulated. The foundation is the basis of the structure and its correct laying affects not only the floor covering, but also the entire structure;
- the boards used for the flooring are not tightly fitted to each other, which causes drafts;
- installing the floor itself too close or below the foundation level;
- a thin layer of insulating material.
Since the bathhouse is mainly built from wooden material, it is most susceptible to the negative influence of various harmful microorganisms, rotting, and mold. There is constant high humidity in the building due to the use of water, the floors do not dry out, and the air temperature in the steam room is elevated.
All this leads to the active development of these factors. You should not lose sight of any bark beetles that are not averse to feasting on wood, thereby causing irreparable damage to the wooden structure.
Based on the above, it is easy to understand why it is cold in the bathhouse and what reasons influence this. It is not only unpleasant to be in such a building, but also dangerous for the human body.
Preferred floor insulation
There are many thermal insulation materials in the construction range, but not all are suitable for use due to their low moisture resistance.
A huge amount of water is consumed in a bathhouse and can be resisted by:
- polystyrene foam with high water resistance. Its internal structure is best suited for these purposes and can be used both with a concrete, wooden base and on the ground;
- loose insulation material - expanded clay (porous granules from clay rocks), perlite (small mineral balls), expanded vermiculite (hydromica from rock), etc.