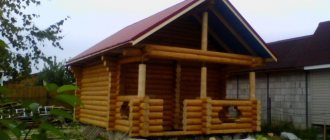
Nowadays, building a bathhouse on your own is not particularly difficult. After all, the market is simply overflowing with different types of building materials, and the construction technology is very simple. But most people pay attention to wood, because it is a natural and environmentally friendly material that creates a unique microclimate indoors. In addition, since ancient times there has been a certain tradition that only wood is used to build a bathhouse!
Today you will learn: how to build a bathhouse from timber with your own hands, as well as what advantages it has.
Table: advantages and disadvantages of timber as a material for a bath
| Advantages | Flaws |
| The log house is erected quickly and easily | Long drying is required (at least a year) |
| Does not require additional professional labor | During shrinkage, slight deformations may appear, which, at the same time, can be easily eliminated |
| The timber is equipped with a tongue-and-groove system, which allows you to firmly connect all structural elements | Timber is still wood, and it is not resistant to fire. |
| The seal protects the building from moisture ingress during slanting rain | The material is susceptible to fungus, bacteria, insect pests (termites) |
| Does not require the construction of a solid foundation | |
| When using high-quality logs, additional finishing is not needed | |
| Characterized by an affordable price |
Timber is the most suitable material for a bathhouse
Required Tools
Few tools were required to build a log bathhouse:
- chain saw (it would take a very long time to cut with a hacksaw);
- drill with a wood drill with a diameter of 12 mm;
- hammer;
- axe;
- hand plane (the volumes are small, and carrying a wire behind an electric plane would be inconvenient);
- slick;
- stapler and staples for it 12 mm high;
- roulette;
- marking pencil.
Since the weather was not always conducive to the successful progress of the work, we also had to stock up on covering material so that the fresh impregnation would not be washed off from the wood.
How to calculate the size of a bath
It should be of such a size that all visitors feel comfortable.
Modern baths are divided into 2 types:
- Dry, in which the temperature varies from 60 to 120 degrees Celsius. Humidity ranges from 5 to 25%. The name of this design is Finnish sauna.
- Raw ones, in which the temperature is lower (50–70 degrees Celsius), but the humidity is higher (from 80 to 100%). This building is called a Russian bathhouse.
The last type is a wooden building, which has a warm dressing room, a washing room and a steam room with a stove and shelves.
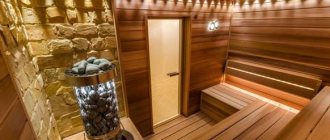
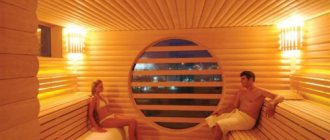
The Finnish sauna consists of a steam room where essential oil or herbal infusion is dripped onto the stones. The healing vapors of these substances have a beneficial effect on humans.
The Finnish sauna is characterized by low humidity
And although the function of these two types of baths is the same, the appearance and dimensions may differ significantly.
It is the Russian bathhouse that is most often built on private plots. This building has three rooms:
- locker room and rest room at the same time;
- washing;
- steam room
It is also worth providing a dressing room and a place to store firewood.
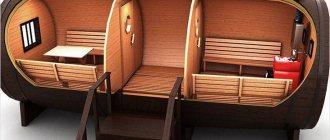
Small sauna for one person
This option is suitable for people who prefer to spend time alone in the steam room, as well as for small families. It can be made not as a separate structure, but as an extension to a residential building. In this case, a waiting room is not needed. All bathhouse premises should be as small as possible without losing ease of use. However, the width of the changing room must be at least 1 m with a total area of more than 1.3 m2, otherwise, when you undress, you will hit the walls with your elbows and knees.
Before building a bathhouse, you must draw up a project
The washing room is only needed for washing. Therefore, its area can be about 1 m2.
The size of the steam room depends on the position in which the owner prefers to spend time here. For sitting shelves, you can allocate a room of 1 m2. However, remember that since the distance from the owner to the stove will be minimal, there is a risk of getting burned from the steam. This can be avoided by positioning the stove in such a way that the steam is directed in the opposite direction from the vacationer.
Sauna for a family of 2–4 people
It is best to do it separately. In this case, the presence of a waiting room is mandatory. Thanks to it, winds and frosts will not be scary in the interior. In addition, this is a great place for drying brooms and storing firewood.
The size of the locker room should be such that each family member has at least 1 m2 of space. The sink area should be a little larger, especially if you have children. Find a place for a wide bench (180x60 cm).
In a bathhouse for several people there must be a waiting room
The height of the ceiling and the size of the shelves in the steam room are determined depending on the height of the tallest family member. His head should not rest against the ceiling when sitting on the highest shelf, but lying on the benches should be as comfortable as possible. The following parameters are considered sufficient for a bench:
- length 180–200 cm;
- width 60–65 cm.
The floor in the steam room is made 15–20 cm higher than the washing room floor. This will save heat in the room.
Bathhouse for a large company
It is better to place the shelves in it in two rows along all the walls. The lower shelves are suitable for those who prefer to sit. A 40cm width will be sufficient. And the upper shelves are for bed-ridden procedures.
It is very important to choose the optimal dimensions for the steam room. A small one will not fit enough people, and a large one is difficult to heat.
Remember that it will be difficult to heat a bath that is too large
The lounge room should have enough space for guests. The size depends on how many people you are going to invite. It can be combined with a dressing room and equipped with wardrobes.
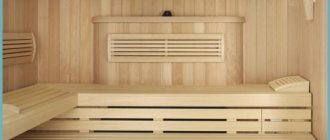
Finnish sauna
This bathhouse is heated using an electric stove. Otherwise, it is very similar to its Russian counterpart. Unless the sauna air dries wet wooden elements faster and prevents them from deteriorating from moisture.
The smallest sauna looks like an insulated closet, in which two people can hardly sit down, jostling with their knees.
The internal appearance of a Finnish sauna is very different from the Russian one we are used to
Stage 2. Timber processing
Processing logs for scraping
Processing a log for scraping
Step 1. After the consumables have been delivered to you (or you have cut and delivered them yourself), they need 25-30 days to rest.
Step 2. Next, carefully examine and sort through the logs - keep only the highest quality ones, and discard defective or damaged ones.
Step 3. Then start processing. First, peel the bark from the logs (do this carefully so that they do not crack), leaving a little of it on the sides - about a 15-centimeter strip on each side.
Step 4. After processing, place the logs in storage approximately 25 cm from the surface of the ground. You can stack it however you like - in stacks, packs, etc., the main thing is that the distance between the logs is 7-10 cm.
Scheme for preparing logs for building a log house
Log storage
Video - Preparing logs
Table: which log house to choose for a bathhouse
Both timber and logs are suitable for the construction of such a structure. There are also switchboard structures.
Wood is an environmentally friendly natural raw material. Its low thermal conductivity will allow you to build a bathhouse that can be easily heated and retain this heat for a long time.
| Logs | timber | Panel baths | |||
| + | — | + | — | + | — |
| Corresponds to the tradition of the Russian bath | Difficult to process and install | Easy to install and use | Needs preliminary testing | Easy to use and handle | Requires installation of additional thermal insulation |
| Retains heat well | Requires a good foundation due to heavy weight | Retains heat well without the need for additional thermal insulation | Shrink strongly | Does not require a powerful base due to its light weight | Needs exterior finishing |
| Does not require additional insulation | Needs pre-drying | If there is good soil under the structure, it does not require the construction of a powerful foundation | Subject to torsion | Inexpensive | Characterized by a short service life |
| Does not require preliminary impregnation | Shrinks a lot | Accessible | May crack | May be artificial | |
| Allows you to create the correct microclimate in the bathhouse for all procedures | Expensive | Durable | |||
| Durable | |||||
| Eco-friendly | |||||
Stage 4. Waterproofing the base
Waterproofing strip foundation
Waterproofing a strip foundation with roofing felt
Treat the surface of the foundation with molten bitumen and lay a layer of roofing felt on top. After the bitumen has completely dried, repeat the procedure. As a result, you will have reliable two-layer waterproofing.
Waterproofing with mastic
Additional insulation with roofing felt
Tips for choosing materials for construction
When choosing material for your bath, it is recommended to follow the following rules:
- Forest cut down in winter is ideal for building a bathhouse.
The cut trees from which timber will be made must dry well - Good ventilation and a canopy are simply necessary for high-quality drying of the material.
- The appearance of the timber is very important. If there are cracks, dents, chips, then it is classified as a low-quality product. Also undesirable is the presence of knots, which may subsequently fall out. They are not even suitable for partitions.
- If there are small holes in the tree, this may indicate that parasitic bugs have settled in it. Burn such a log, otherwise it will infect all the others.
- Blue shades are signs of rotting.
- It is easier to work with timber. It is already initially ready for installation on the foundation. But the logs will need to be adjusted to size, and only then transferred to the base.
- A substrate is required to store the material.
For the construction of a bathhouse, it is better to choose timber, since it is easier to work with.
High-quality timber will not only make the surface of the walls beautiful and correct, but also reduce construction time.
Caulking cracks
Inter-crown insulation can be moss, tow and jute - all of them equally cope well with their heat-insulating functions. But it is most convenient to work with jute, which is unwound gradually, while laying on top of the beams, and attached to them with the most ordinary nails with a stapler.
There is no need to caulk after using jute. But if tow or moss was used, then at the end of the bath’s shrinkage period it is necessary to caulk absolutely all the cracks between the crowns - for this purpose a hammer, caulk and a wooden spatula will be used. The process itself looks like this: after shrinkage, tow is clogged into the cracks.
How to make a drawing
The construction of any structure involves the creation of a detailed project plan, since it helps to calculate the materials. The bathhouse is no exception. The main thing to consider when creating it is how many people will visit it. The dimensions of the building directly depend on this. It is also important to decide whether your bathhouse will be freestanding or combined with another building. It is recommended to make a bathroom in it. To do this, you need to think about the sewer system in advance.
The project should depict:
- dressing room;
- steam room;
- shower;
- bake;
- lockers for clothes;
- shelves and beds.
It is possible to indicate the location of the table.
Photo gallery: bathhouse projects
The bathhouse can be located on the ground floor of the guest house
Don't make the bathhouse too big
A bathhouse for large groups must have a relaxation room
It is not necessary to make a special room for firewood, just allocate some space near the stove
If you have the financial opportunity, you can build a whole bathhouse complex
Laying the first crown
The first beam is laid not on concrete, but on wooden planks 15 mm high, located across the foundation strip every 30 cm. This is done in order to prevent contact of the first crown with the waterproofing. Some builders prefer to use a special backing board instead of slats, but the benefits of such technology raise reasonable objections. Opponents of the board claim that it rots faster than timber, and at the same time forms an additional inter-crown gap in the most vulnerable place of the wall.
After laying the beams on the slats and checking the horizontality, the resulting gap is filled with ordinary mounting foam. The corners of the first crown are connected with metal staples. It is not necessary to attach the timber to the foundation: the weight of the entire structure is enough to provide the house with the necessary stability. In some cases, it is possible to attach the first crown to anchors located at the corners of the foundation.
An important nuance: the joining angles must correspond exactly to 90 degrees. Otherwise, the diagonals of the intersection will be broken, which in turn will lead to unwanted deformations of the building.
Step-by-step technology for building a simple bathhouse with your own hands
The job will be much easier if you plan everything carefully in advance.
How to build a foundation for a timber bath
For the construction of a bathhouse, it will be enough to pour a strip foundation. To do this you need:
- Dig a trench. Its perimeter should be slightly larger than the perimeter of the future structure.
- Lay out a sand-gravel cushion and reinforcing mesh.
- Install formwork and pour concrete. The optimal foundation height for a bathhouse is considered to be 0.7–1 m. It all depends on the degree of soil freezing.
The dimensions of the foundation depend on the parameters of the bathhouse
The base should rise above the ground by no less than 0.5 m. Thus, the wooden lower crowns of the building will be protected from moisture.
It is also possible to use a pile foundation. For this:
- You need to make support posts from bricks or asbestos pipes.
- They must be placed around the entire perimeter and corners of the future building.
- All supports must be anchored in the ground with a concrete pad. To do this, you will first have to dig a hole, fill in a sand cushion, install formwork, lay reinforcement, pour concrete, and only then install the pillars. The distance between supports must be at least 1.5 m.
A schematic representation of a columnar concrete foundation will help in its construction
It doesn’t matter which foundation you choose to build your bathhouse, additional reinforcement is still necessary.
The columnar foundation must be installed on a sand cushion
The foundation takes about four weeks to harden.
For a bathhouse, you can choose any type of foundation
After the foundation has completely hardened, it needs to be covered with waterproofing material. To do this, you can apply molten bitumen to the surface of the base, and roofing felt on top of it. This operation must be done twice, each time waiting until the bitumen has completely hardened.
How to correctly place the first crown
The instructions for this type of work are as follows:
- First you need to lay 150 mm thick wooden slats on the base. They must first be treated with an antiseptic. The distance between the slats should be about 300 mm.
- The first crown is placed on them. The slats prevent the timber from contacting the foundation, which provides additional protection against rot.
It is advisable to first mark the location of the slats on the foundation on the diagram - Do not fasten the first crown right away. First, just lay it down and make sure you do it level. A construction square and a level will help you. Just now start fastening. The best fastening option is anchor bolts.
Now many people have stopped attaching the lower crown to the base. The structure already stands perfectly on the foundation, supported by its own weight. This has its advantages. Indeed, if rot appears on the lower crown, it will be easier to replace it.
The distance between the crown and the foundation must be filled with foam.
How to build walls correctly
After laying the first crown, you can proceed to the walls:
- The first crown is covered with heat-insulating material, for example, jute, moss or tow. The last two options must be laid with an overlap on the edges with an overlap of 100 mm.
- Then the second crown is laid and fixed with wooden dowels, holes for which must be drilled in advance. Don't forget to seal between each layer and check with a level.
Do not attach the top two layers at once. The building will shrink. The ceiling beams can only be fixed after this, which is why these crowns will need to be raised.
After each layer of timber it is necessary to lay insulation
Where to start installing windows and doors
There are two methods for creating openings for installing windows and doors:
- They can be done when the construction of the bathhouse is already completed. When laying the crowns, leave small gaps in the places where future openings will be located. Then just use a chainsaw to make them.
- The construction of openings can also be done during the construction stage. This method is more time-consuming; you will also need special grooves and bars with end notches.
The construction of openings can be done after the construction of walls
Installation of caulking
Before proceeding to this stage, it is necessary to give the walls time (at least six months) to shrink. However, if moss or tow were used as a sealant when laying the crowns, caulk is not needed. But still, carefully check the entire structure for visible cracks. If any are found, then it is necessary to twist the sealing material into a bundle and press it into the gap with a special device.
This stage is carried out only if cracks have been found in the walls
Roof installation stage
As soon as complete shrinkage of the wood has occurred, the construction of the roof can begin. If you do this earlier, the roof will suffer severe deformation.
All work takes place in several steps:
- First you need to lay the beams along the top of the wall framing and secure them.
- Then attach the rafter legs to them at a distance of 1 m from each other.
- You need to cut them at an angle in advance. This will make it more convenient to connect the rafters at the roof ridge.
The roof can be mounted with hanging rafters - If soft material in a roll is used as finishing material, then the rafters must be completely covered with boards. If you plan to use tiles, slate or other sheet material, then you need a frame.
- Following the instructions for attaching the finishing material, you should cover the roof with it.
- To protect the roof from the adverse effects of the environment, you need to trim its ridge with galvanized iron.
- At the last stage, it is necessary to sew up the roof fronts using clapboard, wooden boards or siding.
Video: building a bathhouse from timber with your own hands
Stage 1. Preparation of round timber
Preparation of round timber
Preparing the log
Attention! To determine the quality of logs (you can refuse low-grade sawlogs at any time), you need to know about the ideal harvesting conditions, which we will consider below.
Round timber must be harvested at sub-zero temperatures, that is, in winter. It is at this time that the amount of moisture in the wood is minimized, therefore, during drying the material will deform and crack less.
In order to ensure the durability of the log house, certain sections of logs (the so-called butt logs) are used during construction. These sections start from the rhizome and end at the crown. Such butt logs are denser (which compares favorably with the tops) and there are practically no knots in them. Selection criteria also include the round shape and degree of curvature of the trunk. In both cases, a defect is an error exceeding 1 cm per linear meter.
Harvesting logs for a log house
Butt logs
Attention! If the length is, for example, 5 m, and the error exceeds 5 cm, then the log can be safely rejected.
The same applies to diameter. For example, the diameter of the base of the log is 35 cm, while the top is 25 cm or less. Such round timber is categorically not recommended for use in construction.
Logs for a log house
Finally, pay attention to the type of wood. Ideally, coniferous trees (spruce, larch, etc.) should be used for a bathhouse. Larch is characterized by resistance to moisture, although in extreme cases you can resort to the “pine-spruce” combination, in which the first few crowns are erected from pine. And if only spruce is used in construction, then the material must be treated several times with an antiseptic.
Perform further actions in accordance with the previously drawn up project. You can create such a project yourself, find it on the Internet, or order it from specialists. It is with the help of this document that you can calculate the required amount of consumables, determine the area and shape of the base.
How to decorate the walls of a bathhouse outside and inside
This process must be taken as seriously as possible. Beauty, convenience and safety depend on this stage.
How to choose material
The best choice for finishing work will be natural wood.
Coniferous trees can release resin when interacting with high temperatures, so these types are not recommended for cladding a steam room.
For a steam room, it is best to use lining made of linden or larch. Linden retains its original appearance for a long time, does not darken or crack. And larch is not afraid of fungus, mold and rot. Pine is perfect for finishing a dressing room.
Step-by-step instructions for interior decoration
The work consists of several stages:
- Install sheathing on the walls and ceiling. The distance between the beams should be several centimeters less than the width of the insulation.
- Place steam and heat insulating material between the beams.
- Then attach the cladding.
Rolled insulation is laid between the beams
Video: interior decoration of the bathhouse and insulation of the ceiling
How to treat the floor
The most common floor finishing materials are boards and tiles. If the choice fell on tiles, then they should not be slippery.
Wooden bridges will help prevent slipping on tiled floors.
When tiling the floor, place anti-slip bridges on top
If you want a wooden floor, then it is recommended to opt for larch. The quality of this material exceeds all expectations.
And, naturally, the floor requires insulation. If it is made of concrete, then as a thermal insulation material you can put, for example, expanded clay or crushed stone between layers of mortar.
Remember that the floor in the steam room must be raised. This will help keep the room warm.
Table: materials for finishing a steam room made of laminated veneer lumber
| Material | Advantages | Flaws | How to attach |
| Salt crystals or blocks for gallotherapy | They have a healing effect on the entire body, especially on the respiratory system and skin. | Not suitable for rooms with high humidity, so this option only applies to saunas | Visually, this material looks like bricks that are lined up near one or more walls and fixed together with two-component quick-drying glue. It dries in ten minutes. |
| Wild stone or decorative brick | Makes the interior unique and increases fire safety. Improvement is possible from the use of soapstone or jadeite | When exposed to high temperatures they heat up | Construction waterproofing paper is attached to a wooden wall with an overlap of 40–80 mm. Then the painting mesh is mounted using galvanized staples. It needs to be plastered and then covered with stones. |
| Tile | Decorates the interior. Characterized by fire safety and durability. | Requires special skills when installing | Laying occurs on a surface that has been plastered. The tiles are fixed using highly specialized adhesives. Placed from floor to ceiling. |
| Cork moisture resistant coating | Capable of insulating. | Has considerable thickness | They are glued to the surface with special glue. |
Photo gallery: steam room finishing options
Salt brick has many healing properties
Salt sauna helps to cope with problems of the respiratory system
The stone in the interior of the steam room looks very harmonious
Not the entire steam room can be finished with tiles, but only part of it
Cork coating has insulating properties
Cork insulation has a significant thickness
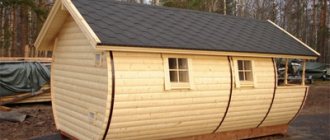
Features of the exterior finishing of a bathhouse made of timber and foam block
When building a bathhouse from half-beams, foam blocks and lumber, the construction requires careful external finishing.
Finishing a summer bathhouse with siding
It is best to clad brick buildings with siding. For wooden structures, this option is not very suitable, since it disrupts natural ventilation, as a result of which the tree does not breathe.
Despite its variety and beauty, siding cannot be called the best choice
Using lining
An ideal option for both interior and exterior decoration.
If insulation is provided from the outside, then a sheathing is needed, which will serve as a frame for laying steam and heat insulating material. Then another sheathing is installed, onto which the finishing material is mounted directly.
The humidity of such material should not exceed 15%.
The exterior decoration of the bathhouse with clapboard looks very aesthetically pleasing
If the insulation was carried out inside the structure, then the lining can be attached directly to the walls.
Block house finishing
Ideal for finishing a bathhouse made of profiled timber. It is fastened in the same order as when using lining. Either on the sheathing or directly on the wall. Thermal insulation is not needed in this case.
The wall, lined with a block house, looks very neat
Imitation of timber
It's the same lining, just thicker and more expensive. It is used to decorate walls inside and outside. In all its properties it is the same as lining.
It’s impossible to say right away that finishing material can look so natural.
Facade tiles
It must be secured to the sheathing with self-tapping screws. The advantages are a neat and beautiful appearance, durability. Also, the wood underneath will not be destroyed.
There are a huge number of varieties of facade tiles
Other finishing options
The facade of the bathhouse does not need to be further finished. If high-quality timber was used, then it is enough to varnish or paint the walls. To do this, first saturate the wood with an antiseptic to prevent mold, mildew and rot from appearing. If necessary, repair cracks in the beams. Apply a layer of primer to the treated and dry surface. Wait for it to dry and repeat the process in areas that were not treated very well. Wait until it dries completely again. Then you can paint, if necessary - in 2 layers.
Varnish coating is beautiful, but short-lived
Paint is a short-lived coating that needs to be touched up periodically.
Video: painting the outside of a bathhouse
Roof installation
In its simplest design, the roof on a log bathhouse is held in place by a gable rafter system supported by ceiling beams or a mauerlat.
The functions of the latter are successfully performed by the upper crown of the log house, which can be covered, if desired, with an additional support beam.
The stability of the structure is provided by vertical supports or horizontal crossbars; all elements are connected exclusively with metal fasteners.
The rafters are made of timber with a cross-section of 50×150 or 100×150 mm and are installed in increments of 60-120 cm. The upper part of the rafters rests either on the second leg or on a ridge beam; the specific type of system is selected based on the size of the bathhouse and the presence of internal load-bearing partitions.
The gable of the bathhouse is subsequently covered with boards and insulated.
In a more complex design, the bathhouse has an attic floor, a raised rafter system, a chopped pediment or a complex roof configuration.
For obvious reasons, such projects require the involvement of specialists and are more expensive. The same applies to bathhouses with two floors and insulated attics.
In order to save money, most owners opt for the first option, covering the rafters with sheathing, roll waterproofing, counter-lattice and temporary or permanent metal roofing. Requirements that must be met at this stage include:
• Reinforced treatment of wooden elements with fire retardants. • Providing fire protection for future chimneys. • Overlap and sealing of joints of roof waterproofing materials. • Laying ventilation ducts under roofing materials, rain-protected channels for removing exhaust air from the bathhouse and vents for inspecting and ventilating the attic. • Protecting areas around pipes with special aprons, using special self-tapping screws with rubber gaskets, screwed in strictly at right angles in places where the wave deflects.
Advice! The most inexpensive and yet reliable solution would be a roof made of metal tiles or profile sheets.
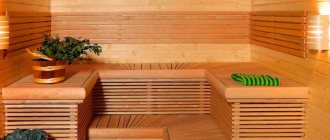
Interior improvement
At the end of construction, the bathhouse must be landscaped.
Steam room
It should contain the following elements:
- Foil.
- Mineral wool.
- Vapor barrier membrane.
- Wooden ceiling plinth.
- Floor plinth.
- Ventilation valve.
- The ceiling is made of wooden lining.
- Lamp.
- Wooden floor.
- Sun lounger.
- Thermometer and hygrometer.
- The back of the lounger.
- Chimney.
- Container for water.
- Kamenka.
- Sauna stove.
- Furnace temperature protection.
- Non-combustible base under the stove.
- Door to the steam room.
- Bath accessories.
- LED backlight.
Some elements in the steam room are required
Some rules:
- The entrance to the steam room must be made from the washing room or dressing room.
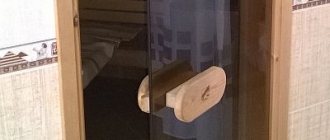
- Tempered glass or wood are the materials for doors. There should not be any metal on them, except for hinges.
- The shelves should be of such a size that it is comfortable to lie and sit on them. There should be room on the floor for the person who will whip you with a broom.
- There cannot be any coniferous species in the steam room. They secrete resin.
- The steam room should have a thermometer and hygrometer. Their presence will allow you to control temperature and humidity.
- Bright lighting is not suitable for a steam room. Here it should be warm and soft.
- It is better to place the stove near the door.
- It is necessary to take care of insulating the walls and floor around the stove.
Shower room
In large baths there should be more than one shower. In addition, provide hooks and shelves where you can put toiletries. A bench and a mirror are also integral parts of this room.
Build a central sewer in this room where the water will go.
There must be a shower in the bathhouse
Rest room and wardrobe
Here you can place lockers for clothes, a table and chairs, and put upholstered furniture. The presence of sockets to charge your phone, turn on music or an electric kettle will also be useful. You can also build a kitchen area here, if there is enough space.
Cozy lounge option
Construction of a bathhouse is a very troublesome undertaking that requires a lot of effort, time and finances. But it's worth it, isn't it?
Finishing
After completing all the activities described above and laying the roof, the log house must stand until it shrinks completely. The standing time ranges from one and a half years (for raw, even timber) to six months (if glued dried raw materials were used).
After the required time has passed, you can begin finishing:
- Houses made of profiled material do not require cladding either inside or outside. To ensure their durability, it is enough to treat the walls with an antiseptic or paint them with a composition for external use.
- In buildings made of even timber, cracks inevitably form during the shrinkage process. These cracks must be sealed, after which it is necessary to provide cladding that protects against blowing.
The durability of the future construction depends. This is a fundamental, basic issue, and it must be taken with the utmost seriousness, because the cost of error is too high.
Customer errors
A minor mistake made by builders during the construction of a wooden house can dramatically worsen the thermal characteristics of the house or shorten its life. But customers can also make mistakes. Conscientious builders always dissuade private owners from purchasing log buildings that have stood on the production site for a year or more. As a rule, their lower crowns have already begun to rot or are affected by fungus. To give it a marketable appearance, the log house can be bleached, but this will also have a bad effect on the durability of the wood.
Another problem with old log houses is that there is a possibility that the cutters who made the box are already working in another place, and the assembly of the log house will be carried out by other people. The hired team will easily shift the blame for poor quality assembly onto unknown cutters. They say they made an open marriage, and it is impossible to collect it qualitatively. The assembly of the log house should be trusted only to those who manufactured it. Otherwise, there will be no one to ask for quality.
By the way, not only chopped logs, but also other materials deteriorate due to improper storage.
Director Alexey Markin talks about another mistake often made by customers.
Another piece of advice that protects you from mistakes can be considered naive, but in some cases it will come in handy. Builders strongly advise against contacting companies that promise to build a log or timber house in a month. The construction of a building from wood of natural moisture or even dry wood is always carried out in two stages - the construction of a log house with a roof, and after about a year's break, windows, ceilings, and floors are installed to allow the log house to shrink. Only houses made of laminated veneer lumber do not need shrinkage. Previously, the portal Repair.Divandi talked about.
Photo No. 1
– A log house with huge cracks.
Foundation
We choose columnar concrete.
| Step, No. | Description |
| We make markings on the ground. In plan, the dimensions of the bathhouse are 3x3 meters, the distance between the columns is 1.5 meters. The partition between the rooms is not load-bearing; there is no need to build a foundation underneath it. Drive pegs around the perimeter and stretch ropes between them. Along the ropes, mark the position of the intermediate posts. | |
| Step 2. | Dig holes 50–60 cm deep, approximately 40 cm wide, and at the bottom make a sand cushion 15–20 cm thick. |
| Step 3. | If the soil is clayey, there is no need to make formwork; pour concrete directly into the holes. Give the concrete time to set approximately two weeks. |
| Step 4. | Mark the location of the stove; according to our project, it will be located between the combined steam room with a washing room and the rest room - this location will allow you to heat two rooms at once. You need to make a deeper foundation for the stove, preferably to the depth of soil freezing. But if the stove is not very complex and massive, then a depth of 1 m is enough, make a sand cushion 25-30 cm thick. If you are still afraid that the foundation may “undermine” in winter, lay foam plastic slabs 2-3 cm thick around the perimeter of the pit. They will absorb the swelling forces, the foundation will remain motionless under any climatic conditions. How to lay a stove is a large and interesting topic; a separate article is needed to consider it. |
| Step 4. | We recommend not pouring them, but walling them with concrete blocks measuring 20x30x60 mm. First, level the concrete a little at the base, use a hydraulic level and cement-sand mortar for this. Next, place the outermost column, use a cement-sand mortar to level it in height and place intermediate columns. At the same time, use blocks to “pull up” the foundation under the stove; it should be higher than the columns by the height of the beams, floor beams and floorboards. |
Columnar foundation (with the first crown)