Having a bathhouse on your property is almost everyone’s dream. But it is obvious that building a bathhouse requires free space, time and money. If you cannot boast of a large land area, and your budget is limited, then pay attention to the projects of small baths or barrel baths.
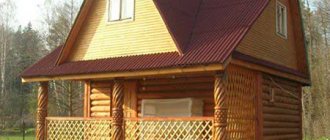
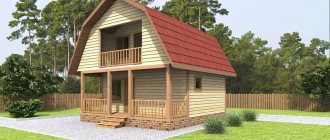
For example, a 5x3 bathhouse project is the best option for a small suburban area. The advantage of this bathhouse is its good capacity (up to three people can steam in it at the same time), while the construction is non-bulky and budget-friendly. But the benefits are not limited to this; we will tell you more about them later.
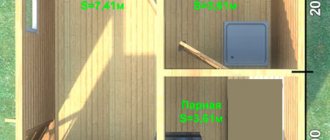
Bathhouse layout 5x3
In a bathhouse, no matter what size it is, there must be certain rooms.
Without them, the bathhouse will not be complete. The first room a person enters is the dressing room. This is a kind of hallway where you can take off your clothes. Its interior must have a convenient cabinet for storing things while a person is steaming. Many people install another box here in which fuel is stored, that is, firewood or coal.
Next is the rest room. Even small bathhouse projects should include this room. Here, as a rule, there is a table and several comfortable chairs for drinking tea and relaxing with friends.
The next important room is the sink, or shower. Cooling procedures will be performed here after a person has steamed the body.
The interior of this room is very simple. There should be several benches, a shower and a container of water. In modern baths, they often simply install a shower instead of a sink. If we are talking about this type of bathhouse, then you can add a washing machine to this room to save space in the house.
The most important room in the bathhouse is the steam room. It is for the sake of visiting it that people build such buildings. Here, according to tradition, a stove should be installed and wooden benches equipped. The main thing in a steam room is hot air. What is important here is not so much the interior interior as proper thermal insulation. We must not forget that this room is not only very warm, but also humid. For this reason, the number of electrical appliances in a given room should be kept to a minimum. A pair of light bulbs in special shades is allowed, as well as a stove powered by electricity. It is better to make the interior of the steam room in a simple rustic style. You don’t need to come up with anything special here; just treat the walls with wood. If the bathhouse was built from wooden logs, they can simply be treated with special solutions so that they can better withstand high temperatures and humidity.
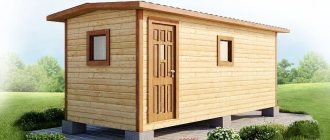
These are the main rooms that should be in every bathhouse, even the most compact one. In addition, sometimes a comfortable terrace is attached to the bathhouse for drinking tea in the fresh air. There are also more advanced options with swimming pools, but not everyone can afford such buildings. If a small family will use the steam room, there is no point in building a huge room and spending a lot of money on it. Even in a compact 3 by 5 sauna made of foam blocks or other material, you can have a great rest and improve your health.About the benefits of bath procedures
Visiting the bathhouse is a tradition that most people adhere to. The optimal combination of moisture and temperature, which can only be achieved in a properly constructed and equipped bathhouse, has a beneficial effect on the cardiovascular, respiratory, nervous system, as well as the musculoskeletal system. It has been proven that after water procedures, the skin rejuvenates, a state of vigor, freshness, and strength comes. The use of safe building materials for the construction of a bathhouse and the correct execution of construction work will ensure a positive impact on health.
Features of a 5x3 bath
In order to build a bathhouse on your own site, you must first draw up its design. It must be developed taking into account the amount of free space on the site. It must be remembered that the bathhouse should not be very close to the water or adjacent to the neighboring area. In addition, this room must be visible from the window of a residential building. These are fire safety requirements that must be observed not only for the sake of a tick on the documents, but also to preserve the lives of those who will use the premises.
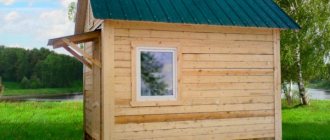
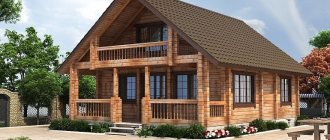
If there is enough free space on the site, you can build a spacious and comfortable 5x3 bathhouse. These projects are very popular, since the bathhouse is quite spacious, and several people can steam in it at the same time, but at the same time, the building is not particularly bulky. Project of a 3 by 5 bathhouse, a photo of which can be seen in Fig. 1 is medium in size, but at the same time, such a bathhouse can fit absolutely everything that is necessary for a comfortable and complete rest. Recently, the design of a 3 by 5 bathhouse with a terrace on which you can relax after hygiene procedures has been in considerable demand.
As for materials, any is suitable for a 5x3 bathhouse, but it must meet the requirements for these premises. The thing is that the materials for building a bathhouse must have a high level of thermal insulation. Otherwise, you will have to spend a lot of effort and money on insulating the room.
In former times, steam rooms were most often built of wood. In modern areas, 5 by 3 bathhouse designs made of timber are often found. In addition, 5x3 projects are also made on the basis of foam blocks. It is worth noting that a 3 by 5 bathhouse project made from blocks will serve for a very long time and perform its functions well if the thermal insulation procedure is carried out correctly. Foam blocks need to be protected from external factors. In this case, the bathhouse will last for decades.
Working with wood is a little more difficult. It must be chosen very carefully, since many types of wood release too much resin when heated. Thus, the walls of the steam room become dangerous, since you can easily get burned on them. When choosing a 5 by 3 log sauna project, many choose coniferous species, but they are the most resinous, although steaming in such a steam room will be very useful due to the essential oils released by the wood.
Ventilation
When building baths from any material, the main task is to ensure good drying of all rooms after the bath. Then there will be no problems with fungi and mold.
When building a bathhouse from gas silicate blocks with your own hands, do not forget to leave ventilation holes at the top and bottom of the wall in each room. They can probably be cut out later, but why complicate your life. To prevent suction from them while vaping, they are closed with doors. And they don’t go into the room - they end up under the insulation. Their task is to remove all steam from under the casing after visiting the steam room.
One of the options for external insulation of walls made of foam blocks with subsequent finishing
3 by 5 bathhouse project: advantages
- compactness. This bathhouse project assumes compact dimensions, so the building will easily fit even in a small area;
- no difficulties during the construction process. Construction of a 3x5 bathhouse does not require any special skills; many people can build a bathhouse with their own hands;
- speed of construction. Construction of a small bathhouse will not take much time;
- saving. To build a small bathhouse, you will need less material, so the costs will be significantly reduced;
- no need to build a reinforced foundation. Little material is used for construction, so the total weight of the bathhouse is small, and you can limit yourself to a simple budget foundation;
- quick kindling. A small steam room heats up much faster than a spacious one, so you can create the desired microclimate faster and also spend less fuel.
Finishing in the steam room and washing room
No matter how hard you try to do a vapor barrier, water will still seep under all the layers and settle in the wall. To minimize its amount, it is better to tiled the walls in the washing room. If you are afraid that it will be cold, make a warm floor (you can also use the walls).
In the steam room, also lay the floor and part of the wall - to a height of 10 cm or higher - with tiles. And then there’s the whole “pie” in full.
If you take into account all these nuances when building a gas silicate bathhouse with your own hands, it will delight you for many years.
Construction of the foundation
The foundation is the first stage of any construction. For a bathhouse, a ribbon or column type is more often chosen. The choice depends on the composition of the soil at the construction site. Clay and fine sand require the construction of a monolithic strip foundation; if the soil is predominantly rocky with coarse sand, a columnar foundation is erected. If the groundwater level is high in the area, it is better to choose a foundation on screw piles: it will be more reliable. All three types of foundations must be built following the recommendations for their construction in order to increase their strength and service life.
Why do they trust us?
1. No prepayment.Staged payment for results.
2. We do it on time or for free.Construction is divided into stages with a specified completion date.
3. No hidden fees.The price is final at the contract stage.
4. "Full construction".All work is done by one company.
Additional options/services
All prices for the construction of a bathhouse are current and updated 05/10/2020
| Foundation: pile-screw | 4000 RUR/pile with installation |
| Foundation: support-column | 5,000 rub. |
| Increasing the wall thickness to 140 mm (replacing timber with a section of 90x140 mm with timber 140x140 mm) | 22,000 rub. |
| Metal stove "Ermak-16" with installation and pipe through the roof | 43,000 rub. |
| Brick screen for sauna stove | 10,000 rub. |
| Assembling the log house into a “warm corner” | 24,000 rub. |
| Assembling a log house on wooden dowels | 24,000 rub. |
| Antiseptic treatment of the bottom of the bath (to protect against rotting and harmful insects) | 8,000 rub. |
| Replacing the floorboard with a thickness of 36 mm instead of 27 mm | 4,500 rub. |
| Increasing the insulation layer (floor, ceiling) up to 100 mm | 4,000 rub. |
| Increasing the insulation layer (floor, ceiling) up to 150 mm | 9,000 rub. |
| Additional row of timber (increasing ceiling height by 14 cm) 90x140/140x140 mm | 5000/8000 rub. |
| Painting the outside of the bathhouse in 1 layer (customer's composition) | 17,000 rub. |
| Replacement of ondulin roofing with metal tiles | 12,000 rub. |
| Replacing the entrance door with an insulated metal one | 12,000 rub. |
| Change house 3x2 m for construction workers | 18,000 rub. |
| Generator rental if there is no electricity on site (customer’s gasoline) | 10,000 rub. |
One-story baths made of timber Two-story baths made of timber https://www.youtube.com/watch?v=tqPLDYg1v3k
Flooring
At the beginning of laying the walls, it is necessary to leave pockets for installing floor joists if the project plans to have a wooden covering. Provided that a concrete floor will be poured, this is not necessary. The logs, before being installed in the pockets, are treated with fire retardants and waterproofing impregnation. Additional fastening is made with metal corners. During further construction, a rough coating is laid on the logs to make it more convenient to carry out the remaining work. Upon completion of finishing, the floor is constructed according to the technology chosen for these purposes.
Engineering ways to eliminate deficiencies
If we take into account the fact that blocks made on the basis of foam concrete have significantly more “pluses” than “minuses”, then it is simply impossible to refuse the use of such materials. As a result, builders have to look for solutions to eliminate all the shortcomings of the building material.
First of all, the problem with the fragility of building blocks can be solved by strengthening the foundation. For the construction of buildings made of foam blocks, a special slab base is often used, but it is also possible to use a strip foundation (profiles “T”, “G” and “L”, which do not shrink).
As for the increased hygroscopicity and the negative impact of moisture on foam concrete, these disadvantages of the material can be eliminated by additional finishing of surfaces and their insulation.
Thanks to such simple and affordable processes, it is possible to increase the reliability and durability of any structure almost significantly, and eliminate premature wear and destruction.
Types of blocks
To build a bathhouse, you first need to choose the type of block. Here are the most common:
- Aerated concrete blocks. They come in lower and higher densities. For a small bathhouse, the first option is suitable. A bathhouse made from such blocks will be durable and frost-resistant.
- Foam blocks. They also have a cellular structure. Very small in weight and large in volume. Requires major waterproofing.
- Gas silicate. Consist of concrete and lime, smooth surface. Just like foam blocks, they are highly hygroscopic.
- Cinder blocks. They were popular in their time before alternatives appeared. Very uneven surface. They are cheap. When heated, low-quality cinder blocks can release hazardous substances into the air.
- Expanded clay concrete. They are similar to cinder blocks, but instead of slag, expanded clay is added to them. They do not require much waterproofing and are light in weight. Expanded clay concrete and cinder blocks are smaller in size than foam blocks or gas silicate blocks.
- Arbolite. The most environmentally friendly of all presented, thanks to the addition of sawdust to the composition. High thermal insulation and low weight, but increased susceptibility to moisture.
- Porous ceramic. Rarely used in building construction due to high prices, mainly for external decoration.
The best blocks for a bath
There are several criteria for selecting blocks:
- The higher the density of the block, the less thermal insulation.
- Ceramic, gas and foam blocks are less durable than other types.
- You definitely need to look at the service life, for example, cinder blocks are the most short-lived.
Note! Experts advise using expanded clay concrete blocks for a bathhouse. The highest strength, average thermal insulation and density, long service life and low cost - the ideal middle peasant of all options.
How is a vapor barrier done on walls?
Even before you make a bathhouse from foam blocks, you need to think carefully about how and with what its walls will be insulated from destructive steam. Judging by world experience, it is most expedient to do this using polymer vapor-tight membranes, which are integrated into the gap between the cladding and the wall. And in order for air circulation to be maintained, the cladding itself must be placed at least 5 cm from the walls.
By the way, the fastening elements that are usually used with other walls (nails, moths, screws and deadbolts) are not used for foam blocks. No, just for foam block walls you need conventional fasteners, because the porous structure of this material to some extent complicates the process of assembling profiles for all frame types of cladding. Therefore, it is necessary to purchase in advance for this purpose special umbrella-type dowels, called “fungi”.
But hidden electrical wiring in foam concrete walls is much easier to do than in concrete or brick, and additional insulation, like in wood, is not needed. As for the doors, covering and breaking through windows, it is no different from other buildings.
Preparation for construction work
Steam room.
Next, we plan the upcoming work step by step:
- we determine the location of construction;
- We prepare a detailed construction project;
- We calculate the required amount of building materials;
- carefully select foam blocks and cement;
- prepare tools and equipment;
- pour the foundation;
- we install a drain;
- We waterproof the basement and interior spaces;
- we build walls;
- we build a roof;
- We complete the interior and exterior decoration.
After we’ve made the drawings, counted the blocks and found a suitable location, we get to work. It will take 2-3 weeks to pour the foundation, taking into account the complete hardening of the cement. Construction will take the same amount of time. In total, it will take a month and a half to erect the building with your own hands.
Location options
The bath building itself can be rectangular or square. The layout of the washroom depends on the shape of the room.
In a rectangular building, the washing room can be located in a series of rooms in series. For example, first there is a locker room, then a rest room, then a wash room, and at the end - a steam room. If one of the rooms in the bathhouse is missing, it is simply removed from the list. Option for the design and layout of a bathhouse made of timber with a washroom and a kitchen. It is appropriate to divide the square-shaped building into four parts. The first two will be the locker room and the rest room. Steam room and wash room next
The very location of these four rooms relative to the facade of the bathhouse building is not important. If planning is necessary in an existing small building:
- you can leave only the steam room and washing room in it, and move the remaining rooms outside the building;
- this could be an extension that will house a vestibule, a locker room and a rest room;
- if the area of the site does not allow, then only the locker room can be moved into the extension;
- a relaxation room in warm weather can be successfully replaced by a cheap gazebo;
- for special connoisseurs of comfort, it is possible to arrange a swimming pool in the area adjacent to the bathhouse (you can make it in the open air, or you can organize a canopy).
If funds do not allow you to immediately build a bathhouse in which the layout of the washroom will correspond to your desires, you can apply the principle of gradual extensions. To do this, you just need to plan the future bath complex and allocate a sufficient area for it.
DIY construction
When the main stages of preparation are completed, you can begin building a bathhouse from aerated concrete. When good weather arrives, they begin to prepare the site.
Marking and excavation work
After leveling the soil and removing the plant layer, the construction site should be level, with a slight slope to one side in order to ensure the drainage of melt and storm water.
We carry out the work in the following order:
- We mark the contour of the foundation in accordance with the prepared project. The width of the base should be 10 cm wider than the wall. To make marks, you will need a tape measure, a right triangle 30*60 cm, 0.5 m pegs, a cord, a hydraulic level, and a tape measure.
- You need to drive the first peg into one of the corners of the building, then, placing it in a triangle, mark the transverse and longitudinal walls. The second and third pegs should be driven in at the ends of the center lines.
- The latter is placed after the triangle is moved to the opposite corner and the axes are marked. We check the diagonals in the resulting rectangle. They should differ by less than 20 mm.
- To facilitate foundation planning, you can make a cast-off. To do this, install 80-120 mm posts 1-2 m from the driven pegs to the outside. At floor level, boards are nailed to the posts, parallel to the walls. Make a control check using slats and levels.
- The cords are pulled according to the axial dimensions. The result should be a structure that defines the contours of the outer and outer sides of the foundation and its levels. The soil is removed along it.
Formwork and reinforcement
The foundation for a bath can be a strip or a monolithic slab. The slab-shaped base has a number of advantages:
- The level of soil freezing in this case does not matter.
- The form is resistant to temperature changes and soil type.
- It's easy to make. This does not require special qualifications.
- Standard soil displacements do not lead to deformations.
- The large area of contact with the ground reduces the influence of melt and groundwater.
- The load from the building is distributed over the entire surface.
The disadvantages of this design include:
- Large waterproofing area.
- It is more difficult to make a smooth surface.
- The consumption of reinforcement and concrete increases.
To make the slab, the formwork is placed on the outside along the perimeter of the bathhouse. It is advisable to lay plastic or metal reinforcement in solid pieces, raising it above the ground by 10-15 cm. It is permissible to fill the site in layers, then the reinforcing elements are laid after pouring the first layer.
After excavating the soil, a sand cushion and a layer of gravel are poured. If the costs are acceptable, then the foundation slab can be made with insulation and heating.
The sewerage system must be thought out and installed before concrete pouring begins.
Thermal insulation is laid on top of the waterproofing and covered with another moisture-repellent layer. The thickness of the slab must be at least 20 cm.
The tape-type base must be lowered below the freezing depth. In this case, a trench is dug around the perimeter and for load-bearing partitions. A sand cushion is made, compacted, and a 15-20 cm layer of gravel is poured.
Double-sided formwork is installed, laid and tied, or the reinforcement is welded. It is advisable to protect the strip foundation with insulation from the outside.
Pouring the foundation
The construction of the foundation, when installing a bathhouse made of aerated concrete with your own hands, if funds and the location of the site allow, is best done using a concrete mixture made in a factory.
First of all, because it will be faster and there will be fewer transitions with different drying times. The work in this case will take one day, and not a week, as when preparing the mixture yourself in a concrete mixer.
The removal of the pipe distributing concrete from the mixer is most often enough for a small area of the bathhouse. Therefore, they cover the entire frame and pour the mixture evenly into the right places.
In addition, you need to take into account that concrete made in a factory contains modifiers, plasticizers, and antifreeze additives. During transportation, a mixture with a homogeneous structure is created in a concrete mixer. When using technology, pouring the foundation becomes less labor-intensive and time-consuming.
When making concrete yourself:
- It is advisable to organize work in several shifts;
- try to find and buy recently made cement;
- Use the freshly prepared mixture immediately.
After the foundation is poured, it must be properly dried:
- Cover the stove with plastic wrap.
- In hot weather, you need to water the surface to avoid rapid drying and cracking. It is recommended to do this every 3-5 hours in the first 5-7 days.
- You cannot pour concrete yourself in cold weather. Drying it requires special equipment.
Waterproofing the base for masonry walls
To protect the bath structure from capillary moisture, which can rise from the ground through the foundation into the walls, cut-off waterproofing is installed.
If this is not done, then in winter the water turns into ice. This leads to a change in its volume and destruction of aerated concrete from the inside.
The consequences may be cracks, distortion of window and door openings. The salts contained in the water appear on the surface.
A musty smell of dampness, an increased level of humidity appears in the room, and colonies of harmful microorganisms, fungus and mold form.
Instead of health procedures, you can get a decrease in immunity and a tendency to respiratory diseases.
The following can be used as waterproofing material:
- modern waterproofing membranes;
- sprayed waterproof insulation;
- bitumen mastic;
- rolled materials - glassine, roofing felt, roofing felt, glass roofing felt, hydroisol, hydrobutyl, brizol.
Horizontal waterproofing is done in the following order:
- The foundation surface is cleared of debris and dirt.
- Seal large cracks and joints with mortar.
- Cut-off insulation made from roll materials is laid on a 1 cm cement solution.
- Another layer of mortar or glue is applied on top, and the blocks are mounted.
Construction of walls and partitions
The stability and strength of aerated concrete structures are ensured by laying load-bearing walls with tying blocks.
If the base before laying the first row has a difference in elevations of more than 5 mm, then instead of glue, make a layer of mortar up to 20 mm to remove unevenness.
The construction of walls begins from the corners of the building. The correct installation is checked in the vertical and horizontal planes using a level. Often a special stand with a plumb line is used.
A cord is stretched between the blocks located in the corners, along which the height of the remaining elements is set. It is advisable to apply the adhesive to a thickness of no more than 3 mm, using a tool with serrated edges.
Excess glue is squeezed out. The evenness and density of the masonry is achieved using a rubber hammer. In order for the wall to be of good quality, you need to follow the following rules:
- It is necessary to bandage the blocks in order.
- Row chain ligation is used when laying in one block.
- Bonded rows are used when laying in a two-row manner.
- To obtain products of the desired shape, use a hacksaw with hard teeth.
- A wall chaser is used to lay connecting plastic or metal reinforcement.
- To level the surface of the blocks, use a grater.
- In winter, the glue must contain plasticizing additives.
At least one reinforcing belt must be made around the perimeter of the building. For this purpose, there are special u-shaped gas blocks. Reinforcement is placed in them, overlapped, tied and filled with concrete. This gives the entire structure tensile strength.
Lintels over window and door openings
To do this, you can use factory-made gas silicate or aerated concrete rectangular lintels with a built-in reinforcement cage with a special anti-corrosion treatment.
The only drawback of this method is the additional costs. This gives you the following benefits:
- during operation, the lintels do not collapse, crack, or float;
- no additional insulation is required, since thermal efficiency indicators are not reduced due to the uniform structure of aerated concrete;
- there is no extra load on the walls and foundation, because aerated concrete lintels are not much heavier than standard blocks.
You can block door and window openings using U-shaped elements. A frame welded from reinforcement is laid inside the furrows. To improve thermal conductivity, you can insert polystyrene foam insulation.
Reinforced concrete lintels are used less frequently. This is due to the greater weight and high thermal conductivity of reinforced concrete compared to aerated blocks.
To make the connection reliable, you need to maintain the depth of support. Aerated concrete reinforced structures should rest on the masonry by 25 cm. Load-bearing reinforced concrete - 35 cm. If the blocks are laid on metal corners, an output of 20 cm will be sufficient.
If it is not possible to purchase reinforced concrete or u-shaped forms, you can assemble formwork from boards, perform reinforcement and fill it with concrete.
Ceiling, roof and roofing
Before laying the Mauerlat, you need to make an armored belt. Holes are laid or drilled in it into which studs are inserted into the wall for several blocks.
They will be needed to secure the Mauerlat. Another row of blocks can be laid on top of the armored belt to avoid a cold bridge.
The floor beams and rafter structure are attached to the Mauerlat. For beams, you can use a 50*250 mm board, or a 15*15 cm beam. For rafters, a 50*150 mm board is suitable.
For additional fastening, the rafters can be tied to the Mauerlat using metal wire. In some designs, the rafters are attached to the supporting beams and extend to the outside of the house.
The roof of the bathhouse can be made gable or single-pitch. Single-pitch is easy to install and is cheaper.
Gable roof is better in terms of thermal conductivity, precipitation and aesthetics. For bathhouses measuring 4*6 m or larger, you can add an additional attic. A 25 mm board is suitable as flooring.
The rafters are sheathed on the roof every 0.4-0.6 m. Waterproofing is laid on it with an overlap of 15 cm from top to bottom. The material is secured with staples to the wood using a construction stapler.
For ease of installation, roll insulation can be rolled out gradually, while simultaneously laying the roof covering.
Modern roofing material is attached to the sheathing using special nail screws and closed with caps.
For the roof, you can use slate of different colors, perforated metal sheets, metal tiles, and ondulin.
Installation of water pipes and sewerage
The water supply and sewerage system can be included in the common house or performed separately.
In simple designs, wastewater from the washing room, steam room is discharged into the ground or waste pit. In more advanced options, a full-fledged sewer system is installed, which must be laid at the stage of foundation construction.
5-10 m from the bathhouse you need to make a hole for 2-3 concrete rings. If the soil is sand or black soil, good. Clay absorbs water worse. The bottom of the structure needs to be covered with crushed stone to a depth of 0.4-0.5 m, a layer of sand of 30-40 cm should be made outside the rings. 10-15 holes should be punched in each concrete ring.
Drainage paths (watering cans) are made in the floor of the washing room and steam room, which are connected at a depth of at least 0.5 m to the septic tank. The sewer system can be insulated with foam chips or mineral wool.
To eliminate unpleasant odors, you need to make a siphon or water seal. You can put a viewing well on top of the septic tank.
If the sauna is provided with a full-fledged bathroom, then the size of the septic tank must be increased, and the entire structure must be moved further away from the building.
The design of the water supply depends on the source of water supply. Depending on the area, it may be a well, a container for imported water, a well, or a full-fledged water supply system.
In the latter case, it is enough to simply install the pipes and insulate them from freezing. Install the taps. To establish a water supply from a well, you will need a submersible or surface well pump. It can be placed both in the room itself and in a place next to the source.
Hot water supply is made using electric heaters, or a tank that is heated by a stove.
Floor installation using the selected technology
If the foundation is made in the form of a solid slab, in which holes for sewerage are prudently left, then the floor can be insulated with solid polyurethane heat insulators, a screed can be made, and ceramic tiles can be laid.
In the case of a strip foundation, you need to make logs from boards or timber, which should be treated against fire and rotting. They are laid on the ledge of the foundation through a moisture-repellent gasket, and to increase rigidity, additional racks (support chairs) are made of reinforced concrete or brick. A one-way slope is often used to ensure water flow.
Then they work in the following order:
- waterproofing is laid on top of the load-bearing elements;
- laying the subfloor;
- insulated with polyurethane boards;
- waterproof with roofing felt, glassine or membrane film;
- They make a clean floor from tongue-and-groove boards, which are fastened with screws in a “sunk hole”.
If necessary, such a structure can be easily disassembled, dried, and repaired. The joints between the floor and the wall are covered with plinths.
There are spill-type flooring options. To do this, water drainage pipes or a concrete floor with drainage paths are made in the underground. Floorboards are laid on top of them, with a distance of 1 cm between them.
Furnace laying and stone selection
The easiest way is to place an electric heater in the bathhouse. This will eliminate the need to stock up on firewood and make a chimney. But many classic lovers prefer to build brick stoves.
The oven must be such that:
- maintain the temperature in the steam room more than +45˚C;
- heat the stones to provide the required amount of steam;
- there was no smoke or carbon monoxide;
- Use firewood economically.
The construction of the furnace begins with the foundation. The structure will be heavy, so the base must be strong:
- Dig a hole 0.5 m deep and 20 cm larger around the perimeter of the stove.
- Before pouring concrete, it is covered with crushed stone to a depth of 15 cm.
- For the base, grade 100 concrete or a 2:1 solution of M400 cement with river sand is suitable.
- The foundation must dry for at least 3 days.
Lay out a flat area with bricks the size of the stove. Check the accuracy of the levels. Waterproofing is done with roofing felt. Lay out the second row of solid bricks and check the levels.
Then do this:
- Before installing the door through which air will be supplied on the first row, a wire is tied to it at the corners and wrapped with an asbestos-cement cord.
- To keep the fastening more rigid, the wire is twisted and embedded under the first row.
- They lay rows of bricks and block the door.
- Prepare the base, put in the mortar and grate.
- Install the combustion door and water tank, if provided.
- After the 9th row of masonry, all levels and angles are checked and the slab is installed.
They lay stones and make a chimney. For a wood-burning stove, stones 7-12 cm are suitable. These can be quartz, jasper, jadeite, jade. The absence of mica inclusions and a smooth surface indicate good quality.
Insulation outside and inside
If a d400 gas block was used for construction, then there is no need to insulate the building from the outside. But it needs protection from moisture. For this purpose, plaster with a reinforcing mesh is suitable, which can be attached to the block with nails. The layer of plaster must be covered with façade water-repellent paint.
In the case where the walls were made from a more durable D600 block, it makes sense to add additional insulation. The choice of heat-insulating materials on the market is large:
- polyvinyl chloride foam insulation;
- polyurethane foam;
- penoizol;
- expanded polystyrene;
- foamed polyethylene;
- ecowool;
- mineral, basalt and glass wool;
- foil insulation.
For the interior decoration of the steam room, you need to use foil-coated thermal insulation materials, as they better withstand temperature changes and high humidity. They are laid on aerated concrete with an overlap, secured with glue and a stapler with long staples. On top of them is a lathing for the lining.
The remaining rooms can be insulated from the outside with suitable insulation. Solid board materials can be immediately plastered and painted. Rolled products require additional protection, such as siding.
Interior and exterior decoration
If the outside is plastered, then the final finishing consists of painting it. In addition, there is a large selection of colored plasters on the market that do not require additional processing.
The interior decoration of a bathhouse made of aerated concrete most often consists of covering the steam room with clapboard, ceramic tiles or plastic washing panels. The remaining rooms may have different designs.
The steam room should be equipped with shelves. They are made in steps, the height of each element is no more than 35-40 cm. They should be positioned so that it is comfortable to lie down, stretched out to full height, or sit without touching the ceiling with your head.
The material for the shelves is wood, which does not release resins when heated. It can be larch, Canadian cedar, aspen, linden or alder.
Wooden surfaces in the steam room cannot be treated with paint or varnish. To emphasize the texture, you can use stain.