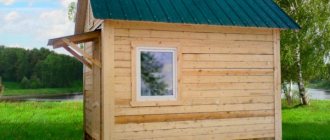
Having a bathhouse on your property is almost everyone’s dream. But it is obvious that building a bathhouse requires free space, time and money. If you cannot boast of a large land area, and your budget is limited, then pay attention to the projects of small baths or barrel baths.
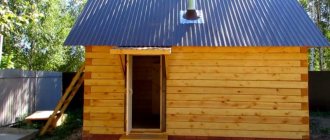
For example, a 5x3 bathhouse project is the best option for a small suburban area. The advantage of this bathhouse is its good capacity (up to three people can steam in it at the same time), while the construction is non-bulky and budget-friendly. But the benefits are not limited to this; we will tell you more about them later.
Sauna stoves with separate firebox, sink, steam room
Above, we have already tried to briefly tell the reader that an increase in the size of the bathhouse inevitably leads to the need to resolve the issue of heating the premises in addition to the steam room.
You can find out how the furnace power is calculated for the known cubic capacity of a steam room here. However, we are talking about adequate heating of a steam room.
If you take the firebox into the rest room, where it will serve as a fireplace, some of the heat will be transferred to the rest room. Whether this will be enough can only be determined empirically, because the specific temperature outside the window, the power of the stove, and the cubic capacity of the rest room all matter.
But we also have a soap one - what to do with it? You can remove one of the sides of the stove, but this is usually done with brick stoves, although you can experiment with the brick lining of a metal stove.
Another option for heating a soap bar is to move the tank that heats the stove into the washing room, then the tank will act as a radiator.
Another option is heaters or underfloor heating. You don't spend much time in the bathhouse, so running heaters won't break the bank.
You can also transfer the heating of hot water to radiators, that is, create an autonomous heating system in the bathhouse, but you need to remember that heating the water takes heat away from the stove, so its power drops. But there is still summer when heating is not needed.
Therefore, the stove should be such that you can regulate its power. This is realistic for gas and electric stoves, but you will have to tinker with wood stoves, including brick ones.
If you are interested in what kind of sauna stoves there are - Russian or Finnish - look through our section dedicated to stoves. There is a lot of useful information about stoves for saunas with a separate firebox, sink, steam room...
Step-by-step construction of a bathhouse
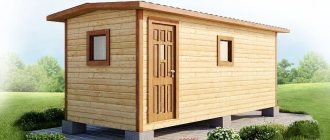
After developing a detailed project, selecting and purchasing the necessary materials, you can begin the construction phase. Let's look at step-by-step instructions for beginners, which will show you the whole process step by step with photo examples of how to build a 3x4 m sauna cheaply with your own hands.
Site preparation and foundation arrangement
At the selected site for the construction of a bathhouse, first remove debris and all vegetation (trees, shrubs). One of the optimal foundation options for such a building is a columnar foundation. For its construction, prepare the required number of holes for supports.
Foundation pillars are located at the corners of the building, at the intersection points of walls and along the perimeter.
For a columnar foundation, it is recommended to make holes 100-150 cm deep. The exact values will depend on the depth to which the soil freezes in the construction region. A 10-15 cm layer of crushed stone and sand is poured onto the bottom of the pits.
Then asbestos-cement pipes are installed in the pits, inside which a reinforcement frame is placed and concrete is poured. The solution is allowed to harden and gain strength, which depends on the time of year.
Walls and roof
Traditionally, walls are raised from timber with a section of 150x150 mm. To install the first crown, the foundation is covered with waterproofing, for example, roofing felt.
When laying timber you need to be careful and adjust it to the length of the wall. The most common method of laying timber is “in the paw”.
The walls are erected to a given height, providing openings for doors and windows. The crowns are fastened with wooden dowels. Jute must be laid between the crowns.
When the walls of the bathhouse are raised to the desired height, rafters are installed in accordance with the selected roof shape. The rafter legs are secured to the last crown with metal brackets.
If a shed roof is chosen for construction, the rafters are fixed with internal and external or two external supports. In the case of a gable roof, the lower parts of the rafters must be securely supported on the walls. At the top, the rafters are fastened to each other, thus creating a ridge.
When considering the construction of a 3 by 4 bathhouse with your own hands from the foundation to the roof, do not forget about the use of materials such as hydro-, heat- and vapor barrier. They are laid in a certain order, according to the photo below.
Interior arrangement
Equipping the bathhouse inside begins with the installation of communications. For the sewer system, pipes are laid during the construction of the foundation. For these purposes, a drainage well or other system for collecting wastewater is made outside the building, connected to the bathhouse through a pipe at an angle.
Having completed the sewer work, the floor is installed. Most often it is made of concrete or wood. In the case of concrete, tiles are used as a finishing material. If the floor is made of wood, then it is made to leak.
Let's look at a step-by-step guide to arranging the floor in a bathhouse with a drain with your own hands:
- If the water from the bathhouse will be drained directly under the floor, then a deep pit is made under the drainage pit, at the bottom of which a 200 mm layer of sand is laid, and then a 400 mm layer of crushed stone.
- A foundation is erected and waterproofed after the concrete has hardened.
- Along the perimeter of the subfloor, soil is removed with a slope of 10° from the foundation walls towards the pit.
- The slopes are covered with crushed stone, compacted, or a concrete screed is poured over a reinforcing mesh with 80x80 mm cells. Ironing is done on top of the concrete base.
- After preparing the drain and the pit itself, strapping beams and floor joists, pre-treated with an antiseptic, are mounted on the foundation. The lower beams are fixed using anchors or studs. The floor joists are connected to the crown beam with a notch or metal corners.
- A floor board with a thickness of at least 20 mm with a gap of 5-7 mm is mounted on top of the floor beams.
To extend the life of the wood, it is recommended to ventilate the bathhouse after each visit.
The walls of the bathhouse are lined from the inside with moisture, heat and vapor barrier materials. Mineral wool is most often used as thermal insulation. Then the windows and doors are installed, water and electricity are supplied.
Foundation construction
A 3*5 bathhouse made of timber, and even more so a 3 by 3, is a lightweight building, so the foundation here is laid as simple as it gets. As a rule, two options are used:
- shallow belt - its depth reaches about 40 cm, it is laid along the perimeter of the future building;
- columnar - even simpler to implement and cheaper, but not reliable enough for unstable soils.
The technology is simple and involves the following steps.
- A rectangle is marked on the selected area - 3 by 3, 2 by 3. For marking, stakes and a cord are used. Check the correctness of the markings by stretching the cords diagonally - their lengths must match.
- Then the value of the internal perimeter is plotted in the same way. The thickness of the foundation should be equal to the thickness of the timber - 150, 200 mm.
- They dig a trench 40–50 cm deep, compact sand and gravel at the bottom, and tie a reinforcing rod.
- The formwork is constructed from plywood or wood scraps. Fill with concrete grade M300 or M350.
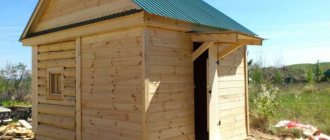
After the concrete has hardened - about 4 weeks, you need to start building the walls. The photo shows the finished foundation.
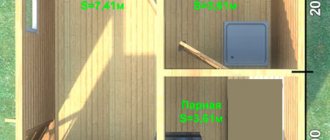
Bathhouse size 3 by 4: internal layout
The internal layout of a 3 by 4 bath can be comfortable and convenient for one person, two or even three people. This is not exactly a tiny sauna, but it is not a luxurious sauna either. However, if you use your imagination, you can arrange everything with maximum comfort and place everything you need on these few square meters.
Features and Benefits
Many owners of private houses prefer to install just such small bathhouses on their property.
The fact is that they have quite a lot of advantages:
Economical. First of all, it is worth noting that building such a bathhouse is very profitable. The construction of a 3x4 building will require very little materials. If you build a room from timber, then only one beam, sawn into two parts, will be used to build a bathhouse. There will be no waste here.
And if you build the premises yourself, you will also be able to save on work. In addition, it will take very little time to build a bathhouse - as a rule, following all the advice, you can build a bathhouse in just a few weeks.
Thoughtful layout. Since a 3x4 bathhouse is small in size, every free meter has to be used to the maximum. However, such a rational distribution of space is very beneficial.
As a rule, such a room is divided into two main parts. The main part is the steam room. The second one is reserved for the dressing room.
In this part of the bathhouse you can equip a place to relax. But only a few people can comfortably sit here; there won’t be enough space for a large group.
Durability. With the right selection of materials, baths can be very durable. Since the room is small, you can invest in good wood with high-quality impregnation. This is much more profitable and better than rebuilding a huge sauna, which will soon lose its attractiveness.
It is also worth noting the fact that registering such a small bathhouse is much easier. And then it will be much more convenient to sell it.
Space layout
Every free meter of a 4x3 bath should be used rationally. In addition to the steam room and dressing room, there may also be room for a shower. The main thing is to first draw a plan and make sure that all the rooms will really be comfortable and functional.
Each of the compartments has its own layout features:
The main part of any bathhouse is, of course, the steam room. It is not necessary to allocate too much space for it. If you want the bathhouse to be more functional, and there is room for something else besides a steam room, then you can limit yourself to a space of one and a half by two meters. In such a tiny room there is enough space for one person to sit on a shelf. There will also be enough free meters for a small stove or boiler to heat the room.
Bathhouse size 3 by 4: internal layout
A 3 by 4 bathhouse is a comfortable room with enough space not only for a steam room. What should the layout be like inside? What ideas are there for 3x4 structures? Should the sink and steam room be located separately or in the same room?
Why think about planning?
To some, it may seem like a waste of time to think about the interior layout of a bathhouse. However, this is not the case. A well-thought-out layout will help make the bathhouse the way you dreamed of. Factors that make it clear that the location of each room should be thoughtful:
Layout option for a 5 by 5 meter bathhouse with a bathroom
- Only in a properly planned room can physical and spiritual harmony be achieved;
- The sauna space, thought out to the smallest detail, is safe for relaxation;
- In a steam room, where every detail is not done so easily, but with preliminary consideration, it will be beautiful in any case;
- Also, designing the interior space will help to wisely use every centimeter of the building. And this, in turn, will help save your personal budget.
When important moments are approached seriously and thoughtfully, everything turns out at the highest level. The appearance of a bathhouse on the site will help you unforgettably spend time with friends or relatives, lead a healthy lifestyle and improve your health. Therefore, if you want to see a bathhouse on the territory of your private sector, you should start thinking through all the nuances in advance.
Classic 3 by 3 bathhouse project
An area of 9 square meters is not the best size for building a bathhouse. But large-sized structures are not always necessary, especially in small areas.
A traditional bath building consists of several parts:
dressing room - room for rest
here it is important to take care of comfort by installing a tabletop and comfortable attributes of seating furniture; steam rooms - a stove-heater must be installed to generate heat and steam. It is better to place the steam room between the steam room and the dressing room near the front door
There should be beds or equipped shelves to save space, on which each person should fit at full height; sinks - here there will be a container with water for cooling.
The location is chosen in such a way that the building is located at a distance of 15 meters from a residential building. This is advisable from a safety point of view. The best option is considered to be the proximity of the bathhouse to a natural or artificial body of water: a pond, a swimming pool, etc.
The basis for the bathhouse construction should be a sand and gravel area. Otherwise, you will have to dig a hole 1.5 meters deep and then fill it with soil.
Recommendations for setting up a steam room:
- the topmost shelf should not be very close to the surface of the ceiling, so that it is convenient to go down without hitting your head on the ceiling;
- the height of each shelf must be calculated in advance, even at the stage of designing the bathhouse and creating the drawing;
- You need to choose benches both high and low. The latter will be used by beginners and people who cannot stand high temperatures;
- the stove must be positioned in such a way that it is convenient to reach it while lying on a shelf;
- It’s better if the steam room has fairly low ceilings and a threshold at the front door. This is necessary so that the room quickly warms up and steam does not escape through the door cracks.
It is important to calculate not only the width and height of the bathhouse building, but also the height of the ceilings. The number of shelves (beds) themselves and their configuration depends on the wishes of the owner and the frequency of use of the room
An example of the layout of a 3 by 3 bathhouse inside is shown in the photo.
Choosing the optimal area
The optimal area of the bathhouse directly depends on the number of people who will use the steam room at the same time. The desire to save on building materials and firewood for the firebox is understandable, but you should not allocate too small a space for the steam room. There is a possibility that it will quickly overheat, and being in such a small steam room will be uncomfortable.
As for the ceiling height in the steam room, the permissible minimum is 2.1 meters. If you make the room higher, the steam will rise up and occupy the empty space.
If the area of the site does not allow, then you can build a small 2x2 or 2x4 bathhouse, but in this case the layout will only include the necessary minimum - a steam room and a dressing room.
This option is convenient only if the bathhouse will be used in the warm season. For a comfortable stay, the bathhouse can be combined with an open terrace or veranda, in which case a full-fledged relaxation room with sun loungers and a table can be located in the open air.
To save space in this case, you can place a bench and hooks for clothes in a small dressing room. And yet, it is advisable to allocate separate rooms for the steam room and washing room, because not everyone can tolerate high temperatures and high humidity.
Heating should also be provided in the room, otherwise the cold outside air will quickly cool the room when the door is opened. Even a small fireplace will help correct the situation, making the interior more cozy and homely. But if the plan provides only one stove for complex heating, then it must be capable of heating the entire space.
It is also a good idea to provide a ventilation system; as an alternative, you can use a window to ventilate the room.
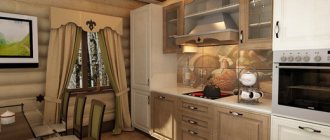
The rest room can occupy up to half the total area of the entire building. It is also necessary to install full-fledged changing rooms and places for storing clothes and towels.
For a large family with children, a large bathhouse is needed, especially if it will be used throughout the year. But even with a large total area of about 6x8 and 6x10 meters, you should not make the steam room too spacious. It is much easier to warm up a small room than a space of several square meters.
The steam room can be designed for 2-3 people, who can comfortably lie down on wooden benches.
In a bathhouse measuring 8x8 or 9x8, you can provide all the necessary premises for a comfortable stay. Up to 15 people can be inside such a bathhouse at the same time. In addition, with a properly thought-out layout, everyone will find a place where they can relax after a steam room, drink tea or even sit near the fireplace.
- https://skedraft.ru/planirovka-bani/banya-5-na-5
- https://proekt-sam.ru/banya-bassein/planirovka-bani-s-mojkoj-i-parilkoj.html
- https://v-banyu.ru/planirovka-bani-3h5-mojka-i-parilka-otdelno.html
- https://v-banyu.ru/banya-5-na-5-planirovka.html
- https://vbanepar.ru/planirovka-bani-vnutri-foto.html
- https://dekoriko.ru/banya/proekty/planirovka-3-na-5-m/
- https://planvsem.ru/banya/planirovka-bani.htm
- https://2gazon.ru/postroiki/bani/planirovka-3×5-mojka-i-parilka-otdelno.html
- https://dekoriko.ru/banya/proekty/planirovka/
- https://proekt-banya.ru/article/banya-5-na-5-iz-kirpicha-ili-brusa
How to create a project?
A separate sink and steam room are an undeniable advantage of 4 x 5 bathhouse projects. Perhaps this is their only similarity, and from the mass of options, everyone can choose what they like best.
- The simplest plan for a one-story bathhouse includes a common room, a sink and a steam room. With this layout, the rest room also serves as a dressing room, so in winter and late autumn it is not very convenient to use. From the relaxation room, a door leads to the washing room, where there is a modern bathroom with a shower, sink and toilet. From the washroom you enter the steam room with a shelf and a stove.
- The second project is similar to the previous one, only a spacious terrace is added outside. It can be glazed, creating a cozy veranda, which also provides a place to relax.
- A bathhouse with a dressing room allows you to wash at any time of the year, and it is more convenient to store firewood at the entrance. Through a small corridor you go into the relaxation room, then into the washing area and into the steam room.
- The best option is a bathhouse with a separate toilet. Only to create this project will you have to sacrifice meters of a relaxation room or steam room. It looks like this: the door from the vestibule leads to the rest room, and from it you can go to the washing room, and then to the steam room or toilet.
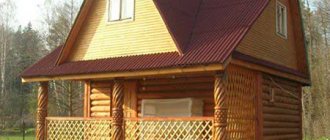
- The attic allows you not only to effectively use the construction space, but also to accommodate guests who come to the dacha. We will equip the first floor with a dressing room, a “hall”, a washing room and a steam room, and we will equip the second floor as a living space. To create comfortable conditions for guests, zone the attic into a bedroom and a place where they can enjoy all the delights of country life.
3x5
Since people are interested in washing and steam room options for these dimensions, separately and together, we will present both options, and then you can decide which one you prefer, but everything that was said about the possibilities of reproducing the conditions of a Russian bathhouse in a building with an area of 3 by 3 meters - remains valid even when increased to 5. Make a stove in a surround, use steam generators if it is not possible to make a full-fledged closed heater.
Washing and steam room separately
Let us say right away that this option cannot be called the only possible one. Moreover, for those who are not inclined to receive guests and drink libations, the design of a bathhouse with a steam room and a sink of such dimensions may seem unsuccessful. But you can always start from what you have and reshape everything in your own way