Having built a country house, many home craftsmen think about a bathhouse. And if previously the steam room was used for washing and washing, now, with the development of progress, such buildings are used for relaxation and healing. And relaxation should take place in a cozy environment, for which any bathhouse has an appropriate room.
Tea parties and long conversations are held in the relaxation bath room, so everyone strives to decorate this room in the right way. And in addition to the obligatory furniture, there are also decorations here that highlight the unique interior of the steam room. We will talk about which paintings are best suited for a bathhouse in this article.
Panels for couples often contain various inscriptions, most often humorous.
Beautiful examples
Quite typical is a bath panel made using the carving technique. The deliberate roughness of the work only gives it a certain zest. The panel depicts the interior of the steam room itself with traditional brooms and tubs surrounded by steam, the unusualness of which is added by the crayfish lying on the bench. The composition is made in natural shades, and therefore will easily fit into any bath interior.
A more modern solution would be to decorate the recreation area with a panel made from saw cuts, designed in the form of a figure of a large bear. The work uses both large and very small wooden blanks.
To learn how to make a bathhouse panel with your own hands, see the following video.
Bath finishing materials
It is recommended to use only natural materials in the interior of the sauna, because they are probably non-toxic in case of high humidity and temperature changes. Wood is most often used, and stone and ceramic tiles are used a little less often. Glass, brick and completely unconventional, but very useful salt blocks will do.
Walls
Wood warms up quickly, releases heat slowly and is rich in natural phytoncides. In “dry” areas, you can use coniferous lining with its natural antiseptic effect. But not in the steam room itself, because when heated, the needles release sticky resins.
For a steam room, pay attention to linden, birch, aspen, oak, beech and ash - they are not so sensitive to high humidity. Tile mosaic looks impressive in the design of a shower room, swimming pool or individual decorative areas
When heated, salt blocks release beneficial minerals.
Wood is used to decorate the steam room without additional processing so that it retains its natural healing properties. For “dry” areas, decorative panels for logs, block houses, planks and any other types of wooden cladding are suitable. To make the coating more durable, it is coated with oil or wax compounds.
Floor
For the floor, be sure to choose collections with a textured anti-slip coating. Linoleum and other artificial materials should not be used. Wood boards are also not suitable, because they are too fire hazardous for a bathhouse, and the more budget-friendly ones also contain formaldehyde.
Ceiling
Wooden cladding with a vapor barrier is also suitable for the ceiling, but it is better to place suspended structures in the dressing room and rest room. Ceiling lining looks beautiful, looks impressive, and ensures a healthy microclimate and air circulation.
Lighting
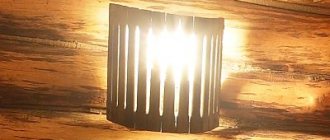
Use built-in ceiling lights - they are the safest and most practical. Small salt lamps-night lights are suitable for decoration. But it’s better to avoid floor lamps and sconces, because the steam room itself is usually small and every centimeter counts.
Furniture
Furniture with soft, rounded shapes is suitable for saunas and baths. L-shaped benches are also suitable if they go the entire wall so that there are no external corners. This is necessary, first of all, so that if someone suddenly becomes unwell, they do not incur additional injuries.
Materials
A bath panel cannot be created from paper, but otherwise there are no restrictions. The main problem with even the thickest cardboard is that the increased humidity of the bath will sooner or later lead to damage. We must not forget that paper is a fire hazard. In most cases, a bath panel is made of wood. This eco-friendly material harmonizes with any decoration and can withstand high humidity and temperature fluctuations.
In addition, not only the works themselves can be made of wood, but also the frame for them. An interesting fact is that at high temperatures, some types of wood (for example, conifers) begin to release resins and essential oils, which have a beneficial effect on the condition of the body. Thus, even just relaxing after water procedures in a room decorated with wooden panels, you can heal your body. To create bath decor, non-trivial materials such as straw and birch bark can be used.
Secrets of fragrant wood or a little about juniper
In this publication I would like to write specifically about juniper wood and summarize various data about this wonderful fragrant tree.
First, briefly about the chemical composition of common juniper. All organs of the plant contain essential oil, which differs little in its constituent parts. The content of essential oil in the stems is 0.25%. Juniper essential oil has a disinfectant, phytoncidal, anti-inflammatory, analgesic and deodorizing effect, promotes regeneration and accelerated wound healing.
Properties of wood. Very important properties of juniper wood are high strength characteristics and virtually no susceptibility to rotting processes. Juniper wood is heavy, dense, flexible, not hard, and convenient for carving. Juniper does not swell when wet and practically does not shrink when dry.
The wood is well processed with cutting tools, the cuts are clean and glossy. The wood does not have resin passages, so it is easily polished. As a rule, juniper crafts are practically not subject to cracking and warping.
Article on the topic: How to build a foundation for a 6 by 6 bathhouse
Use of juniper wood. Beautiful and fragrant juniper wood is used for a variety of crafts and furniture making.
Dried specimens of trees and bushes are an excellent material for producing unusual patterned items. Such wood has already been dried and aged under natural conditions for a long time.
Dried juniper is an excellent material for carved turning and carpentry work. Its wood does not need to be specially dried - it is already dried and seasoned, as a rule, for many years. In Germany, reeds are traditionally made from it - you won’t wear one out in half a century. Juniper wood is also used to make the best types of pencils.
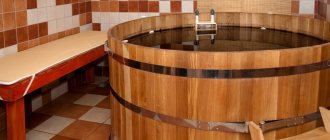
In the Baltic countries, products made from juniper wood such as barrels and mugs are popular. In Rus', they also noticed a lot of useful properties of this shrub: milk in a juniper jar does not sour even on a hot summer day, sour cream remains fresh and butter does not go bitter, and pickles prepared for the winter do not spoil in juniper-steamed barrels.
In addition to its pronounced decorative qualities, the tree has many valuable properties: juniper wood, like a living tree, continues to release phytoncides, thereby maintaining the ability to disinfect the air around it. This is one of the few trees whose wood practically retains its usefulness even after being cut down.
It has been found that juniper volatile substances kill up to 30% of harmful microorganisms contained in the air.
The smell of juniper is healing, it stimulates and strengthens the nervous system, calms, helps with headaches, stress, diseases of the respiratory system, hypertension, and insomnia. The aroma stimulates metabolic processes and immunity, relieves nervous and physical tension, and helps with loss of strength.
Interior items made from this wood have the amazing property of saturating the air with essential oils. When you smell such a product, you immediately remember the fragrant air of a coniferous forest.
Article on the topic: Why do you dream of shaving your legs in a bathhouse?
How long do juniper products smell? It is impossible to answer this question precisely. It all depends on where they are located (whether there are any other strong overpowering odors, for example, in the kitchen or in the steam room where aromatic oils are used), how and with what they are processed, and other factors. My comb, for example, is over 8 years old. With everyday use, it has not lost its scent, although not as rich as it was when purchased. But, unfortunately, this small souvenir from the south no longer smells, since, judging by its color, it has been treated with oil.
They write on the forums that juniper products continue to smell for more than 10 years, but only if the wood has not been treated with any compound. Also discussed on the forums is the issue of slightly sanding the surface of the saw cuts to restore the smell of juniper.
Sorry for the verbosity, I just want to sing odes to this magnificent healing tree!
Wall and ceiling decoration
How to make a steam room in a bathhouse? This question interests novice bath attendants. When the flooring work has come to an end, you can move on to the next stage - designing the surface of the walls and ceiling
It is important to use high-quality hydro and thermal insulation here. In the future, these measures will reduce heat loss and fuel costs
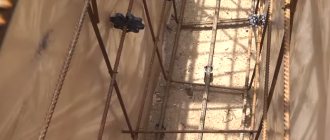
Before attaching the lining to the walls, it is necessary to make a layer of vapor barrier film. It will prevent condensation from accumulating inside the structure. Next, a layer of mineral wool is laid. After this, the thermal insulation layer is covered with chipboard panels.
The final stage will be fixing the wooden parts on the plane of the walls and ceiling. The photo of the steam room in the bathhouse shows the process of decorating the space.
Large selection of sketches, drawings and finished works
These works will decorate even the most modest rest room in the bathhouse and bring the necessary amount of comfort to it. Try it!
How to do it?
Having carving skills, you can make a variety of bath panels with your own hands. They are created according to the same principle.
- First, the drawing is prepared on a paper stencil.
- Then a wooden board prepared to the required dimensions - the basis of the future panel - is carefully sanded on the front side.
- The intended design is transferred to the base, after which all contours and patterns are cut out using a knife.
- The carved areas are treated with stain (always water-based), and the rest - with a solution of linseed oil or turpentine.
- For ease of mounting on the wall, appropriate fittings are attached to the back of the work.
Having purchased the required amount of salt tiles, it will be easy to lay out the salt panel yourself. In fact, the fragments in a thoughtful sequence will simply need to be fixed to the wall with construction adhesive that does not contain water. You can mount it either closely or through a small gap, and the emerging seams can be rubbed with the same salt.
To create such a panel you will need a pine blank, a gas burner, a drawing printed on a laser printer and acrylic paints. In addition, special decoupage glue and matte acrylic varnish, several brushes, a rubber roller, sandpaper and an emery block will be useful.
The work begins with firing the workpiece using a gas burner. The place in the middle of the front side where the design will be located must be left untouched. The next step is to sand the surface using sandpaper. The tool is moved along the grain to highlight the natural structure of the wood. Excess dust is removed with a brush.
The wooden board is varnished with an acrylic preparation and dried. The central zone is painted over with white acrylic, slightly diluted with water. After drying the surface, it must be treated with an emery block.
When the white area is covered twice with acrylic varnish, you can move on to the drawing itself. The front side of the printout is treated with decoupage adhesive varnish and dried. Next, a second layer of varnish is applied to both the picture and the piece of wood, after which the image is immediately glued face down.
The sheet is pressed, rolled with a roller and left to dry. The paper is removed by slightly wetting the surface and using the rolling method. The edges are sanded, the panel is varnished and, if necessary, tinted.
Instructions for making bath panels using a burner
Very often, the natural texture of wood becomes the basis for applying a design using a burner. If you do not have special artistic abilities, we recommend doing the work in this order:
- We transfer the desired pattern onto the block using carbon paper and a simple pencil.
- We use a burner to repeat the outline of the design.
- We cover the surface with colorless varnish in several layers.
- We fix the galvanized fastening part at the back.
To draw a bright, contrasting line, you need to press the tool harder. Draw secondary lines with moderate pressure. Make essays with light movements.
Rest room interior
We recommend decorating the relaxation room in the same style as the bathhouse itself, so that they complement each other. Windows should be small and as airtight as possible to prevent drafts and cold. Neat roller shutters made from natural fabrics will help you hide from prying eyes.
In the relaxation room you need soft, comfortable lighting so that it does not hurt your eyes after the bath. Small local sconces and floor lamps or spotlights with a brightness control are suitable. The main thing is to have fewer exposed wires and sockets, because even a room with a sauna is still high in humidity.
A comfortable sofa or bench with cushions wouldn't hurt, but choose upholstery that's not sensitive to moisture. For example, natural leather, for all its beauty, will quickly deteriorate in such conditions. Take care of shelves, racks and closed cabinets for oils, brushes and bath accessories.
If the rest room is spacious enough and well insulated from moisture, think about entertainment. This could be a TV, a pool table, a table football table or a bookcase. The fireplace looks very impressive - even a compact decorative biofuel model will do.
Preparation
I read a bunch of sites on how to dry wood at home, since no one uses fresh saw cuts - they crack badly and can become moldy. To be honest, there is very little information on the Internet on this matter, it is poorly verified, scarce and contradictory. Basically, all the advice boils down to the fact that this should be done in production conditions. In the end, I chose and decided to try the two most realistic methods for me: boil the saw cuts in oil or in a very concentrated salt solution. I outlined a general procedure: file, dry, process, sand. So, vacation came, we went to the village, and I began to act.
Article on the topic: Is it possible to take a steam bath with lumbar osteochondrosis?
Wood carving for a bath: the best examples of work
You can decorate the interior in different ways, but if we are talking about a bath room, then there is no better option than wood carving.
This technique has been widely used for many years, but it has no intention of losing its relevance. For a simple reason: the resulting works are incredibly attractive and fit organically into the overall style of the room.
The best examples of wood carvings for a bathhouse with a lot of photos are in this material.
Where to begin?
Of course, with the purchase of the appropriate tools. There are two ways:
- purchase cutters of different shapes separately;
- buy a large set at once.
It seems that the advantage of the second option is obvious: you will have a dozen different tools at your disposal at once. Almost any creative idea can be brought to life!
Which wood is best to work with?
Before you get down to business, of course, you need to decide on the type of wood species that is best to deal with. If you are a beginner, then it is advisable to first hone your skills on alder, aspen, spruce, fir and other soft-type species. They are flexible and will allow you to reduce the risk of error to a minimum.
If you already have some experience in wood carving, then you can choose a harder wood: birch, beech, apple tree, ash, acacia, etc.
Bath panels made using wood carving are distinguished by a fairly impressive variety of motifs. Ultimately, the choice of topic depends on the relevant experience of the person undertaking the process. By the way, if you decide to equip a hammam in your bathhouse, then ornamental oriental motifs will fit perfectly as decor. It all depends on your imagination - although you can choose a ready-made sketch.
- bath motifs;
- abstract patterns;
- geometric contours;
- inscriptions;
- flowers;
- alcoholic drinks, etc.
Process Features
Most often, special plates are prepared for wood carving. They are given the desired shape using an ordinary chisel. As a starting material, you can take an ordinary board and cut it in full accordance with your idea.
The drawing itself can be applied to wood with a simple pencil. You can take a ready-made sketch or drawing, or you can come up with your own. Or borrow someone else's idea, but with your own twist. Then you will end up with a completely original work that claims to be unique.
After the design is completed, it is necessary to thoroughly sand the plate, apply a stain that gives an interesting relief, and then completely varnish the surface. On average, one job will take you no more than 4-6 hours. Provided that you have certain skills in working with wood, of course.
Large selection of sketches, drawings and finished works
These works will decorate even the most modest rest room in the bathhouse and bring the necessary amount of comfort to it. Try it!
Conclusion
Don't be upset if your first pancake comes out lumpy. Ultimately, people learn from their mistakes. But the next works will be much more thorough. Wood carving for a bathhouse is one of the easiest ways to make your room comfortable, spending a minimum of material resources. It would be stupid not to take advantage of this!
vk.com, forumhouse.ru, tutknow.ru.
Specifics of making plywood bath decorations
If it is difficult to make a wooden bath panel, then you can use plywood as an alternative.
Such decorative elements, if properly designed, will perfectly complement the interior of the steam room. To make the product yourself, follow the following instructions:
- We draw on paper the pattern with which we want to decorate the bath room.
- We transfer the drawing onto plywood using carbon paper.
- We drill holes in closed fragments with a drill.
- We cut out the pattern.
- We cover the product with several layers of colorless varnish.
- We attach a fastener made of galvanized metal.
If desired, some elements of the design can be burned out. By combining these two methods, you can create an original decoration for the steam room.
Materials for making panels for the bathhouse
First, keep in mind that the interior of the bathhouse cannot be decorated with products from:
Papers. High humidity in bath rooms will damage such a picture. Even decorations made of thick cardboard will suffer. In addition, this material is fire hazardous.
The most common material for making decorative elements for bath interiors is wood. It combines optimally with the overall ambiance of the steam room.
This material is also able to withstand frequent temperature changes and high humidity. You can make various bath decorations from wood: carved panels, plywood products, paintings with a burner.
Even frames for products can be made from this practical and environmentally friendly material.
Manufacturing technology of carved panels for baths
Wood carving is often used to decorate tables and chairs in the recreation room, as well as for various panels. Before you start working on carved paintings, you need to decide on the design. Here you can fully express your imagination and sketch out a personal sketch or use any other ready-made drawing.
- We grind the block from the inside.
This product can be used to decorate a dressing room or a rest room.
Specifics of making plywood bath decorations
If it is difficult to make a wooden bath panel, then you can use plywood as an alternative. Such decorative elements, if properly designed, will perfectly complement the interior of the steam room.
We draw on paper the pattern with which we want to decorate the bath room.
Instructions for making bath panels using a burner
Very often, the natural texture of wood becomes the basis for applying a design using a burner. If you do not have special artistic abilities, we recommend doing the work in this order:
- We transfer the desired pattern onto the block using carbon paper and a simple pencil.
To draw a bright, contrasting line, you need to press the tool harder. Draw secondary lines with moderate pressure. Make essays with light movements.
Features of making a mosaic panel for a bath
Recently, mosaics have become increasingly popular in decorating the walls of bathhouses. Most often it is used for the internal lining of a Turkish bath, since with its help it can be used to emphasize the national oriental flavor. However, in traditional Russian baths this decorative element is also popular.
We fix individual parts on a special mesh. Please note that at this stage elements can easily be torn off from the overall canvas and replaced with others. This allows you to create an original drawing.
A mosaic panel can visually expand a small room. The market offers many production models of mosaics with 3D effect. You can decorate your bathhouse with a pattern of any geometric shape. Please note that a mosaic panel is not the main finishing coating, but a decorative element. Therefore, it should stand out on the wall, and not merge with the overall cladding.
Rules for making a wooden frame for a panel in a bathhouse
To build an original picture frame for a bathhouse with your own hands, you can use straight branches. We follow this algorithm:
- Using garden shears, we separate the branches, taking into account about four branches on each side of the future frame.
You can install any wooden product in such a frame to decorate your bath room.
Interior decoration in a steam room is important to create a general atmosphere. The above instructions and photos of bath panels will help you create an original decoration with your own hands, even without special artistic skills.
Do-it-yourself bath panel To create an original panel for decorating a bath room with your own hands, you do not need to have any special artistic talent. However, it is necessary to choose the right practical and environmentally friendly
Buy paintings for the bath, paintings for sale in Moscow Bath paintings and panels can be bought in our art gallery.
Manufacturing technology of carved panels for baths
Wood carving is often used to decorate tables and chairs in the recreation room, as well as for various panels.
Before you start working on carved paintings, you need to decide on the design. Here you can fully express your imagination and sketch out a personal sketch or use any other ready-made drawing. Most often, a bath attendant with equipment or plump ladies in a steam room are carved on wooden panels for decorating a steam room. Also very popular are interesting cut-out sayings about the bathhouse: “To wash in a bathhouse is to be reborn” or “The fragrant steam heals not only the body, but also the soul.”
You can purchase such a product in a store or from folk craftsmen, but with minimal artistic skills you can make a panel using wood carving with your own hands. To do this you will need a piece of a block of any wood and a sharp knife.
We carry out the work in the following sequence:
- We grind the block from the inside.
- Cut out the design with a knife.
- We cover the cut out elements with water stain.
- We treat the rest with a solution of linseed oil and turpentine.
- We nail the galvanized fastener.
This product can be used to decorate a dressing room or a rest room.
Flooring installation
Finishing a steam room in a bathhouse begins with the floor covering. The floor level in the steam room should be slightly higher than in the bathing area. There are several options for bath floors.
In turn, the coverage is divided into:
Wooden floor. It is considered a fairly common type of coating in modern baths. Its installation involves fastening the support beams at the zero level of the foundation.
Next, boards are fixed to it, the thickness of which is 45-50 mm. The distance between each part should be 15 cm.
Concrete covering. The main advantage of such a floor in a bathhouse is its long-term operation. The only drawback is the installation. The working process on average ranges from 7 to 14 days.
Here it is necessary to use high-quality cement-concrete mortar. During the filling process, a sewer network is created where wastewater will be discharged in the future.
When the concrete base is completely dry, you can proceed to decorating the floor. The best ideas for steam rooms in a bathhouse involve the use of several textured materials in the design of the room.
To do this, use natural stone or ceramic tiles with a textured pattern. These details go well with wooden walls.
For people who prefer decorative details, we suggest using a mosaic covering.
Project development
It is necessary to design a steam room already at the initial stages of construction work. Its dimensions will depend on some nuances. When calculating the area, the following criteria must be taken into account:
Number of persons. When making a steam room in a bathhouse with your own hands, you need to take into account the exact number of people who will relax here. For a comfortable location, it is recommended to make the room more than 6 m2. 4-5 people can fit here.
Ceiling height. Here the height of the tallest family member is taken into account. Next, add 30 cm. Good thermal insulation will help reduce heat loss in the room. The optimal ceiling size is 2.3 m.
Placement methods. Seating shelves allow you to create a more compact area. Reclining benches require the most spacious room possible.
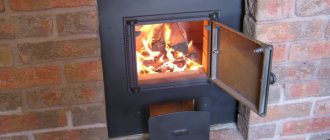
Furnace structure. Fire safety standards require the location of furnace equipment at a distance of 40 cm from the wooden walls of the building. If the surface of the material is impregnated with a special impregnation, then the distance is reduced to 30 cm.
A brick oven heats up slowly and retains heat for a long time. The thickness of the walls of such a structure is impressive. Electrical installation is considered the safest equipment. The only requirement will be to reduce the height of the ceilings. This will reduce the heating time of the room.
Interior styles
Modern baths do not have to be monotonous, like a carbon copy. The sauna can also match any interior style if you use a little imagination!
Bathhouse in the old Russian style
In our latitudes, this is the most popular solution for decorating baths and saunas. The Old Russian style resembles a cozy village hut. These are natural logs, rough furniture, embroidery, dried flowers, cozy textiles and an aged stove.
Bathhouse in Scandinavian style
Scandinavian interiors have firmly conquered the market over the past few years, and saunas are no exception. This is a minimum of furniture and decor, contrasts and accents, light wood and free space. Such baths are functional, pragmatic and very attractive in their brevity.
Country style bathhouse
At its core, country is the same rustic style, but with a Western twist. It is dominated by light, smooth wood, beams and beams, ceramics, clay, bright utensils and accessories. Stone and brick are used, and in dry areas leather and forged elements are used.
Bathhouse in ethnic style
Moroccan and oriental motifs, intricate interweaving of textures and exotic patterns are now in fashion. These baths are a little mystical, but very inspiring
Pay special attention to lighting, because romantic twilight sets the mood for eclectic decoration
Bathhouse in a modern style
Here, natural wood is harmoniously combined with the most modern equipment and technology. For example, a multifunctional shower stall with lighting against the backdrop of absolutely smooth lining. The design is dominated by minimalism, the principle of contrasts and laconic forms.