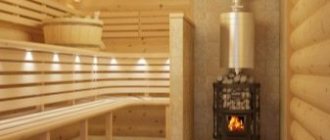
In many private houses, mini-hotels, small cafes and restaurants, fireplaces and stoves running on solid fuel are still used for heating and adding comfort to the interior.
To ensure efficient combustion of wood or coal and to prevent gas products from entering the room, you should cover the surface with a facing material, which is most often used as tiles.
After laying tiles of any type, the space remaining between them needs to be sealed, as builders say - grouted. To do this, you will need a heat-resistant grout for joints that can withstand heat without losing its integrity and appearance.
The role of grout for ovens
Grout is one of the integral materials used when laying tiles. It has not only a decorative function, but also a protective one. The grout not only perfectly handles the seams between the tiles, but also prevents dirt and moisture from getting under the tiles.
Grout can also transform a room and become a highlight; to do this, you can use a design trick and use a grout that is different from the color of the tile, but it is important to choose the contrasting color correctly.
What causes cracks to form on the stove?
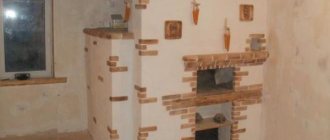
The fact that the stove is made of brick into a single continuous structure does not mean that over time this structure is not subject to chipping and natural wear. If the stove is assembled incorrectly, the heat from burning fuel will not lead to additional strengthening of the brickwork by firing, but, on the contrary, to the formation of cavities and cracks.
Important!
The quality of the brick also affects the frequency and prospects for the formation of cracks and their configuration. It is highly not recommended to use damp, porous bricks.
In addition, the dimensions and standard dimensions of the furnace itself are important; if the proportions and width of the mortar joint are incorrectly observed, then cracks are quite possible. Also, if the foundation under the stove is not built correctly and shrinks relative to the foundation of the house itself, this can lead not only to cracking, but also to the destruction of the entire masonry.
Types of heat-resistant grout for ovens
You can find a variety of grouts on sale; they differ from each other based on the base from which they are made.
- The most common and well-known grouts are based on cement or cement with the addition of sand. Grouts based on Portland cement can be purchased ready-made (the consistency is suitable for use from the moment the package is opened), and dry mixtures are also available for sale, which must be diluted with water or latex, and then used.
- Grouting using epoxy resin and a special component that ensures the hardening of the composition. The use of latex grout makes the seams more neat, but using latex grout is not so easy, in order to work with it you need to have certain skills, so it is most often used by professionals. The price of grout is much higher than cement grout.
We inspect and select material
Before proceeding with the procedure, it is necessary to carefully and painstakingly inspect the stove to identify cracks or places where they are intended, but have not yet formed. Based on the configuration of the fracture sites, the material is selected.
We’ll talk about choosing the material for preparing the composition a little later, but for now let’s look at what tools you’ll need for the job:
- Construction trowel or spatula.
- Wooden rule.
- Fine-grain sandpaper.
A small list of tools and a minimum of construction skills is all you need to fix a cracked stove wall.
Buying grout for the stove
You can buy a ready-made mixture for processing tile joints on a stove at any hardware store, but before purchasing, make sure that it meets all the necessary qualities:
- Stability at high temperatures. How well a composition can withstand elevated temperatures is one of its main qualities. Since the surface of the oven heats up, and along with it the tile itself and the seams;
- Moisture resistance. For stoves located in a bathhouse, resistance to moisture is more important than ever. It cannot be assumed that moisture resistance is not important for a home stove, since it will need to be cleaned of various contaminants using household chemicals and water;
- Resistant to sunlight. When the sun's rays hit colored surfaces early or late, they contribute to fading. The manufacturer indicates how long the color of the grout will remain unchanged;
- Grain composition. The finished compositions have two types of grain size. A coarse composition of this type creates a ribbed surface; a fine-grained composition, when used, creates a smooth glossy surface;
- Choice of grout color. Grout can be selected in three ways. The first two are classic. The color closest to the grout color is selected, or, on the contrary, the color opposite to the color of the tile is taken.
The third method is considered the most interesting; a contrasting grout color is selected, but most often the designer is responsible for selecting colors.
Recommendations for choosing a suitable reveal
A tile fugue has two main purposes: protective functions and giving the tiled surface an attractive and finished look that matches the overall design of the room. When choosing a suitable mixture, you need to study the characteristics of various compositions and be guided by the following criteria and factors:
- surface operating conditions;
- type and quality of material used for cladding;
- type and condition of the surface (horizontal or vertical);
- depth and width of the processed seam.
—>
Grouts from trusted brands
- "Terracotta". The grout, which is produced in white, is colored using colors. It withstands temperatures up to 400 degrees and resists moisture. It is sold in bags with a capacity of up to 20 kg. When used, the mixture behaves obediently and does not spread. Popular mass among consumers costing 900 rubles.
- Isomat Multifill Smalto. Grout, which is produced in various colors, is well resistant to moisture, high and low temperatures. On sale it is presented in bags with a capacity of 2 kg, the cost is 350 rubles. The finished composition has good plastic qualities, thereby not causing any difficulties in working.
- PLITONIT Super Fireplace ThermoRepair. Used for grouting joints of stoves and fireplaces. The mixture is available for sale in 5 kg bags, costing 350 rubles. It tolerates exposure to various temperatures and moisture well. The composition is flexible and does not cause any difficulties in working.
- Mixonit Fuga KL. A universal product used to work with various types of tiles. Tolerates high temperatures and repels moisture. The color palette is varied, which changes the cost, ranging from 600 to 700 rubles. To place the composition on the surface you will need a construction gun.
Color solutions
Usually, when choosing a grout, a simple buyer is guided by the appearance of the mixture, and not by its physical properties. Let's look at this nuance in detail.
Cement fugues allow you to choose any shade to match your tiles. Even if the desired color is not on sale, you can add color to the mixture. “Epoxy” is painted at the initial stage, its shade depends on the quartz sand: transparent, bronze, silver, golden.
If at the stage of choosing a color you are faced with an insoluble dilemma, then I advise you to opt for standard white grout, which is considered a win-win option. This option is best used for walls, since the seams on the floor will quickly acquire a grayish tint.
Source
Making your own grout
It is also possible to make grout at home. There are several cooking options. For the first option, you need to purchase plaster and water-repellent liquid (sold in a hardware store), all components must be connected together and water added until a mixture is formed, the consistency of which will resemble sour cream.
For the second option for making grout at home, you will need clay and cement in a ratio of 5 to 1; a composition is mixed with the addition of water, which can be used as a grout.
How to cover cracks in a stove so it doesn't crack from the heat?
To prevent the stove from cracking in the house, it is necessary to responsibly carry out the work during the construction of the building.
The main causes of the malfunction are laid down at this stage. But if the problem has already arisen, it is important to resolve it promptly. How and how to do this, you will learn about this in the article. Content:
First you need to understand why cracks are spreading along the wall of the stove.
Reasons for appearance
Before properly and reliably caulking the stove, in order to prevent repeated malfunctions, you need to know what can affect the integrity of the stove coating:
- during a long break in heating the house and sudden temperature changes;
- the furnace was laid using low-quality mortar;
- Perhaps the reason is the settlement of the building or foundation. In this case, it will be necessary to carry out major repairs to the foundation, increasing its size and strength;
- after laying the stove, the process of normal drying of surfaces was disrupted;
- when plastering the stove, a low-quality solution was used or a thick or very thin layer was applied;
- Perhaps the reason is faulty ventilation and condensation deposited on the walls of the furnace.
Is it possible to use a stove with cracks?
The answer to this question is unequivocal - you will need to cover up a faulty, smoking stove immediately; it is not recommended to use it. Such requirements are explained not by a violation of the appearance of the walls, but by cracks that allow carbon monoxide to enter the room. Poisoning from combustion waste can lead to dire consequences.
Firefighter statistics show that most people die in a fire because of the gas, and not from the fire.
Damage diagnostics
Therefore, at the first sign of smoke in the house, you will need to do the following:
- diagnose the furnace surfaces and find the fault;
- after this, immediately prepare a solution or buy ready-made material for filling cracks;
- cover the walls and plaster them again.
But first of all, diagnostics will help determine the size of damaged surfaces and the approximate amount of materials to be repaired. If the mortar has simply cracked due to high temperatures, you simply need to remove the layer of plaster and apply a new layer of high-quality materials.
It’s worse if the cracks are through and continue to expand after the work has been done. In this case, it may be necessary to call specialists to identify the causes and lay a new stove. Stone stoves are a complex structure, so you shouldn’t try to lay it out from a book; it’s better to entrust this work to an experienced stove maker.
Such cracks can no longer be simply covered up
In this example, you shouldn’t cover it up either. The brick was badly cracked.
If the cracks are small and their size does not increase, you can begin to troubleshoot the problem yourself. To do this, it is important to prepare a high-quality solution and apply it correctly to the wall. How to cover up cracks in a stove so that it does not crack from the heat - knowledge of the basic materials for making the mortar will help in this matter.
Examples of small cracks:
How to cover up cracks?
For these purposes, you can use several options that will reliably seal cracks in the walls and prevent gas from escaping into the room. Let's look at each method in more detail.
Fireclay clay
Before you cover cracks in the stove with fireclay clay, you need to know its advantages:
- the material is resistant to temperature during fuel combustion;
- high level of vapor permeability;
- resistant to moisture when heated;
- environmentally friendly material, safe for humans and animals, therefore can be used in residential premises.
To make the solution you will need to mix several ingredients:
- 1 part cement grade 500;
- 2 parts fireclay clay"
- 7 parts river sand.
The solution is mixed well and water is added. The consistency depends on the skill and type of work, but you should not make it very liquid or thick. To get rid of stones and lumps, the clay can first be soaked in water for several hours and the lumps of material can be crushed, and the cement and sand can be sifted. Such a solution will be plastic and laid on the surface in an even layer.
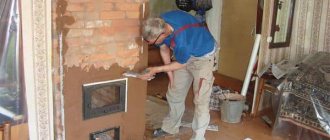
Plastering walls is easy if you have a certain skill. To do this, it is important to install beacons and, distributing the solution, level the layer on the wall. You will need to prepare a trowel and spatula, the size of which depends on the surface area.
Clay and sand
This is the most affordable, inexpensive solution for plastering surfaces. Such a solution for the oven has sufficient plasticity and is not subject to destruction under the influence of high temperatures.
It’s easy to prepare the solution for use; for this you will need:
- prepare a large trough in advance, add the required amount of clay and completely fill the layer with water. For 1 bucket of clay, pour 3 buckets of water. The clay should soak for 24 hours;
- then mix the solution and add more water to it. We pass the slurry through a sieve, get rid of lumps and let the solution settle;
- drain the excess water, making the solution as thick as homemade sour cream;
- add river sand in a 1 to 1 ratio and mix the solution.
Expert opinion Pavel Kruglov Stove maker with 25 years of experience Important!
At this time, you can determine the quality of the solution. Having lowered the shovel holder into it, and seeing the adhering clay, in this case you will need to add a little sand. Only after seeing small clumps of sand and clay solution on the holder can you start plastering the walls of the stove. With this solution it is necessary to repair all cracks that appear, after wetting the surfaces and then plastering the stove in several layers. In villages, they still use the old method, adding horse manure to the finished solution. This solution is obtained with increased thermal insulation properties. Hay plays the role of air layers that prevent the free passage of heat.
Grout
This oven putty is sold ready-made, but it’s easy to make yourself. The main advantage of this material is the ability to retain its properties even when heated to 10,000. Industrial materials are used for arranging and repairing stoves and fireplaces, but the price of such grout is high, so home craftsmen do it with their own hands.
The mixture for coating the oven is made in several stages:
- knead large lumps of clay and pour it into a trough;
- fill it with water and leave for 10-12 hours;
- pour part of the sand into the soaked clay, maintaining a ratio of 1 to 4, mix the solution well, adding 5 parts of chopped straw in small portions;
- Add 1 kg of coarse table salt to the finished putty and finally mix the solution.
The finished grout can be used to fill gaps between bricks, crevices, cracks and complete the first rough layer of plaster.
Furnace glue
In order to repair a cracked stove, you can buy heat-resistant special glue at a hardware store. Due to its properties, it is not exposed to high temperatures for a long time. It consists of the addition of fireclay clay and cements with high fire-resistant properties.
A plastic and hard adhesive mixture is produced. Using hard materials, the surfaces of the stoves are plastered. Plastic glue is used to fill cracks and seams between bricks.
When using this material, you must follow the instructions when diluting and using the heat-resistant substance. You should not make it in large portions; it dries out quickly and becomes unsuitable for work.
How to properly coat a stove?
In order to reliably cover the cracks in a brick kiln, work is carried out in several stages:
How long does it take to dry?
It is not recommended to use the oven until the solution is completely dry. When using different materials, this period may vary. Using heat-resistant glue as a putty, the layer of solution will dry within a few hours.
It will take more time for the solution of clay and sand to dry and form. In this case, you will be able to use the stove only after a day. Then the brick oven, protected from cracks with mortar, will remain crack-free for a long time.
Therefore, we do not advise you to rush, immediately flooding your Russian stove with a stove bench. Repairing cracks in a furnace is a simple but important job. The choice of material for the solution is a purely individual matter. The main thing is to do the work carefully and responsibly. Then your house will always be light and clean, without the smell of burning and smoke penetrating through the cracks in the walls of the stove.
Grout application options
There are several options for using grout.
Semi-dry method
To implement it, the grout mixture is diluted with a small amount of water so that the consistency is similar to wet sand. Next, the mixture is placed into the seams using a special jointing tool.
- This method has a number of disadvantages; in order to use this option, you must have experience in processing seams, otherwise the seams will soon crumble.
- This method can only be used for seams no larger than 5mm. The color palette is limited to only two colors: gray and white.
Using a construction gun
To do this, the grout mixture is diluted with water and placed in a construction gun. After that, the composition is squeezed through a narrow spout into the seam using a gun, and the excess is removed.
To seal the seam, the mixture can be further pressed inward.
- This method is very convenient to use; you can use colored compounds, but it is not the most budget-friendly method.
- It is necessary to purchase a suitable composition and special tools.
Applying grout to the entire surface area
Dilute a mixture similar in consistency to sour cream, apply it to the entire surface of the tile, then use a rubber spatula to remove excess from the surface of the tile and wipe it with a damp towel.
A fairly common method of application with a long service life, but at the same time quite expensive and does not have a large palette of colors.
Operating rules
Before starting to work with heat-resistant grout, the surface of the stove must be thoroughly cleaned, removing dust, dirt, old plaster, and residual mortars or adhesives.
After laying the tiles, you should wait at least a day until the lining is completely dry. In damp, cold rooms, complete setting of the mass that fixes the tiles to the brick wall may take longer. In such a situation, it is better to play it safe and wait a few days.
Grouting must be done at an air temperature of at least +5, maximum +35 ℃. In very cold rooms, the composition will not fill the cracks well, and in hot rooms, the mixture will dry out too quickly, which may affect the quality of the seams.
After opening the package, fugu should not be stored in air for a long time. Take the required amount and close the bag or container with the product after a maximum of 15 minutes.
With prolonged contact with the environment, the contents may absorb moisture from the air and deteriorate. For the same reason, a ready-to-use heat-resistant composition should be used within an hour.
If the portion is not enough, you should prepare the next, fresh mass.
To fill the seams with heat-resistant grout, you can use a rubber spatula or a special gun. Of course, using a gun is much more convenient; the product is applied carefully between the seams, without getting on the front part of the cladding.
The paste is placed into the gun tube using a narrow spatula, then the end of the nozzle is cut off at an angle of 60°, resulting in a hole with a diameter of up to 8 mm being formed in the nozzle.
The nozzle is inserted into the space between the seams, the grout is slowly squeezed out and the gun is moved along the entire length of the seam. The result is a beautiful, uniform layer that performs protective and decorative functions.
Photo of heat-resistant grout for stoves and fireplaces
Facade repair
If there are few defective areas, then they are not difficult to repair with fresh cement mortar. Repairs begin with preparation: using improvised means (screwdriver, chisel, etc.) you should remove all remnants of the dried mortar. Under no circumstances push the chipped pieces deeper. The brick wall is moistened with water so that it does not absorb it from the applied mortar. After this, you can begin to carefully fill the space between the bricks with cement mortar.
The consistency of the solution should be thick so that it does not leak. To do this, add water carefully during the cooking process, controlling the resulting mass. The first step is to seal the vertical seams, and then the horizontal ones. They are sealed as tightly and flush as possible. In all areas there should be good adhesion to the existing masonry.
The solution that is located at the outer surface should contain less water than the one that fills the seam in the depths of the masonry.
Unstitch the seam in the same way as other sections of the wall so that there are no visible differences. For this purpose, not only a trowel, but also cuttings of a hose will do. When the repair comes to an end, excess mortar and other inclusions are removed from the brick wall. After drying, the influx of cement mortar is mechanically removed.