When planning to build your own bathhouse, everyone is faced with the fact that there are quite a lot of types of bathhouses, so choosing an option becomes difficult. They differ in the number of floors, shape, material, etc. In this article we will look at bathhouses with floors.
What should a winter tent be like?
Having decided to independently design a shelter, you need to familiarize yourself with the requirements that it must meet.
First of all, the product must protect the fisherman from bad weather. In addition, you need so much space inside to be able to relax, have a snack, and warm up. Today, although you can buy a winter tent, many fishermen prefer to make it with their own hands, taking into account their needs. A homemade design must meet the following criteria:
- have low weight and dimensions;
- be mobile;
- have a dense and breathable coating;
- easy to install and dismantle;
- retain heat for a long time;
- be strong and strong.
Materials for the construction of one-story houses
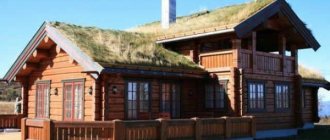
Environmentally friendly materials are increasingly being chosen for one-story houses. , blocks, or have long become classics. A relatively new and modern technology is frame construction. One of the most budget options and the fastest.
However, houses made of logs and timber fit more harmoniously into the interior of suburban areas. The rounding is more solid and representative. Hence the high cost. Houses made of timber are simpler and more affordable. However, they are in no way inferior to log cabins in quality and performance characteristics. In addition, laminated laminated timber is simpler and more convenient to work with than solid wood.
Layout of a modern one-story cottage measuring 8.8×10.8
The exterior of a private house should not only match the tastes of the owners, but also fit into the surrounding landscape. If houses made of brick or stone may look somewhat heavy and overly pretentious, then one-story houses made of timber will be an excellent decoration for any site: from an abandoned wild garden to a well-kept property in any style. Rustic simplicity and minimalism are the basis of most interior and exterior styles: rustic, farmhouse, country, retro.
Bathhouse with floors: advantages and disadvantages
The main advantage of a bathhouse with floors is the space saving. If we compare a regular bathhouse with a bathhouse, taking into account the fact that they have the same dimensions, the second one will have a larger capacity.
An important advantage of the building is its efficiency. It is cheaper to build a bathhouse with floors than, for example, with an attic, and even more so with two floors; in addition, the work will take less time.
Originality can also be highlighted as a separate advantage. In our country, such a building can be seen rarely; it looks unusual and interesting. In addition, such a layout gives room for imagination; with it it is easy to create a cozy interior in the relaxation room.
An inexpensive bathhouse with beds is a good option for those who need to have a sleeping place in the bathhouse, while at their disposal a small area and a very limited budget.
If you want to get rid of the floors, then just finish the ceiling in the rest room, and you will have a bathhouse with a full-fledged attic.
Despite the abundance of advantages, a bathhouse with sheets also has disadvantages. In particular, you need to understand that the floor will be a small room with an uneven roof and most often its height will be less than a person’s height, i.e. it is not a full-fledged room. For this reason, in terms of convenience, a bathhouse with floors is inferior to a bathhouse with an attic or a two-story building.
We recommend reading:
Wood-fired sauna vat
In addition, the room and the room above the floors do not have a wall, so there is no sound insulation. If, for example, in a bathhouse with several bedrooms, someone can calmly go to sleep in another room while the rest continue to relax in the rest room, then it will be difficult to sleep in the bathhouse.
The steam room and washing room are rooms characterized by high levels of humidity, so it is important to think carefully about ventilation. But even with good ventilation, the floors will always be warmer than below, because
because warm air accumulates under the roof.
Choosing the location of the bath
We understand that the relatively small size of suburban areas significantly limits the possibilities of choosing a construction site, but under any conditions the main criteria must be observed.
- Firstly, the bathhouse cannot be located in lowlands. If this is not possible, then you will have to make artificial backfill; you will have to take a one-year pause to allow the brought soil to shrink.
- Secondly, water supply issues should be resolved in the optimal way. One option is to install a storage tank on the roof. This option has a significant drawback - the tank must be reliably insulated, but even such insulation does not provide a complete guarantee against freezing.
- Thirdly, each site has its own layout; the bathhouse should not destroy the existing design, but complement it.
- And, fourthly, it is necessary to resolve issues with the supply and storage of building materials. If you have everything ready, call your helpers and start construction.
Size of shelves in steam room
- About half a meter will be required for the minimum height of each shelf in the steam room of a Russian bath. These dimensions will be suitable for an adult to lie down with bent legs.
- For most people, the minimum length of the shelf (curtains) in the bathhouse is 1.8 m. With this arrangement, you can lie upright, but you don’t have to bend your legs. It should be remembered that there are people above this mark, so additional space when designing will not hurt.
- The minimum shelf width in a bathhouse starts from 0.4 m. There will be enough space for a bathhouse attendant using a broom. It is possible to sit on such a bench, but steaming on it will be uncomfortable.
- The most commonly chosen width is 0.6 m. Most people can easily fit on such a shelf, but many will not find it particularly comfortable.
- A width of about a meter will suit almost everyone. Even overweight people can easily fit on a bench with such dimensions.
Video - making shelves in a bathhouse.
English traditions of one-story construction
Until the end of the 14th century, single-storey buildings predominated on the island, and this period of architecture is called Tudor. It does not yet reflect the later penetration of the ideas of Italian and French architecture. It is these fairy-tale-looking buildings that most often come into mind when people want to build “something English.”
20. Country cottage in the “Tudor” English style outside and inside
21. Interior in English style
22. A modern version of the English type with obvious borrowing of Scandinavian ideas
23. The interior of a country house in this case corresponds to the external simplicity of the building, and is not devoid of a nice “country” coziness
24. New English manor, carefully preserving adherence to classical traditions in interior design
25. Traditional interior
Requirements for customers:
- Arriving at the site, at the construction site. If there is no check-in, moving the log house is free up to 15 m from the vehicle, then 300 rubles/each meter for moving the entire set of the log house.
- Housing for a team of 3 - 4 people for the duration of assembly (3 - 5 days).
- If you don’t have housing, you can pay an additional 8-12 thousand rubles (depending on the size) for the entire assembly period.
1. Log house 4 x 6, five-walled with internal sheathing of the walls (cutting the corner “into the paw”, size 4 x 6 is the internal dimension from wall to wall) 2. Clear height from floor to ceiling 2m.30cm. 3. Floor joists and ceiling beams made of hewn logs. 4. Rafter system for a gable roof with a ridge height of 2m.50cm. their boards are made 50 x 150 5. The rafter beam protrudes beyond the walls of the log house by about 50 cm, and the roof slopes fall below the rafter beam by 15-20 cm, which allows you to get: a). Quite a nice appearance. b).The lowered roof slopes protect the walls from rain. c).About the wall there is approximately 70cm. dry space where you can burn a woodpile. 6. Lathing - unedged board 25mm. 7. The roof is covered with roofing felt (covering the roof with any other material is discussed). 8. The gables are covered with clapboard and a frame is made for the second-light windows. 9. The finished floor in the bathhouse and in the rooms is a 38mm tongue-and-groove floorboard. 10.Two bath doors made of 50mm boards. and two double windows 60 x 60 11. The log house is assembled on moss and installed on posts 40 x 40 x 40, assembled from foundation blocks on a sand bedding (sand is provided by the customer) Any changes are possible at your request!!! YOU CAN SEE YOUR LOG BEFORE IT ARRIVES TO YOU. Write to us by email and we will send you a photo of the finished log house of the size you need.
Facilities
Seven objects in the capital for commercial development of transport hubs will be presented to investors as part of the road show “Convenient Moscow: how to invest in transport hubs.” This was announced by Deputy Mayor of Moscow for Economic Policy and Property and Land Relations Vladimir Efimov. The organizer of the meeting and subsequent competitions will be the City Department of M...
In Moscow in 2021, 194 thousand people registered as self-employed. 495.4 million rubles of tax on professional income were transferred to the capital budget, said Vladimir Efimov, Deputy Mayor of Moscow for Economic Policy and Property and Land Relations. About 60% of the total number of Russian professional income tax payers work in Moscow, the vice mayor emphasized...
The results of competitive procedures for identifying a private concessionaire for the design, construction and operation of a bridge across the river have been summed up. Lena near the city of Yakutsk. It was a company that submitted a private concession initiative, representing a consortium of the Rostec State Corporation and the VIS Group. The bridge is expected to be put into operation in 2025. “The project to build a bridge across...
Glavgosexpertiza of Russia reviewed the design documentation and results of engineering surveys for the construction of the Utrenny airport for air transportation of rotational personnel and production cargo to the Utrenneye oil and gas condensate field in the Yamalo-Nenets Autonomous Okrug. Based on the results of the review, a positive conclusion was issued. The Morning Airport will be located on the Gydan Peninsula…
Moscow has entered the top five best cities in the world in the ranking of the international consulting company Resonance Consultancy, said Vladimir Efimov, Deputy Mayor of Moscow for Economic Policy and Property and Land Relations. “In the annual Best Cities ranking, published on January 7, Moscow rose to 5th place and left behind Dubai, Singapore, Barcelona, Los Angeles, and Rome. Promotion to the rank...
Kommunarka, TiNAO. School No. 2070 was visited by the Commissioner for Human Rights in the Russian Federation, Tatyana Moskalkova, and the Head of the Department for the Development of New Territories, Vladimir Zhidkin. During a tour of the building, Tatyana Moskalkova and Vladimir Zhidkin examined transformable educational classrooms, gyms, a theater studio, a concert hall, an interactive multimedia library, a chemical laboratory...
FAQ:
How to order and buy a log bathhouse:
- To order a log bathhouse, cutting into a bowl, only upon prepayment, upon conclusion of the contract.
What are the delivery and assembly times:
- Delivery time from the date of order is 3 - 4 weeks. If a log house is available, delivery can take from 3 to 7 days. Assembly 3 - 5 days.
How do you pay:
- Payment is made in three stages: 1) Advance payment upon conclusion of the contract. 2) After unloading the log house by a team of assemblers, at the customer’s site. 3) After completion of assembly and acceptance of the log house.
What kind of foundations are you doing?
- For the log house we make foundations: strip, pile-screw, concrete driven piles.
Preliminary planning and calculations
Calculations and a basic design are prerequisites for a successful result. Draw a preliminary small plan of the room, put down dimensions, mark the location of equipment, window and door openings.
Scheme and principles of placement of regiments
Therefore, owners of steam rooms with windows who decide to independently manufacture comfortable shelves for a bath have a limited choice. They will be able to draw a plan for a future multi-stage structure only along walls without windows and without glazed ventilation vents. Otherwise, the placement schemes are the same for everyone. Shelves can be arranged:
- a single linear object along one wall in one, two or three rows;
- G-shaped design with numerous variations in the number of steps. Two or three along each wall, or the upper and lower benches along the long wall, and the middle one along the adjacent short one, etc.;
- two parallel structures, symmetrical or asymmetrical, installed at opposite walls of the steam room, as in a railway compartment. Or how in the same compartment there are two equal tiers of shelves.
Draw out several options from which you can choose the best. Only for competent planning and calculation of costs for the purchase of lumber, you will also need the exact dimensions of multi-stage or single-stage shelves for a bathhouse.
Dimensions of bath seats or beds
To begin with, we list the traditional sizes of places for receiving bath procedures in a lying and sitting position:
- 1.5 m of length is needed in order to lie on a shelf with legs bent at the knees;
- 1.8 m in length will allow the average majority not to bend their legs when lying down. But according to this parameter, everything is purely individual, sometimes 2.00 m is not enough;
- 0.4 m is the minimum width of the shelf, most often the lower one, used primarily as a stand under the feet of a bathhouse attendant wielding a broom. It will be quite comfortable to stand on such a step, and you can also sit down to refresh yourself and cool down;
- 0.6 m is the most common size for the width of a sauna bench, although not very conducive to lying down;
- The 0.9 m width will allow you to sit across the shelf with your legs tucked in, and people with any physiological characteristics will be able to lie down.
Variations are acceptable, but bath attendants do not recommend doing less than the minimum limits.
Let's figure out the height of bath furniture
In terms of height, the principles of arranging shelves in a bathhouse are radically different from standard designs. All calculations begin with determining the height of the upper bench. In order to be able to sit on it and, when waving a broom, treat the back of a lying person, and not the bath floor, the plane of the upper shelf is located at a distance of 1.10 - 1.20 m from the ceiling. There is another reference point - the level of the steam door of the heating equipment. It is up to the owner to decide whether to adhere to it.
The height of the sauna benches varies from 0.4 m to 0.6 m. A “run-up” of 20 cm will allow you to slightly raise or lower the lines of the benches in the drawing so that the steam room has the required number of steps. The main thing is that the lower tier is at least 0.3 m above the floor surface.
Roof of the bathhouse
The roof is covered with ondulin, sloping, gable, the gables are sheathed with lining made from rounded logs. The rafters are made of boards 50x150 mm, the sheathing is made of slats or unedged boards. The distance between the rafters is 80 centimeters. Before installing the roof, you should temporarily cover the ceiling beams with durable boards. They must withstand the weight of workers and building structures.
Step 1.
Check the dimensions of the top row of the bath horizontally, check the parallelism in length and width. Deviations should not exceed 1÷2 centimeters at the corners of the bathhouse.
Step 2.
Make a rafter template from the boards. Lift the template and “walk” with it along the entire length of the bathhouse, the position of the rafter legs should be symmetrical at the ends. Mark the locations for the notches. Everything is fine - remove the template and start making rafters.
Video - Calculation of rafters
Video - How to cut rafters at the right angle and the right size
Step 3.
Despite the fact that the width of the bathhouse allows for the manufacture of the simplest hanging rafter system, we choose the layered option. The fact is that for inexperienced builders it is very difficult to make a high-quality hanging rafter system at the maximum span values; it is not worth the risk. It is better to install a ridge beam and vertical supports to it (headstocks). Prepare all the rafters and lift them to the bathhouse when assembled.
Video - Installing rafters
Step 4.
At the gables, install vertical posts of the appropriate length and attach the ridge beam to them. Constantly check the accuracy of linear dimensions and spatial position.
Step 5
. Install the rafters one by one, check their position and fix them with steel angles at least 1.5 mm thick. Temporarily tie the installed rafter legs together with pieces of boards; after installing the sheathing, they are dismantled.
Step 6.
Using a rope with blue, mark off the lines for the sheathing slats on the rafters. There is no need to make markings along the entire length of the roof; start with the overhangs, then you can control the distance between the slats using simple templates.
Step 7
Install the roofing, check the position of the rows. To guarantee tightness, you can use waterproofing made of any material. Ondulin is made from modified bitumen and polymer additives based on paper industry waste. The physical characteristics of the strength of such a material require careful handling during installation of the roofing. It is not advisable to walk on it; fixation is carried out with special nails with soft sealing gaskets. You need to hammer in nails with feeling.
Step 8
Align the protruding sheathing to the size of the ondulin sheets. Install support structures for gable trim. Cover the overhangs of the rafters with boards, install ridge protection, etc.
Step 9
Install the drainage system according to the manufacturers' recommendations and sew up the gables. If you don’t want to install a drainage system, you need to make a blind area around the bathhouse.
Video - Installation of plastic drainage
The most labor-intensive work has been completed. In this condition, the log house can spend the winter (the best option), if there is no time, start interior work.
Requirements for basic parameters
A Russian bath, like a Finnish sauna, requires maintaining perfect order in the steam room. This rule primarily applies to torn leaves from birch and oak brooms. In order for the room to be fresh and have a pleasant aroma, and not the smell of musty leaves, cleaning should be carried out especially carefully, including behind the benches. Therefore, when calculating floor parameters, the gap between the boards and the floor must be taken into account. It would seem like such a trifle, but it must be taken into account in construction.
In fact, the requirements for the main parameters of shops are:
- Compliance with rational dimensions for the height of steps;
- Compliance with the dimensions of the width of the benches;
- Taking into account the requirements for the length of sunbeds;
- Ensuring the structural strength of the floors, their functionality and rationality of location in the steam room.
The benches in the bathhouse must comply with the width dimensions.
But before moving on to revealing each of the parameters, it is worth briefly considering what the design of the benches in the steam room consists of.
The simplest and most functional is the frame structure of the floors. The basis is a slatted frame, one side of which is built from bars, the second side is made in the form of planks, tightly attached to the load-bearing walls. The boards of the benches are attached at one end to the frame, and at the other, they lie on a block against the wall. The lower steps have two support points - one on the post of the upper tier step, the second support point is a smaller post.
This scheme allows you to build a durable structure that will provide not only strength, but also functionality. Everything else is just subtleties that will be considered during the work process.
Floor height
Correct selection of floor height parameters is very important for a steam room. Typically, the ceiling height of a steam room is usually taken at the level of 2.1-2.25 m. A high ceiling creates an additional volume that needs to be heated, and the temperature there will be higher, while at the level of 1.2-1.6 meters the temperature for comfortable steam will not be enough. That's why 2.10-2.45 are the most optimal parameters for ceiling height. And if so, then the parameters for the height of the floors will be:
- The lower tier of the beds is 40-45 cm.
- Middle tier 80 cm;
- The upper tier is 120 cm from the floor level.
Thus, from the top point of the floor to the ceiling there remains 1.2 meters (with a ceiling height of 2.45), which is quite enough for normal steam and working with a broom.
The height of the lower tier of 40-45 cm is determined by two parameters - the first, practical, this height is enough to remove debris after procedures using cleaning equipment. The second indicator is related to the height of the rise - it is equal to the height of three steps of a regular staircase.
The height of the second and third tiers is associated with the possibility of the most effective bathing procedures. On the top shelf, the temperature promotes the maximum beneficial effect, and it is more convenient for the bathhouse attendant to work with brooms from the first step; there is no need to reach out to whip the steamer.
Width
The standard width of the shelves is determined depending on the purpose of the tier. The lower tier is usually not used in the steam room for procedures, or is used by those who do not like to steam with a broom, but at the same time do not deny themselves the pleasure of receiving a portion of warm water steam. Oh, yes, this place is to the liking of children, here they are comfortable both in terms of the height of the shelf and the temperature in the steam room. Therefore, despite the small height of the step, its width should ensure that both an adult and a child can sit down. The width of such a bench should be from 30 to 45 cm.
The second tier is usually used by adults to warm up. But it is not recommended to make it too wide. 40-45 cm is enough.
The upper tier is the most popular, so its width should be larger; there should be enough space to lie down and sit down normally. The optimal width of such a tier is 1.2-1.4 meters.
For those who build a bathhouse themselves, the width of the widest flooring may be different; in this case, experts recommend using a simple method for calculation - measure your height, divide the result by half and add 20 cm. The result obtained will be optimal for determining the width of the top shelf.
Cavity length
This parameter is usually overlooked, especially if the steam room is made “for yourself”, that is, it is enough to be content with the fact that you can just sit and warm yourself and whip yourself with a broom. Alas, you won’t really get pleasure from such a bathhouse. Therefore, when determining sizes you need to take into account:
- The minimum length should provide the ability to lie down and bend your legs;
- The average length of a bed is equal to the average height of a person plus 15 cm;
- The optimal length is 220 cm.
Manufacturing technology of a simple shelf
There is nothing complicated in the design of a simple shelf. Anyone can make a drawing and assemble the structure themselves; the main thing in this work is to correctly observe the dimensions and technology of the work.
Materials and tools
To work you will need the simplest carpentry tool:
- Hacksaw;
- Plane;
- Chisel;
- Mallet;
- Hammer;
- Screwdriver;
- Drill and drill bits;
- Tape measure, square and pencil;
- Level;
To make a bathhouse floor, you may need a screwdriver.
The materials you will need to purchase are:
- Timber for the frame;
- Boards for flooring and side paneling;
- Metal squares and screws;
- Wooden spikes;
- Sandpaper of different grits.
Drawings and calculations
There is no need to make a professional drawing for the design of the floors. It is enough to simply draw up a clear diagram on which it will be clear what will be attached and how, what dimensions of the main elements need to be prepared. The diagram can be drawn up directly on the spot, this will make it easier to see the main problem areas.
Frame making
We first make the frame of the upper tier from 50x70 or 50x50 timber. It will consist of three vertical posts 1.2 meters long, two side posts 1.2 meters long, which will be attached to opposite walls, and two bars the entire length of the floors, one of which is installed on the wall, the second on the frame.
The frame is assembled onto metal corners from the inside using self-tapping screws. The second stage is the assembly of the middle tier step, here the racks are taken to be 80 cm high, and the side bars will be 50 mm wide.
The lower tier is installed at a height of 40 cm. Its width is also 40 cm.
Installation and Installation
After securing the frame, the sheathing and flooring boards are installed. At the first stage, the sidewalls of the steps are covered; for this, boards with a thickness of 20-25 mm are taken. They are attached with a gap of 5-7 mm, this is done for better air circulation.
Next comes the installation of the flooring. For this, boards 10-15 cm wide and 20-25 mm thick are used. Here the distance between the boards is maintained at 1-1.5 cm.
The side of the lower tier is not sheathed; this is necessary to ensure cleanliness in the steam room.
Treatment
The Russian version of the bathhouse does not provide for special treatment of wood used for bathing with chemical impregnations and varnishes. It is important here that the surface is smooth and does not cause inconvenience. After installing all the frame and cladding elements, the entire outer surface must be thoroughly cleaned with sandpaper. What to process is a matter of taste. You can use a grinding machine, or you can do it manually. It is important that even between the floors there are no untreated areas where you can get a splinter.
As an additional protection, you can treat the boards with natural oils, rubbing them into the boards; this will add a certain charm to the steam room. True, before steaming in it, you first need to test fire it at least twice so that the oil is completely absorbed.
Shelf boards
Boards for shelves (canopies) in a bathhouse are constructed from various materials; a wide selection is available:
- Aspen. Excellent moisture resistance, no reaction to increased temperature. No cracks form and the color does not darken. A bathhouse with such floors is a relatively cheap option, so it is accessible to a large number of the population. The main disadvantage is the predisposition to rotting from the inside.
- Alder. Resistance to mechanical damage, high moisture resistance. Thermal conductivity is quite low. It has been used as a material for the construction of baths for a long time.
- Linden. Minimal roughness, light color. It holds its shape well, as it does not crack or dry out. The structure is quite soft, so this material is suitable for painting on wood, which can be useful for finishing a bathhouse.
- Maple. Used if replacement of linden is required. It is hard and not prone to deformation.
- Poplar. The wood is quite light and soft. The shades are dim, the palette ranges from light brown to medium. It can be used to create decoration details, as it accepts many finishing materials well.
- Abashi. The color is cream or slightly yellow. African oak is used in finishing any parts of the bathhouse. Resistant to humidity and high temperatures, thermal conductivity is quite low. The material is durable, the structure is smooth. Oak is easy to process as it does not contain knots.
Insulation of the roof of the bathhouse. This is discussed here. And here is an article about how to insulate the floor in a bathhouse.
Material of manufacture
For the manufacture of frames and flooring from available lumber, mainly linden and aspen are used. These tree species are best suited for building floors and cladding the walls of a steam room. The wood of these tree species does not contain resinous inclusions and is not subject to rotting. It is easy to work with this material during the assembly of the structure, and during operation, neither linden nor aspen cause trouble and will last for many years.
But birch and conifers with a high resin content should absolutely not be used as flooring and cladding. They release tree resin, which can cause injury and even fire. And birch will begin to deteriorate almost from the first day.
Principles and rules of placement
For placing shelves in a steam room, there are two rules that must be taken into account when designing a steam room. The first rule requires the shelves to be located opposite the front door. In principle, shelves can be placed diagonally in relation to the entrance door to the steam room, the main thing is that the doorway is always in sight. The second rule is that for a Russian bath the shelves must be of such length that you can lie down at full height. In a Finnish sauna, people usually sit in the steam room, and it is not necessary to lie down here, because in the sauna they do not steam with a birch or oak broom.
Based on these rules, it’s not difficult to guess how to properly place shelves in a bathhouse. But as for the height, the bathhouse will be comfortable if there is 1.2-1.4 meters from the plane of the top flooring to the ceiling. This distance is determined by the minimum required amount of space for the steamer to hover with a broom comfortably, and it is more convenient to move if there is room to turn around.
When choosing different options for placing floors in the bathhouse, you should not forget that you should not place windows above the shelves; at high temperatures, any drop of water falling on the hot glass can cause a crack. You should not place lighting devices above shelves. It is better to install them on the wall near the doors or directly above the doors.
When placing flooring in a steam room, it is necessary to provide a gap between the flooring and the walls. This is especially true for the upper tier. A small gap of 1.5-2 cm ensures normal air circulation in the room, in which case the steam and heat do not burn, but are felt more softly.
Upholstery of walls and ceilings in the steam room and washroom
These rooms require increased attention due to high humidity and temperature. The duration of operation largely depends on the reliability of protection of wooden structures.
The steam room floor needs to be drained. For the floor, take edged boards; you don’t need to pull them tightly during installation. Water will escape through small cracks. The bathhouse is placed on columnar foundations - there is no need for special water drainage, it will “disappear” on its own. How to finish walls and ceiling?
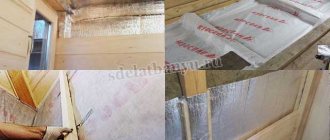
Step 1.
Nail down the mineral wool slats. The width of the slats should correspond to the thickness of the mineral wool. The distance between them should be equal to the width of the insulation.
Step 2.
Carefully insert the mineral wool, avoiding any gaps. To prevent the cotton wool from falling, carefully secure it in several places with thin nails of appropriate length.
Step 3.
Attach aluminum foil to the surfaces of the slats. Lay the strips from bottom to top, overlapping approximately 10 centimeters. For reliability, it is better to additionally seal the joint with special tape or ordinary tape. The foil is fixed to the walls with a stapler. Work carefully; aluminum foil tears easily. The same operation must be repeated on the rough ceiling.
Step 4.
Attach thin slats measuring 20÷50 mm to wide slats, and the lining will be attached to them. Check all dimensions and position of the supporting structure.
Step 5.
Check the distances between the floor and ceiling at the edges of the room. If there is a significant scatter, you will have to cut the first lining at an angle. At the bottom, the cut area will be covered with a plinth and will be completely invisible.
Step 6.
Nail the lining with small nails, hammer the nails at an angle into the groove. Periodically check the horizontal position of the boards with a hydraulic level. If the lining is of high quality, then it will be horizontal throughout its entire height; if the quality of the material is poor, then deviations will have to be eliminated. To do this, you should remove the tenon from the groove a few millimeters; in this way, after 5–6 rows, you can eliminate a crook up to a centimeter in size, and do it unnoticed.
Other rooms in the bathhouse are lined in the same way. The difference is the absence of vapor barrier. It is important to remember that there should be a gap of approximately 1÷2 centimeters between the lining and the mineral wool. It is needed for a little natural ventilation, otherwise fungus or mold will quickly appear on wooden structures.
Nail trim on doors and windows, decorative slats in the corners, and ceiling plinths.
We strongly advise you to provide ventilation in the steam room, either forced exhaust or natural. With its help, you should quickly ventilate the steam room after taking water procedures. Make a hole in the wall under the ceiling for a fan or a closing grille, and come up with decorative elements on the outside. During the operation of the steam room, the ventilation hole must be tightly closed.
SNiP 41-01-2003. HEATING, VENTILATION AND AIR CONDITIONING. Ventilation, air conditioning and air heating (point 7)
General characteristics and main design elements
Polati in a literal interpretation are shelves for sleeping located in a log hut between the stove and the wall. The ancient Slavs had two-story rooms, with adults below and children above. It is not difficult to guess that in the modern interpretation, the beds are nothing more than wide benches. Only unlike ancient times, today they are used in baths in two rooms - in the steam room and in the relaxation room.
In a steam room, or otherwise, the shelf is a multi-tiered structure designed for the main bath procedure - visiting the steam room. The shape of such a structure is a staircase with 2, 3 or even 4 steps, the width of which can be 40 or even 50 cm.
In the rest room, the floors are usually located against the wall, the width is usually from 80 cm to 1 meter. They are needed for a relaxing holiday and for massage, so the height of such a structure is somewhat non-standard, from 60 to 80 cm.
In a Russian bath, the shelves in the steam room are fixed rigidly, so that the frame and the covering cannot be moved from their place without tools. But in modern baths they often use mobile furniture options - benches, stools and chaise lounges. And if the former are applicable for temperatures of 90-110 degrees, then sun loungers are usually used in steam rooms with a low temperature of 65-70 degrees.
What do people look like in a bathhouse?
Bath shelves include several design elements:
- Frame;
- Bed or bed yourself;
- Side boards;
- Additional elements - headrests, ladders;
- Steps - small benches installed in front of the shelves for convenience;
- Stairs and handrails (this element is used for large steam rooms with 5 or more steps).
Terrace
For deck flooring, it is better to use boards impregnated with antiseptics. Nowadays you can buy special boards for terraces; they are made from wood sawdust and plastic.
Terrace board - photo
Their performance characteristics are superior to all existing floor coverings. But they have two drawbacks. First, the appearance does not at all resemble natural boards. This does not harmonize with the overall design of the bathhouse. Secondly, the price of such boards makes many developers think about the advisability of purchasing them.
Balusters and railings can be fixed on spikes or using metal corners. In specialized stores you can purchase finished products; the choice in linear dimensions and appearance is huge. The railings are attached to vertical wooden supports.
After installation, you need to carefully sand all surfaces and fill the gaps at the joints. It is better to make the putty yourself; purchased putty will always differ in color. Putty is done very simply. Collect a small amount of small sawdust and mix it with waterproof PVA glue. The sawdust should be from the type of lumber that you plan to putty.
To finish the terrace structures, use only varnishes or paints intended for external use.
Video - Installation of terraces
Video - Fencing for the terrace
When building a bathhouse, you need to think several years ahead. Some developers do not insulate the bathhouse, citing the fact that they plan to wash only in the summer. In this way they are trying to reduce the financial costs of building a bathhouse. This step is very reckless; over time, situations may arise when the bathhouse will have to be used in colder times. If there is insulation, great; you can install an ordinary heater in the rest room and washing room and create a favorable temperature in the rooms in a few minutes. The same applies to the size of the bath.
Foundation
Strip foundation for a bath
It is possible to install a strip or pile type foundation. The pile method is cheaper and can be implemented in sloping or lowland areas. But the strip foundation for a bathhouse is more durable and has increased thermal insulation, which is especially welcome when planning a heat-loving bathhouse. Let's look at the steps to bookmark it.
Instructions:
- We prepare the ground by removing all debris and removing the top layer of vegetation.
- We apply markings using wedges and cord. We hammer the wedges into the corners of the future building and stretch the cord between them.
- According to the markings, we dig a trench half a meter deep and ten centimeters wider than the thickness of the planned walls.
- We make a fifteen-centimeter pillow of gravel, compacting it thoroughly.
- We place wooden formwork on the sides.
- We install reinforced rods on the bottom.
- Fill it with concrete.
- Cover with film and water for a month until completely hardened.
Hardening concrete
One-story cottages - a practical and fashionable trend
A successful architectural solution does not depend on the number of floors. It sounds almost like Chekhov - everything in a house should be beautiful inside and out: facade, roof, interior. Interestingly, a one-level building also meets other modern needs:
Panoramic glazing, allowing sun and wildlife into every corner, beautiful both in winter and summer;
Construction of open and glazed terraces, verandas, spa pools - only the latter can be considered a novelty, everything else is a familiar attribute of any dacha near Moscow;
Energy efficiency - they try to use every meter of space rationally, and do not build unnecessary premises.
It is convenient to live in a one-story house, and in order for it to look good, it is important to maintain architectural proportions. For example, the height of the roof is of great importance. It should be sufficient so that the building does not seem squat, and if desired, an attic can be installed in it. The result is an average solution - a house with one and a half floors.
As for the architectural style, there are no restrictions at all; one-story houses have been built for centuries. Their design can include both design for a specific historical era, and any fashion trend. Below we will show the most interesting examples, and note that you should always remember one principle. Harmony is achievable only if the external appearance of the building, the interior and the surrounding landscape design match.
How to make a tent with your own hands step by step
Shelter for winter fishing can be made of different designs and from different materials. Therefore, we will dwell on some options in more detail.
From skis and awning
This shelter is far from new and many fishermen have had to deal with it when testing the product in harsh winter conditions. Let's look at the manufacturing instructions:
- Ski poles are used as a frame and placed vertically. Tubes are used horizontally. In the corners, the frame is connected using tees that match the diameter of the frame elements.
- Vertical elements are fixed to the skis. To do this, a metal plate is attached to them, into which a T-shaped tongue mounted on the bottom of the tube is inserted. To attach the stick, simply turn it 90°.
- Two elements are prepared from aluminum tubes to connect the frame to the box. The tube should be curved with a connection element at one end and a latch at the other.
- A spring element is made from a strip of copper that connects the box to the tubes.
- They pull up the awning. Metal strips with holes are attached to the bottom of the covering material, into which brackets installed at the end of the skis are threaded. The awning is connected to the brackets with ropes. To ensure that the structure stands securely on the ice, a pair of suitable weights are attached to it.
Made from polyethylene
If you don’t have a tent, you can make one from the most affordable material - polyethylene. In this case, the fisherman himself serves as the frame, and an ice pick or a drill stuck into the ice is suitable for the stand. From below, the material is folded inward and attached with any objects that are at hand. You can also make a large bag out of oilcloth that will be put on the fisherman.
An oilcloth tent, although simple in design, will be inconvenient to fish in if you like active hooking.
The advantages of the product include minimal manufacturing costs and speed of installation. If you do not consider it necessary to spend money on an expensive shelter, this option will be the most suitable.
Let's consider another design of a simple tent made of polyethylene and plastic pipes. Instead of polyethylene, you can use a suitable fabric. In addition to the materials listed, for manufacturing you will need connecting elements, as well as a soldering iron. Polyethylene will be required 3 m wide and 4 m long. A piece of film is unrolled and separated, since the material, as a rule, has a double layer. Then a triangle or quadrilateral of the desired size is made from it.
After fitting, a frame is soldered from plastic pipes in the form of two or three triangles, which will be installed at the ends of the product. The triangle is made in such a way that adapters, tees and other elements have a transition to a larger pipe diameter, which will make the structure collapsible. As a result, the required element is soldered to the plastic tube on one side, and a larger diameter pipe is inserted on the other.
After assembling the frame and inserting the fishing tubes, the triangles must be tied together with rope.
The polyethylene in one of the end parts of the structure is collected with an accordion and threaded into a ring, after which it is pulled together tightly. To prevent the material from tearing, the ring must be smooth. At the other end, at the entrance, the film is also pulled into a bundle at night, but a small hole is left for the flow of fresh air.
From fabric
The tent can also be made from fabric. For this you will need:
- fabric that can repel moisture - 14 m²;
- metal washers with a diameter of 1.5 cm - 20 pcs.;
- strong rope – 15 m;
- narrow tape – 9 m;
- rubberized fabric – 6 m.
A tent of this design can accommodate 1-2 people. Manufacturing begins by preparing two fabric cuts measuring 1.8 x 0.9 m. Marks are made along the long side at intervals of 65 cm. The same steps are repeated along the short side. At the joints, a cut is made that will serve as the entrance and back wall of the product.
According to the drawing, you can trace the sequence of actions. One of the main points is to sew all the elements well. The seams are reinforced with tape. In the absence of suitable fabric, you can even use ordinary fabric. If bad weather begins while fishing, you can use polyethylene to protect against precipitation. To make it possible to secure the fabric, metal rings are sewn into it.
Stylish “wigwam”, or in the spirit of the American prairies
This design direction owes its birth to the late 19th century American architect Frank Lloyd Wright. Characteristic features of the architecture: horizontally elongated forms, low roofs, encircling open galleries, merging with large windows. The color of the facades matches the surrounding nature: stone, forest, steppe grasses.
15. The only thing that reminds us of an Indian “wigwam” is its compactness and roof. By the way, it is somewhat similar in shape to Chinese multi-stage hip roofs, only with straight edges
16. The fantastic, and at the same time very simple, earthly appearance of this building captivates with its naturalness and the absence of deliberate elements of “decoration”
17. A small cozy building with stone trim looks as if it was built from natural materials collected from the area
18. The building, quite large in size, no longer resembles a “simple Indian hut,” which is emphasized by expensive finishing materials. However, it is typical of the Prairie style
19. The photo shows the design of an ordinary American living room
Construction of a log house
A log house is a traditional structure for a bathhouse; we will examine its construction further.
Material and cutting method
The best and most common material is pine, due to its strength, water resistance and low thermal conductivity. The logs themselves should be selected with a diameter of about 25 cm.
It is recommended to carry out the felling “in the paw”, performing internal protrusion of the walls.
This gives two advantages:
- The net area is 4 m by 6 m.
- Ease of subsequent interior finishing.
Tip: you can choose round logs for the rest room. This will give a natural look to the interior, increasing unity with nature.
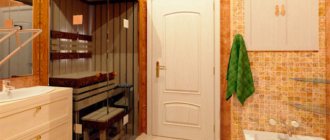
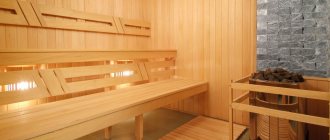
Steam room and washing room
Steam room in the bathhouse
We divide the six-meter wall of the building into segments of 2.5 m and 3.5 m. We leave the larger part for the relaxation room of the bathhouse, and divide the smaller part again, but for the steam room and washing room. The logs in them must be hewn with high quality, since they will then be covered with insulation and waterproofing.
To create floors above these two rooms, proceed as follows:
- We make the net height 2.3 m.
- Lay sanded boards over them, giving 12 m2 of additional space under the roof.
- We make the skate two and a half meters.
- We install the rafters from boards with a section of 50 mm by 150 mm, while we extend them half a meter from under the frame, and lower the roof slope by 20 cm. This will provide several advantages:
- Attractive roof interior.
- Protection of walls from precipitation.
- About seventy centimeters of dry space to create a woodpile.
DIY roof installation
To save money, you can initially cover the roof with ordinary roofing felt. It is inexpensive and easy to use.
If you have a larger budget, you can first cover it with plastic film and install any roofing material of your choice on top.
The flooring can be made of wood or concrete. A wooden floor will look more aesthetically pleasing, complementing the overall natural composition.
- We lay thick beams on the foundation.
- On them we install a rough layer of unplaned boards 25 mm thick.
Installation of a subfloor in a bathhouse
- We attach the logs on top.
- We lay insulation and waterproofing between the joists.
Insulation of the underground in the bathhouse
We create the finishing layer from a 38 mm tongue and groove board. We also use it for installing floors.
Some time after the construction of the building, the log house will shrink, and then it will be possible to move on to the exterior and interior decoration to your liking.
Structural features
Rest on the beds
In such a building there is no horizontally hemmed bathhouse ceiling. And the steam room and washing room are covered with floorboards on top. The mattresses placed on them will become a wonderful place to rest and spend the night during the construction of the main house or while visiting the dacha. For ease of visiting, a staircase is installed.
Floors with a ladder installed to them
Advice: be sure to take care of high-quality ventilation under the roof. Otherwise, when the sauna stove is operating, it will be too stuffy and hot.
Sauna covers significantly increase its functionality at minimal cost.
In order to save the family budget, all construction work can be done with your own hands. To do this, we will consider their step-by-step implementation.
Bathhouse made of a 6x4 log “in a bowl” with floors and a 2x4 veranda
What is a bathhouse with sheets?
In an ordinary bathhouse, in the dressing room, there is no ceiling. There is a ceiling only in the bath and washing compartment. And floorboards are laid on the ceiling above the steam room with the washing area - this is flooring.
The common ceiling of the entire bathhouse, which will follow the shape of the roof, is hemmed along the rafters over the entire roof area and insulated.
Polati provide the opportunity to get additional space in a one-story bathhouse, such as a mezzanine. On the floors you can make a place to relax or store some things.
To install floors, it is required that the roof rafters rest not on remote ceiling beams, but directly on the walls of the log house. In this case, the roof rafters are cut into the walls of the log house and are called wall rafters. Then ceiling beams can be made only above the bath-washing compartment. And you don’t have to install them in the rest room. This makes it possible to make a ladder for climbing to the floor.
A bathhouse with floors has its own characteristics:
- It is more difficult to heat the entire bathhouse room, since additional volume is added under the roof.
- Warm air accumulates under the roof, and the floors will be warmer than below.
- The ceiling in the relaxation room is much higher than in the bath and washing area.
- We have additional space (not a cold attic) for sleeping or storing things.
(the set is included in the price of the sauna)
- Five-wall log house ( the fifth wall is cut-in with a cut outwards
), corners are cut “into a bowl”, the walls inside are not hewn (round timber), the logs are processed with a stapler. The diameter of the log in the log house is at least 22 cm. - The log frame of the veranda (the logs of the lower and upper crowns are solid, extending to 2 m), the log “skirt” of the outrigger with three posts along the entire perimeter of the veranda is raised to 1 m
(in the photo the left wall is blank to the ceiling). - Ceiling and floor joists are logs hewn on both sides (carriage). The distance between the logs in the log house is 80 cm.
- The rafter system is timber 150x50, height at the ridge is up to 2.5 m. Wall rafters are installed in increments of 60 cm (under the insulation).
- The roof sheathing is a second grade 25 mm edged board, the roof is covered with roofing felt.
- Roof gables - 22 mm lining, 150x50 timber for the gable frame.
- The net height of the first floor from floor to ceiling is 2.10 m.
- Inter-crown insulation - moss or tow, nails, staples.
- Columnar foundation made of 20x20x40 cm blocks on a sand cushion.
The price of a 6x4 bathhouse with a 2x4 veranda with a chopped skirt, with floors, with a set of lumber, delivery and assembly is 316,000 rubles.
Bathhouse made of 6x4 logs - in a bowl - with floors and a 2x4 veranda
The price of a bathhouse in a bowl with a 6x4 log frame with a veranda with a set of materials, delivery and assembly. Project, layout of a bathhouse with 6x4 log beams with a veranda.
1. Log house 4 x 6, five-walled with internal sheathing of the walls (cutting the corner “into the paw”, size 4 x 6 is the internal dimension from wall to wall) 2. Clear height from floor to ceiling 2m.30cm. 3. Floor joists and ceiling beams made of hewn logs. 4. Rafter system for a gable roof with a ridge height of 2m.50cm. their boards are made 50 x 150 5. The rafter beam protrudes beyond the walls of the log house by about 50 cm, and the roof slopes fall below the rafter beam by 15-20 cm, which allows you to get: a). Quite a nice appearance. b).The lowered roof slopes protect the walls from rain. c).About the wall there is approximately 70cm. dry space where you can burn a woodpile. 6. Lathing - unedged board 25mm. 7. The roof is covered with roofing felt (covering the roof with any other material is discussed). 8. The gables are covered with clapboard and a frame is made for the second-light windows. 9. The finished floor in the bathhouse and in the rooms is a 38mm tongue-and-groove floorboard. 10.Two bath doors made of 50mm boards. and two double windows 60 x 60 11. The log house is assembled on moss and installed on posts 40 x 40 x 40, assembled from foundation blocks on a sand bedding (sand is provided by the customer) Any changes are possible at your request!!! YOU CAN SEE YOUR LOG BEFORE IT ARRIVES TO YOU. Write to us by email and we will send you a photo of the finished log house of the size you need.
Do-it-yourself mini-sauna in the country: small and compact building options, projects + photos
If the size of the summer cottage does not allow the construction of a full-fledged building, then an alternative option is a mini-bath. In terms of functionality, level of comfort and safety, it is absolutely not inferior to traditional steam rooms, but at the same time requires much less usable space. In addition, independent construction of a bathhouse from available and safe materials even a novice master can do.
Available materials for the construction of a budget bathhouse
Before you build a budget sauna for your dacha, you need to decide on the material for the wall structures. As a rule, natural wood is used to build a private steam room - timber, a simple or rounded log, but increasingly, in order to save money, site owners prefer simpler and cheaper materials. The most popular of them are:
- Brick.
- Foam blocks and gas blocks.
- Wooden beam.
- Edged board.
- Steel frame with wood cladding.
- Plastic corrugated sheet.
Each material has its own strengths and weaknesses, which can be used to advantage when building a compact steam room.
Types of economy baths
An economical bathhouse in the country is an excellent solution for small garden plots, the area of which does not exceed 10 acres. This means that the structure itself must be ergonomic: up to 6 meters in length and 4 meters in width. Let’s consider the main design options that can be advantageously arranged on a small private plot.
Frame
The simplest frame bathhouse is built on a lightweight foundation, has a wear-resistant wooden frame, lined with high-quality materials. In order for a small frame bathhouse to provide additional protection from the negative effects of moisture and temperature changes, the structure is insulated and waterproofed.
Dry logs with a cross-section of up to 112 mm are suitable for constructing a bathhouse. To make a compact bathhouse with an area of up to 13 square meters. m, it is necessary to prepare 80 units of lumber. For insulation, you can use mineral wool, tow fiber and tow.
Frame structures do not require additional external finishing. If desired, it can be done, but this will significantly increase the costs of implementing the project.
Monolithic
Another economical design option for construction on a summer cottage. It involves the use of cheap material - wood concrete, which is prepared from sand, cement, chemical additives and filler. Sawdust from coniferous and deciduous trees, hemp and flax fires, rice and cotton straw stalks are used as filler. There are two technologies for constructing a bathhouse: from sawdust blocks with brickwork or monolithic casting. Monolithic technology involves the preliminary installation of removable formwork, followed by filling the walls with the finished mixture.
Mobile
The modern market offers ready-made ergonomic bathhouse designs with various technical and operational parameters. One of them is a small sauna, which is a tent tent on a steel base, equipped with a mobile heater and a backpack for transportation. There are more affordable and lightweight designs that are equipped with a small-sized steam unit. The undoubted advantage of a mini-sauna for use in the country is the ease of assembly and installation in any accessible place. Depending on the design features, dimensions and type of bathhouse, it can accommodate from 2 to 5 people.
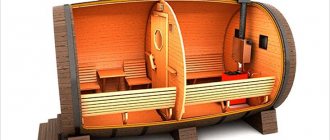
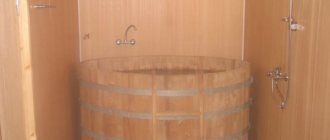
Ergonomic
The budget barrel sauna is the most popular and sought-after design option, which has almost all the advantages of a stationary building. This structure is a large barrel made of wood. It is divided by a special partition into two functional areas: a steam room and a shower room - for health and water treatments, and a dressing room - for installing heating equipment. A mobile barrel-shaped sauna can accommodate from 2 to 4 people in one session. For the construction of walls, edged boards from deciduous trees up to 6 cm thick are used. A mobile economical sauna does not require a foundation, but to increase the stability of the structure it is recommended to use an additional wooden base made of boards up to 5 cm. If the bathhouse is intended to be used not only in summer, but also with the onset of cold weather, then insulation of the structure is a prerequisite. For thermal insulation, frost-resistant and durable materials are used, inert to rotting and the negative effects of external factors.
Choosing a site for the construction of a country bathhouse
On a small site, it is better to build a bathhouse near existing buildings - a residential building, a summer kitchen, a sanitary unit. This option has many advantages, since it allows not only to effectively connect the usable area of various buildings, but also to significantly save on building and finishing materials. When constructing a bathhouse, it is necessary to take into account the following basic recommendations:
- The bathhouse should be located at a safe distance from any bodies of water to avoid possible flooding of the premises.
- The distance of the building from the hydraulic structure should be 15 meters, from neighboring areas - 5 meters.
- It is better to locate the bathhouse in the backyard or south side of the site.
- You should not build a building near a road, field or garden.
- When combining a bathhouse with residential buildings, all fire safety rules must be observed.
- When developing the project, the competent organization of ventilation and wastewater systems, as well as the safe arrangement of steam and heat insulation protection, are taken into account.
Construction of a budget bathhouse at the dacha using frame technology
Building a bathhouse in a country house with minimal investment is possible for any owner of a small plot; according to construction technology, all work is carried out step by step in the following order:
- Preparing the site for construction.
- Construction of the foundation.
- Tying a wooden frame.
- External wall cladding.
- Thermal insulation.
- Arrangement of communications.
- Installation of heating equipment and furniture.
Site preparation and foundation construction
At the initial stage, it is necessary to prepare the site for construction. The area is cleared of dirt and vegetation and leveled. Next, the foundation for the bathhouse is arranged. A cheap option for the foundation for a frame bathhouse is columnar, it is strong and durable. It is recommended to use asbestos-cement pipes as supports. The required number of recesses around the perimeter and at the junctions of the walls are prepared for the pipes.
The installation step of the supports is selected taking into account the type of soil and the maximum load exerted on the foundation.
Shrinkage of the supports is carried out to a depth of up to 150 cm, while a drainage (15 cm) cushion based on sand and fine crushed stone is first poured into the bottom of the hole. The pipes are installed in a vertical position, and fittings are placed in each. The cavity of the pipes is concreted, the area around each pipe is also filled with mortar. After the concrete has hardened, a wooden or metal grillage under the frame is installed on each support.
Timber frame strapping
The frame for a budget wooden bath is made of timber 15x15 cm in size, dried and treated with moisture-proofing compounds. The initial crown is laid on the waterproofed base with alignment around the perimeter. The laying method is in the paw. The walls are erected to the required height with the organization of door and window openings. The crowns are fixed to each other using wooden dowels. The beams are insulated with jute fiber or tow.
On the upper crown, the rafters are fixed to metal brackets, taking into account the configuration of the future roof. For a single-pitched roof, the rafters are fixed with external and internal supports; for a gable roof, the rafters are mounted at the bottom to the load-bearing walls, and at the top they are brought together in the form of a roof ridge.
Next, a lath is installed for installing steam, heat and waterproofing protection. Finally, the roofing material is installed.
External wall cladding and thermal insulation
Even a simple and compact bathhouse needs high-quality thermal insulation and external cladding. For the frame structure, you can use available and cheap materials - OSB and DSP (cement-bonded particle boards), moisture-resistant plywood and boards. On the finished frame, the sheathing is mounted with self-tapping screws, and the joints are filled with mounting foam or sealant. Reliable thermal insulation will provide additional protection for the wooden structure from increased moisture and temperature changes. Mineral and ecological wool, polystyrene foam sheets, reed boards and jute can be used as a heat insulator.
Thermal insulation materials are installed in the free space between the inner and outer cladding, preventing the formation of cracks that could lead to heat loss.
A vapor barrier layer made of glassine or polyethylene film is mounted on the insulation.
Arrangement of communications
At this stage, the laying of all main communications is carried out - water supply (cold and hot), sewage and ventilation systems, electrical wiring. The laying of the sewer system - the installation of a drainage well, a septic tank or a tie-in to the central sewer system - must be provided for at the stage of constructing the foundation base. Next, the bath floor is installed - concrete or wood. An additional decorative cladding – porcelain stoneware or tiles – is additionally laid on the concrete base.
It is better to make a wooden base a leaky structure with a small hole for drainage. The floor is arranged with a minimum slope of 5 degrees.
Next, reinforced electrical wiring is laid. Afterwards, the wall and ceiling structures are insulated using available and moisture-resistant materials, and decorative finishing is done with clapboard or plywood. Finally, doors and windows, heating equipment and electrical appliances are installed.
Installation of heating equipment and furniture
For a frame country bathhouse in the country, it is recommended to choose a compact and economical heater - an electric stove or a wood stove with a metal body. Massive stoves require the construction of an additional foundation, which will entail an increase in the cost of construction and maintenance of the bathhouse. Finally, a standard set of furniture is installed - shelves and benches for the steam room, a table, chairs and hangers for the dressing room, benches and shelves for the shower room .
Useful tips
The construction of a small private bathhouse on a personal plot is a complex and responsible undertaking. To get a decent result of your work, experts recommend drawing up a detailed plan for the construction process. This will simplify the passage of the main stages of work and will allow you to avoid serious mistakes. Step-by-step instructions for building a mini-bath include the following steps:
- Choosing a location on a building site.
- Construction of a foundation for a bathhouse.
- Construction of walls, partitions and interfloor ceilings.
- Installation of the rafter system.
- Thermal insulation, waterproofing and vapor barrier of walls, ceilings and floors.
- External insulation and cladding.
- Installation of heating equipment and chimney.
- Laying floors, installing door and window structures.
- Communications supply.
- Internal cladding of premises.
- Selection and arrangement of furniture, bath accessories.
Projects of small-sized baths
Construction work begins with the preparation of the design of the future bathhouse. It is important to take into account all the main parameters: dimensions and internal layout, location, construction and finishing materials, furniture and equipment. The most common sizes of budget baths are: Square one-story building of 9 square meters. m - the most affordable option for a small-sized bath. It provides for a steam room and a washing room, located on 4 squares with a minimum set of furniture, as well as a dressing room of 4 square meters. m with a folding table and benches. Here you can also organize a locker room and a relaxation area. A small corridor is intended for convenient storage of bath accessories. Bathhouse project for 12 square meters. m provides for a budget construction designed for a small company of 2-3 people. The total space of the bathhouse can be divided into several functional zones by thin partitions made of timber: a steam room, a washing room and a dressing room. A small tray with a drainage hole is installed in the washing room. For such a bathhouse, it is recommended to choose a compact metal wood-burning heater or electric stove. Bathhouse design for 16 square meters. m is quite in demand due to its spaciousness. A standard building is built on one floor and may include the following premises: a steam room, a washing room, a dressing room, a sanitary unit and a rest room. In some cases, such a project includes an open terrace. The bathhouse can have a second floor, equipped with a guest room, a game room or a study. To build such a bathhouse, timber, logs, cinder blocks and bricks are used. A budget project for a country bathhouse of 20 square meters. m includes a minimum of structural elements. As a rule, the building is built on one floor and is divided into a steam room, a washing room, a relaxation room and a terrace. Heating equipment and furniture are installed in the steam room, an area with a shower and a sanitary unit is installed in the washing room, and household appliances and furniture are installed in the relaxation room. This project may not have a dressing room, which allows you to get a fairly practical summer version of a bathhouse. The most popular project is a small-sized bathhouse of 24 square meters. m, which consists of a steam room and a washing room of the same area, a dressing room, a small relaxation room combined with a terrace. Such dimensions of the building allow it to be used for a company of 4-6 people. To save space, multi-tiered folding shelves can be installed in the steam room. If desired, you can reduce the area of the relaxation room by allocating a small room for a dressing room.
Photo examples of ready-made baths in the country
Before starting the construction process, it is necessary to develop a working design and draw up a detailed drawing indicating the technical parameters of the future structure. Original and popular options for budget bathhouses in summer cottages, built with your own hands, in our photo selection. A functional frame bathhouse in a summer cottage is an affordable and relatively cheap construction option for home use. To reduce construction costs, you can create your own project, and also use only inexpensive and practical materials. And a compact heating stove, made by yourself, will also help to significantly reduce the cost of servicing the finished bath.( 7
Is it difficult to make a choice between building a bathhouse or a residential building on a new site? Build a bathhouse with floors! You will get both the opportunity to take a steam bath and a place to stay while the long-term construction of the main housing is underway.
Calculation project
Calculation of the height of a multi-tiered structure starts from the ceiling. The top shelf should be 60 cm wide and located at a distance from the ceiling of at least 1.1 meters. This distance is necessary so that on the upper tier it is possible to sit normally and whip the steamer with a broom.
The height of each tier should be about half a meter. The lower tier should be at least 30 cm away from the floor. It is better to make the lower step, 40 cm wide, removable and not attached to the floor, so that you can dry and wash the steam room floor. Based on these recommendations, the number of tiers is calculated, varying their height and optimally using the area of the room.
Prices for sizes with delivery and assembly
4x5+2 (4x7)
— with delivery and assembly
280t.r.
4x6+2 (4x8)— with delivery and assembly
RUR 310
5x5+2 (5x7)— with delivery and assembly
324 tr.
5x6+2 (5x8)— with delivery and assembly
RUR 365
6x6+2 (6x8)— with delivery and assembly
426 tr.
6x7+2 (6x9)— with delivery and assembly
530 rub.