Our portal is replete with examples of the construction and operation of small, or, as they are now commonly called, mini-houses, but usually these are either frame-modular or frame structures. As it turns out, logs are also a suitable wall material, especially when the construction concept is environmentally friendly and natural. One of our craftsmen, with the nickname mike099, shared his experience with everyone interested. His topic collected all the stars, which indicates its relevance, so it makes sense to expand the reach of the audience by considering the construction process in stages:
- Eco-hut.
- Preparation.
- Foundation.
- Box.
- Roof.
- Interior work.
Advantages and disadvantages of a log house
Log house
Now it is fashionable to talk about the special energy of wood, beneficial effects on humans, etc. But, even if we discard the esotericism and turn to modern science, we can see that the characteristics of moisture absorption, air microfiltration parameters and other properties of wood correspond to the needs of the human body many times better the most advanced materials.
A house made of wood is talked about as “living”, preserving the health of its owners. With certain reservations this is true, but the flip side of such properties is the need for counter-care. A “classic” log house made of natural wood requires much more care and supervision than a brick or concrete one.
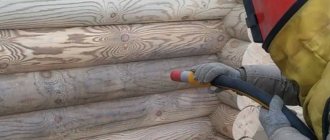
To begin with, wood is a material with a high degree of fire hazard. At the same time, various types of fire-prevention impregnations and coatings either noticeably worsen the notorious environmental component and (or) aesthetics of wood, or lead to a noticeable increase in cost. In addition, most fire retardants have a limited service life, usually not exceeding 10-15 years. Then the processing must be repeated.
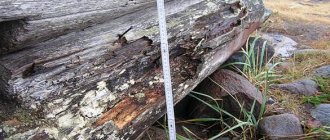
The tree is also significantly susceptible to biogenic influences:
- rotting caused by various kinds of fungi and algae;
- damage by insects - wood borers (various types of larvae, beetles and worms);
- damage by rodents (mice, rats).
Measures to combat these scourges are as ambiguous as treatment with fire retardants.
Treatment of wood with fire retardants
Stage 8. Caulking logs
Types of tools and caulking methods
After shrinkage is completed, the log house is caulked. To do this, prepare the following equipment:
- hammer;
- caulk (made of wood or metal).
Attention! If you sealed the inter-crown space with tow or moss, you can skip this step, since you most likely will not need caulking. But if you find even the slightest cracks, then it is still better to carry out the procedure.
Proceed to work only after the insulation has completely dried. First, twist the material (tow or moss) into a rope, then hammer it between the crowns with a hammer and caulk.
Caulk
You can use tape jute - in this case, the material is simply fixed with nails or a mounting stapler.
Primary and secondary caulking of a log house
Video – Caulk of a log house
Main types of log material
The severity of the problems described above can largely be reduced at the stage of procurement of materials. The question of how to make a log house with your own hands is preceded by the question of what to make it from.
The options are as follows:
- log house made of natural logs;
- timber frame;
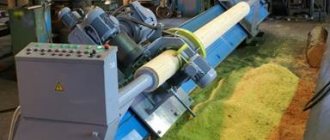
- log house made of factory-processed logs (rounded).
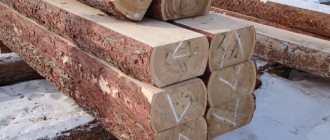
In turn, when deciding how to make a log house from timber, you have to make a choice between ordinary construction timber (1), profiled timber (2) and laminated timber (3).
Beam: construction (1), profiled (2), laminated veneer (3).
From the point of view of convenience and manufacturability of work, timber is noticeably superior to ordinary (natural) logs. A rounded log is fundamentally no different from timber, except, perhaps, for higher expressiveness and originality of building design.
I recommend: Equipping the facility with construction and finishing materials
The disadvantage of treated construction wood will be a noticeably higher cost, to some extent offset by higher quality and reduced labor costs during operation. And, in addition, the absence of that very spirit of “naturalness” of the log house.
It must be remembered that a log house usually only has external walls and (not always) partitions. To fully answer the question of how to make a log house, you will need a number of additional materials, in particular:
- timber for logs;
- boards for floors, cladding of gables, ceilings, ceilings, etc.;
- timber and boards for roof structures;
- window and door fillings (blocks);
- roofing material.
Finishing
After completing all the activities described above and laying the roof, the log house must stand until it shrinks completely. The standing time ranges from one and a half years (for raw, even timber) to six months (if glued dried raw materials were used).
After the required time has passed, you can begin finishing:
- Houses made of profiled material do not require cladding either inside or outside. To ensure their durability, it is enough to treat the walls with an antiseptic or paint them with a composition for external use.
- In buildings made of even timber, cracks inevitably form during the shrinkage process. These cracks must be sealed, after which it is necessary to provide cladding that protects against blowing.
- We install a windproof membrane under the sheathing, and the finishing itself is made of lining (inside), siding or metal siding (outside). It is also possible to line the walls with brickwork.
House made of timber lined with brick - in progress
Types of wood for logs and quality characteristics
For the log house of a residential building or household. the buildings do not use aspen and linden, at the same time, as a material for making a log bathhouse, their wood is very good.
They don’t make log houses from birch - it is easily attacked by insects and various fungi, and is fiddly and inconvenient to work with.
Oak timber
Good (but expensive) cedar, larch, oak. Larch is more difficult to process, but a frame made from it is not subject to rotting and is more resistant to fire. Log houses made of oak, beech and hornbeam can last for centuries, but, like larch, the high price of wood from these species is aggravated by the difficulty of processing.
Regardless of the species, it is very important that the wood used has a moisture content not exceeding 12-15%, otherwise the logs will give excessive sediment, they may lead, and in addition, raw wood is more susceptible to rot, damage by insects and rodents. Therefore, logs for a log house are prepared in advance and kept to dry for at least a year or two.
Stage 9. Roof
Construction of a roof on males with layered rafters
Rafter system
As soon as the tree shrinks, you can begin building the roof. If you do this earlier, the roof will simply collapse.
Step 1. Place wooden beams on the wall framing (we have already talked about this).
Step 2. Fix the beams and attach the rafter legs to them in 1 m increments. In the ridge part, cut the rafters at the appropriate angle for the connection.
Step 3. Nail a solid board deck to the rafters (if you plan to use rolled roofing material) or make a sheathing (if you use slate, tiles, etc.).
Step 4. Install the roofing according to the instructions for the specific material.
Step 5. Cover the ridge with galvanized sheet steel to protect it from aggressive environmental influences.
Step 6. Cover the roof gables with siding or clapboard.
How to sew up a pediment
After this, proceed to further planned work - pouring a concrete screed or building a wooden floor (in the second case, the logs are cut into the logs of the second crown and fixed), install insulation, carry out interior finishing and arrangement of the steam room according to your project.
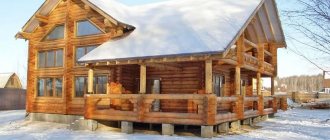
An example of a log house with a shingle roof
An example of a log house with a shingle roof
Cornice filing
Roof overhang trim
Tools for building a log house
It is generally accepted that in the “old days” the question of how to make a log house was solved with one ax, which is not entirely true. Of course, a good craftsman can build something suitable for living with one ax, but both before and now, to make a log house with your own hands, you will need:
- Two-handed saw, hacksaw.
- Scraper, a special plow for removing bark (when working with unsanded logs).
- Chisel and hammer.
- Low-speed drill (or hand crank).
- Measuring and marking tools - carpenter's pencils, chalk, tape measure, square, plumb line, hydraulic level, strong cord with a pair of reliable awls.
Tools for building a log house
A chainsaw will be an excellent help that will significantly speed up the work. It is especially useful if the log house is made from natural, untreated logs.
For temporary fixation of logs, steel carpenter's staples are used.
An important tool is the carpenter’s “dash”, which looks like a massive, durable compass. Its task is not only to build arcs and circles, but mainly to mark lines when making grooves.
Carpenter's trait
For caulking you will need a mallet and special hardwood spatulas.
I recommend: Close the sewer pipe in the toilet and install an inspection hatch
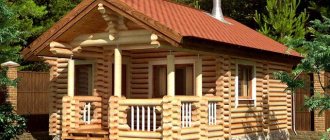
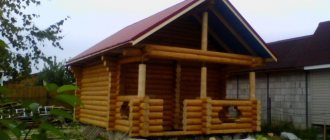
Eco-hut only 30 m²
mike099FORUMHOUSE user
The dream has long crept in about building a wooden house - environmentally friendly, practically without paints, mineral wool, polystyrene foam and other “benefits” of modern industry. The task is to build a solid, comfortable house with minimal effort, suitable for winter visits and year-round living, therefore shingles, boulders, mezzanines, Russian stoves and other delights of centuries past were not included in the project.
The craftsman immediately decided on the design:
- Pile foundation.
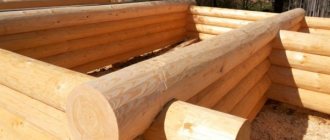
- Box made of hand-cut logs.
- Metal roofing.
- Sawdust with clay and sawdust with lime are used as insulation for floors.
Types of log houses
Before discussing how to make a log house, make it from timber or logs, you need to decide what type of connections (cuts) will be used.
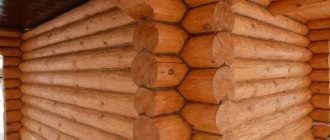
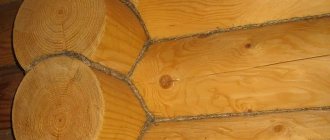
There are two basic types of corner notches: “with remainder” and “without remainder”. In the first case, the ends of the elements extend beyond the plane of the adjacent wall, in the second, the end of the element coincides with the plane of the wall and in plan the log house is a rectangle.
Cutting with remainder
The designs of the interface units also differ. In Russia and Europe, simple-to-execute cuts “into the bowl”, “into the clap” (“reverse bowl”), and their more complicated varieties “into the bowl - into the fat tail” are popular. For timber, cutting is used “into the okhryap”, “into the paw”. In northern Europe, “Norwegian” logging is common; in Alaska, Canada and the States, you are most likely to see “Canadian” logging.
Cutting “into the paw” and “into the bowl”
Each of these types has its own advantages. If you have no experience, when thinking about how to make a log house with your own hands, you should settle on a fairly simple “straight bowl”.
How to make a log house with your own hands
Work on constructing a log building can be organized in two ways.
- Chopping followed by “rolling”. At the same time, the log house is usually made in the place of logging. The log house sits for one and a half to two years, its logs dry out and shrink. Then the log house is dismantled and transported to the construction site, where it is assembled according to a permanent pattern, guided by the marks made on the logs.
- In the second case, felled trunks or logs are delivered to construction. They are processed at the site (often including debarking) and laid on the foundation.
Manual felling of a log house
A log house needs a foundation, just like any other. The log house does not have any special requirements for its type. Moreover, log houses are much less demanding on the quality of the foundation than houses made of stone materials.
Foundations for a log house can be strip, columnar, or pile.
The first, framed crown, in the absence of a foundation, is laid on pads. They are placed under the lower logs of the casing at a distance of about half a meter from the corners of the future log house. Strictly in the horizontal plane, with a deviation of the top edge from the horizontal by no more than 5 mm.
The bottom of the logs lying on the foundation is cut off by 3-5 cm, and a layer of horizontal waterproofing is laid between them and the foundation.
Having exposed the longitudinal logs, longitudinal grooves are cut into them for the next row of logs and semicircular recesses - bowls, into which the logs will lie, forming a perpendicular wall. Then perpendicular logs are laid, in which longitudinal grooves and bowls are also selected. The first crown is ready.
I recommend: How to level an attic floor with noticeable differences
Now comes the turn of the second - the main crown of the log house - the lower trim. Its logs are laid on the framed crown, processed similarly to the framed crown, as described above.
If the log house is not made for rolling, a sealant is immediately laid out between the logs: dried moss or tow. (Fig. 1)
Laying pattern along a “straight bowl”
When the lower frame is assembled, logs are cut into it, giving additional strength and serving as a base for the floor.
Vertical crowns can additionally be fastened with rectangular tenons, which are located at meter intervals along the perimeter of the crown, as well as near corners and openings. Arranging tenons and sockets for them is labor-intensive, so round dowels are often used instead, for which several crowns are drilled through with a brace or drill.
The rows of tenons or dowels are shifted so that, if possible, they are not located on top of each other.
Stage 7. Doors and window openings
We specifically started talking about openings after construction was completed, since there are two options for their arrangement.
Installation of a casing for installing windows and doors in a log house
- In the first case, holes are created after the completion of construction work. At the same time, in the crowns located in the places of future openings, first leave small gaps (the dimensions of the latter depend on the size of the mounted products). Once you've finished laying the logs, simply cut the openings with a chainsaw.
- In the second case, leave openings during the construction process. This is very labor-intensive and expensive, since you will use bars with notches at the ends and special grooves.
How to install a window in a log house
Window installation
Bath windows
Doors for a bathhouse made of logs
Therefore, we advise you to give preference to the first option.
A little about labor organization
As a rule, to make a log house, professional carpenters process the logs directly “on site”, sitting astride a log if necessary. For beginners, this method is fraught with injuries and poor quality, and the installation of scaffolding takes time commensurate with the construction of the log house itself.
5 log crowns
The solution may be to work in two or three steps. The lower part is assembled to a convenient height, and then the crowns are assembled on linings nearby. The finished top is disassembled, marking the logs and transferred to a permanent place. In this case, you can do without forests.
Finally, caulking is done - tamping down the previously laid strands of sealant, etc.
Foundation
Preference was given to screw piles due to the desire to try an “ultra-modern solution” and save money, as well as due to the speed and relative ease of installation. A total of nine piles were screwed in - three support points for each load-bearing beam, pile diameter 108 mm, thickness - 4 mm. Despite some problems when installing the piles and the flimsiness of the coating, which is positioned as a durable protective layer, but in fact can be easily removed with a fingernail, the craftsman is satisfied with the choice. Moreover, perhaps the bathhouse will also be placed on stilts, although he admits that a tape or slab “will be more reliable.”