A log house is a structure made of logs or beams that are stacked horizontally on top of each other.
When building a house, the logs for the first, frame crown are cut off on one side, to a width of at least 15 - 20 centimeters.
The frame is held in place by connecting (bandaging) the elements together using grooves cut into them and additionally inserted dowels. The dressings can be angular, forming the joints of the external walls of the house, and T-shaped, which form the internal partition.
Preparing regular logs for laying
Before cutting down a log house with your own hands, you need to perform two important operations: form a groove along the entire length and a corner connection without additional fasteners. Not only the strength characteristics depend on the quality of their execution, but also the most important property of the structure – the ability to retain heat inside for a long time.
The geometry of the longitudinal recess of the arc profile largely determines the thermal conductivity characteristics of the room. The width of the inter-crown groove has a double meaning. On the one hand, an unreasonable increase in the parameter reduces the useful height of the log, on the other hand, additional widening of the groove has a positive effect on maintaining the internal temperature.
Given this state of affairs, the logical resolution to the contradiction is the following: use a wider ditch when constructing structures in the northern regions.
The profile of the crown groove comes in several interpretations:
- lunar;
- tongue and groove;
- lunar with additional undercut.
Russian lunar profile is considered technologically advanced : the geometry of the excavation accurately repeats the ridge of the response log. This type of log cutting is described in detail in numerous videos due to its wide popularity.
To make a groove you need to have :
- line (a tool similar in functionality to a compass);
- pencil;
- axe;
- adze;
- chisel;
- hammer.
A medium power chainsaw with a good chain will intensify the initial stage of the ditch gouging process. The groove must be made in the lower part of the log to prevent the formation of additional pockets of moisture collection.
The technological process of forming a longitudinal recess includes the following operations:
- put the log of the future crown on top of the existing layer, center and fix it;
- mark a horizontal line on the top workpiece with a length equal to the width of the groove (at least 12 cm);
- adjust the line and draw a corresponding arc line on the surface of the lower one at the end of the upper log;
- draw a groove line along the entire length;
- use the nose of the chainsaw bar to make longitudinal cuts 1.5-2 cm less than the calculated depth of the excavation;
- make a longitudinal cut to the same depth;
- cut out one half of the groove, then the other.
It should be noted that in search of a solution to how to cut down a log house with your own hands faster and easier , experimenting with the shape of the longitudinal groove is not recommended.
The common belief that a triangular shape is no worse than a semicircular shape is erroneous. When connecting, the angular profile not only reduces the contact area, but also provokes the formation of cracks in the log.
Foundation for a log house
The main tasks of any house foundation are as follows:
- holding the base and structure of the house in one, solid plane and, as a result, maintaining the integrity of its walls
- preventing the house from sinking into the ground under its own weight
- preventing the house from freezing from below the ground during the cold season
In addition to the above-mentioned requirements for the foundation of any house, some more requirements should be added to the foundation of a log house:
- Height and moisture protection . The height of the foundation of the log house should be higher than for a stone house . The optimal foundation height for a wooden house above ground level is 50-60 cm or higher. Such a rise is necessary to maximally prevent contact of wooden walls with moisture emanating from the ground.
- Ventilated base. If you are planning a wooden base for a log house, then it should be well ventilated from below. This measure will increase the longevity of the floor. For this purpose, the optimal foundation for a log house will be one of the varieties of pile, columnar foundation, as well as a strip foundation with ventilation.
log house on a pile foundation
- No heavy foundation needed. The weight of wooden houses is much lighter than stone ones and therefore a log house does not require a deep, massive and heavy foundation. For a small log house up to 80 square meters, budget foundation options are well suited: pile and columnar.
Read more about the types and properties of pile foundations
Read more about the properties of a columnar foundation
log house on a columnar foundation
strip foundation
Stage 6
Types of cutting corners of a log house and informative videos on their implementation
A characteristic feature of the construction of a wooden structure using the technology under consideration is the natural fastening of the logs to each other only through structural measures without the use of additional fasteners . ways to correctly implement a corner connection :
- "in the paw";
- “in a state of rage”;
- "into the bowl";
- "in a big way."
The first joining method is the basis of the so-called waste-free technology.
The next three provide additional projections beyond the plane of the walls. The often demonstrated corner cutting of a log house in the video is the last one on the list.
The advantages of joining logs “in a clap” are:
- lower location of the bowl, preventing the accumulation of moisture inside the ligament;
- a closed corner structure, which is formed by the ends of the logs protruding beyond the plane of the wall;
- high strength and reliability.
Before you cut down a corner frame with your own hands , you need to acquire a standard carpentry kit, which was also used when forming a longitudinal groove.
A chainsaw is also welcome here. The bowl is marked as follows:
- lay the log of the future crown and fix it with staples;
- the legs of the line are moved apart by half the diameter of the lower log;
- a line is placed on the cross-laid wooden blanks and the contour of the bowl is drawn, constantly maintaining the contact of the legs with the logs and their verticality;
- Transverse and longitudinal cuts are made according to the intended geometry, the bowl is chopped and its surfaces are cleaned.
Upon completion, the log is placed in the bowls and the gaps are checked. defective if the actual depth of the bowl is greater than the design one . The way out is to wedge or lay a thicker seal.
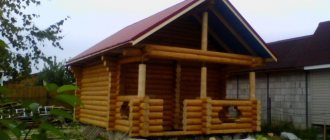
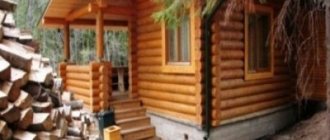
Features of building a bathhouse from round timber
Since ancient times, our ancestors have used processed wooden logs for the construction of various premises, including bathhouses. And in our time, such options are very popular, since such a bath not only lasts a very long time, but is also a real decoration of any local area. This type of material has many advantages. First of all, it is worth noting environmental friendliness. Using such a bath will definitely benefit your health. In addition, round timber baths are valued for their high quality and durability. And the beautiful appearance will become a real decoration of the yard and the pride of the owner, especially if the building was built with his own hands.
It cannot be said that building a bathhouse from round logs is very simple. As a rule, this is done by professionals, since it requires certain knowledge and experience. First, a bathhouse project is created.
At the same time, several people can take a steam bath at once without much embarrassment.
Whether to build it yourself or entrust this work to a professional - everyone decides for himself, but when constructing a building of this type, such as a bathhouse, you need to take into account the complexity of the work. If knowledge in this area is not enough, it is better to turn to the experts, since in inept hands the logs will simply be damaged, and they are quite expensive.
In order to build a bathhouse, you first need to develop a project. After this, having carried out all the calculations, you can begin to select and purchase materials. Next you need to work on the foundation, and then prepare the logs for work. The finished round timber is folded into a log house, and after that doors and windows are installed in the building. Next, you can proceed to installing the roof. Only after this, specialists begin work on the stove and chimney. This stage is quite complicated, but some bathhouse owners try to save money and carry out this work themselves.
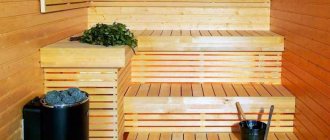
The final stage of work on a round timber bathhouse is interior decoration and thermal insulation. This point is necessary for a bathhouse, since a room of this type must be able to withstand high temperatures and humidity well and not release heat.
Assembly
Watching the video of cutting down one crown of a log house “into a bowl” , you should note the sequence of processing the log: first you need to form the geometry of the “bowl”, and then start cutting out the longitudinal groove. Sometimes the issue is solved differently: simultaneously with marking the bowl, mark the location of the longitudinal groove from the end of the log to the corner joint and combine the operations.
When starting the practical implementation of the planned solutions, you need to clearly know the sequence of assembling the crowns together :
- an inter-crown sealant (tow, linen wool, moss, etc.) should be spread over the already formed layer;
- It is customary to connect several crowns together with dowels (wooden spikes) at intervals of 1.5 - 2 meters;
- the orientation of the wood fibers should be as follows: less dense (southern) fibers “look” inward, northern fibers “look” outward.
After cutting the log house yourself, experts recommend erecting a temporary roof and allowing time for the structure to shrink (1.5-2 years) . Afterwards, you can coat the ends of the logs with a protective compound.
Having developed the skills of cutting the geometry of a corner joint and a longitudinal groove, you can begin to construct a wooden structure. When developing a construction method, you should use the preferred options for the location of technological surfaces: it is advisable to base the bowl and longitudinal groove in the lower part of the wooden workpiece. When assembling, do not forget to place sealing material between the rims and fasten the layers together with dowels.
Method of cutting "in the cloud"
Logging is the simplest and most affordable option for constructing various types of log houses, which is done manually. The process of preparing building material itself does not require much time and labor.
This method involves removing logs from the corners of the log house at a distance of up to 25 cm, which leads to a reduction in the size of the finished structure on all sides. For this reason, it has another name - cutting with residue.
This construction option provides additional strength to the structure, and protruding elements protect the corners of the frame from damage and destruction.
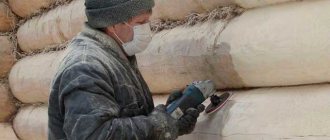
The bowl is made in the shape of a semicircle with a smooth surface and is not equipped with locks. To prevent possible rotting of logs, it is recommended to carry out timely caulking of the walls outside and inside.
Bath sewage system
To drain wastewater from a bathhouse you will need: a pit with a water seal, a well for wastewater and pipes that drain dirty water into the pit and then into the wastewater well.
The pit is torn off from the outside of the bathhouse foundation, and gravity pipes made of plastic, cast iron or ceramics are inserted into it from the steam room and washing room (metal pipes will quickly rust).
The pit should be 500 mm from the foundation, its depth should be 700 mm, and its cross-section should be 500x500 mm. The walls of the pit are covered with a 100 mm layer of concrete, and a 110 mm drain pipe(s) from the bathhouse is inserted into it under the foundation. The main well for drainage, holding at least 2 m3, must be dug at a distance of at least 2.5 m from the pit - the further the better.
A pipe is supplied to it from the pit, laid at a slope at a depth of 1.5 m (below the freezing depth), its outlet from the pit must be located 100 mm from its bottom. After inserting the drain pipe, the main drainage well is filled with gravel or sand 1 m from the bottom, and soil is poured on top - in a layer of at least 500 mm. When laying, carefully compact each layer.
Before leading the drain pipe into the pit, a galvanized water seal is installed, located at an obtuse angle to the drain pipe from the bathhouse. Its edges and upper side are hermetically attached to the walls of the pit; the distance from its lower edge to the bottom should be no more than 50 mm - thanks to this design, unpleasant odors and cold air will not penetrate into the steam room (washing room) through the drainage hole.
https://www.youtube.com/watch?v=channel
To prevent freezing in winter, the pit must be covered with two covers of the appropriate size (wooden or metal), felt should be placed between them, and the top cover should be covered with expanded clay, slag or sawdust.
Schemes and projects of baths of varying complexity
The minimum set of required premises is considered to be:
- steam room;
- shower;
- restroom;
- dressing room (dressing room).
Average room sizes in a Russian and Finnish bath:
- Ceiling height – from 2.1 m.
- In a steam room, there should be at least 1 square meter per person. m.
- Locker room - 2.15 sq. m or 850*1150 mm.
- Suitable washing dimensions are 1.49 sq.m or 1150*1300 mm.
Calculations were carried out taking into account the average height of a person.
When developing a project, you will need to create several drawings from different angles, diagrams of individual structural elements. Among them:
- general diagram, construction plan;
- separate drawings of each department;
- schematic representation of the foundation arrangement;
- drawing of the roof structure;
- planning of fastening of beams, floors, ceilings;
- installation plan, layout of the furnace.
There are three ways to create drawings:
- Perform accurate calculations and create it yourself at home.
- Take a ready-made sample from the Internet as a basis.
- Ordering the development of a project from a professional architect who will complete all the drawings in accordance with the requirements of current legislation will help you obtain a building permit.
When designing, it is important to take into account sanitary standards (sanpin) of the distance of the bathhouse from other buildings, the boundaries of two plots, the house and the neighbor’s fence
Even with a small bath area, it is important to remember that the steam room is the most important room. You can't skimp on its size
For two people, the minimum room size will be 1*2 m.
A good option for a spacious bathhouse with an attic. The main rooms for procedures are located on the first floor, and the relaxation area is located on the second floor.
An interesting project for a bathhouse with an open terrace and a separate room for storing firewood. The main material for construction can be timber, logs or bricks.
Nuances of work
To cut down a log house and make it resistant to bad weather, the logs are oriented with thin annual rings towards the street, and with thick rings - inside the future house.
To facilitate this process, the building can be built in parts. The crossbars (as these parts are called) are usually tied on the ground, aligned upward to the size of human height. Then each of them is disassembled and reinstalled on the base frame.
The optimal choice for a foundation for a wooden frame would be a pile option. It is lightweight and quite easy to install.
In the absence of the necessary experience, it is recommended to start the production of log cabins with the construction of something small and not very significant, for example, a garden gazebo or a small bathhouse. This will give you experience and develop the skills necessary to build a full-fledged house.
Having gradually learned the intricacies of construction, the master will be able to create something not only suitable for habitation, but also causing enthusiastic responses with its exquisite appearance.
Finishing
After completing all the activities described above and laying the roof, the log house must stand until it shrinks completely. The standing time ranges from one and a half years (for raw, even timber) to six months (if glued dried raw materials were used).
After the required time has passed, you can begin finishing:
- Houses made of profiled material do not require cladding either inside or outside. To ensure their durability, it is enough to treat the walls with an antiseptic or paint them with a composition for external use.
- In buildings made of even timber, cracks inevitably form during the shrinkage process. These cracks must be sealed, after which it is necessary to provide cladding that protects against blowing.
- We install a windproof membrane under the sheathing, and the finishing itself is made of lining (inside), siding or metal siding (outside). It is also possible to line the walls with brickwork.
House made of timber lined with brick - in progress
Carpentry Feature Improvement
Time works to improve the instrument and does not stand still. When drawing markings, the main thing is to ensure horizontal and vertical compliance with the line; for this, the ends of the carpenter's line are set using level bubbles. A Canadian inventor proposed an innovation in the form of a marking tool based on a carpenter's line, which he called a scriber. The Russian skilled carpenter did not further elaborate and developed a different version of the scriber, which later became known as the carpenter’s compass.