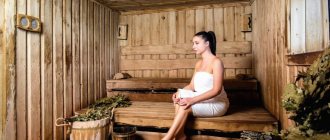
Do-it-yourself sauna stove: instructions for making a metal structure
If you decide to make a metal sauna stove with your own hands, first familiarize yourself with their features.
They heat up and cool down fairly quickly. That is why special requirements are imposed on the design features of such products. A metal stove can have different sizes and designs
Preparation and cutting of material
The metal structure should be made from sheet steel, the thickness of which is 1.5-2 mm. Metal cutting is performed as follows.
| Illustration | Description of action |
| A sketch of the future product is being made. All details are drawn and their size is indicated. The total area of all elements is calculated to determine the required amount of material. | |
| All dimensions are transferred to metal. Right angles must be controlled. | |
| All elements of the future product are sequentially cut off. A grinder is used to cut metal. Burrs are removed properly. |
Do-it-yourself welding of a metal sauna stove
After all the elements are cut to size, you can begin to connect them. You can weld a metal sauna stove with your own hands as follows.
| Illustration | Description of action |
| To ensure the required spatial arrangement of parts relative to each other, adjacent elements are tacked, and then the main seam is applied. | |
| All assembly units of the future furnace are welded. |
Do-it-yourself assembly of individual elements of a metal sauna stove into a single structure
After the main structure is welded, the remaining elements are installed in accordance with the drawing. A chimney is installed on a metal sauna stove with your own hands and doors are hung.
At the final stage, the chimney is installed and the doors are hung
We invite you to look at photos of sauna stoves made of metal.
1 of 4
Required Tools
When planning the installation of a sauna stove, you need to take care not only of efficiency, safety and functionality, but also of the right tools.
To improve the quality of installation, you should first prepare:
- steel sheets (8 mm thick);
- a pipe with a circumference of about 50 cm;
- metal rods, cross section 100 mm;
- grate, combustion chamber, ash door;
- chimney;
- hot water taps;
- water tank up to 1 cubic meter.
For installation of the structure, a welding machine and an angle grinder will definitely be useful.
It is important to select all component materials in accordance with existing SNiPs and PPBs. For example, galvanized asbestos pipes are not recommended for use.
Features of the construction of a simple brick stove for a bath
Of course, a classic bath stove should be built from brick. Such structures are much lighter than those installed in the house for heating. Their only purpose is to boil water using any convenient method and create steam.
Other order options. Click to enlarge image
One of the simple ordering options is shown in the image above. But before starting work, it is necessary to build a foundation and prepare a sand-clay solution.
The base must be deepened below the freezing point of the soil (about 0.5-1 m). To protect yourself from ground movement, the bottom of the pit is made with an expansion.
The first 15 cm are covered with a sand cushion. After draining it abundantly with water, add a layer of up to 20 cm of broken stone or brick. Then approximately the same layer of crushed stone is poured.
Having prepared the site for the foundation, formwork and reinforcing frame are installed and concrete is poured not reaching 15 cm above ground level. The gap from the dismantled formwork is filled with a mixture of coarse sand and gravel.
The concrete screed is covered with roofing felt and the brickwork of the first two continuous rows begins.
I use sand-clay mortar as a mixture for masonry joints. Each stove maker himself chooses the ratio of the components included in it. The degree of thickness (like that of rich sour cream) and good stickiness are important. The solution should not spread, but lie in molds and smoothly smooth out.
Comparison of briquettes for heating - find out their main advantages compared to firewood
Design features
As you know, the main purpose of the stove is to heat the steam room building for a specific time. In order to work with maximum heat transfer, they are equipped with the following design elements:
- The heater is the main attribute of the stove. Its purpose is to maintain a stable flow of heat, which is carried out due to the mass of stones that gain heat from burning wood.
- Chimney. It is presented in the form of a pipe coming out of the firebox and discharging combustion products outside. As a result, wood-burning sauna stoves with a water tank are characterized by low efficiency.
- Door with passage tunnel. Designed to allow the sauna to be heated with wood in the next room, or in the dressing room.
- Heat exchanger. Installed to heat water during combustion.
- The firebox is an area for storing fuel to warm it up; heat energy is immediately released. Often, a grate is mounted in it in different positions, which depend on the type of fuel. For firewood, the grate must be positioned at a level with the door firebox. Bevels are also made on three sides to roll combustion products forward.
- Ash pit. The place under the grate where the ash is located.
Furnace components
Types of heating water tanks
As a rule, containers for preparing hot water are made of stainless or carbon steel coated with enamel. In this regard, the location of the water tank plays an important role, and it can be as follows:
- built into the firebox (internal);
- hinged, attached to the body;
- external, heated from the chimney;
- remote, with heating from a heat exchanger built into the firebox.
A metal vessel for hot water, built into the firebox or hung outside, is one of the worst options. In the first case, it is impossible to control the water level; in addition, it constantly boils, which requires the organization of steam removal. The big inconvenience of a hanging tank is that boiling in it begins much earlier than the steam room is heated. As a result, so-called cold steam is released, which only leads to an increase in humidity. Such conditions in the bathhouse are absolutely uncomfortable and unacceptable.
There is another serious drawback that speaks against attached tanks. Since water must be present in it initially, when the firebox is ignited, part of the heat released when burning wood goes to heating it. Instead of going to the bathhouse to steam, we wait until the water heats up; the heating time of the steam room increases. In addition, when the water boils, you need to drain it from the tank and add cold water, otherwise steam formation will begin, as mentioned above.
Another thing is a stove with an external tank, heated by the firebox or chimney pipe. Option one: a coil with two pipes going outside is installed inside the firebox of a brick or metal stove. They are joined by a remote container located no further than 3 m from the heat source, since the circulation in the circuit will be natural. It is suspended from the wall inside or outside the steam room above the level of the combustion chamber.
This method allows you to control the water level, its temperature, and also makes it possible to attach a mixer or shower to the tank. True, one drawback remains: thermal energy is taken away from the firebox during heating, since it is strictly not recommended to pour water into the system after heating the bathhouse. Due to sudden cooling, boiling will occur in the hot tubes of the register, followed by water hammer and destruction of the heat exchanger.
The best option is a wood-burning sauna stove with a water tank that takes away the energy of the flue gases. Since the latter are characterized by a high temperature, it would be a sin not to lower it by removing heat for the needs of the hot water supply from the gas duct. The heating process is implemented in two ways:
- a large-capacity tank is built directly into the chimney, the water is heated directly from combustion products;
- on the chimney pipe there is a small tank with two pipes, into which a large remote tank is connected (this is how boiler plant economizers are designed).
Removing the heat from combustion products is the best way to heat water, so the energy from burning wood is used more efficiently and does not go down the drain. The time it takes to heat a stove for a Russian bath does not increase, and some fuel savings occur.
Features of masonry: materials and recommendations
It is recommended to use ordinary clay solid bricks for laying the body and chimney. Brand M150 and higher, size 250*120*65 mm. It is not difficult to calculate the amount of bricks for Kuznetsov stoves: you need to multiply the number of rows of the model you have chosen by 0.8. This amount is enough to lay the hull (taking into account the battle and rejection). For the chimney you need to count separately. The calculation scheme is slightly different: you know how many bricks are in one row, multiply by the number of rows (each is different depending on the dimensions of the stove and the height of the building), add 10% for the battle and get the required number.
For the fireclay core (if any), Sh-5 (230*114*40 mm) or ShB-8 (250*123*65 mm) is recommended. Its quantity is calculated individually according to the scheme. The core in Kuznetsov furnaces is not connected to the body, that is, there are no common points of contact between them. Between the two parallel walls, the body and the fireclay core, there should be a gap of 5-6 mm. To make it easier to withstand, you can wrap the finished core (usually it is placed first) with ordinary packaging cardboard of the appropriate thickness. Instead, for better thermal insulation of the firebox, you can lay a heat insulator, basalt cardboard, for example.
Barbecues can also be built according to the principle of bell-type stoves
The height of the rows of ceramic bricks does not coincide with the height of the rows of fireclay. They do not need to be adjusted one after the other
It is important to maintain verticality and horizontality, monitor angles, as well as the recommended seam width. And then everything will be as it should be
In reality, the dimensions of ceramic bricks differ from the standard 250*120*65 mm. If the deviations are not critical, they can be corrected with a seam. Therefore, when calculating stoves and their heights, they take the height of the brick with the seam. It should be 70 mm. But you cannot make a seam larger than 7 mm, so look for a brick of suitable quality and size.
At the top, in the places where the fireclay laying ends, there are compensation gaps that take into account the different expansion coefficients of the materials. It is imperative to observe them: the expansion of fireclay bricks is greater than that of ceramic bricks, and if there is no such gap, the core will after some time break the masonry on top due to the fact that it expands more strongly.
Cutting from the order of the Kuznetsov stove with a mark
The size of the gap must be calculated according to the marks in order. The height of the last row of fireclay is marked on the drawings. Calculate the height of the ceramic brick wall yourself: multiply the number of rows by the height of the row with the seam (70mm) and get the required value. It should be 10-15 mm greater than the height of the fireclay. This gap is compensatory and it must be present. The resulting void is filled with stone basalt wool (not glass wool, but one that has a use temperature above 1200°C).
If there are columns and internal walls inside (usually a quarter thick), the brick can be laid flat or on edge in them. There is no difference, do what is more convenient. There are places in the drawings where in one row there is a brick placed flat and on its edge. In this case, it needs to be adjusted to size (cut).
There are also nuances in the installation locations of furnace castings. Due to the specifics of the program, the drawings above the firebox door show ceramic bricks, but fireclay needs to be placed there on edge. When there is a difference in height, the voids are filled with cut fireclay plates. There remains a gap of 5 mm between the metal parts and the masonry - again due to different temperature expansions. A suitable heat insulator (with an operating temperature of 1200°C or more) is placed in this gap.
For thermal insulation of furnace castings, asbestos cord was previously used. Now they recommend basalt wool or cardboard
Now about the mortar: for laying the body (made of ceramic bricks), clay or clay-sand mortar is used. For laying fire-resistant fireclay, purchased compounds (fire-resistant mastics) are used. Kuznetsov does not recommend soaking the brick before laying it. If you need to do this, then only with secondary raw materials. Immediately after completion, the oven must be dried, even if you do not put it into operation immediately. If this is not done, then during the first few fires there will be a smell of fumes.
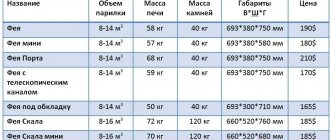
Review of characteristics and model range of Varvara stoves
The Varvara mini wood stove for a bath, like many other fireplaces, has a lot of advantages and features, which you can find out in more detail in this table:
| Name | Characteristics and descriptions |
| This model, if necessary, can be equipped with a water tank, which can be either floor-mounted or mounted. The connection is made to the existing water supply of the house. In order for the tank to fill itself with water, you can additionally equip it with a powerful pump. If necessary and a boiler is available, the system can be used without a water jacket. The hanging water tank, in turn, can be easily removed and cleaned. This option is suitable if water will not be supplied to the bathhouse. Hearth mass. Depending on the chosen configuration, it ranges from 85 to 125 kilograms. In just one hour, heating from 15 degrees to 100 is achieved. | |
| The Varvara stove with a water circuit is one of the most functional models, which can also be equipped with a remote water tank if necessary. The existing water circuit allows you to install a mixer in the house and use a shower. The water circuit is based on high-quality stainless steel, the wall thickness of which is more than one and a half millimeters. The water circuit is also widely used for heating the house. The Woodpile model has small dimensions, which allows installation in rooms with a medium area. The volumetric parameters of the steam chamber are 24 cubic meters, and in total you can load about 40-50 kilograms of stones into the basket. For kindling, classic solid fuel (logs) is used. | |
| In total, there are two such hearths in the model range, which differ in their weight and method of placement. A smaller variation is designed to heat rooms up to 16 cubic meters, a more massive one up to 25. A special feature of the fireboxes is the presence of panoramic transparent tempered glass. The total weight of the stone in the basket for full-fledged work should not be less than 185 kilograms, with the dimensions of such a fireplace being 78x56x78 centimeters. Just like in previous models, heating from 15 to 100 degrees is achieved in one hour of continuous operation at full power. The combustion chamber is carried out at least 14 centimeters, while the diameter of the chimney system is 11.4 centimeters. Logs are used for kindling, and the combustion chamber itself is equipped with tempered glass with dimensions of 30.5x29 centimeters. The power of the unit is 12 kW. | |
| The Varvara mini sauna stove has small overall dimensions of 73.5 x 39 x 67 centimeters. This model is suitable for DIY installation, even in the smallest baths with limited space. To heat the mini unit, there is a water circuit or a hanging tank (42 liters, stainless steel) at your discretion. | |
| The Varvara “Panorama” model is intended for heating a bathhouse, the total area of which does not exceed 24 cubic meters. The fireplace is equipped with a hermetically sealed door made of fire-resistant transparent glass. This makes the view of the flame burning in the hearth as complete as possible. The sauna stove is based on high-quality steel marked ST 3 (thickness 6 millimeters). |
Massive installations are the most functional, efficient, and are also capable of operating on a single fuel load for quite a long time.
One of the simplest and most budget-friendly Palenitsa stoves
Miniature elongated hearth Varvara Uyut-1
Fireplace equipped with a sealed steel flap door
Design features of the Varvara “Baby” stove
Model equipped with small panoramic fireproof transparent glass
https://youtube.com/watch?v=Fzn5zxNJgVI
Making the project safe: basic principles
Traditionally, the oven is built near the wall opposite to the shelves in the steam room. The stove design must be created in such a way that a minimum distance of 30-40 centimeters is maintained between the heating parts of the finished unit and everything that supports combustion. If special protection is installed, for example, made of asbestos cardboard, this figure can be reduced to 15-20 cm.
Prices for asbestos cardboard
asbestos cardboard
A gap must be maintained between the smoke exhaust pipe and the floor/roof elements that come into contact with it, which is subsequently filled with fireproof material. Asbestos is most often used for protection. From above, the mentioned gap with insulation is closed with a steel shaped plate.
For additional protection, the area of the floor in front of the stove firebox is covered with a metal sheet about 10 mm thick. It will protect the flooring material from fire if coals fall out of the firebox.
The standard option for placing a stove in the bath space is shown in the following image. Here you can also see the order of organizing the water circuit, which can be taken as a basis if the supply of warm water will be provided by the stove unit, as well as the features of connecting and removing the chimney.
Standard option for placing a stove in a sauna space
Video
Watch the video for recommendations on building a sauna stove using the Kuznetsov system:
Kuznetsov’s stoves are distinguished by a variety of shapes, allowing you to select a specific version of the stove in accordance with the layout and design features of the bathhouse, as well as the personal preferences and wishes of the customer.
The order of the stove for the bath, or the pattern of laying bricks, is the most important element with which you can correctly lay the stove, while having minimal skills in performing stove work.
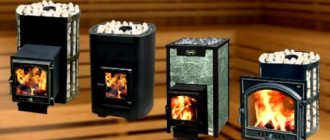
It is worth noting that, despite the abundance of ready-made metal stoves on sale, the traditional wood-burning heater still holds the palm in Russian baths. At the same time, the ordering of a brick stove for a bath, properly maintained, allows its design to be reliable, which will have a positive effect on the service life of your stove.
Other options and calculations
Diagram “C” shows another version of a metal heater, on which the air flow channels are clearly visible.
Please note that there are already two heaters here - the second is used to produce dry steam:
- A – chimney from a pipe;
- B – outer casing – behind it is an internal hot air channel;
- C – fuel supply channel to the furnace;
- D – combustion door, this double design allows the door to heat up less and cool faster;
Calculating power for a wood-burning stove is an extremely difficult task, taking into account the many factors influencing the operation of the stove (option “C”)
- E – ash drawer, note the design feature of this furnace – the drawer is retractable, which will greatly facilitate the maintenance of the furnace in the future;
- F – cast iron grate;
- G – ash pan;
- H – firebox made of heat-resistant stainless steel;
- I – channel for the entrance of the secondary air flow.
The diagram also shows:
- 1 – water dispenser, it will determine the amount of steam you need – some models, primarily electric and gas, use an economizer for sauna stoves, which provides the most economical energy consumption depending on the temperature and humidity in the room;
- 2 – closed-type primary heater;
- 3 – pipe;
- 4 – additional heater for producing dry steam.
Calculations
If we talk about the quantitative design characteristics of the furnace, then it is necessary to keep in mind the following points:
- the solution to the question of how to calculate a stove for a bathhouse largely depends on the type of bathhouse itself and the size of its room;
- if the bathhouse is Russian, then the stove should provide a temperature of 50-60 degrees, which is not high at all, but the humidity is more than 60-70%, which is very significant;
- for a Finnish sauna, these parameters are exactly the opposite - the temperature is high - over 100 degrees, but the humidity is quite low - no more than 20%; the whole idea is based on the axiom - the lower the humidity, the easier it is to tolerate high temperatures;
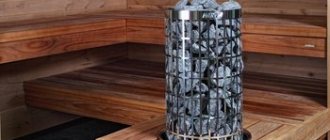
Electric heaters (pictured) have become the unofficial choice for saunas - they fully meet all the requirements of this type of baths
- it is considered unacceptable when the humidity drops below 10%; in this case, it is strongly recommended to forcibly humidify the air;
- the choice of stove is made according to the volume of the bathhouse, based on two parameters: there must be at least 12 cubic meters per person;
- the power of the stove should be calculated relative to the volume with a coefficient of 1.2 (minimum, in some cases 1.5) to take into account heat loss - thus, if the volume of the bath is 20 cubic meters, it is necessary to choose a stove for a volume of 24-30 cubic meters;
As the main calculation method, which does not affect special knowledge in the field of heat engineering and mathematics, the following can be accepted:
- initial data: let the volume of the room be 3 x 4 x 2.5 meters - 30 cubic meters;
- heating to 60 degrees requires 50 kcal/hour per 1 cubic meter of volume;
- 1 sq.m of oven area produces 300 kcal per hour;
- to heat our room per hour it will take 30 * 50 = 1500 kcal/hour;
In the above algorithm, only the cost of heating 1 cubic meter to the required temperature requires discussion, which largely depends on specific natural conditions and differs significantly in Murmansk, Kostroma or Sochi.
Brick kilns
The whole idea of the calculation is based on the assumption that you are going to build the stove yourself. This means it will be brick. All other types of stoves, in principle, exclude any calculations on your part - you simply make a choice from what is available, based on the volume of your bath.
We offer two options for brick heaters.
Their construction principles are the same, taking into account the following nuances:
- it will be necessary to create orders - layer-by-layer laying out of bricks, which significantly simplifies the entire construction process;
- the construction of a brick sauna stove must be accompanied by a study of the soil and, in any case, strengthening of the foundation;
This is a very simple and therefore the best example of a brick heater for a bath (diagram “F”)
- in diagram “F”, pay attention - the doors of the blower and firebox are located on different sides;
- in diagram “G” the warm air channel (section BB) has the appearance of a zigzag, this is of fundamental importance.
Finishing such a more complex brick heater will require the selection of a special mortar (diagram “G”)
The construction of a brick bathhouse sooner or later raises the question of how to line the stove in the bathhouse. The lining of the stove in the bathhouse is usually done at will and over time, when there is confidence in the correctness of all calculations and the normal operation of the stove.
But what you need to keep in mind right away is the solution for the sauna stove.
Its preparation has some features:
- the solution must be created on a clay basis and can be of three types: clay;
- limestone, and
- cement;
- sand – 4 units of measure;
- sand – 2.5;
- sand – 3-4;
A brick oven requires not only a layout, but also cladding, which further increases the “price” characteristic.
Helpful advice! Strengthening the foundation of the furnace does not allow even the slightest mistakes. We strongly advise you to strengthen the foundation with a well-compacted sand and gravel mixture, place the stove itself on a reinforced concrete slab with an area one third larger than the area of the stove base, and under no circumstances drain the foundation.
Types of brick kilns
Over its thousand-year history, humanity has created several types of sauna stoves, which operate according to different schemes and based on different principles.
Moreover, even if you have a small stove for a bath, its arrangement will be individual. As for the most common designs, they are as follows:
- gray stove;
- black;
- white oven;
- heaters combined with a stove.
Black stoves, in principle, do not have a chimney, and the smoke here comes out of the room through the door. They are considered the most ancient and have existed in the world for centuries. Their advantage is the ability to obtain a large amount of steam with a small amount of fuel. The disadvantages include the need to wait for the fuel to completely burn out in the firebox.
A gray heater stove for a brick bath, as well as the arrangement for it, assume the presence of a chimney. At the same time, one of the advantages of such stoves is their high efficiency while warming up the steam room quickly enough. However, such stoves, just like black ones, require their owner to wait for the wood in them to completely burn out.
The most common in our time are the so-called white stoves, which are characterized by the presence of a completely closed chimney that does not release combustion products to the outside. However, they also have their drawbacks, for example, they take a very long time to heat the bath. In addition, a white brick stove for a bathhouse and its installation are difficult to implement, and not every householder can do it.
As for stoves with stoves, they are usually not used in the bathhouse, but are laid out in utility rooms when, for example, it is combined with a summer kitchen. In addition, such stoves can be built in a sink and are used to heat the water necessary for washing or washing clothes.
There are also unusual designs, for example, stoves for Kuznetsov’s bathhouse and orders for them. The author of such a stove claims that the efficiency of his brainchild exceeds 80%, however, if you are building a sauna for the first time and do not have sufficient experience in this area, it is better not to take risks and give preference to a traditional wood-burning heater.
Independent construction of a metal furnace
Stage 1. The metal structure being manufactured will have a closed heater and in order to use water and get steam it is necessary to open the door slightly. To make a sauna stove from a pipe, first prepare materials and tools. To simplify the manufacturing process, you will need a diagram of a stove for a metal bath.
You need to have at your disposal:
- sheet of steel with a thickness of at least 8 millimeters;
- grate;
- a metal pipe with a diameter of 50-60 centimeters with a wall thickness of about 10 millimeters;
- 10 mm rod;
- doors and latches for arranging a blower, heater and firebox;
- water tap;
- approximately 2 meters of pipe, of which 90 centimeters will be required for the firebox, 60 for the tank, and 50 centimeters for the manufacture of the necessary parts.
The tools you need to prepare are a welding machine and a grinder.
Stage 2. For further work you will need a long piece of pipe. First of all, a blower with parameters of 50x200 millimeters is cut out in it. Above the hole located on the inside of the pipe, you need to weld a mount intended for the grate. To do this, you need to take a metal plate that is equipped with eyes. Grate boxes are always available in specialized stores.
Stage 3. Now they begin to create the firebox. First, a hole is made with parameters of 250x200 millimeters. The fastenings required for installing the stove rods with a diameter of at least 10 millimeters should be welded on top. They can be replaced with grates for round-shaped units. You can buy such products in the same place.
Stage 4. A hole is created on the opposite side of the structure. Water is poured into it. Next, stones are placed in the heater. For example, diabase and soapstone are used. Flint, granite and mica-containing stones cannot be used.
Stage 5. A hole is created in the cover intended for the heating unit for mounting the chimney pipe, which is then placed in place. Next, it is recommended to additionally install a water container. To do this, weld the last piece of pipe onto the heater and attach the tap to its lower part. When operating the unit, smoke will begin to move through the pipe and heat the water without bringing it to the boiling point.
How to heat a stove with wood
Before heating the stove, it is necessary to close the heater channel and open the direct flue damper. This will significantly increase traction. Then firewood is placed in the firebox and afterburning is done using paper or rags soaked in kerosene or barbecue liquid.
It is best to burn the stove with hardwood wood
After the firewood has ignited, it is necessary to open the valve of the channel that connects the firebox to the heater and close the direct gas duct. At this time, the stones should be covered with a lid.
The stove is heated until the temperature in the steam room rises above 60°C. After the firewood has completely burned out with a poker, be sure to check whether there is any unburnt wood in the corners of the firebox. If such pieces of logs are found, then you need to throw them away, otherwise they will smoke. The heat must be checked for the presence of blue flames. If they are, then you still can’t take a steam bath, because you might get burned.
Burning coals are thrown away in the same way as unburnt wood. After this, water is poured onto the heater, which will remove soot from its surface, and the walls and shelves of the bathhouse are washed from soot.
Project selection
This stove project is suitable for most types of baths.
The dimensions of the structure will allow you to heat the room (10-15 m2) up to 50 degrees, and when steam is supplied, up to 90 degrees. A tank with a capacity of 180 liters is built into the stove and satisfies all the necessary needs for hot water for a comfortable washing process for all family members. To allow the heater to cool down for a longer period of time after finishing the fire, iron pipes are provided (6 pieces, next to the water tank).
The pipes also support the stones above the firebox. The pipes heat up quickly, and after the heating process is completed, they gradually release heat. There is a hole above the cobblestones through which water will be supplied to generate steam.
Safety precautions when installing a chimney
It is imperative to ensure high fire safety of the chimney for the bathhouse
To do this, as mentioned above, pay special attention to the tightness of the connections of individual parts of the pipe, as well as to the cutting when the chimney passes through the ceilings and roof
In places where the pipe will pass through the ceiling, it is necessary to insulate it from wooden elements with heat-resistant material - this can be asbestos, mineral wool, sand or expanded clay.
- To do this, a metal panel with a hole through which the pipe will pass is fixed to the ceiling where the chimney passes.
- A kind of box is installed on the attic side, which should be 10-15 centimeters higher than the attic floor. An insulating material is placed or poured into it, which will protect the wooden floor from the high temperatures of the chimney pipe. The pipe must be at least 25 centimeters from combustible floor materials.
Pipe passage through the ceiling
It is very important to arrange thermal insulation protection not only in the ceiling, but also on the wooden wall of the bathhouse. Basically, bathhouse buildings are built from pine, and its wood is quite resinous and can easily overheat and even burn from the high temperatures of a nearby chimney
Therefore, the wall must be protected using non-combustible material - this can be special drywall, asbestos, masonry, foil-lined mineral wool, or a combination.
It is very important to protect not only the ceiling, but also the walls.
- After passing through the attic, the smoke exhaust duct is discharged through the roof and rises above it by at least one and a half meters.
- Around the chimney, when passing through the roofing, waterproofing is installed, which will protect the roof sheathing from moisture, and therefore from the appearance of mold and destruction.
The passage through the roof needs waterproofing
A special protective mushroom is placed on top of the pipe head and a spark arrester is installed.
Water tank
Sometimes a metal tank for heating water is built into the chimney system of a bathhouse, built from metal sandwich pipes, inside which there is an uninsulated part of the chimney. Tanks can have different volumes - this will primarily depend on the power of the selected furnace.
When choosing this chimney accessory, it is best to pay attention to a stainless steel product that will serve for a long time. Naturally, you need to focus on the diameter of the chimney pipe to which the tank will be attached
It is better to purchase the entire set as a set so that you do not have to disassemble an already assembled structure.
Finished chimney section with water tank
The water tank has pipes onto which sections of the chimney pipes are placed. They must fit tightly together, otherwise the draft will decrease and carbon monoxide may enter the room.
A metal water tank is also built into the structure of a brick chimney. In this case, hot air from the furnace passing next to it heats the water poured into the tank. When building a container, you need to provide a place in the chimney wall where there will be a tap and a pipe with a tap for filling the tank.
Diagram of a sauna chimney
This diagram clearly shows all the above-described sections of the smoke exhaust system of a sauna stove.
Approximate general diagram of a sauna chimney
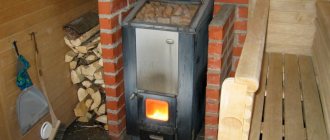
It is worth noting that a sauna stove with its firebox usually opens into another room - the dressing room. This is provided so that there is no risk of getting burned during washing, and so that the bathhouse attendant has the opportunity to constantly add firewood to the firebox.
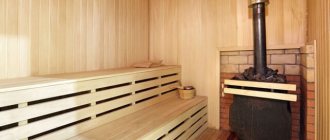
The stove itself is located directly in the bathhouse with a metal sheathing, which encloses the hot walls and is 10-15 centimeters away from them. Pebble stones are placed at this distance, which, when heated, give off heat to the room, and if you want to get steam, they are splashed with ordinary water or an infusion of fragrant herbs. In this embodiment, the chimney and the tank installed on it are also located in the bathhouse.
Cast iron stove with fence, metal chimney and water tank
The figure also shows how the chimney should pass through the ceilings and roof and how to ensure complete safety of its operation.
Based on this diagram, you can easily build a chimney yourself if you strictly follow all the norms, rules, sizes and volumes of insulating materials.
Brick foundation for a sauna stove
A brick oven is a fairly massive structure; it places a load on the foundation 4-5 times greater than an iron oven with similar parameters. Therefore, the foundation for such a structure should be stronger and more solid.
Foundation for a brick stove
The foundation for a brick stove is formed using the following technology:
First, they dig a pit, its depth should be at least 0.7 meters
As for the width and length of the pit, it is important that they exceed the parameters of the main structure by about 0.2 meters. The bottom of the finished pit is leveled and thoroughly compacted. Next, pour sand in a layer of up to 0.2 meters, moisten it well and compact it using a vibrating plate or other device. Broken bricks, crushed stones or stones must be poured on top of the sand layer. The height of this layer must be at least 0.2 meters
The rubble material is well leveled, covered with a small amount of sand, spilled with water and compacted thoroughly. Sand should fill all the voids in the rubble layer, so it is added until the material remains on the surface. On top of the compacted layer of rubble material and sand, crushed stone of the middle fraction is poured to a height of up to 0.1 meters; it should also be compacted using special devices. Formwork made of wooden boards is installed on the formed cushion. If the pit’s length and width exceeds the stove by 0.1 meters on each side, then the dimensions of the formwork structure must fully correspond to the length and width of the sauna stove. The wooden formwork should rise approximately 15-20 cm above the ground level. A reinforcing frame is laid inside the formwork structure; steel rods with a diameter of 12 mm are used for its manufacture. Next, you should prepare a concrete solution using classical technology and pour it into the formwork with a reinforcing layer. Before pouring concrete, the formwork walls are moistened to prevent moisture from being absorbed from the concrete mixture. The solution is poured in layers of 0.2 meters until the top level of the wooden formwork is reached, the surface is well leveled and left for 21 days for the concrete to gain the required strength. During this time, the foundation should be protected from drying out. After this, the wooden structure is dismantled. Between the walls of the pit and the finished foundation for the brick sauna stove, a space of 10 cm was created on each side, which allows waterproofing of the base. For this purpose, melted tar is used, which is used to cover the side surfaces of the foundation in 2-3 layers. Then the free space is filled with fine gravel or coarse sand. These materials create a kind of drainage layer.
Basic requirements for stoves for Russian baths
When working on the drawing of a sauna stove, you should remember that the following requirements apply to such structures:
- high thermal power, allowing air to be heated at the ceiling to 95-100°C, at the floor - up to 45°C. The numerical values of this parameter depend on the area of the building and the material from which the walls are made;
- small dimensions. A stove for a Russian bath should take up minimal space;
- heating enough water. On average, one person requires at least 15 liters;
- the ability to accumulate heat over a long period of time;
- safety. During operation of the heating structure, smoke and gas should not penetrate into the bathhouse.
In order for the microclimate to be suitable, the oven must meet certain requirements
Pros and cons of such ovens
The required properties for the material used in the manufacture of the furnace are heat resistance, strength, durability, and corrosion resistance. In addition, it must withstand sudden temperature changes and have good thermal conductivity.
The ferrous metal from which a thick-walled pipe with a diameter of 500-600 mm is made cannot be called completely corrosion-resistant. But it is precisely this type that is optimally suited for the independent production of a sauna stove, as it meets almost all of the requirements listed above.
The use of a round-shaped pipe for a stove in a bathhouse reduces the length of welding seams - these are the very first places for corrosion to form, and it is through them that carbon monoxide escapes. In addition, this option remains the cheapest, although prices for ferrous metal are rising.
Calculations, diagrams, drawings
Some craftsmen prefer to build a sauna stove “by eye,” arguing for the simplicity and undemanding nature of the structure. But the thermal regime and quality of the steam depend on how correctly it is designed (if desired, you can always install a steam generator in the bathhouse). For example, with excess power, the air in the steam room will heat up very quickly, but the stones will remain cold for a long time. If the performance of the heating device is not enough, then it will constantly overheat, which will quickly disable it.
The parameters of a sauna stove are calculated based on the actual cubic capacity of the room. To determine the volume of a steam room, three quantities are multiplied - its length, height and width. After this, adjustments are made related to the characteristics of a particular structure. So, for bathhouses with a bare frame, the obtained value must be increased by 1.5 times, and for each uninsulated square meter of surface (windows, doors, etc.) 1.2 m3 is added to the volume of the room. For example, the actual volume of an unclad building measuring 2x2x3 m with a window (1x1 m9 and a glass door (1x2 m) is taken equal to V= 2x2x3x1.5+1.2+2.4=21.6 m3.
Experienced stove makers calculate the power of the stove based on the fact that for each cubic meter of the actual volume of the steam room, 1 kW of energy will be required. So, in our case, a 20 kW heating device is suitable. To calculate the size of its firebox, the resulting power is multiplied by 2. For example, in the example discussed above, a firebox with a volume of 40 liters will be required. As for the linear dimensions, the height of the combustion chamber should be no more than 2/3, and the depth should be no less than 2.5 of its width.