Articles
All photos from the article
Every home craftsman who is at least a little familiar with construction can build a small bathhouse from timber. However, before starting work, you need to competently draw up a construction project and calculate the required amount of materials so as not to encounter a shortage or, conversely, to avoid unnecessary costs. Actually, this article is devoted to the topic of designing a bathhouse, in which we will familiarize ourselves in detail with all the nuances of this work.
Bathhouse made of timber, size 3x4
General information
Any construction, even if it is a bathhouse measuring 3x4 meters, requires the availability of design documentation. It is necessary not only for calculating materials and drawing up estimates, but also as instructions for performing construction work.
A drawing of a bathhouse made of 3x4 timber, which will be in front of your eyes during the construction process, will allow you to avoid mistakes at all stages of the work. Therefore, you should not neglect the preparation of the project even when constructing such small buildings.
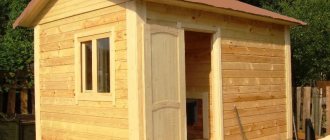
Three-dimensional design of a 3x4 bathhouse
The process of building a small bathhouse
When building small baths, savings can be seen at almost every stage of the work. This applies to both the construction of the foundation and the finishing work inside the premises. lightweight strip base is most often Serious cost savings can be achieved at the stage of purchasing building materials. Although the buildings being erected are oversized, most often the expected difficulties do not arise during the connection of rows of logs during their laying and selection of suitable lumber.
Small baths provide an undeniable advantage to the owner, which is associated with the heating process. For such structures, minimal power equipment is sufficient, which costs much less than traditional furnaces. An additional opportunity for savings opens up when choosing the technical support for a bath. As a rule, the most primitive and easy-to-manage option is chosen here.
Creating a Project
As an example, let's look at how to complete a 3x4 bathhouse project made of timber, which involves a detailed description of the construction.
In the process of this work, it is necessary to decide on the following points:
- planning of the future bath;
- features of the base;
- roof structure.
Below we will consider each of these design stages separately.
Layout
Of course, a bathhouse made of 3 by 4 m timber is a small building, however, this area is quite enough to accommodate a steam room, shower and locker room. Therefore, it is necessary to think in advance about how the rooms will be located in order to make the most practical use of the space.
First of all, you need to decide on the size of the steam room, which depends on its planned capacity. For example, if the steam room is small - for one or two people, then you can arrange another relaxation room in the bathhouse.
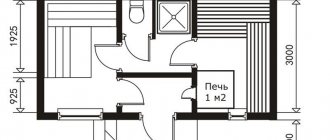
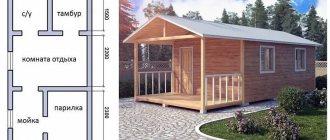
Layout of a bathhouse with a relaxation room
In the proposed bathhouse project, the rooms are designed as follows:
| Room type | Dimensions |
| Steam room | Occupies 3.33 m2 |
| Shower room | 1.81 m2 |
| Restroom | 5.04 m2 |
However, with this layout, things will have to be left in the rest room, since there is no locker room. The only thing that can solve the problem is an attached vestibule, which can be adapted for these purposes.
If a more spacious steam room is required, then in addition to the shower room there will only be room for a locker room. True, many developers, in order to increase the usable space inside the bathhouse, resort to one trick - they make the building corner, for example, an excellent option is the size of a bathhouse made of timber 3 by 3 by 3 by 4.
This solution is suitable for cases where the bathhouse is located in the corner of the site. Such a structure does not take up much more space, but at the same time has sufficient area to arrange all the necessary premises.
An example of a three-dimensional corner bath project
In this case, the rest room can be made both closed and open, i.e. in the form of a terrace. The second option can be implemented in a summer bath.
If the recreation area is expanded by a meter in length and width, then a barbecue will fit here. In this case, you will get a bathhouse made of 4 by 4 by 3 by 4 timber. Of course, an increase in size will also lead to increased construction costs.
Thus, the layout of the bath depends on the following points:
- purpose - only a steam room or, for example, a recreation area at a summer cottage;
- the size and features of the site allocated for construction;
- budget allocated for the construction of the bathhouse.
To complete the space planning work, you should draw a plan indicating the size of the rooms.
Diagram of a pile-screw foundation
Foundation
The foundation for a small bath can be of several types:
- pile-screw - consists of metal pipes that are screwed into the ground to the required depth. From above, all piles are connected by a grillage. The advantage of this design is the possibility of building a bathhouse on a slope, however, it can only be realized if the soil is strong enough;
Diagram of a columnar foundation
- columnar - columns built from brick or concrete blocks are used as the base. As in the previous case, all the pillars of the base are united by a grillage;
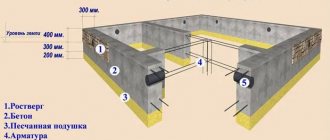
In the photo - strip foundation - strip - is a closed monolithic contour, which is located under all load-bearing walls. Brief instructions for arranging such a foundation look like this:
- trenches are dug to the depth of soil freezing;
- a sand-crushed stone cushion is poured into the bottom of the trenches;
- formwork is installed;
- reinforcement is performed;
- The formwork is filled with concrete.
The choice of foundation depends on the type of soil. If the soil is unstable, a strip foundation should be poured. If the soil is stable, the best option would be a columnar or pile foundation, the price of which is much lower.
Roof frame diagram
Roof
The roof is a conventional gable structure. As a rule, in such baths the frame is based on hanging rafters, which are fastened together by a ridge purlin and lathing. To strengthen the structure, tie downs are installed between the rafter legs.
At the roof planning stage, you need to draw up a diagram on which all the frame parts should be displayed and their dimensions indicated.
Note! If the bathhouse will be used not only in the summer, the roof must be insulated. To do this, you can use mineral mats, expanded clay or other heat-insulating material.
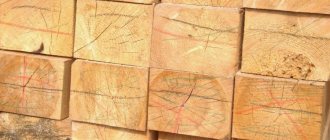
Beam with a section of 100x150 mm
conclusions
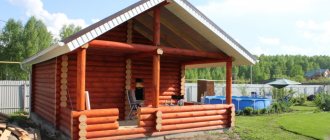
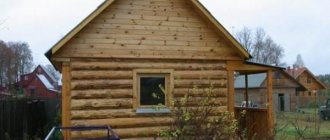
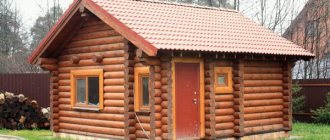
The photo shows a small bathhouse made of natural material!
Such a building does not put forward any special requirements; it can be erected fairly quickly and without calling in specialists. And even with the choice of project there will be no problems - almost all of them are of the same type (see also the article “Layout of a 3x4 bath - even if it’s “tiny”, but it still requires a plan”).
Did you like the article? Subscribe to our Yandex.Zen channel
Material calculation
After preparing the project, you can calculate how many cubes of timber are needed for a 3x4 m bathhouse. To do this, you first need to calculate the number of pieces of timber.
For example, a bathhouse is being built from timber 3 by 3 by 4 m, i.e. The height of the walls is 3 meters. The section of the beam is 100x150 mm.
In this case, the calculation looks like this:
- at the beginning we will find out how many pieces of timber will be needed for one wall - 3000/150=20 pieces;
- Now you can calculate the required volume of timber for a wooden wall 4 m long - 0.10x0.15x4x20=1.2m3x2=2.4m3;
- in the same way, the volume of material for three-meter walls is calculated - 0.10x0.15x3x20=0.9m3x2=1.8m3;
- Now you can find out how much 100x150 timber is needed for a 3x4 bath - 1.8+2.4=4.2 m3. Of course, the material must be purchased with a small reserve, so the resulting value must be rounded to 5m3.
Note! The required volume of timber should be adjusted depending on its length. For example, if the length is 6 meters, then the volume should be calculated as for six-meter rather than four-meter walls.
Now that we know how many cubes of timber are required for a 3x4 bathhouse, we can calculate the total cost of the material for the walls. To this amount you need to add the cost of materials for the foundation, roofing, and interior decoration.
This way you can find out how much it will cost to build a sauna with your own hands from 3x4 m timber.
Advice! For the lower crowns of the bath it is better to use hard wood, for example, larch or oak. This will increase the strength and durability of the walls.
Here, perhaps, is all the basic information on the design and calculation of a small bathhouse made of timber.
Advantages and disadvantages
It would take a long time to list the advantages and disadvantages of blocks in bath walls. Everyone will find their own qualitative differences in this material, both good and bad.
It’s still more pleasant to start with the positives:
- foam blocks do not shrink at all;
- the bathhouse is ready for use immediately after construction, external and internal decoration and installation of the stove;
- minimum construction period;
- the cost of the finished structure is two times lower than a wooden frame or brickwork;
- absence of harmful chemicals in the production of concrete blocks and, as a result, absence of unpleasant odors;
- low weight of the material, allowing for easy masonry and the use of the simplest foundation;
- has high heat-repellent qualities;
- are not subject to the growth of mold, mildew or other microorganisms;
- The thickness of the walls is good because you can use just one block at a time, this will be enough to create a warm, comfortable room.
But there is often a fly in the ointment. Therefore, we note the disadvantages:
- If the blocks are not treated with a special hydrophobic solution, they can easily absorb moisture. In winter, even with double insulation, it can freeze and ruin the walls of the bathhouse. The structure may simply crumble.
- When using concrete blocks in such a building with high thermal parameters, the problem of condensation on the walls arises.
What you should immediately consider
Everyone’s needs are different, so it’s worth starting to design a bathhouse with a steam room, sink, relaxation room, bathroom, terrace, swimming pool, etc., with how exactly you are going to use this bathhouse in the future.
The second point is what the climatic conditions are like where your bathhouse will be - there are specifics for areas with particularly harsh winters, for example.
The third point is what opportunities you have, from budget to the geology of the site.
And if there is certainty at least on the points:
- number of persons;
- frequency and seasonality of use;
- type of bath (Russian or Finnish, iron or brick stove);
- wall material (logs, beams, bricks, blocks, frame);
- dimensions of a geologically suitable area;
- allowable costs,
- then you can start designing.
We will show you options for what a bathhouse can look like given certain given dimensions - these are not the only options for plans, you can build on them and make any necessary adjustments.
Let's put it this way: our article is for those who have already figured out in their minds what size of bath they are expecting and would like to get acquainted with ready-made plans so that in the end they can either choose a ready-made one or make their own based on the existing ones.
IMPORTANT! When looking at the plans, take into account the fact that we did not take into account the thickness of the walls and insulation, and this can significantly reduce the area of the room from the inside. Therefore, calculate in advance the thickness of the walls and the insulation cake, and then subtract it from your plan (or, conversely, add it if you want to maintain the dimension inside)
Roof
There are two options: gable or single slope. For a bathhouse measuring 3x3, you can use the simplest option - a lean-to slope.
Installation of pitched roofs
If you choose this option, then you need to do the ceiling right away. For a bathhouse, it must be insulated; you can choose mineral wool (much more expensive and more complex) or polystyrene foam (cheaper and faster). Let's focus on a simple option - foam insulation. It is not afraid of moisture, and there is no need to use various steam and water barriers.
Foam insulation
Characteristics of foam plastic
Prices for foam insulation
PSB foam insulation
Insulation needs to be installed in several stages:
- nail edged boards to the ceiling beams from below, 20 mm thick is sufficient;
- lay foam boards on them. Place them as tightly as possible, avoid gaps. Polystyrene foam can be cut perfectly with a special carpenter's knife under a ruler. During the marking period, provide dimensions 1÷1.5 cm larger - the foam will shrink during installation, the insulation will become airtight;
- Lay any boards on top of the beams, these can be various sections, slabs, etc. The main requirement for them is to withstand the weight of people during the installation of the roof. Once the roofing work is completed, no one will walk on the roof anymore.
Ceiling insulation with foam plastic
If the roof is gable, then make a temporary ceiling, and insulation can be done later. Is everything ready? Great, let's build a roof.
| №№ | Illustration | Description and explanations |
| Step 1. | Check the vertical position and dimensions of the top crown. The dimensions are normal - excellent, there are significant horizontal deviations - no problem, we will level the horizontality with rafters. | |
| Step 2. | Determine the angle of inclination of the slope. We recommend an inclination angle of approximately 20°. Another important point is which direction the rainwater will flow, take into account the features of the site, the location of the entrance doors and the features of existing buildings. | |
| Step 3. | Place a stop for the rafters at the calculated height. It’s simple to do - install vertical supports from beams of a given height, place a horizontal beam on them. The distance between the supports is approximately 1.5 meters. The structure can be assembled without cuts; it is enough to use metal corners and self-tapping screws. In order for the stop to withstand angular forces, secure it with corner boards to the floor beams. | |
| Step 4. | Measure the length of the rafters taking into account the overhang. For our case, 3.2 meters is enough. For rafters, use 50x100 mm boards; for a 3x3 meter bathhouse, 6 pieces are enough. | |
| Step 5. | Install the outer rafters, stretch a rope between them and lay all the rest along it. To secure it to the beams, it’s safer to make notches; if you don’t have the desire or skill, use metal corners. | |
| Step 6. | Ondulin | For the roofing we chose ondulin - one of the cheapest and fairly high-quality materials. You should not use various advertised hydrobarriers. Firstly, if you install the roofing material correctly, there will be no leaks. Secondly, if they exist, then no barriers will help: they will sag under the weight of the water and tear over time. |
| Step 7 | Lathing. Ondulin is in many ways similar to ordinary asbestos slate, the difference is that it has less physical characteristics in terms of the perception of vertical forces. This means that the sheathing should be laid more often; each sheet of ondulin should rest on four slats. The distance between the slats is 35÷40 cm. Instead of slats, you can use narrow unedged boards; they are almost the same in cost, but when nailing ondulin, there is less chance that the nail will “go nowhere.” | |
| Step 8 | Ondulin fastening | Carefully align the first row, do not rush the sheets to arrive immediately; for beginners, it is advisable to lay out the entire row and check its position, and only then pick up a hammer and nails. Ondulin can be fastened with ordinary slate nails; fixation is carried out in the upper wave. The lower the slope angle, the greater the overlap of sheets should be. In our case, the sheets should overlap by about ten centimeters. Be careful not to overdo it with driving force, so as not to damage the wave. If you wish, install a drainage system. |
| Step 9 | Fill up the spaces between the rafters and the wall of the bathhouse on the side of the elevation of the slope with boards, install wind boards. |
That's it, urgent work is done, the log house can be left for the winter. During this time, the bathhouse will shrink and the relative humidity will stabilize to natural values. If you want to wash faster in your own bathhouse, continue construction work.
Choosing a site for the construction of a bath complex
Step-by-step instructions for building a bathhouse at the initial stage involve selecting a place for work and preparing a construction site.
The ideal option is to select a location for the construction of a bathhouse at the stage of planning the placement of objects on a private plot of land. Very often, if there is a small area, the bathhouse complex has to be combined with some outbuildings, for example, a toilet and a summer kitchen. In some cases, a bathhouse is combined with a residential building. Bath complexes of this type are quite complex, and their development requires the involvement of professional designers of residential buildings. When designing a structure and determining the location for its construction, it is necessary to take into account some natural factors that influence both the choice of location of the construction site and the layout of the bathhouse complex:
- groundwater level;
- identification of areas that are flooded during floods;
- location of a natural reservoir;
- prevailing wind direction and precipitation patterns;
The level of groundwater is easy to determine on your own. For this purpose, you should dig holes at least a meter deep in the corners of the construction site and, after some time, check whether water has appeared in them or not. The level of groundwater affects the choice of the type of foundation for the construction of a bathhouse complex.
Building on a hill allows you to avoid flooding during floods. The distance to a natural reservoir should not be less than 15 m, and in the absence of an elevated area, the distance to the reservoir should be at least 30 m.
In the process of selecting a site for construction, it should be ensured that the distance to the site boundary from the construction site should be at least a meter. In addition, the bathhouse construction site should be located at a distance of 15 m from existing buildings.
Important points
Before starting all construction work, the design of a 3x4 frame bathhouse (and any other as well) must contain a number of technological and construction solutions.
- Thermal insulation. High-quality measures for sealing and insulating the bath will guarantee good air exchange. For these works, fiberglass or mineral wool is most often used, because they have excellent characteristics;
- Vapor barrier. The main disadvantage of frame construction is the appearance of condensation. This is explained by the fact that moisture penetrates into the frame through cracks during rains and snowfalls. Therefore, in order to avoid such a phenomenon, you need to carry out this stage of work well.
A good solution would be to use a vapor barrier film or glassine; they are placed between the layer of inner cladding and insulation. Experts do not recommend using roofing material, since when heated it emits an unpleasant odor;
Choosing the right wood. Only good dried boards are suitable for construction work. Aspen, larch and linden are ideal for these tasks.
They have a low thermal conductivity and are almost not deformed. The lining itself must be without flaws and of the highest quality.
Foiled mineral wool
Interior decoration
Despite the many trends in the design of modern baths, the most popular is still the traditional decoration in the Russian style with ordinary benches in the steam room and traditional bath utensils.
In the classic version, the Russian bath has three main zones:
- dressing room or dressing room;
- washing compartment;
- steam room
In this case, the washing room and steam room can be combined, and the dressing room is divided into a relaxation room and a separate locker room.
By choosing an antique design for decoration, you can bring wooden utensils (ladles, tubs, tubs) into the interior of your bathhouse, purchase bath furniture with carvings or forging elements, decorate the walls and ceiling with bundles of brooms and aromatic herbs. Textile accessories can include weaving and embroidery.
For those who want to use modern finishing materials, such as ceramic tiles or chrome faucets, in the design of a Russian bath, you should remember that all elements must be in harmony with the overall design line
Remember that it is extremely important to choose the best combination of simplicity and modern design elements to introduce a casual touch of bad taste into the interior
Lighting is also important: it should be warm and subdued, emphasizing the intimacy and tranquility of the atmosphere - first of all, this rule applies to lighting in the steam room. To diffuse bright light, you can use special filters
Making the foundation
Strip foundation Next, you can begin making the foundation of the building. A bathhouse made of wooden beams has a relatively light weight, and therefore in this case several foundation options can be used.
- Shallow strip foundation. It has good load-bearing properties and is quite simple to manufacture. Does not require the mandatory use of technology. Among other things, this option is quite economical.
- Columnar foundation. Like the previous option, it is quite simple to manufacture and affordable, and is also less prone to deformation due to soil displacements.
It is necessary to decide which of the options to use in a particular case individually, but since the context implies independent performance of work without the use of special equipment, the first option will probably be easier. To do this, first a trench is dug inside the marked perimeter, after which a sand cushion is poured onto its bottom, and then the formwork is assembled. Reinforcing strapping is performed inside the formwork, then the foundation itself is poured.