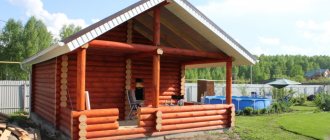
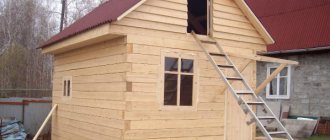
Having your own bathhouse is the dream of many. But not everyone can afford to build a spacious 8 by 8 bathhouse. Even if your site or budget does not allow you to implement such a project, do not despair, a small bathhouse can also be functional and convenient. If you cannot boast of a large territory and have a modest budget, pay attention to the 5 by 5 bathhouse project.
The design of a 5x5 m bathhouse is small, but in a bathhouse of this size there is enough space to accommodate all the rooms necessary for a comfortable stay.
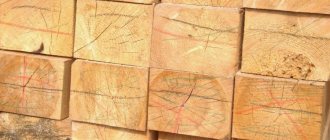
Material advantage
- lighter than logs;
- easier to install;
- minimal shrinkage;
- affordable price;
- easy calculation of the amount of material needed so as not to purchase too much.
For example, if you have a bathhouse made of timber 150 by 150 mm, the volume of material with a standard length of 6 m is equal to: 0.15 * 0.15 * 6 = 0.135 m3, and in 1 m3 = 7.41 pcs.
If you need a 5x5 sauna:
- 5 * 5 * 3 = 75 m3 - the total volume of the building.
- 75: 7.41 = 10.12 m3 – total volume of timber.
Taking into account window blocks and doorways - 9-10 m3.
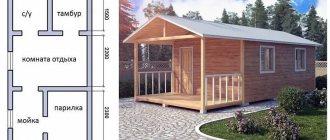
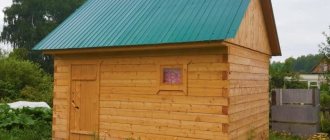
Layout of a 5 by 5 bathhouse for a summer cottage
Advantages of a bathhouse with separate sink and steam room
Recently, the popularity of the bathhouse has only increased. And no wonder: after all, the usefulness of bath procedures has already been scientifically proven. Let's consider what benefits a visit to this relaxation and hygienic establishment gives us.
The bath helps to strengthen the body. Moreover, she carries out this hardening in a soft and gentle way, while simultaneously strengthening the body and protecting it from diseases.
The sauna is an ideal means of preventing and treating colds. Many have experienced this beneficial effect when, when a cold begins, a visit to the bathhouse quickly gets you back on your feet.
Bath procedures remove toxins from the body. This helps to cleanse all the internal organs, the skin, and even the eyes begin to shine brighter. Such gentle and effective cleaning greatly increases the external attractiveness, eliminates ailments, and prolongs life.
The bathhouse has many more wonderful advantages: you will feel them fully as soon as you build this essential outbuilding on your own site. And here’s what a project for a bath house made of rounded logs looks like, and how to build it. This information will help you understand.
The video shows how a 3x5 bath is made:
Foundation
The reliability of the foundation is the key to the durability of the building. When building a foundation for a 5 by 5 bathhouse, you must adhere to the basic rules, and not think that the larger it is, the better. Particular attention should be paid to waterproofing, which will not allow moisture from below to penetrate the wood and quickly destroy it.
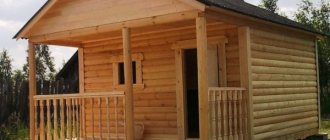
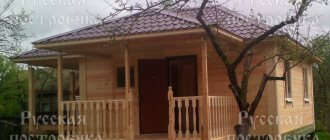
Layout of a 5x5 bathhouse with a veranda
Varieties
Each type of foundation depends on the soil at the construction site, the size and weight of the building. It does not have to be deep; for example, on heaving soils it is usually shallow.
Selection factors
- natural conditions;
- maximum load;
- soil freezing depth;
- groundwater;
- soil density and type.
Wrong choice of foundation will lead to distortion of the walls, deformation and destruction of the building.
Bathhouse plan 5 by 5 with a large relaxation room
Attention! The weakest foundation structure is made of brick, where even the densest reinforcement will not help. The concrete base deteriorates more slowly, but cracks and fractures may appear in it.
Depth device
For a bathhouse from timber, you can make a recessed base and a shallow base. If previously it was customary for wooden buildings to install a foundation whose base would be below the level of soil freezing in a given area, now it has been decided that this is impractical, since a wooden building does not have much weight.
In addition, the cost of a buried foundation is higher, which is what made the shallow-depth option the leader.
Bath plan 5x5 made of wooden beams
Construction type
- Columnar is an inexpensive base option. When constructing it, concrete blocks are most often used, which are installed at the corners of the building and under massive partition walls. The distance between the pillars is up to 1.5-2 meters.
The fastest option is from asbestos-cement pipes:
- drill holes in the ground;
- install pipes in them;
- pour concrete into them.
- Tape - the most common, strong and durable, located along the perimeter of the future building and along the line of partitions. During construction, reinforced concrete is used, where a reinforcement frame is installed in the center of the foundation to strengthen the structure.
- Pile is a good solution for swampy and unstable soils. Piles are driven into the soil to a depth below the freezing point of the soil. Then a reinforced concrete frame is made around the perimeter.
High bathhouse 5 by 6 by 5 for a suburban area
Construction stages
The first thing you need to do is to choose an area for construction, taking into account all the norms for distance from fences, houses and buildings. Construction consists of several stages.
Foundation
Installation of the foundation is the first stage; this construction is quite light, so it does not require monolithic slabs, just choose a strip or screw type. A pit for water is dug under it.
In addition, the tape type retains heat better; you can create a cellar.
Construction of the structure
After the foundation has settled, you can begin to form the walls. The frame is installed, logs or gas blocks are assembled - depending on what material the construction is planned from.
Thermal insulation and antiseptics
Thermal insulation material is located between the crowns and between the boards. The wood must be treated with compounds that prevent rotting and mold.
Floor
Floor installation must be carried out taking into account the necessary waterproofing. Roofing felt, beams, and boards are used.
The finishing coating is usually made from tongue and groove boards. In a bathhouse made of aerated concrete, the floor can also be tiled.
Ceiling
It will be exposed to steam, so it is important to design it correctly. First, the beams are installed, the boards on top must be lined with polyethylene from the inside with an allowance on the sides for better waterproofing.
The beams are lined with insulation. To isolate the steam, a layer of foil is needed, then the planks and tongue and groove board are nailed.
Roof
It can be one- or two-slope; the first option is budget-friendly, but not very practical.
The outer covering is most often made of metal tiles.
Interior work
The walls are sheathed in this way: planks are attached, then a layer of insulation, a layer of foil, and a top layer of boards. After this, the stove is equipped and the furniture is installed.
Waterproofing device
Below are instructions for installing it.
- Apply melted bitumen on top of the foundation plinth.
- Place a strip of roofing felt on top.
- Apply a second layer of bitumen after the first has cooled.
- Place the 2nd layer of roofing felt.
What does a 2 by 5 by 5 bathhouse look like in cross section?
Sauna stoves with separate firebox, sink, steam room
Above, we have already tried to briefly tell the reader that an increase in the size of the bathhouse inevitably leads to the need to resolve the issue of heating the premises in addition to the steam room.
You can find out how the furnace power is calculated for the known cubic capacity of a steam room here. However, we are talking about adequate heating of a steam room.
If you take the firebox into the rest room, where it will serve as a fireplace, some of the heat will be transferred to the rest room. Whether this will be enough can only be determined empirically, because the specific temperature outside the window, the power of the stove, and the cubic capacity of the rest room all matter.
But we also have a soap one - what to do with it? You can remove one of the sides of the stove, but this is usually done with brick stoves, although you can experiment with the brick lining of a metal stove.
Another option for heating a soap bar is to move the tank that heats the stove into the washing room, then the tank will act as a radiator.
Another option is heaters or underfloor heating. You don't spend much time in the bathhouse, so running heaters won't break the bank.
You can also transfer the heating of hot water to radiators, that is, create an autonomous heating system in the bathhouse, but you need to remember that heating the water takes heat away from the stove, so its power drops. But there is still summer when heating is not needed.
Therefore, the stove should be such that you can regulate its power. This is realistic for gas and electric stoves, but you will have to tinker with wood stoves, including brick ones.
If you are interested in what kind of sauna stoves there are - Russian or Finnish - look through our section dedicated to stoves. There is a lot of useful information about stoves for saunas with a separate firebox, sink, steam room...
Wall installation
Advice: never tightly fit elements of wooden buildings. Drying the wood will reduce the height of the timber, so the bathhouse may warp if you do not leave gaps.
- Prepare slats 15 mm thick so as to cover the foundation with them in increments of 250-300 mm. They will additionally protect the timber from rotting.
- Install the crown beam on top.
- Fill the free space between it and the slats with mounting foam.
- Make sure that the crown has a horizontal surface before finally securing it. Use a building level.
- Secure the beams together with steel brackets from the outside. After construction, bathhouses are usually removed.
The crown beam is usually not fixed, since after the walls are installed, the weight of the building will guarantee its stability on the foundation. This will especially help when it needs to be replaced after a while.
- Lay insulation, for example, flax jute, on top of the crown beam.
Laying the remaining beams
- Prepare a beam with a cross section of 150 by 150 mm.
- Install and secure the second crown. Use metal pins or wooden dowels for this. In the first case, it is necessary to prepare unloading holes in the timber according to the diameter of the pins.
- Do not secure the 2 upper crowns, as they will have to be removed to install the ceiling beams after the frame shrinks.
Beam connection
Butt-butt
In this case, the beams are connected end to end, with the connecting seam overlapped by the next one. The reliability of the method depends on a perfectly flat end surface, which must be sawn off strictly at a right angle. Heat loss with this option will be high, even with a fairly tight connection.
Warm corner
Such a connection is also called “root tenon”, when a special groove is made in the end part of one beam, and a vertical tenon is made in the end of the other. You can also make several vertical spikes, this knitting is called “double or triple slotted spike”.
Advice: be sure to use inter-crown insulation for a bathhouse, which increases the joint density and thermal insulation of the log house.
Two-story bathhouse 2 by 5 by 2 by 5
Intercrown insulation
The best choice is flax-jute fabric. It is sold in rolls of different sizes and can be easily cut into strips. Thanks to the installation of this insulation during the construction process, after shrinkage the walls become a solid monolith.
Connect the crowns of the log house to each other at the corners and along the perimeter with wooden dowels. It is advisable that they be made of hard wood, such as larch.
How to make a dowel
- Prepare a board 25 mm thick.
- Cut it into bars of the required length.
- Remove sharp corners from the sides, giving the bars a rounded shape.
You can also use ready-made cuttings from brooms and rakes, which can simply be cut to size.
How to connect timber with dowels
- Drill through the top beam and halfway through the bottom.
- Remove the top beam.
- Drive the dowel into the bottom beam with light blows of a hammer until it stops.
- Put insulation.
- Return the top beam to its place by placing it on the dowels.
Window and door frames
Install the door block on a row of frames at floor level. To level it vertically and horizontally, use a plumb line and a building level, then secure it in the opening. The window block is installed in the same way at a predetermined height.
Tip: leave a gap of 80 mm or more above the door and window units, filling it with insulation. It is necessary for subsequent shrinkage of the material.
Interior arrangement
A logical and correct solution would be to place a mini-locker room at the entrance to the steam room, since entering common areas in shoes and clothes is unhygienic and not entirely correct. Considering that when entering the bathhouse people need to put on suitable clothes or wrap themselves in a sheet, it is necessary to make a separate place where all this will be stored. This could be a shelf or a small cabinet. Next, we decorate the dressing room; there may be a table for tea parties and a small billiard table. Near the steam room there is a swimming pool or sink, which will allow you to refresh yourself after the bath procedures.
Washing
Here you can place a shower, a basin and a washbasin. These attributes are mandatory for those who care about hygiene. The main thing is to arrange them correctly so that they are comfortable to use, and also to make the interior look more aesthetically pleasing and pleasing to the eye.
It is necessary to remember the requirements for coatings. They must be resistant to moisture and high temperatures.
Steam room
For a comfortable stay in it, you should make niches on which you can sit. Most often they are made in the form of steps. This way you can create an interesting decorative element and increase the capacity of the room. Even if the steam room is small, many people can be in it at the same time. Heating sources (firewood, stones, mixtures that allow the room to reach the desired temperature) are installed in some far corner. Such items must be placed on a heat-resistant surface. This is required by safety regulations. Niches can be placed above the wall. In the middle there is a wooden stand, which allows you to exit the steam room comfortably.
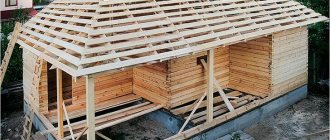
Roof
- Place wooden beams horizontally on the top frame of the walls.
- Install rafters on them every 1 m. They should be flush at the roof ridge.
- Place roll boards on the rafters or make slate sheathing.
- Cover the ridge with galvanized iron.
- Cover the gables with boards or siding.
The final stage of construction is insulating the bathhouse. Use non-flammable materials, such as mineral wool, after protecting them from moisture.
Possible extensions
Additional buildings can be open or closed. In the first case, they are created for relaxation in the summer, but the second option is used when there is a desire to increase the area of the bathhouse by creating new rooms. But at the same time, the construction of extensions can be a continuation of the bathhouse or done in the form of a major reconstruction with the demolition of part or the entire wall.
Extensions for the bathhouse can be a gazebo, terrace, summer kitchen, vestibule, or dressing room.
As a rule, such buildings are postponed until better times. For open extensions, wood is most often used, as it has a more presentable appearance and does not require external finishing. But for indoor spaces, you can take any material at your discretion. But do not forget that capital extensions are built on a foundation.