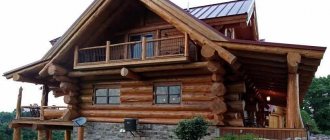
Log bathhouse in paw
“A paw is the end of a log that has been processed into five edges..., or a wife when you need to take time off for an overnight fishing trip” (author)
Hello to all blog visitors!
A log house in the paw is also called a “clean corner” and “a log house with corners without residues.” People quite aptly give images of technology in the corners of a house or a bathhouse chopped with an ax. It is the corners that are the most difficult process, requiring careful adjustment.
Even small deviations of the cutting in the paw create consequences, the most serious of which are the blowing of the corners and the violation of their verticality (i.e. the bathhouse will be lopsided). We will leave detailed questions about how to cut a log house to people who are professionally trained, and the topic of today’s conversation is insulating the corners of a log house in the paw.
Peculiarities
Logging in the paw is most often used in the construction of wooden houses than other types.
This can be explained by its advantages such as:
- an even and smooth corner of the structure without parts of the logs protruding forward;
- attractiveness and aesthetics of the building;
- convenience when decorating the exterior of the house (for example, when covering with siding);
- the log is used to its entire useful length, which means that the material is consumed as economically and efficiently as possible, which reduces the cost of the work process itself.
However, with all its advantages, this method is not without some disadvantages, namely:
- the construction of walls that meet the necessary heat consumption requirements is unlikely;
- the stability of such a building leaves much to be desired;
- the work is delicate, almost like jewelry, it is difficult to perform without special knowledge, experience and skills, and the slightest mistake can lead to the walls “floating” over time;
- Possible cracking and drying out of corners.
When erecting a log house in a paw, it does not hurt to resort to the help of special technical documentation - GOST 30974-2002. It clearly states what joint sizes are recommended for logs of a particular diameter.
Felling stages
High-quality assembly of a log house using the methods listed above is a rather lengthy and painstaking process, even for experienced woodcutters. There is a certain sequence for carrying out work that cannot be violated.
The log house should be cut in accordance with the list of steps given below.
- The first step is to prepare the log for subsequent felling. It can be simply debarked or scraped. Assembly can be carried out either from dry material or from round timber with natural moisture. In the latter case, you will have to give the finished log house time to shrink; the period can range from 6 to 36 months, depending on the diameter of the logs and weather conditions.
- Next, blanks are prepared from future logs of the lower crown, trimming their ends on both sides. The peculiarity is that the depth of the cut surface must be equal to its width. Next, the remaining two sides are trimmed in the same way, obtaining an exact square in cross-section.
- Markings are applied to the resulting blanks to obtain the desired shape. The location of the points depends on the chosen chopping method. The marked places are cut off, obtaining a finished framed log. This is how the required number of blanks for the first crown is processed. It is worth noting that the first crown does not require notching from the bottom, while the remaining logs of the log house will need to be processed from above and below, obtaining the required connecting element.
- Based on the sample of the first full log of the wall, a plywood template is made to facilitate further work. This will help avoid constant measurements and prevent possible errors when cutting logs under the corner joint.
Connection in paw without residue
A log house in a paw is called a joint without a residue; the technology is most often used for the construction of buildings from solid timber. Fastening in the corners is provided by end locks; the edges of the masonry do not protrude beyond the walls. Basic chopping methods:
- Half-tree connection. The ends are cut in half in a horizontal plane and overlapped at an angle of 90 degrees. This technology is the simplest; experts recommend laying the lower crown on the foundation in this way;
- Joining timber into a groove. The lock is formed by a straight tenon installed in a groove. When processing a workpiece, the end is divided into four parts, and a tenon or groove is cut out of the two middle parts.
A more complex way of placing the corners of a log house into a claw is the dovetail lock; a reliable connection is ensured by a tenon of an original trapezoidal shape. The operation of marking paws into a dovetail is more complex and requires special skills.
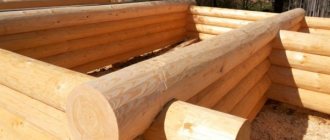
Warm corner
The “warm corner” technology involves assembling the corners of the house without outlets. To make an angular connection of the log frame elements, tenons are cut out in even-numbered crowns, and grooves of the appropriate size are cut out in odd-numbered ones. The joints are alternated with bandaging, this ensures the rigidity of the structure. To seal tongue-and-groove joints, a fibrous material is used, preferably jute.
Depending on the shape of the tenon, the type of connection may be called “dovetail” or “half-dovetail”. The groove should repeat the geometry of the tenon as much as possible and fit it in size so that the corners are not blown out.
The “warm corner” technology has a number of advantages:
- economical timber consumption;
- laconic, modern outlines of the house;
- the ability to additionally insulate corners from the outside;
- the opportunity to sheathe the outside of the house with modern materials and install external insulation.
Seal problem
Angle thermogram
Let us immediately emphasize that the problem of thermal insulation of crown joints is by no means new and has been successfully solved by builders over the past millennia. All modern techniques are simply the replacement of archaic building materials with their modern analogues.
Despite the fact that during shrinkage the entire frame is deformed, the main channel of heat loss is still the corner joints, so finishing the corners of the frame is often considered as a separately paid operation.
Let's consider what methods exist for insulating corners, and how you can sew up roof joints.
Re-caulking
A more modern version of caulking involves the use of jute ropes and ropes, which significantly speeds up the process, but reduces the reliability of holding the insulation in the gap.
Creating wedge joints
This method is applicable only at the construction stage. It consists in a more careful implementation of the joints between the crowns, the locks of which have a wedge-shaped configuration.
Scandinavian-Canadian wedge
The recess inside the log is filled with a sealant with a maximum service life (for example, mineral wool), and the edges are sheathed with a closing sealant.
Polymer sealing
Polymer sealing scheme
The most effective and fastest way to insulate houses made of profiled timber and logs is polymer sealing.
The peculiarity of this technology is that if it is performed correctly, you can forever forget about the consequences of shrinkage, since the seam is filled with an elastic sealant with a high adhesion coefficient.
When the logs shrink and shift, the new seal is deformed but not destroyed.
The only problem with this method is the high price of a sealant that is resistant to climatic factors.
As an alternative, a combined approach is used, when the main volume of the insulated gap is filled with ordinary (that is, inexpensive) acrylic sealant, and the outer protective layer is formed from a stable special composition.
In such cases, the repaired log house can be covered with cladding made of boards, the fixation of which must be carried out taking into account shrinkage displacements.
Wind protection of the facade
Sometimes the deformation of a log house is at such a stage that sealing the joints alone is not enough to normalize the heat balance of the house. In such cases, external wind protection is installed in the form of additional facade cladding.
This design is installed using the “ventilated facade” technology, and a block house or lining is used for external finishing.
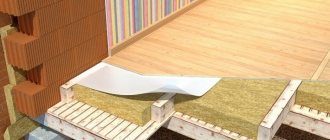
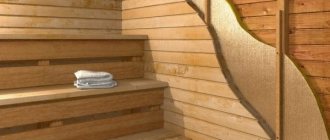
Internal thermal insulation
Any sealant that can be used to seal seams in a wooden house is very critical to large changes in humidity and temperature. Therefore, in baths and saunas, in addition to all the methods listed above, internal thermal and vapor insulation is installed, which can be made either in a standard multi-layer method or using a simplified technology - from penofol.
This approach not only extends the overall period of normal operation of the log house, but also increases the energy efficiency of the house.
will carry out decorative and protective finishing of log and timber houses, including the installation of additional thermal insulation. You can clarify the details of cooperation and calculate the cost of the necessary work using any method of communication published on the “Contacts” page.
Calculate the cost of painting and insulating your home right now
Do you have accurate measurements of the house?
I measured it myself. I have a house design. Measurers came. I want to call a measurer.
By clicking on the button, you consent to the processing of personal data
Painting a wooden staircase - choice of dyes and main stages of work
About technologies for external protection of log houses using natural and mineral oils
Why choose Aquatex wood oil
Review of sealants Zhivitsa for wood
Peculiarities
Regardless of what kind of lumber, timber or logs the house is made of, there are two main ways to connect corners:
- “into the bowl”, after the junction there is a certain piece of log;
- “in the paw”, beams or logs are cut without leaving any residue.
When using this method of cutting corners, a very beautiful form of joint is obtained, which can be decorated in an original way, for example, by painting different elements of the log with contrasting colors.
With a corner connection without any residue, insulation becomes of particular importance, since in this option, the corner remains unprotected and, in the absence of good insulation, allows the cold to pass through.
Typically, this method of cutting a log house is used if the cladding of the log house is planned in the future. Closed corners, chopped without leaving any residue, become warmer and more airtight.
You can cover the pre-caulked corners with a regular board. If you fix the board rigidly, then when the log house settles, the logs may hang and cracks may appear. To avoid this, it is necessary to make a vertical slot 2 cm long in the board and, when screwing it to the corner joint, screw a self-tapping screw into the highest point of the slot.
A board nailed in this way will not interfere with the natural shrinkage of the house. If over time the length of the slot turns out to be insufficient, you can unscrew the screw and screw it again to the top point.
We invite you to find out which moss is best for a log house
After the shrinkage processes are completed, the corners can be sheathed with clapboard or siding. Cladding corner joints chopped into a paw does not cause any particular difficulty, since the corner is cut without leaving any residue, it will not interfere with making the sheathing in the usual way.
In another way, this angle is called “warm”, and this is no coincidence. With this type of cutting, the corners allow less cold to pass through, making the house warmer. But from the outside of the building, the logs protrude outward; often the ends are of unequal length, which does not allow the frame to be installed correctly. The question arises: how to sheathe the corners of a log house in this case?
In some sources you can find advice: gradually cut down the protruding structural elements, and fasten them with staples to strengthen them. However, as a result of sawing off the ends, which are elements of the supporting structure and give strength to the house, the building may lose stability and weaken.
If pins were not installed during construction, then for a weakened structure, even the slightest effort is fraught with destruction. Therefore, you should think carefully before making such a decision.
If the ends are of different lengths, they are filed so that they form an even line. It is quite possible that in this case the frame will recede greatly from the wall, then the dimensions will have to be equalized using thick bars with a section of 50x50 mm.
You can use an alternative option, which involves mounting the frame separately for the wall and separately for the corner. In this case, the corner frame is an independent structural element and is made in four planes. The presence of additional corner elements will increase the consumption of material, but in its finished form such a structure looks very impressive.
Logging in the paw is most often used in the construction of wooden houses than other types.
This can be explained by its advantages such as:
- an even and smooth corner of the structure without parts of the logs protruding forward;
- attractiveness and aesthetics of the building;
- convenience when decorating the exterior of the house (for example, when covering with siding);
- the log is used to its entire useful length, which means that the material is consumed as economically and efficiently as possible, which reduces the cost of the work process itself.
However, with all its advantages, this method is not without some disadvantages, namely:
- the construction of walls that meet the necessary heat consumption requirements is unlikely;
- the stability of such a building leaves much to be desired;
- the work is delicate, almost like jewelry, it is difficult to perform without special knowledge, experience and skills, and the slightest mistake can lead to the walls “floating” over time;
- Possible cracking and drying out of corners.
When erecting a log house in a paw, it does not hurt to resort to the help of special technical documentation - GOST 30974-2002. It clearly states what joint sizes are recommended for logs of a particular diameter.
Modern insulation materials
I’ll say right away that materials with a closed porous structure (foam plastic, polystyrene foam, penoplex, etc.), sprayed polyurethane foams (including polyurethane foam), synthetic sealants (acrylic, silicone, etc.), foamed polyurethane foams (such as foam rubber) – completely unsuitable for insulating log corners. Why? Because they are absolute vapor barriers. Moisture emanating from a house or bathhouse, accumulating in the thickness of the insulation, causes the seam itself to freeze.
Or another case. There is a so-called “warm seam” offered by some sellers as a reliable option. However, if we follow the technology of its installation, we will end up with hermetically sealed seams and the absence of natural ventilation. Inside the heat-insulating tape, moisture vapor from inside the house collects, which means you can expect condensation to appear at the joints and accelerated rotting of the corners. This method is good for insulating double-glazed windows in a concrete house, but not for the corner of a log house.
But practical Finns use a special type of tow, made like double-sided tape. Tow can “play” with compression and expansion in the range from 5 to 15 mm. It allows vapor to pass through, but does not absorb moisture. And there is no need to re-caulk.
There are also well-proven new products made on the basis of jute (ThermoJUTE) and flax (ThermoFLEN). These are specially developed products for insulating wooden buildings and the reviews about them are quite good.
One of the radical ways. The corner is completely covered with foil insulation (foil facing out), or nailed with a furniture stapler. The top is covered with wooden paneling for decoration. Helps. But it looks alien and there is no vapor barrier.
Perhaps that's all. I hope the information will be of benefit to someone.
An anecdote from everyday life: “A wife is washing dishes, seeing a leaking faucet in the kitchen, calls her husband. - Pashka, come here, change the gasket for me! The husband mutters fiercely - well, you're completely lazy. »
Good luck and dry corners to your log houses! Bye! Bye!
Wisdom Quote: He who laughs is not angry, because to laugh means to forgive.
What the appearance of a wooden house will be, first of all, depends on its decoration. Many owners of wooden buildings prefer to sheathe the house with a variety of finishing materials, which at the same time decorate, insulate and protect wooden walls from adverse factors. However, the cladding of a log house has some difficulties, the reason for which is the corner joints of the log house. The corners interfere with the installation of the sheathing, without which it is impossible to frame the house. Finishing the corners of a wooden house outside and inside the room causes the greatest difficulty when carrying out finishing work. How to properly finish corner joints, and how to sheathe corners without damaging the wooden structure? We will talk about this in the article.
What you should not use to insulate a log house.
Insulation with polyurethane foam, mineral wool.
Foaming the cracks of a log house is not the best idea, because... Polyurethane foam does not have sufficient elasticity; when exposed to sunlight, it dries out and falls apart. It’s also not worth laying mineral wool between logs - mineral wool wrinkles under the weight of the logs and shrinks. In addition, soft wool is gyroscopic - it absorbs water from the environment, as a result of which the seam between the logs may freeze through. Due to increased humidity, wood begins to rot. It will be possible to insulate the wall of a wooden house or bathhouse with cotton wool, but not the space between the crowns.
Construction of log houses: main stages and features
Any construction begins with the development of a project for the future home. But if we are talking about construction from chopped logs, then first you should think about what material to use for this.
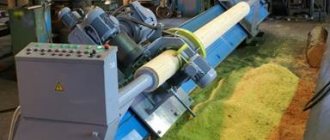
Harvesting and preparation of logs for felling
As a rule, rarely does anyone engage in logging on their own - this is the prerogative of logging and woodworking enterprises that employ professional carpenters - specialists in manual processing, which, as before, is carried out using practically one tool - an ax.
Although stripping is done using a scraper, a sickle-shaped device with which the log is finished.
Modern technologies and tools are used only at the stage when the log house is being assembled - to make longitudinal cuts that ensure a tight fit of the crowns to each other and are a preventive measure against excessive cracking.
Although, many craftsmen fundamentally do not use power tools, such as a power planer, and also do not use saws in their work, since, in their opinion, they destroy the fiber structure, making the wood vulnerable to many negative factors and, above all, moisture.
Special attention is paid to embedded logs, the thickness of which should be greater than the cross-section used for the log house. This feature allows you to protect the house from destruction and makes it easier to install floor joists and lower floors
House design and construction site preparation
Considering the design features of the house, at the design stage it is advisable to turn to specialists. But in order to save money, you can choose a ready-made project, offered in large quantities by specialized construction companies, and adapt it to the conditions of the area, taking into account the geological situation on the site.
Often, developers choose ready-made log houses, which are much easier to assemble on an already prepared foundation. But, when wondering how much it costs to build a 6 by 6 house, you should take into account that the price per square meter of a one-story building will be higher than a two-story building of the same area, since costs are reduced due to the foundation (which, although it should be more powerful, but not much), and also roofing and engineering systems.
But regardless of which building project is chosen, at this stage you should:
- calculate the total weight of the house, according to which you can choose the method of constructing the foundation;
- think through the layout in detail; later it will be impossible to make changes, since the partition in a log house is often tied to the crowns of the outer walls;
- calculate the space for window and door openings, as well as their number;
- choose the type of roof in accordance with the design features of the building;
- develop the sequence and stages of assembling the log house;
- design all engineering communications.
An important issue is the storage of material on the site, which must be provided with appropriate conditions. As a rule, for this purpose a special canopy is arranged, under which logs are laid with the obligatory relaying of thin wooden blocks, 4-6 cm thick.
Foundation structure
Despite the fact that the weight of a chopped log is greater than, for example, timber, there is no need for a powerful foundation
But it is important that the foundation of the house is reliable and stable so that the shrinkage of the log frame occurs evenly
Of course, the type of foundation is also influenced by the geological conditions of the site, but still, the most popular are columnar, pile foundations, as well as a monolithic slab.
But if it is planned to build a basement under the house, then a monolithic or prefabricated strip foundation is installed.
After the foundation for the log house is ready, it is necessary to waterproof it using roofing felt, mastics and other materials.
This is necessary to protect the first crown from moisture, and as a result, the entire house from premature destruction.
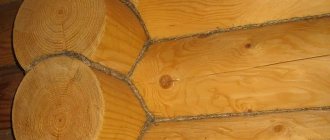
Minuses
- The most important flaw is the drafty corners of the house or bathhouse due to the short edges of the logs. Additional insulation of the corners with thermal insulation materials helps to retain heat in the room. For additional insulation, it is recommended to cover them with corner boards.
- The compounds tend to dry out over time, which naturally results in the appearance of cracks and cracks. To prevent this from happening, the log house must be regularly wedged.
- If the size of the logs is selected incorrectly, blowouts may occur in a couple of years, which cannot be eliminated even with the help of an expensive sealant. This is a minus of all log houses, but in this case it is more pronounced.
- Compared to cutting into a bowl, the period of operation of such a house or bathhouse is shorter. If you take a responsible approach to the issue of finishing and insulation (especially corners), you can extend the period of trouble-free use of your home. Otherwise, the destruction of the wood structure will lead to a gradual loss of structural stability.
- Difficulty in building a house, bathhouse and other structure. It is unlikely that you will be able to do all the work yourself. A “Canadian bowl” log house is easier to create, and the result as a reliable and durable structure is guaranteed.
When cutting into a paw, it is important not only to select a forest of the same diameter, but also to carefully adjust all the crowns, corners and joints. Even small errors can subsequently lead to blowouts and the bevel of a house or bathhouse
- For the lower crown, which will be laid on the foundation, it is worth selecting dense and thick wood. During the preparation process, the logs are given the correct shape, for which one side is trimmed using a plane. It will serve as the inner part. When processing the edges, the tree must be cut to 1.5 diameters. The final shape is square or rectangular.
- Before making a log house, the ends of the logs are marked. Marking begins with a log that has the smallest diameter in the upper cut. Based on the parameters of the paw of a given log, the ends of other logs are marked. Defects in marking the paws violate the vertical position of the corners and their airtightness.
- The edging, which will be located on the inside, is completely trimmed. From the outside it is trimmed to a length equal to 1.5 - 2 times the diameter of the log. The remaining edges are processed to a length slightly exceeding the diameter of the wood.
- The log house is assembled from the frame crown. Two logs are laid parallel. Parameters are measured using a level. Then two more logs are laid perpendicularly and marking begins.
- The logs in the log house are placed with their butts in opposite directions, while maintaining a clear horizontal position in each row. Insulating material (moss, tow, jute, etc.) is laid along the entire length of the log. The log house is connected by means of a block of wood, the blows of which allow the logs to be placed with the closest possible fit to each other. The log house, lined with insulating material, must be left for some time to dry and shrink, after which you can begin final caulking, sanding and finishing with purchased materials.
To assemble a log house, bathhouse and other structure, a beginner will need:
- chainsaw;
- axe;
- hammer;
- caulking tools;
- level or rope;
- marker;
- square;
- measuring instruments.
Before starting work, it is recommended to make a sketch and calculate the amount of material required.
How to chop?
Building a house from logs with your own hands is not such a difficult task. The main thing is to prepare the materials correctly, follow certain rules, observe all the subtleties of this process, and then cutting itself becomes a fairly easy task.
The finishing of the corners is no less important. Any technology can be used here, the main thing is to protect the house from wind and cold, which can penetrate through loosely fitting elements or cracks in cracked corner joints.
From the outside, corners can be covered with siding, artificial stone, natural or pseudo-brickwork. The inside of the joint can be sewn up with the same clapboard. Another thing is that a house made of logs is aesthetically pleasing in itself, it is a real classic of its kind, and covering it with clapboard or, even worse, siding means destroying the very image of a log house.
For this purpose, it is better to use coniferous wood. Important indicators are natural humidity, the time when the tree was cut down (preferably in winter), the place of growth (optimally - northern regions). Pine is well suited for construction (its cost is lower); larch or cedar are also often used (these species are more expensive, but they have higher strength and a longer service life).
The assembly itself includes several main steps.
- Preparation of blanks. The top and bottom are hewn to a depth equal to the width of the workpieces. The appearance of the workpieces should be in the shape of a parallelogram, turned towards the master with the side that has a square cross-section.
- The parallelogram is divided from the end into eight horizontal components.
- Next you need to place the necessary points on the plane. The location of the points depends on the selected paw type.
- They indicate future challenges. Lines are drawn from them at an angle, which depends on the location of the intersections.
- Excess material is cut off and the connection elements are hewn out.
- A template is made on plywood or thick cardboard along the first joint, which will serve as a sample.
It is recommended to apply a special protective compound to the prepared blanks, which will reduce the risk of rot, protect against parasites, and increase the fire resistance of the entire building. In addition to protection, it is necessary to provide additional insulation of the log house.
To avoid the “spreading” of the paws during operation, the joints of the logs on the inside are equipped with a special spike, which reliably fastens the upper and lower logs.
Before proceeding directly to the assembly, the foundation is poured. A log house does not have a very large mass, so it is quite acceptable to use a columnar or shallow foundation strip.
Thicker logs go to the lower crown. They are laid directly on the foundation strip, laid with roofing felt or unloading board, the thickness of which is fifty-five millimeters.
Before you begin laying the next crown, you need to make a special semicircular groove on the logs along the entire length of the log. To do this, one log is laid on top of another, and, using a carpenter's line, a line is drawn on the overlying log parallel to the underlying one.
Next, the top log is removed, turned over, and a groove is selected in it. Once the sampling is completed, the log is re-laid on top and tapped along its entire length. The purpose of this operation is to determine how well the sampling was done and how tightly the logs are connected to each other. If everything is in order, the groove is made with high quality, the connection is laid with insulation (tow, jute, moss), and the log with the groove is finally installed in place. And so - with each log of the upper tier.
Types of log cutting
When constructing a log house from timber into a paw, a unified technology is used. First of all, the so-called casing crown is laid on a previously prepared foundation. Grooves are cut at the ends of the logs, the shape of which may vary.
The crowns are fixed using two types of spikes:
- plug-in, straight, which is simpler, in which holes are cut into which pegs are driven, usually with a diameter of up to 40 mm;
- root, protrusions in the log itself, more difficult, but more reliable.
There should be no gaps when assembling the structure. It is mandatory to insulate the log house into the foot.
There are a number of technologies for connecting the corners of crowns without leaving any residue. The two most widely used are:
- straight paw in the shape of a rectangle;
- oblique paw, also known as a dovetail in the shape of a cone.
Both options allow the use of root tenons; these methods are called straight paw with undercut and dovetail with undercut. Other options are less common.
At this stage of the work process, it is important to process the log in such a way as to obtain identical dimensions of the logs at its ends. Process subsequent logs according to the measurements of the first
GOST 30974-02 will come to the rescue, which clearly sets out the established figures for felling in the paw.
For further calculations, we will take a value of 200 mm as the smallest log diameter. Then we proceed according to the scheme:
- determine the central points at the ends using a tape measure;
- markings are made, for which we take a plumb line and draw two vertical lines on the end with small dimensions so that they are symmetrical;
- the distance between the lines must comply with GOST - in this case A = 141 mm;
- then we draw similar lines in the horizontal direction.
After this, begin to lightly trim the irregularities along their circumference, without touching the lines beyond 10-15 mm. Then cut off the humps completely
It is important to know that the horizontal edges of the log must be equal in length to or exceed the maximum diameter of the largest log. Vertical planes should provide optimal plank coverage of the corner and a convenient assembly process
Carry out calculations to divide the vertical edges of the log into 8 identical parts. Draw horizontal lines through them so that they are parallel. Then you need to trim the block to get 2 planes that pass through different horizontal lines. Maintain the slope along the overall horizontal axis of the entire log.
Take the values from the table for the desired diameter, draw verticals on the planes of the blockhead. Next you need to trim along the lines and repeat the procedure for the other end.
Log house in paw
Installation of sheathing: nuances
Layout of sheathing for siding.
The main task of the lathing is to prepare an ideal plane for the subsequent installation of siding. The sheathing slats are installed perpendicular to the direction of the siding panels. The decision to sheathe the house vertically or horizontally must be made at this stage.
For preliminary marking, you will need such necessary tools as a building level, a laser level, or at least a plumb line. It is necessary to make vertical markings along the wall of the house in increments of 30-40 cm. The hangers are attached using the markings. The sheathing will be attached to them.
It is better to assemble the lathing first on one wall, and then move on to the next. Installation begins with setting the slats on the left and right corners of the house “to zero.”
Siding installation diagram without sheathing.
- The first option is using construction cord. The first point of attachment of the cord is selected at the top on one of the fixed slats. The second point is at the same height on the other staff. The third point is selected in the middle of the first staff. The fourth is in the middle of the second rail. The fifth is at the bottom of the first rail and the sixth is at the same height of the second rail. The result will be a zigzag. This is a general approach; you can place the cord attachment points more often. The remaining slats are installed according to the marked level; if adjustment is necessary, you can place blocks of different widths under the slats (if the sheathing is assembled from wooden slats).
- The second option is to use an auxiliary rail. It is attached at the top between the slats installed in the corners. The rest of the sheathing slats are attached to it with a free suspension, opposite the installed brackets. This option is more suitable for installing profile sheathing. After this, all that remains is to carefully attach them to the hangers.
After completing the fastening, the auxiliary rail is removed. The limitations in the use of this method are clear: it can be used if the distance from corner to corner of the wall is not very large, otherwise the auxiliary rail will bend greatly under its weight and the profiles suspended on it. Of course, you can install additional fasteners at one or several points and then dismantle them along with the rail itself.
Upholstery with siding is carried out according to the usual scheme:
- marking the line for attaching the starting profile;
- installation of the starting profile;
- installation of corner profiles;
- fastening J-profiles or trim around window or door openings;
- installation of siding panels;
- installation of the finishing profile;
- installation of gables.
Adviсe
A log house is the most common option for constructing such a building. The assembly process itself takes a little time, especially if all the preparatory work was carried out efficiently.
Although it is possible to build such a house yourself, it is better to consult with an experienced craftsman before starting work. It is necessary to take into account every little detail, because the strength and safety of the new building may depend on it.
Of course, reviews about this cutting method are contradictory. But it is supported not only by its obvious, well-known advantages, but also by the fact that this method is still the most common, despite certain difficulties and disadvantages inherent in it.
A reasonable approach to business, strict adherence to all the necessary rules will help you successfully complete this work and get a warm, cozy, durable and safe log house.
See below for information on how to cut into a paw.
The qualifications of the hewer are of great importance
If a worker who undertakes to build a log house does not handle the hatchet skillfully, gaps on the paw are inevitable and the assembly of the corners itself will have negative consequences. After some time, the tree will dry out, the house will shrink and warp, or even...
The only budget option is to notice in time, insert wedges (cut from wood of the same species) and caulk the cracked areas. This does not guarantee a beautiful exterior, but it will help resist drafts and dampness.
“For accuracy, cut the paw according to the template; if during assembly, something went crooked and with obvious “inconsistencies” - replace the elements. It's stupid to hope for chance. If you don’t react right away, you’ll end up with cracks and distortions, for which you’ll pay with money and nerves.”
Cutting corners with a chainsaw
“Modern technology” of chopping in the paw . Very often, today's “masters” cut their paws with a chainsaw. And here there is a negative point that not many people know about. The saw cuts off the densest “old” wood on four sides. What remains is the core, which is always looser and therefore less durable. In addition, a good carpenter’s ax in the hands of experienced craftsmen “crushes” the rings of wood during cutting, while a chainsaw makes the cut smooth, while opening the pores of the wood.
The result is that the log sections going into the paw lock are open to the atmosphere and are subject to faster rotting. Conclusion: when choosing an ax or a saw, choose an ax. But it’s much more difficult to do the job with this “flying” tool; it will take a long time to get used to it... A chainsaw is without a doubt easier and faster.
Let's move on to the topic of how to insulate a log house, or more precisely, its corners. Without delving into the physics of the processes, I’ll say right away that proper insulation is always done from the outside, that is, from the outside. Moreover, it doesn’t matter what the house is built from (wood, brick, types of concrete, etc.). Any experienced heating engineer will confirm this. Let's move on to reviewing the materials.
Traditional - jute or linen, tow, moss. What to choose? Canvas based on jute or flax in the form of a twisted ribbon began to be used relatively recently. It is easy to install, and its twisted structure ensures strength. In addition, the seam looks aesthetically pleasing.
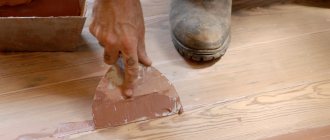
The second stage of insulating the corners of the log house in the paw
For better insulation of the log house, the corners are additionally insulated and sewn up outside and inside the log house. Before starting external insulation, the corner of the log house is leveled using a chainsaw. After this, the corner is treated with protective antiseptics to protect against fungus and mold, as well as for fire protection. After this, four vertical guide posts are mounted on the corner of the log house; to avoid hanging corners, the guides must be mounted on sliding fasteners. Galvanized metal profiles or dry wooden blocks treated with antiseptics are used as guides. After this, linen or jute insulation is placed in the cavity between the guides along the entire length of the corner, after which a windproof membrane is mounted on the corner, all joints of the windbreak and the frame are carefully glued using double-sided adhesive tape.
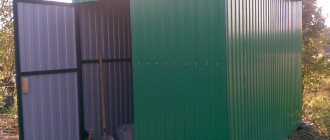
After insulation, the outer corners are sewn up. Most often, imitation timber and logs, as well as dry planed boards, are used to fill corners; less often, unplaned boards, metal or vinyl siding are used.
Our company carries out the following types of work on finishing corners in log houses and bathhouses:
- Caulking of corners in log houses cut into bowls and paws, in log houses made of timber
- Insulation of corners
- Sealing and painting of external and internal corners in log houses with boards, clapboards, imitation timber and logs
Glued laminated timber will save heat
Glued laminated timber itself is a very warm material. In terms of its thermal insulation characteristics, it significantly surpasses other types of construction raw materials common on the market. The thermal conductivity coefficient of wood is 4 times less than that of brickwork. The layers of glue in laminated timber are also good heat insulators.
A guarantee of heat preservation indoors is the use of timber with an Austrian (German) profile. Thanks to its special serrated section, it ideally protects against blowing and eliminates the need to use inter-crown insulation.
However, you still can’t do without insulation completely.
Wet method
Now let’s look at how to properly insulate a house made of timber under decorative plaster or painting.
The preparatory work is the same as for a ventilated facade, with the exception of the lathing - it is not stuffed. Instead, special metal hangers are screwed (nailed) onto the wall (pictured below).
You can buy them or make them yourself from metal 0.7 mm thick. Dimensions 26x6 cm, where 6 cm is the width, 10 + 10 cm for hanging insulation 10 cm thick and 6 cm for the heel. They are fastened with self-tapping screws 51x4.8 mm in such a way that there are 2 hangers per basalt slab. Testing showed that one holder can withstand a load of 16 kg, which is enough for one mat. The second one is stuffed for insurance.
When all preparatory operations have been completed, insulation begins. To do this, the slabs are pressed against the hangers. In places where it touches the metal, marks remain, which are cut right through with a knife. After this, the insulation is mounted on metal holders, and then finally attached to the wall with special dowels (the fastening diagram is shown below in the photo).
Each subsequent mat sits on hangers with an overlap of 0.5-1.0 cm over the previous one (the slabs will stand apart, tightly blocking the connecting seams). The passage of external corners, window and door openings has its own nuances, which can be seen in the work “Technology for insulating walls with basalt wool.”
After insulating the entire area of the façade, the thermal insulation layer is reinforced with fiberglass mesh. Glue - “CERESIT CT190” or plaster-adhesive mixture “EK THERMEX - EK Chemical”. The mesh is glued overlapping, overlapping the previous strip by at least 10 cm, and covered with a 3-millimeter layer of diluted glue on top.
Finishing
Before applying decorative plaster, the facade is treated with a primer. Before painting, the walls are primed and then puttied. The paint should allow the wood to breathe. Therefore, only acrylic options are for outdoor use.
Choosing a material for insulating a house made of timber from the outside
The material used to create the insulation of a timber house from the outside must meet the following qualities: be environmentally friendly, non-flammable and durable. For this purpose, polystyrene foam, mineral wool, foil, polyethylene foam, isoplat, extruded polystyrene foam, inter-crown insulation, sprayed polyurethane foam, SIP panels are used. It is also very effective to insulate walls with penoplex and basalt insulation. They are considered one of the best materials.
Each of them has its own unique features. Before you start insulating your home, you need to become more familiar with the properties of the heat insulator. When selecting, you need to take into account the following characteristics: frost resistance, thermal conductivity, strength, elasticity, thickness of the material and its quality. You also need to take into account the installation conditions necessary to use this type of insulation. Often, when insulating a house, several types of insulation are used simultaneously.
Choose wisely
Jute insulation
Jute or linen fabric. When purchasing, look for insulation made from primary natural fibers of jute and flax. “Which fabric is considered natural? The one that is obtained after primary processing of plants and without third-party additives.”
We noticed that the fibers are very short or contain thread trimmings of a different color - a product made from recycled materials (usually recycled sack containers or rags). Don’t be shy to ask for a certificate, which should indicate the raw materials, the presence of impurities and additives, and most importantly, their proportions (in %).
For information: all jute and linen fabrics are produced using the same technology, which, by and large, has not changed for the last hundred years. Equipment and costs are also comparable. Therefore, a reduction in the price of finished products is possible due to low-quality raw materials (for example, recycled) or due to a decrease in the total mass of raw materials (this means lower density, strength and durability). This will affect the quality parameters of the insulation, and therefore the comfort of life in the future home.
“When there are several options for purchasing jute or linen, do not try to buy cheaper. A low price is usually a sign of unnaturalness or low quality.”
Moss. Moss insulation is perhaps the oldest. The ancestors noticed that, unlike tow, birds do not pluck it for nests. In addition, it is a natural antiseptic, “not friendly” with fungus, does not rot, and rodents and insects do not revere it. But there are three "Don'ts".
- Not all moss is applicable. Preference is given to long-fiber flax (red flax, cuckoo flax, sphagnum).
- Not all builders know how to lay correctly. It is better to attract those who work with him constantly.
- Fragility. Moss dries out over time, turning into dust of little use.
The ideal option is for experienced builders to bring the “necessary” moss and carry out the installation as needed.
Insulating a log house with moss
By the way, it is better not to use moss to insulate the corners of a bathhouse - it easily ignites from high temperatures. Fire-resistant impregnations are not recommended for moss - they reduce its physical qualities. But if you look from the other side, from time immemorial in Rus' bathhouses have been built and insulated this way.
Be sure to impregnate the remaining popular folk insulation materials, namely jute and linen and tow, with fire retardant compounds.
To complete the description of popular natural materials, I will name their main advantages:
- The ability to absorb moisture and dry quickly, depending on the humidity outside and inside the house, i.e. they “breathe” rather than seal;
- Do not form static electrical charges;
- They do not contain any components hazardous to health.
Property of jute
Jute fiber is extracted from the stems of jute, a herbaceous plant belonging to the linden family. The growing area of jute is quite extensive; it is cultivated in Asia, Africa, Australia and America. India is one of the main suppliers of jute to the world market. In this country, jute fibers have been used to make fabrics and clothing since the 18th century.
Jute fibers are less elastic than flax, and the fabric they make is rough and tough, so jute is widely used as a raw material for the manufacture of ropes (twine, ropes) and packaging fabric (burlap).