Recently, there has been a trend to purchase or build real estate made of wood. This is explained, first of all, by the environmental indicators, low cost compared to stone and the speed of construction of houses. Log houses retain heat well and regulate humidity levels.
Scientists have proven that a wall with a thickness of 240 mm is similar in its characteristics to a brick wall, the thickness of which is 1 meter. It is necessary to insulate such a house both inside and outside. Insulating the log house will allow you to achieve the desired level of thermal insulation and save on heating costs in the winter.
Why is it necessary
The main problem with log cabins is drafts. Moreover, this applies not only to old buildings, but also to recently built ones. The market offers a variety of materials, the main purpose of which is to insulate the log house.
It is necessary to take into account the fact that not every one of them is suitable for outdoor work. This is due to the fact that some insulation materials, when in contact with moisture and frost, lose their basic properties and characteristics. That is why special moisture-proof material is used for external insulation of the house.
Insulating a log house from the outside has its drawbacks, which include the complexity of the work and aesthetic qualities.
By the way, it should be noted that if the house is made of rounded logs or beams, then it is best to insulate it from the inside, since with external insulation the appearance of the log will be lost, and the money for expensive processing will be thrown away.
How to insulate external walls
Most often, blocks, bricks, ceramic and concrete stones are used for this. In this case, thermal insulation material must be laid between the wooden wall and the cladding.
As a rule, its outer side should have an air gap. Due to this, excess moisture will be removed from wooden structures. Ventilation ducts are also needed in the structure.
The best interventional insulation, according to experts
Both synthetic and natural materials can cope with the task of insulating a house. They have good thermal insulation characteristics. But we shouldn’t forget why many people build wooden houses. The main criterion for choosing this building material is its naturalness. So why ruin the whole eco-friendly picture of the house by using synthetic materials that can cause allergies in residents.
Synthetic insulation can be compared to plastic film; they do not allow air to pass through and prevent wood from breathing. A greenhouse effect occurs in the crown joints, which leads to the formation of mold, fungi and rotting of the wooden material. Therefore, you should not use them, even despite their good thermal insulation characteristics. After all, insulation materials should not harm the main building material.
Another thing is natural inter-crown insulation, we can say that they complement the characteristics of the logs being between their crowns. These materials have good thermal insulation, hygroscopicity, and vapor barrier. They do not interfere with the wood’s breathing and do not interfere with air exchange in the room. Many natural insulation materials have unique bactericidal properties, protecting the home from bacteria. They also contain a lignin component, which prevents the formation of biological agents in the inter-crown space.
Wall insulation options
One of the most popular options is laying aerated concrete blocks. It is worth noting that aerated concrete has almost the same thermal conductivity as wood. At the same time, it has high vapor permeability, and is also:
- environmentally friendly;
- frost-resistant;
- fireproof.
By the way, when using aerated concrete blocks it is not necessary to use a vapor barrier material and create a ventilated gap between the aerated concrete and wood. The optimal option for insulating timber walls is technology using mineral wool. Vata has:
- low thermal conductivity;
- low hygroscopicity;
- excellent thermal insulation properties.
This material is non-flammable and is not affected by insects, mold and fungi, and also does not contain toxic substances and has a high degree of vapor release into the external environment.
How to insulate a log house from the inside
To perform high-quality insulation, you need to decide what materials should be used to insulate the log house from the inside to ensure maximum thermal insulation of the building. There are many types of materials, including textile fiberglass yarn, mineral wool, rigid foam, Porylex, polystyrene foam, penoplex, foil insulation. Let's briefly look at the most common types of insulating materials, which will answer the question of how and with what to insulate a log house from the inside.
Vapor barrier: importance of application
Insulation of the walls of a wooden house begins with the installation of a vapor barrier layer. This process is necessary because during the first year of construction of the structure, the moisture content of the wood changes greatly. Typically, log houses are allowed to dry for 12 months. When the humidity of the tree changes, shrinkage occurs, namely: cracks and deformations appear, the size and shape of the logs change.
This process lasts for five years. As a result, the tightness of the grooves and joints is broken. More often this applies to houses made of laminated veneer lumber or hand-cut logs.
Selection of material for vapor barrier
If the house is made of wood that has been machine processed, then the following can be used as a vapor barrier material:
- aluminium foil;
- polyethylene film;
- roofing felt
If the timber is laminated veneer lumber, then there is no need to install additional vapor barrier. This is due to the fact that during production, laminated veneer lumber is dried to a minimum moisture content. Such houses shrink slightly and there are practically no deviations in the grooves and joints.
The most budget-friendly and popular option for installing a vapor barrier on wooden walls from the inside is a technology using ordinary polyethylene film. In this case, its thickness is chosen to be more than 0.1 mm.
Despite its cheapness, this option disrupts the microclimate in the house due to the presence of a shell made of airtight material.
What difficulties can you encounter when working independently?
The technology for applying warm joints to wooden houses and log houses, at first glance, seems simple. In fact, this is quite a complex job, the quality of which largely depends on the knowledge and experience of the master. When faced with sealing for the first time, unprepared people will probably experience many problems, which begin already at the very first stage. It is very important to choose the right sealant and tool for the job, and choose the right cord size.
Particular attention should be paid to surface preparation; if it is done poorly, it can negate all further work. Laying insulation and applying sealant also causes difficulty. Both must be done very carefully. It is necessary to strictly adhere to the technology; any violation can lead to undesirable consequences.
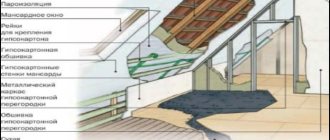
Insulating walls: instructions
In your work you must use:
- insulation;
- anchor bolts;
- waterproofing film;
- antifungal solutions;
- self-tapping screws;
- plumb lines;
- building level;
- furniture stapler.
Initially, it is necessary to treat the wood with an antiseptic solution from the inside. This must be done to prevent fungi and insects from destroying the tree. The solution must dry completely. After this, waterproofing material must be attached to the walls. It is important to remember that the film must be laid in one direction.
In no case should the sides of the waterproofing film be confused, since it allows moisture and air to pass through from its rough side to the glossy one. The plastic film must be attached to the walls using a stapler, and it is better to seal the joints with tape.
After this, the sheathing is performed. It is better to make it from bars. You need to start the process from the corner of the house. Fastening is done using self-tapping screws. In this case, the bars are fixed vertically and at the same distance from each other.
Laying insulation
The next step will be laying insulation, which is mounted on the walls using anchor bolts. After installing the slabs of thermal insulation material, it is necessary to attach a second layer of waterproofing film to it. Now it should be laid with the glossy side outward, and the rough side facing the insulation. The film can be attached with a furniture stapler.
To attach the decorative finishing of the house, it is necessary to install bars with a cross-section of 40 x 50 mm. These bars are attached on top of all completed layers. Now you can decorate the walls.
Materials and tools
To insulate the gaps between the crowns you will need:
- interventional insulation;
- hook for removing old caulk;
- Lebeza (flat spatula) for caulking - needed for sealing cracks;
- flat chisel - seals seams in corners;
- lebeza (narrow thin wedge) to expand the grooves;
- triangular caulk with a groove - it is used to form rollers;
- disk for caulking thin grooves;
Caulking tools. a - hook for removing old caulk; b - swan for caulking; c - winch for expanding the grooves; g - disk for caulking thin grooves.
- wooden mallet - helps to hammer the insulation into the cracks;
- construction stapler.
Internal insulation
This process consists of several stages. Before starting work, you must carefully examine the entire internal surface of the walls. It is especially necessary to pay attention to corners, floor joints, window sills and windows. Problem areas can be noticed by the presence of moisture or drafts. If cracks and gaps are found, they must be plugged with tow or filled with foam. The same examination should be carried out with the ceiling and floor.
There are several technologies for wall insulation. They depend on the materials used and options for performing the work. The “warm seam” technology is used when insulation does not involve finishing the walls with decorative plaster. Various sealants are used during this process. They are used on a synthetic or natural basis. The sealant is placed at the joints of the timber. It is worth noting that this reduces the thermal conductivity of the seams.
Mineral wool finishing
But when using mineral wool, you can achieve high thermal insulation performance. Typically used for insulation:
- glass wool;
- basalt fibers;
- slag fiber.
It is worth noting that mineral wool is an environmentally friendly and noise-absorbing material. When using this insulation, it is necessary to install vapor and waterproofing. This is due to the fact that the structure of the wool allows steam to pass through and absorbs water.
Stages of work
Just as with external insulation, it is necessary to treat the log walls with an antiseptic solution from the inside. Next, install the sheathing, which will consist of two components. As a rule, it is a transverse metal structure. It is stuffed onto logs at a distance of 80 cm from each other. Now the counter-lattice is being performed.
At the same time, it is made of the same materials, but is attached parallel to the first one. This sheathing serves for ventilation, removing excess steam, as well as installing insulation and preventing condensation. The next step is to install the insulation itself. Its joints are taped. The insulation is installed between the sheathing strips. It is better to lay the film overlapping and under no circumstances confuse the glossy and matte sides.
Now you can carry out interior decorative finishing of the room. Lining, fiberboard, chipboard, and plasterboard can be used as finishing materials. Installation of finishing is carried out to a metal profile. If wooden logs were used in the process, and the insulation was laid between them, then the decorative trim is attached specifically to them.
Regarding the ceiling: here it is necessary to ensure its tightness, that is, to exclude drafts and leakage of warm air. For this, ecowool or foil-isolon are usually used. Next, a sheathing is made into which the insulation is laid. After this, you can begin decorating the ceiling. We must remember that not only the preservation of the thermal conductivity properties of a wooden house, but also its service life depends on the quality of insulating materials.
Operational Requirements
High-quality insulation for the crowns of a wooden house must have:
- low level of thermal conductivity to ensure minimal heat loss - the best performance for natural materials;
- high vapor permeability - the walls must breathe, ensuring natural air exchange between the street and the room;
- the ability to absorb moisture well and quickly release it (dry), which allows you to maintain the same moisture content of the timber or log around the entire circumference (the processes of the occurrence of multidirectional stresses inside the timber, leading to its cracking, and the appearance of mold (rot) between the crowns are eliminated). The best in this indicator are flax and jute, but synthetic heat insulators do not absorb liquid - it remains on the fibers. Therefore, artificial insulation materials are not used in bathhouses - the walls will begin to rot;
- uniform density - there will be no cold bridges;
- high elasticity, which allows you to tightly close the gap between the crowns when the house shrinks and the walls swell or dry out;
- resistance to fungus and mold;
- resistance to ultraviolet radiation (sun) and the vagaries of nature (rain, snow, heat, frost);
- long service life comparable to the durability of a house;
- optimal ratio between thickness and density (indicators are given in Table 1);
Table 1. Optimal ratio of thickness and density.
| Thickness, mm | Density, g/m2 |
| 5 | 400 |
| 6-7 | 600 |
| 8-10 | 600-700 |
| 10-15 | 800 |
- environmentally friendly - does not contain components harmful to health;
- sufficient tape width. There are 2 rules here.
- At frost temperatures of -20oC, the width of the thermal insulator should be at least 10 cm, -30oC - 12 cm or more, -40-50oC - 14-18 cm.
- Insulation that is 5 mm smaller in width than the groove will help you get a beautifully designed inter-crown space. If further insulation of the gap is planned with the same material (caulking), the tape should be 10-15 cm larger than the contact area of the crowns.
Wood sealants
For warm joint technology, special wood sealants are used, which are usually made on an acrylic base. The main feature of sealants is their elasticity, due to which constant sealing occurs, even when the size of seams and cracks changes.
Price
As already said, the tube is more expensive. One tube of 600 ml is enough for an average of 4-6 linear meters. It depends, of course, on the thickness and unevenness of the seam, as well as the experience of the finisher. The cost of a tube of German Remmers, for example, is 430 rubles. In this case, in the best case scenario, the cost of 1 meter of seam will be 72 rubles. A 25 kg Eurotex bucket costs approximately 7,300 rubles. When using such a sealant, the cost of one meter will be 28 rubles.
By the way, a warm seam for a wooden house can be ordered from a contractor. However, the price of such a service will cost 150-170 rubles per linear meter. In a day, a novice specialist can do 50-200 meters. (Much depends on the size/evenness of the seams and personal abilities).
If you decide to apply it yourself or check the craftsmen for lice, the technology for applying the sealant is described below.
Precautionary measures
Many sealants are fireproof for wood, and also do not pose any risk of explosions, and are non-toxic. Still, when working with them, it is worth protecting the skin of your hands with gloves, but not allowing the product to get into your eyes or mucous membranes. When treating the surface of walls inside the room, ensure good ventilation.
Is it possible to do the sealing yourself?
The production of a warm seam is carried out once and for many years, so special care and strict adherence to technology are required. Non-professionals, beginners, as well as those who ignore important rules, will often make mistakes that will lead to a significant decrease in the quality of the finished seams.
The most common mistakes are:
- Wrong choice of sealing agent.
- Carrying out work in cold and damp weather.
- Applying seams with low thickness.
- Poor base preparation.
- Making interrupted and rough seams.
- Poor smoothing of joints.
If the technology is violated at each stage, the sealing layer may crack, swell or even rupture. This can cause depressurization and the entry of cold air into a wooden house. Moisture will also get into the cracks, and this will cause the materials to rot and the appearance of fungus and mold. As a result, if you completely follow the technology and buy only high-quality materials, then you can do the work yourself.