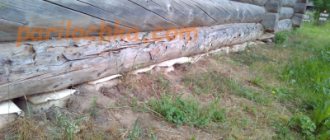
The blind area around the house is simple, but a structural element that greatly prolongs the life of a building. Of two completely identical individual houses built at the same time in an area with a smooth, favorable climate, one, whose owners decided to save on the blind area, required major repairs with partial replacement of the foundation in less than 20 years, and the second has already outlived its brother by more than twice and is worth as much as no matter what happened without signs of any violations in the structure.
At the same time, the blind area can be made completely with your own hands, incl. and around an existing building, without having any construction skills and thereby saving at least 150,000 rubles in the family budget, at current prices. This is for a house 10x12 m in plan and a blind area of the simplest type. If the house is 12x15 m and the blind area is capital, the savings from installing it yourself will be more than 250,000 rubles.
If now you immediately want to study the step-by-step instructions for laying a blind area, then please, here is a detailed video:
However, this is quite true, but only one specific example. Meanwhile, only in officially approved construction regulatory documents one can count at least 20 blind areas for different climatic conditions, the nature of the soil, the type of building, the availability of local resources of building materials, etc. And the notes to each diagram indicate when, under what conditions and how this design can be changed in order to simplify and reduce the cost.
Therefore, we will further deal with what cannot be covered in the video . Namely: we will try to explain the various intricacies of blind areas so that you, the reader, understand the meaning of each of their elements, each production operation and can ensure the long life of your home without unnecessary work and costs.
Why do you need a blind area?
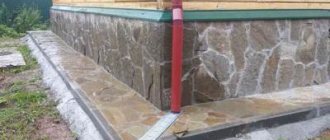
A blind area in the general sense is a cornice attached to a wall, covering the horizontal angle between it and the ground or floor. An ordinary floor plinth is also a blind area, only internal. The operating principle of the blind area is simple: do not completely block the path of unfavorable factors (moisture, dust, etc.), but take them to the side where they will not cause harm. The plug will eventually leak, but if nothing is leaking here, then nothing will leak. The obvious is easy to overlook, but the simple is difficult to invent: the blind area in construction appears only in Ancient Greece.
General diagram of the foundation blind area
The foundation blind area is a low but wide cornice of the base with a slope lying on the ground (see figure on the right), made of a material that does not allow moisture to pass through and does not allow gases to pass through poorly. The foundation is the basis of the building, and the blind area ensures its reliability and durability. Its significance for the foundation consists of 3 functions:
- Protective – from precipitation;
- Safety - as a stabilizer of the gas regime in the soil around the foundation;
- Insulation – neutralizing the effect of heaving of freezing soil on the foundation of the house.
First. Due to thermal deformations and unequal shrinkage of the soil and foundation material, a gap inevitably arises between them. Through this gap, rain and melt water flow down the foundation, albeit in a very weak stream. The drop wears away the stone, and this flow washes away the foundation. And if the blind area takes it to the side, then water will naturally seep through the capillary passages of the soil. The water in the capillary can no longer wash away anything, because... its gravitational pressure is compensated by the force of surface tension.
Second. All soil inhabitants need oxygen. There are many among them who support “soft power”: plants – root aggressors and relatively large burrowing animals; both create passages in the soil through which water can again flow under the foundation and wash it away. At the same time, the soil around the house should not be allowed to suffocate; then chemically aggressive substances will form in it, which are not only smelly and harmful to health, but also destroy the foundation.
The blind area allows enough air to pass through so that there is enough useful soil fines, approximately the size of a nutritious grass root and an earthworm. And large “agents of influence”, finding that their oxygen is blocked from above, move away: there is enough land around, they can grow and dig somewhere else. Here the unreasonable creatures turn out to be smarter than other famous politicians.
Third. Frost heaving of the soil is dangerous primarily due to uneven lateral pressure on the foundation; it can lead to skewing of the building. The same house made of sand-lime brick, 10x12 m in plan and 6.5 m high from the base to the roof ridge, tilted as a whole by only 1 degree, begins to collapse 20 years after construction due to horizontal stresses in the structure. The blind area creates a layer of unfrozen, and therefore plastic, soil around the foundation, which evenly distributes lateral pressure.
Note: in the simplest case, the blind area acts like a snow coat on winter seedlings; here it does not release heat upward like the same cornice, only in the opposite direction. If the construction geology in a given location is unfavorable, then it may be necessary to insulate the blind area, see below.
Based on this, we can immediately draw important conclusions:
- The blind area should frame the house with a continuous strip: any gap will attract harmful factors, which will entail increased weakening of the foundation, which is especially dangerous because it is concentrated in one place.
- Cracks in the blind area are unacceptable for the same reason.
- The blind area cushion (see below) should not be buried more than 1/2 of the calculated freezing depth in a given area, otherwise it will turn into a rigid appendage of the foundation and lose all its functions; o together with the soil, without losing connection with the foundation. However, throughout the entire territory of the Russian Federation this condition is met without any additional measures.
Functions performed
Organizing a blind area around a concrete house with your own hands is an important stage of construction, which performs a number of useful functions and affects the durability of a residential building. The main purpose of such a structure is to effectively drain water from wall structures and the foundation of the house.
A high-quality concrete blind area extends the service life of a building by preventing deformation of the base during prolonged exposure to precipitation, groundwater and other factors. Having a temporary concrete structure will effectively drain and transport water away from the foundation.
If it is missing, and a lawn or flower bed is tightly adjacent to the room, this will negatively affect the waterproofing and increase the risk of destruction of the base by the root system from garden plantings that grow nearby.
Constant rain and snow will also become a big problem, since moisture accumulated in the soil will begin to affect the foundation, contributing to its rapid destruction.
For many years, the technology for constructing a blind area consisted of using clay, which was placed in a special trench around the perimeter of the building and carefully compacted. The finished layer is additionally moistened to form a waterproof film.
Today, concrete blind areas are the most common, the manufacturing technology of which has its own nuances. This material has many advantages, since it allows you to create a smooth surface without gaps, cracks or cracks, which enhances the insulation of the base of the house.
At the same time, experts recommend filling the blind area with concrete even if there is no finance for organizing the finishing touches. And for the design to be as efficient as possible, it is better to equip it before the cold weather.
The list of the main functions of the structure looks like this:
- Presentable appearance of the exterior. The presence of a competently constructed blind area is the final stage in the design of the outer part of the room.
- Protection and drainage. The design saves a garage or private house from the negative effects of groundwater and rainwater. And if it is equipped with a storm drain, all excess liquid ends up in the sewer pit.
- Soil stabilization. The thickness of the concrete blind area allows the soil layers to breathe normally and at the same time prevents the penetration of large living organisms along the base.
- Reinforced thermal insulation. With the help of such a protective covering, the degree of soil freezing is reduced, so there is always a comfortable microclimate in the house.
- Protection against soil swelling.
How is the blind area arranged?
The construction of the blind area is also simple: it is a trench 20-50 cm deep, dug along the perimeter of the building close to the foundation. A thermal gap (expansion joint) is immediately made between the blind area and the foundation; To do this, it is covered with a rubber-bitumen compound and then with 2 layers of roofing material, the lower ends of which are bent into the trench by 50-70 cm.
Note: if the blind area is insulated, then the thermal break is superimposed on the insulation of the base/foundation.
Then the trench is lined with waterproofing made of polypropylene film; it gives just the right gas permeability. A cushion of sand and crushed stone is poured into this trench; in most cases - in a cage made of geotextile (road mesh), which prevents the migration of the cushion material into the ground, but does not prevent the outflow of moisture from it to the sides. Modern technologies for building blind areas involve laying multi-layer cushions. Alternating layers of sand and crushed stone make the blind area much simpler and cheaper, while at the same time increasing its efficiency.
The cushion for a monolithic covering is poured into the formwork, for a slab covering it is limited from the outside by a curb stone, and for a soft covering it is placed either in the curb, or just like that. According to previous ideas, it is the covering that is the actual blind area, and the pillow only supports it. But multilayer cushions in geotextile with propylene insulation are able to take on all the functions of the blind area, so the coverings of modern blind areas can only be decorative and ergonomic. In general, blind areas are divided into 3 types:
- Rigid - monolithic made of concrete, asphalt and cement-filled crushed stone with iron-plated surfaces;
- Semi-rigid - with a multi-layer cushion and flooring made of paving slabs, cobblestones, porcelain stoneware, reinforced concrete slabs with an additional cushion;
- Soft - bulk made of crushed stone on a multi-layer cushion.
What is
A concrete blind area is an external structure with waterproofing, which is installed along the perimeter of the building and has a slight slope from the wall to the topography of the garden area. According to the requirements of the project, the structure is pressed tightly against the base of the house, but is made movable. In structure, it resembles a layer cake, which has the following components:
- Base layer (bedding). It is created from crushed stone or clay.
- Waterproofing layer.
- The top covering is concrete.
When is what kind of blind area needed?
All types of blind areas cope well with their responsibilities, but for different periods. The durability of monolithic ones is almost equal to the service life of the building, but they are labor-intensive and expensive. This also applies to asphalt: its binder - tar - in modern conditions remains profitable only in large-scale road construction. Cement self-leveling coating is inexpensive and relatively labor-intensive, but is applicable only on stable soils; on heaving soils (wet loams, etc.) it is strictly not recommended. In addition, all hard coatings are not decorative.
Note: the case when you need to unconditionally choose a hard covering is an insulated blind area. It is useless to insulate semi-rigid and soft blind areas. And when you need to make a blind area with insulation, let's look further.
Soft covering is very cheap and easy to make. But it lasts no more than 5-7 years, but on any soil in any climate and replacing it is elementary, as far as this concept is generally applicable to construction work. It is optimal as a temporary one if there is a shortage of funds or you are simply tired of construction. We'll sort out the finances, we'll raise our hands again, we'll finish the job thoroughly, but for now it will serve just fine.
In general, taking into account modern construction achievements, preference should be given to semi-rigid blind areas. Their service life is up to 20-25 years in most of the Russian Federation, except for the permafrost zone, and in terms of labor intensity, maintainability and the possibility of complete replacement, they are almost equivalent to soft ones. The cost depends on the coating material; work as expected on any soil.
The decorative qualities of semi-rigid blind areas are also determined by the coating material, for example. a blind area made of paving slabs (we will look at it in more detail later) from the point of view of a landscape designer is no different from a garden path. Nothing is an exaggeration. The partial water permeability of the slab blind areas at the seams between the slabs makes it possible to dispense with internal slopes in the multilayer cushion, and leave the flooring horizontal, i.e. It will be possible to walk on it even in icy conditions.
Next we will look at how to properly make a blind area from the already mentioned paving slabs; The technology for constructing cobblestones differs from it only in the coating material. Along the way, we’ll deal with soft crushed stone and self-leveling cement, because The pillows needed for them are the same as for slab ones. Let us dwell in more detail on the concrete blind area as the most durable and the only one suitable for insulation. And we will touch on specific issues: the width of the blind area, its slope, insulation, drainage and the subject of discussion among builders - the connection between the blind area and the base.
DIY device technology
To understand how to make a beautiful and durable blind area, you need to choose the right type of structure. Concrete is widely used as a reliable, durable and easy-to-use material. It is not difficult to make such protection. The concrete blind area is easy to install with your own hands, and the step-by-step instructions will allow even an inexperienced person to do the job for the first time.
Preparation and marking
The construction of a house concrete blind area begins with the selection of materials and tools. Work is carried out only in the warm season, when the air temperature remains stably above zero. In addition to the required volume of concrete, you will need waterproofing material, metal for reinforcement, a board for formwork and construction tools.
At the next stage, marking is done. The width is noted, which should be 200 mm greater than the roof overhang or drainage elements, if it is planned to install curbs or a drainage system; this is taken into account when marking. To do this, stakes are driven along the outer edge of the future formwork, and a cord is pulled between them. The level of the structure along the base is marked with a spirit level or laser level so that it is horizontal. Its height should be at least 7 cm, taking into account that the structure should be at an angle of 3-10 degrees from the wall of the house. The line connecting to the house can be applied in various ways, the most convenient is using a paint cord.
Next, a 30 cm deepening is dug out for the future structure. Sometimes you have to remove a layer of fertile soil and get to the clay base. In this case, all plant residues are carefully removed. The bottom of the recess should follow the future slope.
Formwork assembly
The formwork is made from edged boards along the width of the blind area being poured. They are secured from the outside with pegs driven into the ground, metal fittings or rods. At the corners, the formwork can be fastened with bolts or ties. The upper edge of the formwork is leveled along the edge of the future structure, which greatly facilitates the work of laying and leveling concrete and creating the desired slope.
Cushion and reinforcement
A concrete blind area begins with the installation of a cushion, which will become a reliable foundation for it. First, the bottom is sprinkled with clean clay, which is carefully compacted, maintaining the slope. Clay allows you to create a reliable water seal, since it practically does not allow water to pass through. It is better to lay it in layers, moistening them for better shrinkage. If the bottom of the trench is clay soil, it is enough to simply compact it.
The bottom of the trench is covered with geotextile with a density of 150 g/m³ or other dense waterproofing material with an overlap of 30 cm on the wall and the formwork. The next layer is coarse sand, the thickness of which, after compacting with a vibrating plate or manual device, should be at least 20 cm. Then a layer of crushed stone or gravel up to 10 cm is laid around the house.
Reinforcement is done with a mesh with a cell of 10x10 cm; options with a larger cell are allowed. The mesh must be deep in the concrete, so it is mounted at a height of 3 cm from the surface. Installed on plastic clamps for fittings or other similar elements. Beacons made of 20 mm thick boards treated with water-repellent compounds are installed on top. Their top edge should coincide with the top edge of the concrete; in the future they will serve as deformation compensators.
Preparation of mortar, concreting
Filling is carried out with concrete grades M200, M250, M300. The mixture is ordered from concrete units or made independently. For example, the proportions of M250 concrete used for blind areas are 1 part cement, 2.1 parts sand, 3.9 parts crushed stone.
Laying is done in parts between previously installed wooden beacons, leveled according to the rule, observing the design angles of the surface. No later than 2 hours after the completion of concrete laying, the surface is ironed by sprinkling it with a 2 mm layer of Portland cement 400.
To improve the properties of any brand of concrete used for the blind area of a private house or other building, it is recommended to add microfiber made from polypropylene or basalt fiber to it.
Care
After pouring the blind area of the house, the concrete surface is covered with a film and moistened for several days so that the hydration reaction takes place and the monolith gains strength. The formwork is dismantled after the concrete solution around the house has completely set after 15 days.
To extend its service life and improve its appearance, it is equipped with curbs, storm drains, drainage trays and sand traps.
Tile blind area
In general, the correct diagram of a slab blind area with internal slopes has been circulating on the RuNet for a long time, but along with it there are also inaccuracies . Since the original information is advertising and commercial, perhaps the authors protected their know-how in this way. Let's try to supplement the source material until it is suitable for use. The correct blind area from paving slabs is made according to the diagram in the figure:
Scheme of a blind area made of paving slabs
First, pay attention to the outer bend of the waterproofing up to the crushed stone. Its purpose is to prevent the first layer of sand from spreading. And drainage of a thin (3-5 cm) layer of sand will be ensured through the crushed stone layer overlying it.
Drains for tile blind areas
Secondly, the recommended total cushion thickness of 30 cm is only valid if the blind area lies entirely in humus. If the humus layer is thinner, then the drained layers should not be buried in dense soil; The layer of crumpled clay is in any case 15-20 cm. What if there is less than 20 cm of humus or no humus at all? Install drains, see fig. on right. Prefabricated gutters are placed on the ground 1-2 m from the lowest corners along the overall slope. In general, drains are desirable for slab blind areas on any soil, and it is better to drain the collections into a storm drain (storm drain) or drainage well, if there is one.
Third, the thickness of the crushed stone layer is 3 times the thickness of the first sand layer, and the upper sand layer is 2 of them. For the blind area to function properly, the proportions must be maintained, but the thickness of the lower sand layer must be at least 3 cm. The thickness of the overlying layers is calculated along the wall and increases outward in accordance with the slope.
Finally, the slopes. They should decrease slightly from bottom to top. In this case, the slope of the clay preparation outward is 0.08-0.12 (8-12 cm/m), the lower crushed stone is 0.05-0.07, the upper crushed stone is 0.03-0.04. The top of the tile cushion is horizontal.
Requirements for the blind area and design rules
When starting the process of constructing a concrete blind area with your own hands, you need to make sure that it has the same width, 20-30 cm greater than the overhang of the cornice. In most cases, architects adhere to dimensions of about 1 m (this value can be deviated when placing strip foundations on subsiding soil). The encircling structure is buried to half the freezing point of the soil. Its thickness varies from 7-10 cm. If it acts as a path, a deviation of up to 15 cm is allowed.
The optimal slope of the blind area is 92-94 degrees from the load-bearing wall. The base can rise by 50 cm. The outer lower side is raised 50 mm above ground level to ensure effective drainage.
Soft and cement
The design of a soft crushed stone blind area is even simpler, see fig. The conditions for penetration into humus, slopes and the “trough” of waterproofing are the same, and the thickness of the crushed stone layer is equal to the total thickness of the crushed stone and top sand with tiles in the previous case.
Scheme of soft crushed stone blind area
The cement-filled blind area is done in the same way, but in formwork, and 2-3 cm less crushed stone is placed, see fig. below. Then the top is filled with cement-sand mortar no worse than M200; for its proportions and method of preparation, see the section on concrete blind area.
Scheme of cement-filled blind area
When the solution has set, but is still wet (watch out, don’t miss the moment!) to increase its resistance to abrasion, the surface of the pouring is ironed: sprinkle with an even layer of dry cement from M400 in a thin layer, just enough to cover the fill, and rub it thoroughly with a polisher.
Then the blind area is covered with a dark film (the iron surface ripens better without light) and periodically once a day or two, lifting the film, sprayed with water. An ordinary broom will work as a sprinkler. The period of aging until suitability for use is from 20 days. The outside temperature for the period of work is not lower than +12 degrees.
Note: in the blind areas already described and in all other areas that require clay preparation, the clay should be thicker. It works here more as a heat insulator, and fatty clay has less moisture absorption.
Dismantling of formwork
After assembling the formwork, reinforcement is placed inside and cement mortar is poured. After pouring the concrete, you need to give it time to harden. The duration of exposure depends on climatic conditions.
At high temperatures, it is necessary to additionally pour the poured concrete and cover it with polyethylene so that the solution dries evenly. When the concrete has hardened, it will be possible to disassemble the assembled formwork, first removing the supports and then the main boards.
So, concrete formwork is assembled to make a concrete blind area. The purpose of this structure is to protect the foundation. Therefore, it must be done. You can do the work yourself. For the manufacture of formwork forms, boards and bars are most often used, but other materials can also be used.
Once and for all!
What advantages and disadvantages does a monolithic concrete blind area have, are stated above. In addition, it requires careful implementation. It must be said that a blind area made of ready-made reinforced concrete slabs does not fully possess the qualities of a monolithic one; it is the same slab blind area, only more expensive and heavier. It is used more in industrial construction when there is a stock of reinforced concrete products or a source of their supply.
A summary diagram of a monolithic concrete blind area is shown in Fig. below. It only requires some explanation. Firstly, the formwork for pouring is installed after laying the waterproofing. Its outer bend upwards, as in a multi-layer pillow, is not needed here. However, it is highly advisable to place geotextiles on the insulation before installing compensators (see below) and laying reinforcement around the perimeter of the formwork so that the sand does not spread later. You don’t have to bring the textile tape all the way to the wall, but put it on the formwork up to its edge, and at least press it there with pushpins so that the mesh doesn’t slide down during further work.
Scheme of a monolithic reinforced concrete blind area
Second, after filling the cushion, but before laying the reinforcement, the formwork must be divided into sections using thermal deformation compensators; Without them, a solid concrete strip will soon crack. The maximum section length is 3 m, but expansion joints must, in addition, be installed between all pairs of adjacent and external corners of the building, see fig. That is, each section of the blind area should be a convex geometric figure in plan, without corners protruding into its contour.
Installation of formwork for reinforced concrete blind area
Compensators are made of wooden planks 15-30 mm thick. Since they will not remain in the blind area forever, the workpieces must be thoroughly soaked, twice, with hot bitumen. It’s better not to soak it, but to scald it: boil it in bitumen, brought almost to a boil, for 10-20 minutes, turning it all the time. Compensators are installed immediately with the required slope - using them, like beacons, using a long rule or, if you have some construction experience, a half-ter, the filling surface will be formed.
Note: if you have the opportunity to get hold of to treat wood with creosote, don’t! Creosote is a powerful poison and carcinogen; its use is steadily declining in industry, where special installations can be used to protect personnel.
Third is the pouring solution. The final grade of reinforced concrete must be at least M200, i.e. cement is needed from M400. But this is not enough, you still need to accurately follow the composition recipe. You can’t get by with bulk parts “by the bucket”, or even by eye, the tape will crack after some time, and repairing a monolithic blind area is more difficult than laying a new one. Components should only be measured by weight! The pouring of a monolithic concrete blind area is carried out with a solution of the following composition, calculated per cubic meter of finished material:
- Cement M400-M600 – 280 kg.
- Crushed stone – 1400 kg.
- Construction sand, fraction 0.2-0.35 mm – 840 kg.
- Technically pure water – 190 l.
The solution, as we see, turns out to be very dry, even drier than for floor screed. This is necessary because fresh pouring should maintain the specified slope until it hardens. Pouring is done section by section, in fairly large portions of the solution, so you shouldn’t rely on a handy tub and a hammer drill with a mixer; you need a concrete mixer. Mixing is done in the following order:
- Weigh out the portions of components required for the next section.
- Dry cement is thoroughly mixed with at least 20-25 revolutions of the mixer hopper; this is necessary to break up its clots and lumps.
- Sand is introduced in 3-5 doses, mixing each dose with 5-6 revolutions of the hopper.
- Crushed stone is introduced in the same way.
- Add water in a gentle stream over 3-5 turns of the hopper.
- Add another 10-15 revolutions of the hopper.
The poured section is compacted with a vibrating plank, trying not to touch the reinforcement with the working part in order to avoid the formation of cavities with cement laitance, which greatly reduce the strength and durability of the blind area. Then the slope is derived using compensators, like beacons. After the solution has set, it is advisable to iron it, as for a cement-filled blind area, and just like it, the monolithic one is covered with a dark film and periodically sprinkled with water. It is forbidden to cover with a damp cloth, such as, for example, a foundation! The solution on top will get wet, weaken and the entire blind area will crumble!
Installation of formwork
It is better to start installing formwork around the house in the warm season. Before starting construction work, it is necessary to prepare the site and mark it. The markings are carried out using pegs; they are driven into the corners of the building and string is pulled between them.
Next, you need to remove the fertile layer along with the roots of the plants growing there. To do this, dig up the area to the depth of half a shovel. The width of the trench should be equal to the width of the future concrete strip.
Advice! To prevent plant germination, it is recommended to water the prepared area with a special solution.
Next, you need to choose a material for constructing the formwork; as a rule, boards are used. It's affordable and profitable. In addition, you can use:
- particle boards;
- moisture-resistant plywood;
- steel sheets;
- permanent formwork options use forms made of expanded polystyrene reinforced with fiber additives.
But most often boards are used; to assemble the frame, it is recommended to take timber with a section of 30 by 60 mm. The rules for installing formwork are quite simple. It is necessary to drive prepared boards or strips of plywood around the perimeter of the markings made.
Supports are used to strengthen the structure. The same boards are installed across them in increments of about 1 meter. These elements will help create expansion joints. Next, you need to lay a layer of waterproofing and pour a layer of sand 5 cm thick.
The poured sand is spilled with water and compacted to increase the density of the bedding. The second layer of backfill is crushed stone; this layer also needs to be compacted, but without moisture. When backfilling, you need to form a slope from the walls to ensure water drainage.
Do or pay?
Now you know enough to decide what kind of blind area you need. Further material will help you understand the details, and in order to decide whether to take on the work yourself or order it from builders, we inform you: the price of just the work of constructing a blind area in Central Russia ranges from 2000-2500 rubles / sq. m. m for soft crushed stone up to 3300-4200 rub./sq. m for concrete monolithic. We emphasize: this is only work, the purchase of materials with delivery is the owner’s, so there is no need to count on wholesale discounts.
This is due to the fact that a normal customer, a normal designer and normal builders make the blind area at the same time as the entire structure. A finished house without a blind area is unfinished, but how much do builders like to finish unfinished projects and whether such work is profitable for them, you can ask any of them. Perhaps expand your knowledge of Russian, in parts not reflected in general-purpose dictionaries.
Consumables and tools for work
If you follow the formwork technology, the choice of material has virtually no effect on the quality of the resulting blind area. To create a formwork frame, the following materials are prepared:
- chipboard boards or sheets,
- beam,
- fasteners and wire for ties.
To perform the work, the home master must first prepare the following tool:
- for cutting wood: saw and hacksaw;
- for planing - a plane;
- marking devices: tape measure or folding meter, ruler, square and building level for setting the horizontal level;
- drilling tool - electric drill.
How can you save money?
But how to reduce the cost of a homemade blind area? To determine the scope of work, you need to know its width; the length will be given by the perimeter of the building, and the depth will be given by the selected scheme. According to SNiP, the blind area should extend at least 20 cm beyond the roof overhang , including gutters, but not narrower than 70 cm.
That is, we climb onto the roof with a plumb line and beat its outline along the ground. Then we measure along the entire length; if somewhere up to 0.7 m is missing, add as much as needed. Then we measure the resulting perimeter of the blind area; We now have a complete set of data to calculate the volume of materials and labor purchased.
Note: to avoid soil acidification, a blind area width of more than 1.5 m at a length of more than 2 m is undesirable. If this happens somewhere, we make the actual blind area 20 cm from the edge of the roof, and the rest will need to be paved with paving slabs on a simple sand cushion, like a path. You can make a playground in this place for children or for relaxation, with a barbecue, or somehow solve the issue based on landscape design methods.
Possible installation and dismantling errors
Regardless of the building materials used and the fairly simple technology, errors are often made when installing/dismantling the form, which lead to a violation of the integrity of the blind area.
The main mistakes made when assembling formwork:
- Unsatisfactory quality of fastening of mold components.
- The proximity of the support stakes to the structure.
- There is no waterproofing.
- There is no height reserve.
- Vertical displacement of the form.
- Installation of a wood form on unstable ground without additional fixation.
- Installing the form on an uneven area.
- Incorrect distance between supports, excavation collapse when pouring concrete mixture.
- The use of low-quality wedges that break under intense load.
- The use of building materials that do not meet regulatory requirements and do not have the necessary wear resistance.
In order to avoid any of the problems mentioned, it is necessary to select boards for installing formwork in accordance with GOST requirements; they must be of the same thickness with dimensions no less than those indicated in the technological map for the construction of the blind area or the project.
Serious deficiencies in the integrity of the walls of a wooden structure—knot holes or large cracks—are covered with plywood or steel patches. Narrow cracks up to 15 mm can be clogged with small crushed stone, then the concrete solution will not be able to seep through.
After installation is completed, it is recommended to water the wooden formwork elements with water ; the wood will become wet, swell, and possible gaps between the elements will become significantly smaller.
Insulation and drainage
The next circumstance that can significantly increase the cost and complicate the blind area and still turn to professionals is its insulation. However, it will only be of any use if the blind area is monolithic, expensive and complex. Taking into account the fact that insulation most often has to be combined with drainage, the cost of work here can be a small fraction of that of materials. But is insulation necessary at all? And when, if so? Insulation of the blind area is necessary in the following cases:
- The house has a heated basement or ground floor.
- The house was built on heaving soil: clay or loam with high moisture absorption.
- The winter is unstable, with prolonged thaws, and the house stands on dusty soil with high moisture permeability; these are sandy, loess and alluvial soils.
- The freezing depth can reach that calculated according to SNiP (see below) more often than once every 3 years or once for any period of time for more than 2 months.
What and how to insulate?
Extruded polystyrene foam (EPS) and polyurethane foam are suitable for insulating blind areas. The latter, at first glance, is tempting with its cheapness, but it only seems so. Below we will deal with foam, but for now we will deal with EPS.
If the need for insulation is caused only by point 1, and the winter in a given area is consistently not very severe and the soil under the building is stable, the blind area should be insulated according to the diagram on the left in Fig. The principle is clear from there: the insulated blind area pushes the zero isotherm away from the house, which ensures its durability, as described above, but under difficult operating conditions.
Designations on the diagrams:
- reinforced concrete monolith;
- Eps boards;
- waterproofing;
- sand cushion;
- stone border;
- geotextile drainage pipe clip filled with crushed stone;
- drainage pipe.
The simplified (left) diagram differs from the traditional ones, which we will talk about in more detail. First, how much EPS should I put under the blind area? This material is not very cheap, and every extra centimeter of its thickness means in this case an overspending of about 10,000 rubles. and higher.
Here it is appropriate to use the experience of traveling construction teams, that is, coven workers. They, by the way, are not at all such grabbers and scammers as they signed with the Soviet “Crocodile”. If the wolf is fed by his legs, then the coven, like a banker, is his reputation. Which consists not only of the speed and quality of work, but also of the savings on materials that are visible to the owner, because coven workers do not carry them with them.
So, the shabashniks have long ago developed an empirical formula to calculate the minimum permissible thickness of EPS under a blind area, namely: take the estimated freezing depth under the house in centimeters, subtract from it the width of the blind area, also in centimeters, and multiply the resulting value by 0.75, this and there will be the minimum required thickness of EPS in millimeters. Let’s say freezing is 1.8 m or 180 cm; The width of the blind area is 1 m, then you need a layer of EPS from 60 mm. More won’t hurt, as long as the customer forks up.
Seasonal soil freezing in the Russian Federation
The freezing depth can be accurately calculated according to SNiP 2.02.01-83 “Foundations of buildings and structures”, with annexes and design manuals, and according to SNiP 23-01-99 “Building climatology”. In recent years, houses are often built on heaving soils, because... plots for development on them are cheap and there are a lot of them left from Soviet times, when they tried not to build “on the pukka”. In this case, the map in Fig. will help you decide on insulation, and for certain specific points of the Russian Federation - table. lower, because Calculation according to SNiP, although simple, is painstaking and requires taking into account many factors.
| City | M | √M | Soil freezing depth according to SNiP, m | ||
| loams and clays | fine sand, sandy loam | coarse sand, gravelly | |||
| Arkhangelsk | 46,1 | 6,79 | 1,56 | 1,90 | 2,04 |
| Vologda | 38,5 | 6,20 | 1,43 | 1,74 | 1,86 |
| Ekaterinburg | 46,3 | 6,80 | 1,57 | 1,91 | 2,04 |
| Kazan | 38,9 | 6,24 | 1,43 | 1,75 | 1,87 |
| Kursk | 21,3 | 4,62 | 1,06 | 1,29 | 1,38 |
| Moscow | 22,9 | 4,79 | 1,10 | 1,34 | 1,44 |
| Nizhny Novgorod | 39,6 | 6,29 | 1,45 | 1,76 | 1,89 |
| Novosibirsk | 63,3 | 7,96 | 1,83 | 2,23 | 2,39 |
| Eagle | 23,0 | 4,80 | 1,10 | 1,34 | 1,44 |
| Permian | 47,6 | 6,90 | 1,59 | 1,93 | 2,07 |
| Pskov | 17,9 | 4,23 | 0,97 | 1,18 | 1,27 |
| Rostov-on-Don | 8,2 | 2,86 | 0,66 | 0,80 | 0,86 |
| Ryazan | 34,9 | 5,91 | 1,36 | 1,65 | 1,77 |
| Samara | 44,9 | 6,70 | 1,54 | 1,88 | 2,01 |
| Saint Petersburg | 18,3 | 4,28 | 0,98 | 1,20 | 1,28 |
| Saratov | 26,6 | 5,16 | 1,19 | 1,44 | 1,55 |
| Surgut | 93,3 | 9,66 | 2,22 | 2,70 | 2,90 |
| Tyumen | 56,5 | 7,52 | 1,73 | 2,10 | 2,25 |
| Chelyabinsk | 56,6 | 7,52 | 1,73 | 2,11 | 2,26 |
| Yaroslavl | 38,5 | 6,20 | 1,43 | 1,74 | 1,86 |
Note: within the same region, the depth of freezing can vary significantly depending not only on the soil, but also on the presence of communications in it, etc. If you want to achieve maximum savings, you need to calculate exactly according to SNiP and geological data directly under the house.
On the left diagram of Fig. at the beginning of the section, another crazy trick is visible: the vertical EPPS base slab (its thickness is calculated in the usual way based on the heat loss of the building) is not brought down to the freezing depth, but breaks off at the lower edge of the insulation of the blind area. The fact is that an insulated blind area reduces heat loss through the bare root of the foundation, and you won’t have to groan over bills for fuel or electricity for heating. The existing methods for calculating heat loss do not take this circumstance into account. But a weak additional heat flow from the side, combined with an upward geothermal flow (our planet has a positive heat balance, otherwise life on it would be impossible) pushes the zero isotherm even further. This is a case where harm turns to good.
When is drainage needed?
If, under the operating conditions of the building, at least one of paragraphs is present. 2-4, the blind area already needs to be drained from above. As shown in the right diagram of Fig. with diagrams. Drainage pipe diameter 110-200 mm; slope - within 0.03-0.1; You can drain the drain into a storm drain.
Note: if you come across a description somewhere of how to replace a special drainage pipe with a homemade one made from a sewer pipe, try to find the author and let him show where one will last at least a year without falling into complete disrepair.
How to lay EPS?
Laying EPS for blind area insulation
The actual insulation of the EPS blind area is not difficult: the slabs are simply placed on a sand cushion before laying the reinforcement, see fig. There is only one nuance here that can increase the efficiency of insulation: it is made of two layers of half-thickness slabs, and approximately half of the lower slabs are cut in half lengthwise and the halves are laid along the edges of the trench. This will result in a displacement of the seams along and across, which will negate thermal bridges.
What about foam?
Now let's see why it is undesirable to insulate yourself with cheap and technologically advanced foam. But because it is generally impenetrable, neither to moisture nor to gas. Therefore, when insulating with foam, in any case, a drainage depth of approximately 1 m is required, see fig. below.
Firstly, you can’t get by with open gutters here; without a filter grid on them, the drainage will quickly become clogged. Special gutters (on the right in the figure) are roads. Secondly, you can’t bring a deep drain into a storm drain; you need to build a prefabricated well with pumping. As a result, a seemingly cheap blind area becomes much more expensive.
Insulation of the blind area with foam
When things fall apart
The worst case is when the house is located in a drainless lowland, in a place with high groundwater or prone to flooding. What is needed here is full-fledged lower drainage of the entire building, and this is such a topic that the blind area, as they say, rests. Just look at the figure, and this is only a summary diagram of the drainage of a house, without a collector network, a well and pumping. As for the blind area specifically, in this case it is not recommended to insulate it at all: general drainage will not allow the soil to swell.
Building bottom drainage diagram
Rules for concreting a blind area around a house
The technical characteristics of the concrete solution directly depend on how correctly the proportion of materials and their quality are selected. The optimal indicators are strength of at least B15 and frost resistance within F50-100.
Recommended mixture composition:
- cement M400 - 1 part;
- fine or medium sand - 3 parts;
- large or medium crushed stone - 4 parts;
- water - 1 part.
The mixing process is step-by-step. First you need to mix water and cement until you get a homogeneous solution. Then sand is poured in and, lastly, filler.
Step-by-step instruction:
- Wetting the formwork and bedding. Wet wood does not draw water out of concrete, thereby ensuring consistency of its composition and high-quality hardening.
- Mixing the solution. It must be poured from one of the lower corners of the formwork so that the concrete fills all the cavities under its own weight. After filling each cell, the procedure is paused and the solution is leveled with a rule and a spatula.
- Making a drip lining for a drain. This thickening is necessary to prevent the slab from thinning under the influence of rainwater pouring onto it.
- Curing of concrete. This requires at least 28 days at an air temperature in the range of + 15-25 ºС. The slab must be covered and moistened daily to prevent cracking.
After complete crystallization of the material, its surface can be treated with impregnation and simultaneous polishing. This will give it additional strength and an attractive appearance.
When to finish the base?
Finishing the base above the blind area
Usually it is recommended to do the blind area as the very last thing, after finishing the base. But these tips go back to the times of Khrushchev-Brezhnev mass construction, when plinths were, at best, plastered. And now, for example, how to make a waterproof thermal joint between the blind area and the base, trimmed with relief stone or base siding?
Taking into account the use of modern finishing materials, the base of the building should be finished after installing the blind area. It won't get worse, it will only get better. Look at fig. In the place marked with a red dotted circle, above the thermal seam, the finishing of the base forms a small cornice - a teardrop. Now only a tropical hurricane can drive moisture into the seam.
Prices for construction work
The cost of construction of formwork for the blind area depends on the chosen design, material and dimensions of the structure.
Usually it is not calculated separately and is included in the cost of building the blind area. It is known from practice that the labor intensity of such work reaches up to 40% of the labor intensity of work on the construction of a blind area, and the cost is in the range of 10 to 20% of the cost of the concrete surface.
Moreover, the higher the slope, the higher the cost, since it is more difficult to create conditions for the correct and stable position of the forms.
In addition, the price is affected by the reusability of formwork. Typically, builders have their own mold made from laminated plywood, which allows for cheaper installation/removal costs.
Prices also vary depending on the region of construction of the blind area and the choice of material, for example, the cost of assembling/disassembling formwork per 1 m2:
- Moscow and Moscow region: board - 250 rubles, shield - 350 rubles;
- Leningrad region: board - 200 rubles, shield - 290 rubles;
- Voronezh: board - 180 rubles, shield - 260 rubles;
- Chelyabinsk: board - 220 rubles, shield - 310 rubles.
A lot of important and useful information about the design of the blind area is presented in this section.