Nowadays, building a bathhouse on your own is not particularly difficult. After all, the market is simply overflowing with different types of building materials, and the construction technology is very simple. But most people pay attention to wood, because it is a natural and environmentally friendly material that creates a unique microclimate indoors. In addition, since ancient times there has been a certain tradition that only wood is used to build a bathhouse!
Today you will learn: how to build a bathhouse from timber with your own hands, as well as what advantages it has.
Required tools and materials
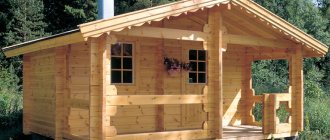
A do-it-yourself sauna made of timber 150x150 is an ideal option for an average climate!
But you should not rush to implement the project - it is very important to choose the right material to avoid problems in the future! Spend a decent amount of money for the services of specialists or make a log house from timber with your own hands - it’s up to you! But even a superficial calculation of all the costs in the case of independent work will surprise you - the savings in this case can be equal to the cost of all materials! What a reason to get down to work yourself. What to build a bathhouse from if not wood!
The advantages of a wooden structure are obvious - this includes minimal shrinkage upon completion of construction (if the wood is dry), and a much lower cost compared to the same log structures, as well as a much simpler construction technology. Savings also occur on the foundation, which is made of strip or columnar, since the structure itself is not as heavy as when building from brick or stone. Of course, timber is not the most economical material in all regions; it is quite possible that after doing the calculations you will find that a bathhouse made of cinder blocks will cost you less.
Price for various projects
The price of a turnkey bathhouse directly depends on the chosen project, its complexity and costs. The ambitions of the developer company and the qualifications of the workers are also very important. We present the cost of some ready-made turnkey bathhouse projects in various regions of Russia:
| Developer company | Project price, rub. | ||
| 6X6 | 6x9 | 9X9 | |
| "Region-Stroy 53" | From 450,000 | From 780,000 | From 980,000 |
| SC "Estate 53" | From 370,000 | From 690,000 | From 850,000 |
| LLC "Russian House" | From 430,000 | From 770,000 | From 980,000 |
| "SNK-Stroy" | From 380,000 | From 700,000 | From 870,000 |
Having analyzed the service, a turnkey bathhouse made of profiled timber, we can say with confidence that this is a great way to save your money and time. Of course, unless you decide to build it yourself. This is the only way to win and save even more money. But not all busy people can carve out so much free time for themselves.
Do-it-yourself sauna made of 150x150 timber - how to choose the right timber?
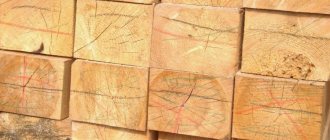
The first rule when choosing a material for a bathhouse is that it should only be coniferous wood! Just imagine how you steam in a bathhouse, inside of which the air is saturated with essential oils that are extremely beneficial for health! Is it worth denying yourself such a pleasure, considering that there is no fundamental difference between coniferous and other types of wood in terms of price.
All beams are divided into materials of forced drying and natural humidity. Artificially dried material is much more preferable because it does not shrink noticeably. It is quite simple to determine by eye the quality of the proposed beams - firstly, they must be stacked, and secondly, polished and packaged. If the blanks are piled up, avoid them.
You can save on wood with natural moisture. Just keep in mind that it should be used in construction immediately after purchase - no need to wait until the wood dries . However, the workpieces will not be able to dry properly, because if the top and side bars dry out faster, those in the middle will retain moisture until they are used. In addition, when drying, cracks and splits will begin to appear, and the wood can be significantly deformed. Drying on your own will take about a year, and there’s a lot of fiddling around with this matter.
The dimensions of the workpieces should be selected based on the climate. Bars 150x150 are by no means the only option, it is simply the most suitable for the middle climate, where even in cold winters the temperature does not drop below -30 ° C. If the climate is even warmer, then a 100x100 bathhouse is suitable, but for the northern regions, 180x180 blanks are preferable. The partitions are made from the option that is acceptable in price and quality. Calculating the required amount of material is quite easy - we did these problems in the first grades of school.
It is important to buy the full volume at once, or better yet, with some reserve, especially since there will probably be a discount for a larger batch. The beams remaining after construction will not lie idle - they will make excellent furniture! When the beams are ready for transportation, prepare a good “cushion” for storing them on your site - lay all kinds of boards and logs on the ground at intervals of at least one meter. When the beams are folded, slats and thin boards should be laid between them so that the wood is properly ventilated and does not become moldy.
The foundation is a reliable foundation for your bathhouse
Since wood is a fairly light material, on hard soils the bathhouse can be placed on a columnar foundation. However, the most versatile and reliable is still a strip foundation, which is applicable to any soil, and its arrangement can be done even by a person far from construction. The only negative is a lot of labor, but nothing prevents you from calling friends and relatives for help, who will be the first to take a steam bath in your bathhouse!
When digging a trench, keep in mind that it must be no less than 20 cm deeper than the frost layer, with a total depth of 70 to 80 cm.
The width of the foundation should be no less than 10 cm larger than the dimensions of the beams, and it should rise above the future blind area by at least 15-20 cm. The foundation is made using traditional technology - first a sand layer is laid, which eliminates seasonal movements of the soil under the base of the house. The filled sand is watered and after settling it is also compacted. You can lay concrete blocks on top of it or fill it with concrete mortar.
For blocks you will need additional equipment, which, moreover, cannot always drive up to the desired location. Therefore, the easiest way is to install the formwork, line the walls with roofing felt so that there are no leaks anywhere, and pour the mixture. When pouring, reinforcement bars are installed to which the first row of beams will be attached. Don’t forget to lay burlap or a layer of sawdust on top, so you can easily maintain the desired humidity.
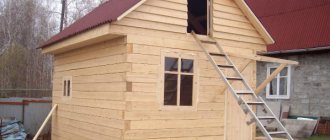
Building a bathhouse from timber with your own hands - we build walls
After two weeks, or better yet just a month, of the foundation drying, you can begin installing the so-called strapping crown. They use the strongest and strongest beams for it; it is better if they are thicker than the others, for example, 200x200. It is recommended to prevent the wood from touching the foundation in order to protect the beams from rotting, for example, to lay the same roofing material.
The lower beam should be pre-treated with an antiseptic; some craftsmen also treat it with machine oil. The construction of a bathhouse is possible according to different scenarios - both nailing together beams and cutting out grooves. It is better not to use nails with fresh wood - when dry, they do not allow the beams to settle, resulting in the formation of cracks. Grooves are considered the most reliable method of adhesion.
The final stage is to caulk the cracks!
When the beams are laid, prepare for a fairly long wait - on average, it will take up to six months for the frame to shrink. Therefore, lay strong boards on top of it, on top of which spread a thick film or slate... The main thing is that the wood does not get wet, but at the same time it is important to ensure good ventilation. When the structure has stood for a sufficient time, you should begin caulking - sealing all the cracks. For this purpose, there are both proven insulation materials such as moss, tow or felt, and modern sealant designed specifically for these purposes.
The use of sealant significantly speeds up and simplifies the work, however, it is up to you to decide which method to use. Usually they start caulking from the bottom crown, gradually moving upward - it is important not to overdo it so that the beams themselves do not move! With a ready-made frame, things will go faster - the construction of a bathhouse from timber with your own hands has just begun! Next in line are insulation of the bathhouse (warm floor and ceiling), ventilation system, installation of a heating system, but these are separate topics for discussion.
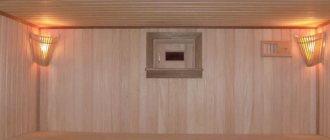
Peculiarities
Wood is an ideal option for building a bathhouse, since it is in this design that you can create ideal conditions of temperature and humidity, the effect of a Russian steam room.
There are several more reasons that make wooden beams a favorite among other materials:
- Wood has low thermal conductivity. The correct choice of the cross-section of a wooden beam allows you to heat the room in the shortest possible time, while it will take a long time to cool down. For northern latitudes, do not use timber with a cross-section below 200 mm; for central Russia, a section of 150 x 150 will be sufficient, and for the southern districts you can build from timber with dimensions of 100 x 100.
- To make timber, coniferous trees are often used, which have anti-allergenic and antibacterial effects.
- A small one-story bathhouse made of timber does not require a massive foundation, as, for example, for a brick or stone building.
- The timber shrinks several times less than a log. It is also not subject to warping, deformation, or cracking.
- It is quite convenient to work with timber, in contrast to rounded logs. Wooden buildings require virtually no interior finishing.
- The timber is usually already treated with biological and fire-resistant impregnations, which means that a building made from such raw materials will not rot, will not be eaten by insects, and the risk of fire is minimal.
The size of the bath depends on several conditions:
- territory of the site. The summer cottages of the majority of residents of our country are 6 acres, which means that it is logical to build a small bathhouse on such land;
- construction budget;
- personal preferences of future owners.
The creation of individual projects for wooden buildings, including bathhouses, is carried out by special construction companies or design bureaus. Many similar companies also offer turnkey construction, which includes all stages from project development to building construction and organization of all utilities.
If you decide to order only plans and drawings from the company, and the construction will be carried out on your own, pay close attention to the composition of the design documentation. The finished version must include a sketch and a working draft.
The first provides the following data:
- foundation plan;
- explanatory note with all technical indicators;
- building facades;
- floor plans;
- sectional view of the room;
- floor and ceiling plans;
- rafter system (general view and section);
- volumetric layout or visualization in volume on a computer;
- explanations of all rooms.
Briefly about the main thing
Before construction, it is necessary to choose the right timber, since at each stage factories offer several processing options. If there is a risk that the construction of the bathhouse will not begin on time, choose chamber drying. This way you can store the wood on your site for another couple of months.
To make the building warm, you need caulking - that is, insulation - or you can order wood profiling. If you want to strengthen the foundation and prevent rotting, use larch, at least as a pair of lower crowns.
To calculate how many cubes of timber are needed for a standard 3x4 or other size bathhouse, use the calculator on the website of a house-building company or the special formulas specified in the article.
Ratings 0
How to build a bathhouse from timber
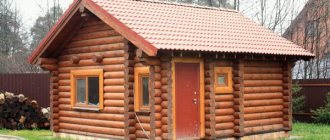
A bathhouse in a country house or on the site of a country house is no longer a dream, but a necessity. The owners of private housing construction develop a construction project in such a way that it includes all the necessary buildings - a garage, a barn, a bathhouse, a pavilion. Therefore, the construction of a bathhouse from timber has recently been rapidly developing and popularizing. But since the land plots are mostly small, the owners choose smaller bathhouse designs, for example, a 100 x 100 bathhouse (beam cross-section) measuring 3 x 3 m with a ceiling height of 2 m. Even in such a small building both a steam room and a shower room will fit , and a rest room. All operations must be regulated by SNiP 31-02-2001. In larger projects, a bathhouse is built from 150 x 150 timber with additional rooms that improve the comfort and functionality of using the building.
General characteristics:
Total area: 36 m2
Building size: 6×6 m
Number of storeys: 1st floor
Delivery up to 500 km: free.
Order a house
or get advice: +7 (495) 946-65-36
Attention! Fixed price without overpayments. We show the real price, which corresponds to the selected configuration and does not change during the discussion of the project or at the time of concluding the contract.
You will need
It is also necessary to prepare in advance insulation, nails, electrical wiring and its components, self-tapping screws of different lengths and diameters, corners for assembling the rafter structure, fittings, plastic or wooden windows and entrance, as well as internal doors. In addition, if you plan to connect the water supply to the bathhouse, then you need to think about organizing a sewerage system. For our do-it-yourself timber bathhouse project, plumbing and sewerage were not developed.
How to lay timber and raise the walls of a bathhouse:
Procurement of building materials, cost and estimate:
We build a timber bathhouse ourselves - steps from the foundation to the roofing work:
Any construction of a bathhouse made of timber can be divided into specific stages:
- Pouring the foundation.
- Construction of a timber frame.
- Installation of rafters and roofing.
- Plank flooring.
- Installation of windows and doors.
- Laying electrical wiring, installing lamps and installing other electrical equipment.
- Decoration of internal walls, finishing work on external walls.
Stage 1. Pouring the foundation
The best option to build a bathhouse from timber with your own hands is a concrete base. Pouring the base
Tool you will need
- Entrenching tool.
- Wooden stakes or fittings, cord, tape measure, level.
- Building material for formwork assembly.
- Reinforcing bars and binding wire for concrete reinforcement.
- Factory-mixed concrete or concrete mixer, shovel, container for preparing mortar, cement, crushed stone, water, sand.
- Waterproofing materials.
The area should be leveled and the perimeter of the foundation should be marked using pegs and a cord. If we are building a bathhouse from small timber, then the foundation will be shallow, and a trench for it can be dug with a shovel. Trench depth – up to 50 cm.
Next, the formwork is installed, the reinforced frame is knitted, the concrete is prepared according to a standard recipe, and the solution is poured into the formwork. While the mixture hardens (about 2 weeks), the foundation is covered with roofing felt.
Stage 2. Trimming and walls of the timber bathhouse
Columnar base for furnace
The beams will be connected like this: the ends - half a tree, the corners - a paw.
- It is recommended to saturate the first two rows of beams with antiseptics and fire retardants, and then lay them on roofing felt laid in two or three layers. The lower beam must have markings for the windows and doors of a bathhouse that has not yet been built. The corner connections of the timber are additionally fastened, using dowels or corners. When constructing a 3 x 3 m bathhouse, intermediate pins will not be needed.
- Next, floor beams are laid for the flooring. The distance between the beams is 1.3-1.5 m.
- The gaps between the beams are insulated with tow, flax, jute or more modern thermal insulation materials, for example, tape.
- If, however, there is a need to install intermediate dowels, then they are fastened every 1 m. The dowels can be wooden or metal. At the corners of windows and doors, pins are attached at a distance of 0.2 m from the edge of the opening.
- After building the walls, the ceiling is installed. The beams for it are mounted in two rows from the top edge of the wall, the approximate height of the ceiling that a do-it-yourself log bathhouse will have is 2 m. The beams need to be cut into half a tree; for a small bathhouse in our project, two beams for the ceiling will be enough.
- The remaining two rows of wall beams are laid on the ceiling beams. These two rows should be secured especially firmly, since the last beam will serve as the Mauerlat in the rafter system.
- Before arranging the roof, you need to make at least a temporary ceiling - it can be covered with any boards, since upon completion of the roofing work they will be removed and a permanent ceiling will be installed.
The main problem when building a bathhouse from timber with your own hands is to bring the frame of the bathhouse under the roof so that the rest of the work can be carried out not in the rain and wind, but in a protected room.
Construction of the roof
Roof
Once the construction of the bathhouse frame is completed, it will be possible to begin arranging its roof. Note that in the type of buildings we are considering, gable roof structures are most often used, which prevent the accumulation of snow on them. Their installation includes the following operations:
- on the last crown of the log house, mortise-sockets are made for attaching rafter legs;
- Counter-lattice slats are attached to the rafters from below, along which the attic ceiling is subsequently sewn;
- in the niches formed by the rafters, first a polyethylene film is laid, which acts as a vapor barrier, and then the plates of the insulating material you have chosen are laid;
- a special under-roofing film is laid on top of the insulation with a small gap, used as waterproofing;
- at the final stage of forming the “roofing pie”, a sheathing is sewn onto the rafters, which serves as the basis for laying the covering.
The attic ceiling is most often covered with clapboard or plasterboard.