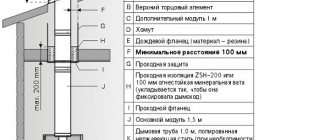
Safety precautions when installing a chimney
It is imperative to ensure the high fire safety of the chimney for a bath.
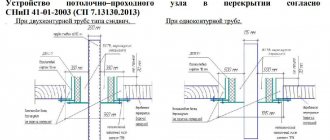
To do this, as mentioned above, pay special attention to the tightness of the connections of individual parts of the pipe, as well as to the cutting when the chimney passes through the ceilings and roof
In places where the pipe will pass through the ceiling, it is necessary to insulate it from wooden elements with heat-resistant material - this can be asbestos, mineral wool, sand or expanded clay.
- To do this, a metal panel with a hole through which the pipe will pass is fixed to the ceiling where the chimney passes.
- A kind of box is installed on the attic side, which should be 10-15 centimeters higher than the attic floor. An insulating material is placed or poured into it, which will protect the wooden floor from the high temperatures of the chimney pipe. The pipe must be at least 25 centimeters from combustible floor materials.
Pipe passage through the ceiling
It is very important to arrange thermal insulation protection not only in the ceiling, but also on the wooden wall of the bathhouse. Basically, bathhouse buildings are built from pine, and its wood is quite resinous and can easily overheat and even burn from the high temperatures of a nearby chimney
Therefore, the wall must be protected using non-combustible material - this can be special drywall, asbestos, masonry, foil-lined mineral wool, or a combination.
It is very important to protect not only the ceiling, but also the walls.
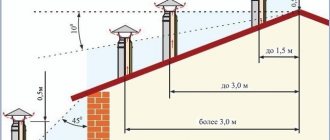
- After passing through the attic, the smoke exhaust duct is discharged through the roof and rises above it by at least one and a half meters.
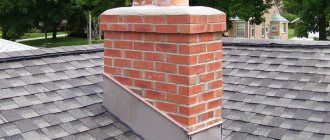
- Around the chimney, when passing through the roofing, waterproofing is installed, which will protect the roof sheathing from moisture, and therefore from the appearance of mold and destruction.
The passage through the roof needs waterproofing
A special protective mushroom is placed on top of the pipe head and a spark arrester is installed.
Water tank
Sometimes a metal tank for heating water is built into the chimney system of a bathhouse, built from metal sandwich pipes, inside which there is an uninsulated part of the chimney. Tanks can have different volumes - this will primarily depend on the power of the selected furnace.
When choosing this chimney accessory, it is best to pay attention to a stainless steel product that will serve for a long time. Naturally, you need to focus on the diameter of the chimney pipe to which the tank will be attached
It is better to purchase the entire set as a set so that you do not have to disassemble an already assembled structure.
Finished chimney section with water tank
The water tank has pipes onto which sections of the chimney pipes are placed. They must fit tightly together, otherwise the draft will decrease and carbon monoxide may enter the room.
A metal water tank is also built into the structure of a brick chimney. In this case, hot air from the furnace passing next to it heats the water poured into the tank. When building a container, you need to provide a place in the chimney wall where there will be a tap and a pipe with a tap for filling the tank.
Diagram of a sauna chimney
This diagram clearly shows all the above-described sections of the smoke exhaust system of a sauna stove.
Approximate general diagram of a sauna chimney
It is worth noting that a sauna stove with its firebox usually opens into another room - the dressing room. This is provided so that there is no risk of getting burned during washing, and so that the bathhouse attendant has the opportunity to constantly add firewood to the firebox.
The stove itself is located directly in the bathhouse with a metal sheathing, which encloses the hot walls and is 10-15 centimeters away from them. Pebble stones are placed at this distance, which, when heated, give off heat to the room, and if you want to get steam, they are splashed with ordinary water or an infusion of fragrant herbs. In this embodiment, the chimney and the tank installed on it are also located in the bathhouse.
Cast iron stove with fence, metal chimney and water tank
The figure also shows how the chimney should pass through the ceilings and roof and how to ensure complete safety of its operation.
Based on this diagram, you can easily build a chimney yourself if you strictly follow all the norms, rules, sizes and volumes of insulating materials.
Where do unscrupulous manufacturers save money?
In conditions of handicraft production, it is impossible to achieve precise geometry of products, tightness of joints and a high service life of chimney systems. This is due to manufacturers saving on materials and the lack of an automated production line.
Cheap steel chimneys are obtained by using:
- Thin sheet steel less than 0.5 mm with a small chromium content of less than 13%. It quickly loses its properties, deforms and collapses under the influence of high temperatures. Perforation corrosion occurs in less than a year.
- Construction mineral wool (up to 300°) instead of technical wool (up to 600°). The insulation is stuffed by hand and crumbles over time. The pipe heats up unevenly and becomes deformed.
- Old equipment for rolling sheets. In this case, the exact geometry of the products is not ensured.
- Welding occurs with an overlap or a mechanical connection in a lock; the high temperature causes the seam to separate.
- Zigging method for connecting parts. Soot accumulates at the joints, making cleaning difficult.
How to calculate the chimney diameter
There are two calculation options: complex and simplified, but they all take into account the amount of oxygen required to ensure combustion of the fuel. Optimal characteristics of chimneys
Optimal characteristics of chimneys
| Parameter | Meaning |
| Temperature of gases at the chimney outlet | +120°С |
| Minimum speed of gas movement | Not less than 2 m/s |
| Recommended chimney height | 5 meters |
| The amount of fuel burned in one stack of the firebox | 10 kg/hour |
Based on these characteristics, you can calculate the diameter of the chimney using the formula
Chimney diameter
- D – chimney diameter;
- Vr – volume of air.
You can calculate the height of the chimney depending on the cross-section geometry using a graph.
Dependency graph
To calculate, you need to know the firebox area (F) and the chimney area f, divide the first value by the second and determine the percentage. For example, the ratio of the chimney cross-section to the firebox cross-section is 10%. This means that the minimum height of a round chimney is 7 meters, a square one is 9 meters, and a rectangular one is 11 meters. The difference in height compensates for the vortex resistance created by each type of chimney.
You must understand that these values only apply to a straight pipe, which is difficult to achieve in a sauna. For the most part, chimney pipes have various turns, this negatively affects draft. To accurately calculate a specific chimney with various curvatures, you will have to invite a “professor”, and we advise you to slightly increase the resulting diameter. All calculations were made with a large margin, plus some increase - this is quite enough for a stove operating on solid fuel.
Some more practical tips on chimneys
| Advice | Illustration |
| If a residential building is heated with wood, the rules recommend checking the draft annually before the start of the heating season. | How to check traction |
| If necessary, the chimney is cleaned. In practice, cleaning is done no more than once every 10–15 years. The baths are heated mainly once a week. Accordingly, chimneys need to be cleaned much less often. Conclusion - there is no need to make special complex structures for cleaning. | Brush for cleaning the chimney of a bathhouse |
| The main “enemy” of the chimney is wet firewood. During combustion, they evaporate a lot of water, the temperature of the gases drops significantly. There is always condensation inside the chimney, to which soot sticks. In such conditions, the chimney may not last even one season. Conclusion - use only dry firewood. | Dry birch firewood |
| To increase the temperature in the bathhouse, a metal chimney pipe can be connected to several elbows - the heat transfer area increases significantly, the bathhouse warms up faster. | Sandwich chimney elbow |
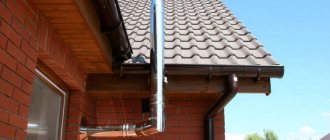
| Try not to lead the chimney through the roof; it is much easier to place it at the end of the bathhouse. In this way, it will be possible not only to reduce installation time, but also to eliminate the risk of leaks on the roof. | Chimney outlet through the wall |
Chimneys can be brick, ceramic or sandwich pipes (double). Let's consider the installation of each of these types.
Organization of passage through the roof
The most critical stage of installation is the passage through the roof. After all, cutting a hole in the roof of the steam room can disrupt the hydro- and thermal insulation of the roofing pie, resulting in leaks and destruction of the rafters of the building. Following these recommendations will help you make the right passage through the roof:
- The hole on the roof must be designed in such a way that the distance between its walls and the pipe is about 10-13 cm.
- Make a wooden box on the roof in the place where you plan to install the chimney.
- Fill the entire space that separates the chimney from the inner duct with non-combustible material. In this case, stone wool is suitable.
- Press the waterproofing layer with sheathing bars.
For proper waterproofing, small cracks in the roof can be sealed with silicone-based sealant. Larger cracks can be sealed by installing a special element - a passage, which is located at the point of exit through the roof.
Chimney passage through the roof
The roof passage is an apron-cap, which consists of a steel base and a rubber tip.
The passage is put on the pipe and securely fixed to the roof. Too much effort when shrinking the apron onto the pipe is not required; it can break the tightness of the connection and cause a roof leak.
Chimney structure for sauna stoves: which design is better?
In the entire design of the bathhouse, the chimney plays an important role - the removal of combustion products.
In addition, by skillfully manipulating the air flow through the chimney, you can regulate fuel consumption and the ability of the stove to give off heat.
Thanks to the chimney, you can maintain the fire even during the steaming process in the bathhouse.
The design of the chimney often varies depending on the type and materials of manufacture. Depending on the installation method, chimneys are divided into:
- internal, which allows for additional heating of the room, but creates an increased threat to fire safety;
- external ones, which do not pose a fire threat, but will require additional fuel for heating.
From a technological point of view, the internal arrangement of the chimney is more complicated, but it allows you to save a valuable resource - heat. Given the high cost of energy resources, this factor has a significant influence when choosing the type of chimney structure.
Important! When choosing to install an external chimney, the chimney is additionally insulated using mineral wool, and the pipes are routed outside, along the facade of the building. The design of chimney pipes also varies depending on the materials used.
There are a considerable number of them, but two designs stand out: a brick one and a chimney made of a metal pipe.
The design of chimney pipes also varies depending on the materials used. There are a considerable number of them, but two designs stand out in principle - a brick one and a chimney made of a metal pipe.
Brick structure diagram
The main advantage of a brick chimney is its heat resistance and thermal conductivity.
However, it is worth noting that the construction of this type of chimney is a very labor-intensive and painstaking task. Such chimneys are usually used for metal and stone stoves.
The main material for construction is refractory brick, and a mortar based on clay or special “kiln” mixtures is also used.
During the construction of a chimney, a necessary point is to maintain the ideal evenness of the masonry, both the structure as a whole and its individual functional elements.
In order to smooth out the planes and reduce the amount of soot and condensation accumulated in the chimney, the inside of the pipe is plastered, smoothing out seams and irregularities. It will also have a positive effect on your cravings.
Metal chimney diagram
Metal chimneys are easy to install and will cost much less. However, unlike a brick structure, metal has very high heat transfer. There are frequent cases of fire as a result of burning of a metal chimney pipe.
Chimneys made of steel pipes are installed directly on top of the stove. Most often, a cross-section of 115 mm is required, but this figure may vary depending on the power of the heat source or the specific recommendations of the manufacturer.
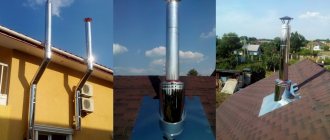
Photo 1. Schemes of two options for installing a metal chimney: inside the house and outside.
Experience shows that the best material for the manufacture of this type of chimney is stainless steel pipes. Its structure can be single, subject to good insulation. However, there is a more practical solution - a sandwich pipe. Such a channel essentially consists of two pipes of different diameters, and the space between them is filled with thermal insulation materials, in particular mineral wool.
There are a number of features and requirements that apply to steel chimneys:
- the internal wall thickness should be from 0.8 mm;
- steel must be resistant to temperatures up to 850°C inclusive;
- the thickness of the basalt filling should start from 50 mm, and its density - from 120 mg/m3;
- It is better to choose a stainless steel model of the outer pipe.
What pipes are used
You need to know that the likelihood of using the sauna without a threat to your health depends on how the chimney of the sauna stove is installed.
The chimney installation scheme comes in two configurations: internal and external. Depending on this, the chimney elements are selected.
Types of installation: where to install
Installation can take place on brackets through the wall or straight through the roof.
In the first case, the entire system is carried into the wall, and then rises, adjacent to the bathhouse, but without passing through it. This looks more aesthetically pleasing, and has the following advantages:
- the free space of the steam room is not used;
- there is no risk of getting burned on steel or stone;
- less chance of fire;
- it’s easier - you don’t need to make a hole through the entire attic;
- cases of smoke are easier to detect, as well as to track the general condition.
But at the same time:
- heat loss increases, since steam actually immediately enters the outside;
- the installation itself is more difficult due to the need to comply with the dimensions of the connection between the hole in the wall and the parts of the product;
- The heating of the pipe is greater due to the fact that the gases escape in the horizontal direction. With this arrangement, the resistance of the flue gases when moving through the channel increases;
- In terms of the number of elements, this option is 10% more expensive than the usual one.
When installing smoke exhaust systems in a straight line through the roof, the chimney is located straight, without bends, it departs from the boiler and goes upward, where it crosses the ceiling and exits on the back side of the roof. Advantages of such a connection:
- Stable draft due to the location of the chimney closer to the roof ridge.
- The condensate container is kept warm, so its cleaning pocket is dry and clean. This extends the service life.
- Cold bridges do not form in the walls, and thermal insulation is not compromised.
- The stability of the smoke exhaust duct is higher due to the fastenings to the roof. The fasteners themselves can be chosen cheaper than for the option on the facade.
- The aesthetics of the structure are not spoiled by side smoke outlets.
- Only a small part of the structure is located outside, which deteriorates over time from snow and rain. You can inspect and clean most of it without leaving the building.
- You can use non-insulated parts of the chimney that are located inside the bathhouse.
- This option is easier and 10% cheaper to install than when outputting through a wall.
- Flue gases go up, there is no obstacle to their exit. Heating is less than with a horizontal connection, since the resistance to smoke flow is minimal.
However, there are also weaknesses:
- The probability of “missing” the occurrence of a fire is higher, since smoke occurs in the ceilings that are located in the attic and on the roof, and they are simply not visible until the fire appears.
- Heat loss through the roof. Tightness is restored when waterproofing is installed before coating.
- Reduction of usable area, since according to safety requirements there should be nothing around the stove pipe for a bath.
- Increased costs for changing the roof and ceiling of the steam room, in particular, after finishing the final finishing.
- If the integrity of the smoke exhaust structure is damaged, the bathhouse begins to smoke.
- Condensation leaks and accumulated soot spoil the appearance of the roof.
- Burns from heated parts are possible in emergency situations.
When deciding on the installation method, the following nuances must be taken into account:
- dimensions of the building - if it is very small, then it is logical to make an external structure;
- the steam room is built from scratch or in an old room - in the first case, you can immediately think about the issue of insulation;
- Do you need to heat adjacent rooms?
External placement
An external smoke channel device is more expensive and difficult to install. This is due to increased requirements for compliance with the dimensions of the connection between the hole in the wall and parts of the product. For external installation, it is necessary to use double-walled chimneys to avoid the formation of condensation and fire. It is external structures that are the least flammable, since the smoke is instantly directed outside, rather than circulating through a pipe located in the building. The advantage of such a system is the absence of the need to make a hole in the ceiling and roof and saving of internal space. This reduces the risk of carbon monoxide poisoning.
Internal placement
The main advantage of the internal location of the chimney is the easy provision of draft in the chimney structure, which is achieved by the vertical direction of the exhaust gases. In this design, the main part will be located in the interior of the building, which allows the bath room to heat up much faster. However, from a fire safety point of view, this design is more dangerous, since it is much more difficult to notice smoke in the ceiling or in the attic.
Material
Smoke exhaust systems for bathhouses are made from different materials. Each of them has certain characteristics, strengths, and weaknesses.
Brick
Brick is the most expensive and durable of materials. There are two ways to lay pipelines:
- Mounted method. It is used in the construction of a heater. Suitable for servicing only one oven, without connecting additional devices.
- Indigenous structures. They are laid out close to the heater. Next, the masonry is connected using a metal pipe. Applicable to multiple devices.
To assemble a brick chimney, you must have practical bricklaying skills. Advantages:
- attractive appearance;
- durability, high strength;
- constant traction remaining at the same level;
- resistance to prolonged exposure to fire;
- slow heating and cooling.
The price of a brick chimney is higher than that of a structure made of other materials.
Brick chimney laying
Metal
Advantages:
- installation of a chimney system made of metal is easier than that of brick;
- low price;
- The inner walls of metal pipes are smooth, soot accumulates on them more slowly.
Metal chimneys are not suitable for climate zones with low temperatures. In such cases, it is necessary to install additional thermal insulation and wrap the pipeline with mineral wool.
Other types
Sandwich pipes belong to a separate group. They are a double-walled structure, with non-combustible material fixed between the walls.
Types of smoke exhaust structures
We provide a summary table in which we briefly summarized the options discussed above.
| Type | Type of heating device |
| Asbestos | A gas boiler |
| Made of black metal | Heating and sauna stoves |
| Brick | Fireplace and heating stove |
| Ceramic | Solid fuel boiler, heating stove or fireplace |
| Stainless steel | Fireplace, solid fuel or gas boiler, heating and sauna stove. |
What does a chimney consist of?
Before we begin installing a chimney for a bathhouse, let's figure out what this structure consists of and what are the principles of its operation.
Based on their location, chimney systems can be divided into internal and external.
An internal chimney is very easy to install, but the proximity of the hot surface of such a pipe to the wooden elements of the bathhouse seriously increases the level of fire danger.
The external chimney loses heat faster, which can negatively affect the draft level in the sauna stove. You will add additional fuel to the stove to create a normal temperature in the sauna.
Thus, both installation options have their drawbacks, but all of them can be compensated for by reliable insulation of the chimney. But creating an internal chimney system, from a technology point of view, is much simpler.
Material used for the construction of a chimney for a bath
There are three main methods for constructing an internal chimney from different materials:
- Metal pipes. This material is quite affordable, but has very high heat transfer. As a result, it requires very good thermal insulation. More than one or two fires arose due to a burnt-out pipe.
- Ceramic pipes. The most reasonable option would be to use an asbestos-cement pipe. Asbestos cement has excellent heat-insulating properties and the construction of chimneys from it will not require a lot of additional work.
- Brickwork pipes. This is the traditional construction method for Russian stoves. Brick gains heat slowly and releases it slowly - this is a smart choice.
Selecting pipe parameters
To determine the amount of material for equipping the stove in the bathhouse with a smoke channel, you need to know its length and diameter.
Diameter
What pipe diameter is best to use for the chimney into the bathhouse is not an idle question; your safety and the normal operation of the stove depend on it.
We are talking about the internal cross-section of the chimney or the size of the lumen of the pipe through which smoke is evacuated to the outside. If there is a factory-made stove in the bathhouse, then it is easy to determine the required internal diameter of the smoke channel: it should be the same or slightly larger than the outlet pipe from the firebox.
The outlet pipes have standard sizes, allowing you to accurately select a chimney pipe for them Source domizbrusa.by
Commissioning
The chimney must be inspected, paying special attention to the quality and tightness of the joints. Clean the inside of the structure with a dry cloth.
All unnecessary items are removed from the chimney and firebox. Test ignition is carried out using a small amount of fuel. At this stage, the efficiency of draft, the presence of smoke at the joints, and its drawing into the room are determined.
After testing, after a few hours the oven is fully heated. You should not cram the combustible materials used into the firebox to capacity; this can lead to failure of the chimney and a fire. All flammable elements and partitions near the pipe must be insulated, the distance between them and the exhaust structure must be at least half a meter. Visual inspection and preventive cleaning are carried out once every six months.
About the installation of fire-fighting fluff in the following video:
Performing device isolation
Installing a stainless steel chimney with your own hands is very simple - you just need to connect the elements in series from the bottom up. Manufacturers of modular stainless steel systems provide a bell at the end of all component parts. It is also necessary to ensure that all elements that go outside have high-quality thermal insulation. The easiest way is to select ready-made modular “sandwich” elements for installation on the street, as well as in places where the roof or wall passes through.
You can make insulation yourself. To do this, the chimney must be wrapped with a layer of basalt wool, and an external contour made of any metal must be installed on top; the cheapest option is galvanization. Essentially, you need to make a homemade sandwich.
Properly performed thermal insulation is necessary for the following purposes:
- Reducing the temperature of the outer pipe;
- Reduced risk of condensation;
- Acceleration of the pipe heating process;
- Increased traction.
Chimney installation rules
Places where pipes pass through the ceiling and other building structures should be considered taking into account the fact that the inside is lined with wood, that is, combustible material
In this case, it does not matter what material the wall or ceiling itself is built from, it is enough that there is a flammable cladding. In general, the postulates for laying chimney ducts sound like this:
Before installing a metal or brick stove, you need to choose a place well so that the future chimney of the bathhouse does not fall on the load-bearing structures of the roof. There is no point in making unnecessary turns of the pipe later, but it is impossible to turn a brick channel. The total number of pipe turns should not exceed 3; the horizontal section from the stove to the insert into the vertical channel should not exceed 1 m in length. The exception is a gas duct inclined at an angle of 45°, sometimes used instead of a horizontal one. But you shouldn’t get carried away here either, make this segment as short as possible; a single-walled metal chimney should be separated from unprotected combustible floor materials at a distance of 0.5 m. If the combustible surfaces are covered with a non-combustible screen, the gap can be reduced to 38 cm. All requirements of fire safety standards are shown in detail in the figure below; the same figure shows how to correctly install the chimney in height so that its cut does not fall into the leeward zone. Then the force of natural traction will decrease significantly; the vertical gas duct must be equipped with a system for cleaning and draining condensate.
Starting from the attic floor, it is strongly recommended to protect the single-wall pipe with a heat-insulating layer of fireproof insulation; the best option is basalt fiber. On the outside, the insulation is wrapped in a galvanized steel casing. Then condensation will not appear outside the pipe, and the attic space will be protected from fire. When installing a chimney through a wall, the same distances are observed as for passing through the ceiling.
Do-it-yourself chimney installation
Assembling a furnace gas removal system is in many ways similar to installing a sewer system made of cast iron pipes. Unlike cast iron, ceramics are sold in ready-made sections, and they can only be cut with a diamond cutting wheel, and only at the end sections of the chimney.
First of all, using a construction cord and a level, markings for installing the chimney trunk are applied to the wall of the bathhouse. You can punch a channel in the ceiling of the bathhouse and run a cord with a suspension or use a laser level. Having guidelines along the vertical axis, you can easily assemble a brick shell.
A 30 cm thick foundation is sufficient for ceramics.
The first two sections of the outer body have side windows for connecting to the sauna stove, so the first section of the ceramic pipe should be angular. After laying the thermal insulation and fixing the ceramics, reinforcing bars are placed in the additional channel.
Separate sections of the ceramic pipe are connected mechanically with the obligatory pressing of a sealing mixture prepared from powder glue. The putty hardens quickly, but for final setting you have to wait 4-5 hours.
They are attached to the roof rafters with a wire frame.
After the chimney is assembled and finally leveled, the fittings are tensioned by heating and fixed. After cooling, the sections are filled with heat-resistant cement-sand mortar. If the pipe height is more than three meters, then the reinforcement is sealed and poured in separate sections of 1.5 m.
It is impossible to align a sauna pipe without a level
Installation of internal metal chimneys
After the installation of the heaters is completed, they begin to arrange the chimney structure, performing work from the sauna stove pipe. This can be either the beginning of a metal chimney or a section of the smoke exhaust structure connecting the heating unit to a brick pipe.
Since chimneys come in two types, their installation is different. When the pipe is placed inside a bathhouse building, almost the entire structure is located vertically. The installation of individual elements is carried out in such a way that each part located above is placed on the one below. This method is called “smoke” installation.
When using sandwich pipes shown in the photo, they are installed differently, using the “condensate” method. Its essence is that to arrange the internal part of the system, the upper pipe is placed in the socket of the lower element. For the outer part of the structure, the “smoke” method is used.
Thanks to this chimney arrangement, the moisture accumulated in the pipe can freely flow down and enter the condensate collector, without touching the heat-insulating material, which, if there is an excess of moisture in it, loses its inherent properties.
The joints of the elements should be located so that the connection is not at the roof level, and also does not fall on the attic and interfloor ceilings. If the heating unit is planned to be installed in close proximity to wooden walls, they must be protected from fire or overheating. For this, heat-resistant materials are used, such as asbestos boards, which are fixed in two layers.
When installing samovar-type water heating tanks, they should be located near the combustion chamber, directly above it or in the attic, if hot water will need to be distributed not to one room, but to two - a washing room and a shower room.
Before you begin installing the pipes, their joints should be coated with heat-resistant sealant and, after completion of the work, additionally secured with special wide clamps.
When, when connecting individual parts of the chimney, significant gaps remain between them, the part that needs to be inserted is sealed. To do this, an asbestos cord is used to wrap the pipe.
The first section of the structure, attached to the unit’s branch pipe, cannot be made multilayer; it must be made of a single-walled metal pipe with special connections, in which there is a valve. This chimney adjustment element (damper) is used to create and maintain the required draft level while the bathhouse is warming up. After the combustion is completed, the valve allows the heating unit to retain thermal energy for a long time.
The installation procedure for this element is as follows:
- A square hole is cut in the ceiling so that a box fits into it, the lower part of which is fixed to the ceiling.
- Through a hole made in the bottom, the smoke exhaust pipe is led into the attic.
- Then the box is filled completely to the very top with heat-resistant material that is light in weight, for example, mineral wool or expanded clay of the middle fraction. The insulation must be laid as tightly as possible.
- In the attic, the box is covered with a metal lid equipped with a round hole. It is placed on the protruding part of the pipe.
As a rule, chimney elements are placed vertically in the attic, but sometimes they can get on the sheathing bars. In this case, a slight bend is made in the structure using bends.
If the oven is brick
This chimney for a bathhouse is easy to build with your own hands. When the row of masonry covers the stove, the construction of the chimney system begins.
So, on the 21st row of brickwork it is necessary to form two channels. They will then be merged. Next, on the right you should block the space above the core. The gap between the core and the masonry will be 2-3 cm. Any voids are filled with mineral wool insulation. With the 22nd row of masonry, the opening will already be closed, and after that you can begin to lay and shift the channels to the middle. To prevent this ceiling from cracking in the future, it is advisable to lay another row of masonry above the stove core.
Next, the chimney will begin to narrow. Valves are installed here. They are made one above the other. Now the brickwork will go into fluff.
For those who have managed to build a brick oven, making a chimney will not be difficult. The main thing is that no cracks arise. Also, the standard for the cross-section of the pipe should not be exceeded. Otherwise, the gases will cool quickly.
How to clean a chimney in a bathhouse?
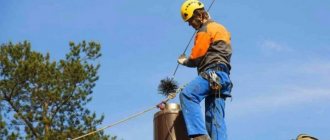
Brick or stainless steel chimneys serving sauna stoves should be cleaned as needed. Practice shows that with year-round use of a bathhouse, such a need occurs at least 2 times a year. For this purpose, there are special pipe cleaners that are tied to a rope with a load so that they can be lowered from top to bottom.
You should drain the condensate through the tap at the bottom of the pipe, climb onto the roof and lower the brush inside. Before doing this, you will need to remove the umbrella or deflector. It is very convenient when a chimney with a hole (revision) is installed in the bathhouse, through which access is provided from below. Then cleaning can be done on both sides, and then the spilled soot can be removed through the hatch.
In addition to the mechanical method, there is also chemical cleaning of the chimney. There is a commercially available product called “Chimney Sweeper log”, which is placed in the firebox of the stove and burned there in accordance with the instructions. The product is quite universal, suitable for any solid fuel heaters and has been tested in practice more than once.
Selection by manufacturer
Those who prefer quality to an affordable price can be advised to buy products from manufacturers with a good reputation.
Steel chimneys on our market are represented mainly by domestic brands. Judging by the reviews, the products of the following manufacturers have the highest quality:
- Ferrum and Kraft (Voronezh);
- Schidel (Germany);
- Baltvent (Kaliningrad);
- Termofor (Novosibirsk);
- Vulcan (St. Petersburg);
- Inzhkomtsentr VVD, Rosinox (Moscow region);
- Rosst@In (Russian Industrial Company) (Moscow).
But the production of ceramic chimneys in our country has not yet been developed. We produce only external blocks and insulation for fireclay pipes imported from European countries.
Basic rules for installing a stainless steel chimney
- The height of the chimney structure should be 50 cm higher in relation to the roof ridge.
- The section of the wall near the firebox and the ceiling through which the chimney passes are the most fire hazardous, so it must be lined with fire-resistant material or a stainless steel protective sheet.
- All pipe elements are connected “via condensate”, i.e. the element is mounted inside the previous one.
- It is not recommended to connect pipes in the bathhouse floor area.
- Choose quality clamps and adapters of the appropriate size.
- You should not use a large number of bends so as not to reduce the level of traction.
- When the pipe is brought out, the outlet is first attached, and then all other elements.
Bottom line
Despite the fact that a chimney for a bathhouse made of stainless steel is a more advanced design, the brick analogue does not lose its relevance to this day (also find out how to make a chimney for a bathhouse with your own hands in a country house). Which modification to choose should be based on existing circumstances and individual wishes. You can get more detailed information by watching the video in this article.
Did you like the article? Subscribe to our Yandex.Zen channel
The best stainless steel chimneys with roof transit and rear exit
Such designs are suitable for boilers and furnaces that do not have a direct upward outlet of exhaust gases, and the exhaust channel is located on the side. To connect the chimney, you need a kit with a side inlet and the ability to attach a high vertical stand (without loading the boiler).
Phoenix 120 mm, 1 mm - good for a bath
This is the best option for a stainless chimney for a bath due to the wall cross-section of 1.0 mm, which allows you to transfer high heat from a nearby boiler, where wood burns at high temperatures. The rear connection provides open access to the rock laying area.
The diameter of 120 mm promotes strong draft, which will allow you to heat the bath to the desired maximum level. The upper part has a narrowing and an umbrella that prevent the hole from clogging.
Pros:
- wide insulation board that can easily be adjusted to the contours of slate or tiles to cover a hole in the roof;
- stainless steel stand to hold the side outlet from the boiler and the high mast; adjust the distance from the partition;
- internal flow diameter 120 mm;
- stainless steel wall thickness 1.0 mm for high heat;
- strong connection of all longitudinal joints using argon welding;
- the socket system is easy to assemble with your own hands;
- environmentally friendly insulating material inside;
- can withstand temperatures up to 1000 degrees;
- guarantee of operation with regular use for up to 15 years;
- Includes pre-furnace sheets and passage parts for floors;
- two sealants with a temperature range of 260 and 1200 degrees for high-quality sealing of adjacent parts;
- 8 clamps for assembly;
- tee for collecting condensate;
- The total length of the chimney is 6 m, suitable for outlet to a large height, which will provide good draft even with closely spaced houses.
Minuses:
- the cost of the set is 29,000 rubles;
- The insulating fiber is 30 mm thick, which is smaller than similar models.
Installation of external metal chimney structures
If the chimney installation scheme provides for its external placement, the pipe coming from the heating unit is laid through the wall of the building. To ensure the safety of the operation process, experts advise laying brickwork, which will insulate the wall when the chimney is brought out through it.
To turn the pipe in the direction of the wall, you will need a product such as a bend or elbow. These structural elements have bends at an angle of 45 or 90 degrees. They are selected taking into account the installation diagram of the smoke exhaust system.
The pipe to the stove in the bathhouse can be routed through the wall, either through a duct or through the attic floor. The box is filled with stone wool. Since there may be small gaps around the pipe, they are treated with heat-resistant sealant.
A tee is installed on the outside of the building. From here the structural elements will be installed further: upward, along the wall and to the condensate collection point located below.
For vertical fixation of the chimney, holder mounts are used. To ensure good traction, the pipe should rise above the height of the ridge by about 50 centimeters. A protective fungus is placed on top of the head.
Water tank on a pipe for a bath
When building a bathhouse, it is worth considering where hot water for washing will be supplied from. It is more advisable to install the water tank next to the air duct. The container will heat up as hot air passes through the pipe. Heat exchangers are made of cast iron, enameled and stainless steel. The most popular is the last option.
It can be installed near the stove and on a pipe passing through the attic of the bathhouse. The arrangement is similar, but in the attic it is easier to fill the tank with water. Since the heat exchanger is not located in the steam compartment, it is possible to connect a water supply with a tap from the pump. Water will be supplied to the tank automatically.
Pipe selection criteria
When purchasing these elements for a chimney system, be sure to take into account the following:
- The size of their internal cross-section. Pipes for sauna stoves made of stainless steel or steel are calculated taking into account the designed power of the unit. For bath buildings, the internal diameter is usually 15–20 centimeters. If the cross-section is too large, the heat will not be able to be retained in the furnace, and pipes of too small a parameter will not create the draft required for smoke removal. In this case, in no part of the structure the diameter should be less than that of the outlet pipe of the heating unit.
- The length of the chimney pipe cannot be less than 5 meters, and the more precise value of this parameter depends on the installation location on the roof. If they plan to install it in the middle of the slope, then the pipe must be raised above the level of the ridge by 50 centimeters. The best location for the chimney on the roof is considered to be 1.5 meters from the ridge, but this value is not mandatory and largely depends on the location of the stove in the room. The quality of traction is affected by the height of the pipe.
- In order for the structure to last for a long time, the thickness of the metal for making pipes must be at least 1 millimeter.
- Provided that a tank for heating water is planned to be installed in the chimney system, this tank will function according to the “samovar” system - it is welded to the chimney pipe.
The best stainless steel chimneys with roof passage and top outlet
These are structures for connection to boilers and fireplaces that have an outlet for gases from the combustion chamber in the upper part of the body.
From there, the system is mounted directly onto the roof, which requires partial dismantling of the roof, but requires a minimum of materials for transitions and connections, due to the straight trajectory. To select, it is important to calculate the length of the structure with the elevation above the ridge.
Ferrum set 115 mm, 0.8 mm - for any fireplace
This is the best stainless steel chimney for a home fireplace due to its direct connection and the optimal diameter for connecting to the outlet of 115 mm. Inside there is stainless steel with a sealed weld that will not allow condensation to pass through.
This is followed by a thick layer of mineral wool with a density of 120 kg/m3, which protects the attic floor and roof from fires. The outside of the chimney is wrapped in laser-welded galvanization, which eliminates damage to the galvanic layer.
Pros:
- all parts for installation in the kit, including ceiling elements for the roof;
- the insulating layer is resistant to temperatures of 700 degrees;
- an insulation thickness of 40-50 mm will prevent the surrounding materials from igniting from hot smoke and heat from the pipe;
- suitable for burning wood (rising ash will not damage or burn through the inner layer);
- screws included;
- stainless steel head that protects the outlet from blocking with snow;
- the package comes with a sealant that can withstand 1200 degrees;
- the box contains 7 sheets of basalt wool and 5 clamps for connecting high structures;
- pre-furnace sheet and stainless steel screen;
- AISI 439 steel on both parts of the pipe (on the one in the room and on the one outside on the roof).
Minuses:
- the thickness of the stainless steel connecting to the fireplace is 0.8 mm, and the cross-section of the pipe wall on the street is 0.5 mm;
- the pipe leading from the fireplace is not covered with insulation (protection starts only from the ceiling), so you can get burned on it;
- the cost of the entire set is 27,000 rubles.
Set Dymok 115mm, 0.5 mm - the most affordable option
This is the best stainless steel chimney at the most affordable price of 11,000 rubles for a complete set. Inside the sandwich structure there is stainless steel with a wall section of 0.5 mm, which is resistant to deformation thanks to the dense winding of Rocwool basalt wool and a galvanized layer on the outside.
The pipe connection is made using TIG welding technology, which provides a strong seam with minimal soot collection on the protrusions.
Pros:
- the price is one of the most attractive 11,000 rubles;
- The set includes an insulated umbrella that protects against precipitation;
- 4 stainless steel clamps for assembling a long pipe into a single unit;
- adapter from single-circuit structure to double-circuit structure;
- roofing adapter (master flush) included;
- 1 m of starting pipe without insulation and 3 m of double-layer pipe for leading to a high roof;
- sandwich thickness 40 mm;
- high quality AISI 439 stainless steel.
Minuses:
- there is no roof insulation, so you will have to purchase additional materials separately;
- only one fastening to vertical structures;
- metal thickness along the entire length of the pipe is 0.5 mm;
- Suitable for burning with coal or gas, but it is better to use wood rarely, so as not to heat up the thin walls too much.
Ferrum set 200 mm, 0.8 mm - for a powerful heating system
This is the best option for installing a heating system not only in a private home, but also in an office building, because the internal flow diameter is 200 mm, which can satisfy the needs of a serious boiler. The wall thickness of 0.8 mm has sufficient rigidity for long-term performance.
Pros:
- insulator filling density 120 kg/m3;
- high-strength stainless steel;
- withstands temperatures up to 700 degrees;
- simple assembly of the socket system;
- sealed internal seam;
- insulation thickness 50 mm;
- 7 meters of pipe for high reach;
- flange for passage through the ceiling;
- a large head covering not only the inner pipe, but also the outer one;
- 8 basalt wool slabs for attic insulation;
- 2 fasteners and 9 clamps included;
- stainless steel screen 1x1 m.
Minuses:
- the large outer diameter of the pipe 280 mm requires a large hole;
- price 42,000 rubles.
Brick chimney structures
Previously, chimneys were laid out of bricks, since during the construction of this element of the stoves there was no alternative to this building material. Creating brickwork is a labor-intensive process. In this case, it is impossible to do without using a laying scheme and mandatory compliance with all design parameters.
Brick chimneys are strong and durable, which has been proven over time. A material such as brick has a structure that can accumulate thermal energy and release it evenly. A brick structure is much more fireproof than a prefabricated metal chimney made according to the latest technologies.
A significant disadvantage of a chimney made of bricks is that their internal surface is rough and has corners. Soot collects on it, which over time begins to interfere with the passage of smoke and reduces draft, which negatively affects the degree of heating of the heating unit.
A brick pipe for a sauna stove, heavily covered with soot deposits from the inside, can cause the sauna to smoke or even catch fire during the kindling process from sparks that hit it (read: “Why does a sauna stove smoke and how to fix it”). As a result, such a situation can lead to dire consequences.
Advantages and disadvantages of a pipe bath stove
Pipe sauna stove
- From a physics point of view, the ideal firebox from a thermotechnical point of view is a ball. In this regard, the cylinder is closest to the ideal shape, which cannot be said about products with four sides, for example. Therefore, those who are planning to make a sauna stove from a pipe are on the right track.
- Another important advantage is the absence of seams on the body or the presence of only one seam.
- If we take a pipe of optimal thickness (not too thin and not too thick), we will get an option that will heat up within an acceptable time, and the stove will last a long time.
- Those who use pipes receive stoves that are not too heavy , which can be transported and installed without any problems.
As for the disadvantages, in this case they will be a direct continuation of the advantages of the pipes:
- It is difficult to work with thick metal.
- We need more consumables for tools (grinder and welding machine).
IMPORTANT! However, you will end up with fewer stitches and fewer future problems.
Why do you need to know the diameter?
Beginners do not understand the importance of the chimney cross-section for a stove and why it is so important to correctly calculate not only the internal size, but also the height of the pipe. When developing an individual project for an autonomous heating system for a residential or industrial premises, the level of traction and performance of the unit depends on the accuracy of the data.
Inexperienced builders can make a pipe with a large or insufficient cross-section. In any such option, the operation of the heating device is disrupted, and you are simply throwing money away. For optimal operation of the home heating system, it is important to carry out an accurate calculation and familiarize yourself with the recommendations of regulatory documents.
Important! Fire safety at home, work productivity, comfortable temperature - the solution to all these issues depends on the correct determination of the size and length of the chimney.