Ceramic tiles are one of the most common finishing materials. If there is no flat surface, tiles in the bathroom are laid on gypsum fiber board or gypsum fiber sheets. Installation can be carried out on the floor or wall, regardless of the type of coating. The sheets are securely attached to concrete, brick and other bases, which makes this material truly universal.
Laying tiles on GVL
In addition, gypsum boards differ from standard plasterboard sheets or gypsum boards in their reliability, durability, and long service life. Gypsum fiber sheets are characterized by high performance characteristics, so they are excellent as a base for laying tiles on floors and walls. By and large, installation of the material is no different from ordinary drywall, so no extra tools or skills are required.
Why lay tiles on a gypsum fiber base?
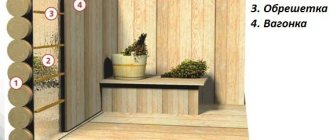
Gypsum fiber sheet is a common building material that allows you to level the surface of walls, floors and ceilings for more convenient tiling. This method allows you to reduce installation time to a minimum and significantly simplify the installation method. GVL provide an additional heat-insulating and sound-proofing layer, and LVGV surface sheathing will provide an additional moisture-resistant layer. Such sheets will not lose their original appearance when in contact with liquid.
Advantages of gypsum fiber material
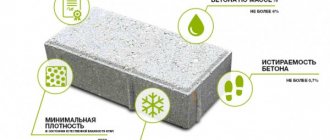
In terms of characteristics, gypsum fiber sheet is very similar to plasterboard, but it is the gypsum fiber base that has a number of distinctive advantages:
Stages of laying gypsum fiber board on the floor
- laying gypsum fiber sheets involves the use of a dry screed (if we are talking about floor coverings). This screed method is suitable for any room;
- in areas of high humidity, moisture-resistant HS sheets are used;
- unlike gypsum plasterboard, gypsum fiber boards have increased fire resistance and moisture resistance;
- in the manufacture of gypsum plasterboard, the sheets are covered with cardboard, and therefore cannot have fire-resistant properties;
- GVL are not covered with cardboard; they contain a number of components that increase the original characteristics.
How it all happens
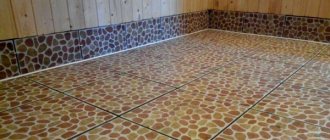
If you omit the process of filling in expanded clay or something else to create a base, then all that remains is to figure out how to lay tiles on a gypsum fiber board floor. The main stages of the process look simple:
- The tiles themselves are purchased and prepared. You need to choose colors and if a monochromatic option is used, then it is better to mix the contents of different boxes with each other. This way you will get an even mixture of shades - even in the same batch, the tones of the tiles may differ slightly.
- Next you need to make the necessary markings. Sometimes the tiles do not cover the entire surface area and marking lines are very useful here.
- After this, glue is prepared - the instructions must be followed. Each manufacturer instructs the buyer in its own way how to prepare a specific composition.
- Next will be the actual laying of the tiles - ordinary work no different from the standard process.
- Naturally, after installing the entire coating, it will be necessary to sand the seams. For wet rooms, it is better to choose a grout with the appropriate characteristics.
In principle, everything seems simple, and in fact it will not be difficult. However, this will only be the case if you follow all instructions exactly. There are several important points that nothing will be said about on packages of glue or tiles:
- Before starting laying, you need to cover the entire floor area with soil. This will reduce absorption and increase adhesion.
- If you plan to lay a covering with a pattern, then it would be useful to find the center of the room or kitchen before starting the laying. In this situation, it will be easier to start work from the center of the room.
- It is better to prepare the solution in small batches - it may dry out if you hesitate a little while carrying out masonry work.
- You should not install more than four rows at a time, as this reduces attentiveness and may affect quality.
- All parts are checked for level relative to neighboring ones.
- To ensure that the gaps between the plates are the same, buy construction crosses - they come in different sizes and you can choose the one that corresponds to the dimensions of the required gap.
- If during the installation process adhesive mortar appears between the slabs, it should be removed immediately, without waiting until it dries and removal becomes a rather complicated operation.
The rest will be easy. It is important to adhere to the originally drawn up work plan and carry out all operations carefully, without rushing. In this case, with proper preparation of the foundation, everything will turn out exactly as you planned.
Tools and materials for installation work
It is impossible to do without piece counting of materials. To do this, you can arm yourself with a calculator, pen and notepad, or enter data into an online calculator for calculating facing materials. Do not forget about openings and niches, complex corners and turns, since the final number of building materials for laying tiles on the surface can vary to a greater or lesser extent.
However, it is not worth taking an even number of slabs. According to experts, all building materials are purchased with an expectation of 10–15%, since operating conditions involve errors. We should not exclude defective parts (manufacturing or received during the installation process).
Accessories for drywall installation
To install GVL (GVLV), you will need the following tools and building materials:
- GVL sheets (GLVL);
- self-tapping screws;
- screwdriver or set of screwdrivers;
- marker, felt-tip pen, pencil or pen for making marks;
- building level;
- corners;
- roulette;
- saw (to adjust the length of gypsum sheets).
To lay tiles you will need the following building materials and tools:
- tile cutter;
- set of plates;
- cement or adhesive mortar;
- spatula for applying adhesive solution;
- rubber spatula for applying the grout layer;
- grout (you can make it yourself or purchase it at a hardware store).
Tools for laying tiles on drywall
Existing varieties
GVL slabs for walls have a straight edge. They can be used for leveling - standard and moisture resistant.
Under alignment
Standard GVL slab for leveling: it is used for cladding rooms where the humidity is normal.
Pros: durable, fireproof and moisture resistant.
The finished material is produced in rectangular slabs with the following parameters:
- length 2.500;
- width 1.200;
- thickness 10 or/and 12.5 mm.
Moisture resistant
The moisture-resistant GVL board is particularly resistant to moisture, thanks to the composition with which it is treated. It is used for covering rooms where the humidity is higher than the corresponding norm. The standard parameters are the same as for leveling plates. They also produce small format ones: 1200x1200x10.
Preparing the base for gypsum fiber
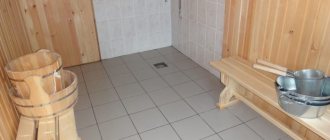
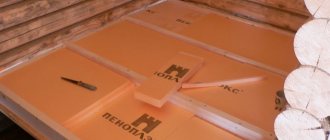
Preparing the surface for laying tiles on GVL is a mandatory step before installation work. If the floor surface is a wooden floor, it is better to inspect it for defects: there is no rot, cracks or potholes. If any are found, replace the boards with new ones or cork material.
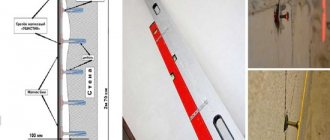
When installing moisture-resistant gypsum fiber boards on the surface, the sheets should be laid on bases along the room. The sheets are attached with self-tapping screws, but you should not forget about bandaging. For ground work, use specialized wood processing compounds. Before laying tiles, it is recommended to treat the wooden floor surface with an impregnation that has a moisture-resistant and fire-resistant effect. An additional protective layer can guarantee the durability of the wooden floor surface without the formation of fungus and dampness.
The final stage on the way to a new floor
After three to four days, the seams are rubbed with a special solution. After removing the plastic spacers, apply the solution using a thin spatula. Excess mortar is removed from the tiles using a damp cloth.
It’s clearer on how to install GVL in the video:
https://youtube.com/watch?v=Tjrqatur2qs
It is recommended to treat the seams between the tiles with a water-repellent varnish. This will increase the waterproofing of the entire bathroom or kitchen.
After letting the grout dry a little, we begin installing the plumbing and other equipment. Such a tiled floor can remain in its original form for a long time, maintaining all the necessary qualities.
Screed and installation of gypsum fiber boards
GVL screed is possible when installed on top of:
- subfloor, including with insulation;
- expanded clay layer (no more than 30 mm);
- prefabricated screed, where in addition to the expanded clay layer there is a layer of polystyrene foam boards.
Installation of GVL screed
Thanks to the gypsum fiber coating, laying the finishing layer will be much easier if the floor surface is as smooth as possible and no additional layers will be required before finishing. GVL screed will allow you to get rid of problems with waiting, since based on sand and cement, it hardens after 2-4 weeks.
Laying ceramic coating
Before laying the tiles, all necessary measurements and calculations are made. This includes counting the number of tiled covering elements. Material calculations are carried out piece by piece, not in square meters
The features of the pattern, color, shape of the room, etc. are taken into account.
The classic styling option is the most common. The elements are laid out from the center of the floor or wall surface. To calculate the center point of the floor, strings are pulled at an angle of 90 degrees, dividing the plane into 4 rectangles.
For diagonal laying, such markings are supplemented by tensioning cords from the corners of the base. The installation procedure in this case is more complex.
Solutions and mixtures for installing tiles on GVL
Mixtures for laying tiles are divided into 3 types:
- cement mortar;
- cement-adhesive mixture;
- solution based on powder glue.
The use of each solution has its own restrictions. It is better to plant paving slabs on cement mortar, while mixtures with the addition of PVA glue or based on dry glue are used for laying tiles indoors. For laying tiles, you should not use cement, the quality of which will be lower than 300. Component ratio: 6x1x25.
To create a cement-adhesive mortar you will need:
- sand;
- cement;
- PVA.
Laying tile slabs on cement mortar with gypsum fiber board without glue will not ensure proper contact. It is better to use coarse sand; before starting the procedure, you need to rinse it and clean it of pieces of clay, shells and other debris, and let it dry completely. Otherwise, when sifting through a sieve, the wet sandy mass will pass through heavily and clog the sieve holes, sticking to the grid.
A solution based on dry glue is used for laying tiles on any surface - walls, ceiling or floor. The main thing is to follow the ratios indicated on the pack of dry mixture to prepare the adhesive solution. The mixture-based solution is used for the following group of finishing materials:
- ceramic tile;
- porcelain stoneware;
- cotto;
- clinker.
When choosing a dry powder for mixing an adhesive base for laying tiles, you need to pay attention to several nuances:
- shelf life of the composition;
- characteristics;
- what surface it works with (despite the fact that the adhesive is suitable for tiles, it must also adhere well to the surface).
Subtleties of the facing process
To properly glue the tiles to the gypsum plasterboard, the solution is applied not directly to the tiles, but to the surface of the base. For this purpose, the adhesive composition collected with a spatula is distributed in an even layer over the floor. In this case, the glue covers an area of no more than 1 square meter. Then they take the tile and place it at the corner from which the layout of the diagram will begin. The tiles are pressed tightly, which ensures optimal adhesion of all surfaces to the adhesive. Then, using a level, the levelness of the element is checked. When protruding the edge, take a rubber hammer and tap the tile on top, trying to give it the desired location on the surface.
Sometimes during installation a small mistake may occur - the tiles may sink. Then the recessed element must be removed and placed again. According to this principle, the entire surface of the base is laid out sequentially. After each element, be sure to check how it is laid relative to the previous ones.
Applying a grouting compound to the masonry surface
Tile grout
The grout cannot be applied immediately, as soon as the tiles have been laid on the surface, several days must pass (for floor slabs - from 72 hours, for walls and ceilings - from 48 hours, depending on the thickness of the adhesive layer).
At the same time, the level of humidity in the room should be reduced as much as possible - it is necessary to limit contact with moisture as much as possible. Otherwise, the substance will not set and the tile will fall away from the surface.
Grouting is the final stage in finishing work, masking the gaps between the slabs and securing the entire masonry to the surface. To apply the composition to the surface of the masonry, a rubberized spatula is used, which will not damage the integrity of the slabs.
Additional recommendations from professionals
Many years of professional experience shared by specialists indicate that some manipulations should be done in a certain way, and not in any other way. After all, the secret to successfully creating a high-quality floor lies precisely in such nuances.
- Tying GVL sheets together will provide them with greater resistance to stress. Fixing with self-tapping screws will allow you to hold on better;
- Before laying the tiles, the gypsum fiber flooring is kept indoors for about 3 days, and only then covered with a primer;
- When buying tile adhesive in a store, be sure to find out its capabilities regarding gypsum fiber;
- Laying tiles begins only on a completely dry primer. This is done using a hammer, beacons and a spatula. In this case, all the rules described above are taken into account.
These are all the nuances that you will encounter in your work.
Features of work
Trims for tiles
When installing a tiled floor, do not forget about the tile corners - trim (these are special plastic corners that can be purchased at any construction and hardware stores). With their help, there will be no problems with laying tiles.
We should also not forget about the difficulty in performing some finishing work, namely, corner laying of tiles. For beginners in construction and installation work, the classic method of laying joint to joint is suitable, where the tiles, if necessary, are cut off. However, it will not be possible to bypass all the difficulties even with this technique, since corners with trimming of 450 are common, and therefore it is impossible to do without a special machine - a tile cutter.
If you study all the intricacies of the classic technology of laying tiles, the process will go much faster, and even such issues as laying corners and turns will not raise so many doubts.
Application area
Widely used in cladding of premises and buildings. From industrial to residential.
They also sheathe:
- balconies, attics, attics. A prerequisite is a good ventilation system for these rooms;
- is a replacement for dry screed;
- rooms with high humidity levels: bathrooms, kitchens, dressing rooms and others. Due to its moisture resistance, the material provides high-quality and durable coating;
- outbuildings where there is no heating to prevent freezing of the walls. GVL retains heat perfectly.
- used in finishing sports halls due to its special strength;
- production premises, because it is resistant to fire and does not allow it to spread.