Cabins are practical, universal designs that are suitable for spacious and small spaces. You can purchase it ready-made or make it yourself by making a shower tray with your own hands. The practical design will save useful space, ensuring proper comfort during water procedures. The shower can be equipped with a steam bath and hydromassage.
DIY shower tray - its types
Showers are equipped in three ways:
- buy a ready-made container and install it on legs or a pedestal;
- a concrete podium is made on the floor with a water drain, lined with ceramic or polymer tiles, mosaics;
- Before construction begins, a lower floor level in the bathtub is provided so that the tray bowl is located on the same horizontal level with it.
The first two options are more suitable for apartments. Additional filling of the floor over the entire area of the bathtub is impractical. The load on the floor increases and a step is formed at the entrance to the room.
When building private houses, you can draw up a project that involves laying sewer pipes below the floor level in the bathroom. This way the shower tray will not protrude to the surface and create a barrier.
Friends, we also recommend that you read the article about laying tiles with your own hands, it will certainly be useful to you, and in addition, a post about grouting, how to do it correctly and what types exist. Write your comments and like if you liked our article.
Factory containers are made from stainless steel, coated metal, acrylic, polyurethane foam, and ceramics. For individual orders, we produce exclusive products from cast marble and artificial stone, which are distinguished by their massiveness.
Ready-made polystyrene pallet
Installation of standard pallets does not require specific knowledge and skills. The light weight of the containers allows you to install them yourself or with an assistant. Some designs are simply placed on the floor. Their shape is designed so that the drain can be easily connected through the outlet pipe to the sewer. If supports are not provided, brick, blocks or stone are laid around the perimeter, and welded metal frames are used. The outside is lined with finishing materials or a screen is attached.
The main task when installing any shower tray is the correct connection to the sewer. The drain ladder or siphon should be located at the lowest point of the container. This ensures free flow of water along the inclined plane of the bowl.
To connect a shower tray with your own hands to a sewer branch, create a slope of the outlet pipe of at least 2-3 cm per linear meter. The angle of contact with the collector should not exceed 45°. With these parameters, the risk of contamination by solid particles is minimal, and cleaning manually or using a cable is not difficult.
If the pan is mounted on legs or stands, and access to the sewer is free, the drain is equipped with a regular siphon. It is inexpensive, but repairs require disassembling the device. The minimum outlet height is 100 mm. If the bowl is monolithic, and it is not possible to penetrate under it, it is optimal to install a ladder.
Video description
In this video you will see how to make a drainage channel for a pallet:
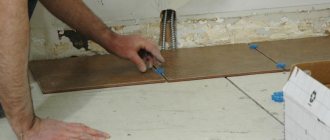
The adhesive can be applied to the inner surface of the tile or to the pallet. The first method allows you to reduce the number of possible errors, the second increases productivity. There should be enough glue so that there is no empty space left under the tile.
Many designers choose mosaic for finishing cheap pallets, which improves the decorative properties of the booth and is quite simple to install due to its increased flexibility. The standard size of elements is 5x5 cm, sheets are 30x30 cm. Installation is almost no different from finishing with ordinary tiles, however, glue is applied only to the surface of the material, and not to the pallet. After installing the mosaic, smooth it out, leveling it in one plane, and after 24-48 hours, grout the joints.
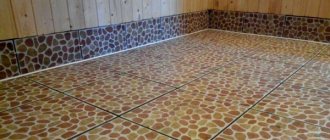
Shower tray finished with mosaic tiles Source remontspravka.com
Final stage
The shower enclosure is installed after all work is completed and the finish has completely hardened. This process can be accelerated by ensuring the room temperature is 25-30 degrees, effective ventilation and acceptable humidity (about 60%). Bathroom doors must remain open throughout the drying period.
If these conditions are met, the fence can be installed just 2 days after installing the pallet. The cabin frame can be assembled from metal profiles and moisture-resistant plywood, and finished with tiles or mosaics. The last step is the installation of swing doors, instead of which it is possible to install a plastic screen or curtain.
Shower, completely decorated with tiles Source stroyka-ug.ru
Shower drains
The drains ensure the collection and removal of wastewater and prevent the penetration of odors from the sewer into the premises. They differ from a siphon in the ability to disassemble and clean without dismantling the device. Some designs are equipped with a check valve that prevents waste from returning when the collector pipe becomes clogged.
The design of a plumbing device is more complex than that of a siphon. Consists of several parts:
- housings;
- neck;
- water seal;
- insulating collar;
- clamping flange;
- grilles that protect against large debris.
Water flows through the drain at a speed of 40-90 l/min, clearing large particles or hair. The removable glass can be easily pulled out and dirt removed.
Types of ladders
The water seal is made in two versions - “dry” without water or “wet” with liquid. Some ladders are equipped with two barriers at once. For connection to the sewer network, the device is equipped with a drain pipe.
To equip a shower tray with your own hands, the drain is selected according to the following characteristics:
- Device height. When connected to a pipe, this parameter is used to calculate the required slope of the drain to the sewer.
- Number of pins. If the shower is the last in a row of plumbing fixtures, it is connected to the line with one outlet pipe. With an intermediate arrangement - two.
- Presence of a check valve. It is desirable that the ladder be protected from flooding by sewer water in emergency situations. Especially if the tray is located below floor level, or the shower room is in the basement.
- Decorative. The visible part of the ladder is the grate. Its function is to protect the device from clogging. However, it can decorate the shower tray. There are many options. Manufacturers even produce completely invisible designs that create the effect of water that has disappeared “to nowhere.”
To equip showers, standard drains are used that collect water at one point, or trays extended along the tray. Such devices are characterized by high throughput.
Adviсe
- If you need to connect pipes from the kitchen or washing machine, use a drain system with two outlets. If a large number of people live in a house, pay attention to the throughput of the drain - in order to avoid water overflowing onto the floor, this figure should be high;
- for a comfortable and safe stay in the shower, use ceramic elements with a relief, rough surface;
- A convenient addition to a tank made independently would be the construction of a small step at the stage of forming the sides.
The shower room will have a complete look and functionality if you decorate it with plastic (fiberglass) doors, attaching a metal profile for the guides to the monolithic structure through the finishing. Transparent material will provide good illumination of the cabin without additional installation of lamps.
Ways to organize a drain in a shower stall
Despite the almost identical appearance - the walls and floor are tiled, some doors, homemade shower stalls have many options for internal structure. There really is plenty to choose from.
If you look from the outside, there is not much difference
The simplest and most reliable option to make a waterproof floor in the shower stall is to install a ready-made tray. It can be installed on bricks or made from foam blocks. By “finished pallet” we mean two types: acrylic and enameled. Acrylic is lightweight and non-slip, but turns yellow over time. Enameled - not bad to use, but slippery when wet: you have to put a rubber mat on it. Another advantage of acrylic is that it doesn’t feel as cold.
If both options do not work, make a pallet from brick or monolithic concrete, which is then lined with tiles - regular floor tiles, or mosaics. This is a capital decision, but difficult to implement. If you decide to make a shower tray from tiles, and you live in an apartment building, you will need very good multi-layer waterproofing: so that there are no problems with neighbors below and on the sides. This does not mean that in a private house a shower cabin is made with your own hands without waterproofing. It’s just that if you mess up, you will suffer yourself.
Half finished brick shower tray
There is another option - an intermediate one. A “trough” of suitable dimensions is made from metal, and it is well treated with anti-corrosion materials. They are installed on a podium made of bricks or foam blocks (a drain is also needed), if necessary, they are lined with bricks on the outside, forming a side or a step. A mosaic is glued on the inside.
These are the options you usually choose from. There is also a device without a visible tray at all, and the drain can be made into the wall, but then in the entire bathroom it is necessary to raise the floor level and form a slope towards the drain.
Now about the sizes of shower cabins and trays in particular:
- 70*70 cm is very small, it’s difficult even for a slender person to bend over, you constantly hit the walls;
- 80*80 cm - somewhat better, but still cramped;
- 90*90 cm - can be considered optimal for a person of average size;
- 100 cm or more - you already feel normal, you can sit down without any problems.
It makes sense to make a homemade shower stall rectangular
If you want comfort, make at least a meter gap from wall to wall, but if the dimensions are very limited, try to leave at least 90 cm. One note: a square is not the best shape for a shower. A rectangle is more practical in this regard. With a cabin depth of 80 cm and a width of 100 cm, you already feel free. And if the width is 110-120 cm, this is complete freedom.
Insulation
To insulate the shower tray, a layer of polystyrene foam insulation, 50 mm (5 cm) thick, is placed on its bottom.
Generally speaking, a brick shower tray is made to save money, and laying insulation significantly complicates the work. And it's not about laying insulation. To lay tiles on the insulation, it must be covered with a screed. To make a screed over the insulation, you need to lay rolled waterproofing, and the screed itself may need to be reinforced with mesh if you use a simple “wet” DSP mixture. It makes more sense to insulate the shower floor by making a concrete tray rather than a brick one.
Therefore, they often do not do insulation, but simply raise the bottom of the brick pan with two layers of laid brick, with channels for sewerage.
Advantages of making a shower tray from tiles
Self-arrangement of a shower tile tray has many advantages, and these include:
- Helps significantly save the family budget.
- It is possible to give free rein to your imagination and make a pallet from tiles of unusual sizes, as well as the required size.
- Choose the cladding that will match the design of the bathroom.
- It is possible to take advantage of all the advantages of choosing the equipment that you consider necessary for the bathroom in your own home.
- You can choose materials that will be beautiful and at the same time great for rooms with high humidity levels.
- You can make a custom shower enclosure, and its installation will not cause any problems.
Another quite significant advantage is that your apartment will have an unusual shower stall, and you definitely will not doubt its quality.
Gutter installation
In the answer to the question “how to make a shower tray with your own hands,” the installation of a drain (or drain) occupies a special place. It will be extremely difficult to correct problems once the pallet and cladding are completed, so it is very important to ensure high quality.
Installation of a ladder in a screed
To do this, you must use the following rules and recommendations:
- The connection between the drainage point and the sewer system is made with a slope of about 3°. This ensures optimal flow rate and prevents blockages and stagnation of water in the shower pan.
- The joints of all elements must be sealed.
- For installation, it is recommended to choose plastic pipes and fittings of the highest quality. They can serve for a very long time because they are not subject to corrosion and destruction from other types of external influences.
- The drain ladder must be firmly fixed. The foundation is poured only after making sure that the structure will not move either at the time of pouring or during the process of strengthening the mortar.
Shower drain installation diagram
Read about how to choose and install a siphon for a sink with overflow in another article.
Recently, a hygienic shower in the toilet has become increasingly popular. Find out more about this on our website.
And there is information about the types of water meters at this address https://okanalizacii.ru/santeh_vodoprov/schetchiki/kak-vybrat-schyotchiki-vody.html
How to do it?
Making a shower with your own hands begins with the need to create waterproofing and thermal insulation.
To waterproof the floor, roofing felt and durable film are used. The areas where the floor and walls meet must be completely covered. Even the slightest cracks need to be removed. Then the entire space is treated with bitumen mastic. It is applied, like a primer, in an even layer. Then you need to let the area dry thoroughly for 24 hours and apply a second coat. The final step will be to attach waterproofing tape to the joints.
Thermal insulation is made using foam plastic with a thickness of at least three centimeters. It must be of such density that it can withstand loads well. When making a sewer drain responsible for draining water, you need to properly strengthen each element: pipes, funnel, gaskets, as well as a grate and siphon, which are responsible for preventing unpleasant odors from penetrating into the room.
Using waterproof glue or cement mortar, you can make the walls of the pallet out of brick. Red brick is preferable because it is more resistant to moisture. You can choose another method: make formwork and pour concrete into it. This method will not work if the repair needs to be done quickly; the concrete will take at least three weeks to dry.
Before tiling with tiles or ceramic tiles, the entire area is treated with a special waterproof compound. When laying tiles, you need to use tile adhesive that is resistant to moisture. To process the seams you will also need moisture-resistant grout.
Moisture-resistant adhesives that have good consumer reviews include the following:
- "Unis Plus";
- "Yunis Pool";
- "Litokol" K80;
- "Ceresit" SM11.
Suitable grouts include Ceresit CE 40 Aquastatic. It contains antiseptic additives that prevent the formation of fungus and mold.
Important points include the fact that when choosing tiles, you need to take into account that they are not too slippery. Information about this in the form of markings must be contained on the packaging.
You can make a pallet using acrylic coating. This material is often used to cover bathtubs and showers. Due to its good performance characteristics, acrylic is in demand among consumers when installing bathtubs and showers. If necessary, the acrylic coating can be easily updated.
There is an even simpler version of the pallet - it is enameled. This way you can save money. But it has two drawbacks - it is cold to the touch and quite slippery. When using it, it is better to lay a rubber mat on the bottom. The iron pan is more rigid and resistant to deformation, but is susceptible to corrosion. The metal is quite thin, so vibration is possible, as well as noise that will be made by jets of water falling on the pan.
A cast iron pan is much stronger and is not susceptible to corrosion. It can last a long time. But it is necessarily covered with enamel, which inevitably chips over time, which spoils the appearance of the shower. Some people make pallets out of wood to maintain a unified style; this requires special processing beforehand.
Whatever option is chosen, part of the space will in any case be covered with decorative tiles. And if you choose a pallet from all sorts of options, the tile option is still preferable. It’s easy to lay it out yourself; there is nothing limiting the choice of the right colors and patterns.
Waterproofing issue
When constructing any shower tray, care must be taken to ensure reliable waterproofing, so that water cannot enter the lower or adjacent room. Moisture seeping through the pan causes the appearance of fungus, an unpleasant odor and destroys the structure.
Insulating materials for shower tray:
Methods for waterproofing a shower tray.
- roll film coverings;
- roofing felt;
- viscous compounds.
- liquid water emulsions (they are almost odorless);
- liquid glass - fills the pores and cracks of concrete and increases its strength;
- waterproofing additives - more suitable when pouring a concrete pallet, they grow in the solution and turn the entire layer into a hydrophobic one;
- one-component mixtures, for example Ceresit CR 65.
It is recommended to make 2 layers of insulation, for example:
- Rolled bitumen-polymer. Glued to a concrete base.
- Cement-polymer. On top of concrete that has settled for 3 weeks.
Before carrying out work, the ladder grating is sealed with masking tape. Rolled materials are laid on a flat surface, excluding differences of more than 2 mm and sharp chips. Insulation with canvas is carried out on bitumen mastic with an overlap of 15-20 cm. When bubbles form, the material is cut and pressed forcefully to the surface. Viscous insulating compounds are applied with a brush, single-component products are applied with a spatula.
Sealant Stern. Antia sealant. Somafix sealant.
The selected product is treated in 2 layers on the pallet and the walls near which it is located, at a height of at least 30 cm. Particular attention is paid to:
- the area near the drain hole;
- joints;
- corners;
- sides.
The best shower sealants contain at least 45% hydrophobic filler, silicone-based rubber, catalysts and fungicides. Somafix, Stern, Antia sealants are effective. Aquarium silicone can be used at joints and for sealing. It is recommended to combine some products, for example, Expanding Plombizol and Penetrating Plombizol, Elastopaz mastic and floor primer.
Elastopaz mastic is recommended to be combined with a floor primer.
When the second layer of waterproofing is completely dry, finishing work begins.
Materials and tools needed for work
When deciding how to make a shower tray with your own hands from tiles, it is important to know that the set of necessary tools will not require additional costs. Almost any home craftsman has everything you need.
You need to prepare:
- a manual or electric tool for cutting tiles (especially if you have chosen a large-format tile type),
- trowel, spatula and chisel,
- roller or paint brush,
- ruler, square and pencil for marking,
- drill with attachments,
- rule and level for leveling the surface.
The set of materials includes:
- cement,
- brick or additional cement to fill the sides of the pallet,
- purchased waterproofing mixture or bitumen,
- facing tiles (it is important to choose a material intended for constant contact with water and having a non-slip safe surface),
- waterproof tile adhesive,
- self-tapping screws
Note: To level the tiles, use a rubber hammer or a spatula with a rubberized handle. Do not forget about the “crosses”, with the help of which it is easy to maintain the same width of the seams between the tiles or blocks of the mosaic canvas.
Step-by-step instruction
The most simplified option for construction work is to have a ready-made concrete base on which the tiles are laid. However, this situation does not always occur, and the owner has to start work from scratch.
Pros of creating a tile shower
Making your own tile shower tray has many obvious advantages, which include:
- significant savings in the family budget;
- the opportunity to use your imagination to create a pallet from tiles of an unusual shape and the desired size;
- choose tiling in accordance with the design of the bathtub;
- the opportunity to take advantage of the independent choice of equipment that you consider necessary for the bathroom in your own apartment;
- the ability to select materials that are used in rooms with high humidity;
- the ability to make a custom-made shower enclosure, the installation of which will not create problems.
Another obvious advantage is the appearance in your apartment of an exclusive shower cabin, the quality of which you can not doubt.
Other Features
When choosing a shower without a tray with a tiled base, you should pay attention to the degree of wear resistance of the materials. It determines how long such a tile will last and what it will look like some time after use. Therefore, even in a shower in a country house, for which a small budget is usually allocated, it is not recommended to skimp on finishing. The cost of tiles will be recouped due to the increased service life. Water absorption of tiles for the cabin should be minimal - class BI or BII (up to 3% or 3-6% of weight gain due to water absorption, respectively).
The “warm floor” system allows you to increase the comfort of using the shower. When choosing this option, pay special attention to safety. For heating, you should choose not a water floor, but a cable floor with good insulation and a protective screen. The moisture resistance class of the heating element must be at least IP44. The system controls are placed outside the room to avoid the influence of water and humid air.
“Warm” floors under the base of a tile shower stall Source moydomik.net
See also: Construction companies that specialize in heating, water supply, sewerage and gasification
Pouring concrete mixture
When the sides are completely dry, start pouring. The ready-made concrete mixture is poured into the masonry. In this case, you need to ensure that there is a slight slope in the direction of the neck, so that water will flow into it from anywhere in the pan.
When the mixture has dried, the surface is primed and treated with waterproofing, preferably in two layers. After drying is completed, the final filling is performed using cement mortar and tile adhesive. The mixture is placed on the outside and inside of the sides.
When creating a homemade shower tray, one should not forget about the need to create a funnel-shaped neck, avoiding sharp transition lines. After the mixture has dried, it is rubbed with sandpaper, first coarse-grained and then fine-grained. Then use a brush to remove dust.
Construction of a wastewater disposal system
The drain includes a drain and a sewer outlet pipe. In order for wastewater drainage to function efficiently, it is necessary to ensure an inclination angle of approximately 3 degrees. For this purpose, special wooden stands are used for the outlet pipe. They are made in different heights and thereby provide the required angle of inclination.
Liquid from a homemade shower tray should move by gravity, without accumulating in one place and ultimately forming a blockage. It is advisable to install a removable siphon for the drain so that it can be cleaned. The grate for the drain hole is chosen to be metal - then it will support the weight of a person.