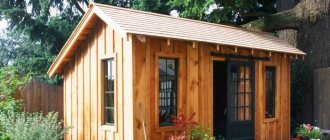
A small summer cottage is a big problem for the owner. After all, on this land (usually three or six acres) you need to fit everything - a country house, a barn, and a bathhouse. Modern architectural solutions make it possible to do this without any problems - for example, a bathhouse measuring 4 meters with your own hands will perfectly fit into the exterior of the site, without interfering with anything and fulfilling its health purpose.
Compact bath project
You can build a compact bathhouse measuring 4 x 4 m without contacting construction organizations and companies, especially if it is a frame-panel project. For a family of 3-4 people, the layout of the bathhouse 4 4 is optimal in terms of the area of the premises and their number. The bathhouse will have a steam room (or room for a sauna), a dressing room (room for storing bath accessories, clothes and shoes), and a relaxation room.
Features of 4x4 m projects
Typical plan of a 4x4 m bathhouse
The design of a 4x4 m bathhouse is worthy of the attention of users for its good capacity. A standard one-story building includes the following layout:
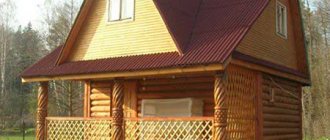
steam room, washing room, bathroom, dressing room and relaxation room or terrace under a common roof. The design of a 4x4 m bathhouse can be one-story or with an attic. Upstairs there is a full-fledged room for guests or for relaxation. Due to its small size, the box can easily fit in a small summer cottage or near a private house.
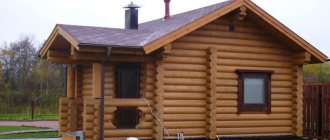
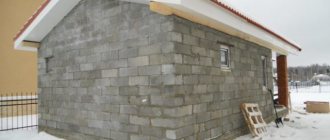
You can assemble a 4x4 m bathhouse from timber, plain or rounded logs, bricks or cinder blocks. The simplest option is made from timber, since the correct shape of the structure and timber allows you to easily assemble the box with your own hands.
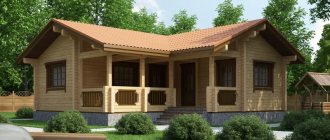
On a summer cottage, a project with an open or closed terrace is usually chosen. After taking the procedures, it’s nice to go out into the air and breathe. And the common roof makes the terrace protected from wind and rain.
Main characteristics of a typical 4x4 m bathhouse design:
- Foundation area – 21.60 m2.
- The area of the internal part is 11.50 m2 + 2.7 m2 terrace: steam room 4.14 m2, washing room 3.59 m2, terrace 2.7 m2, dressing room 3 m2. You can redesign the interior in your own way, so if you remove the terrace, the dressing room will become larger. Fit a full-fledged recreation room.
A 4x4 sauna can be purchased in a ready-made box or made independently. The easiest option is to buy turnkey, the price for this starts from 450,000 rubles. This is without finishing or insulation. For comparison, a ready-made box for assembly by yourself costs from 300,000 rubles. One of the 4x4 bathhouses can be seen in the video:
Stage III. We lay and insulate floors
In short, to make floors in a frame bath, you need to nail bars with a section of 5x5 cm to the bottom of their logs in the relaxation room, the steam room, and the dressing room, and lay subfloor boards on top of them, then roofing felt, and finally - mineral wool 10 cm thick or expanded polystyrene. And already under the boards of the finished floor you should lay glassine for vapor barrier:
In the washing room, the floor needs to be done differently:
- Step 1. So, in order for it to always be warm in cold times and dry quickly, you need to make a separate foundation along its entire perimeter.
- Step 2. Next, remove a layer of soil by half a meter, and fill the resulting pit with gravel and sand to a 10 cm layer. If water gets into such a drainage well, it will go into the ground, and there will be no need to make a pit.
- Step 3. For the logs of such a floor, it is best to use asbestos-cement pipes with a diameter of 10 cm, which are placed directly on the foundation and filled with concrete so that it keeps them from moving.
- Step 4. Then, in the washing room, a 4-5 cm thick edged round board is laid over the pipes, but with a gap of 6-7 millimeters with rubber gaskets, which are nailed.
- Step 5. After all this, the floor can be pressed down with baseboards.
More details in the video:
Construction of a bathhouse
The construction of a 4x4 bathhouse is carried out according to the selected project. You can compose it yourself or take a standard one, for example, in this article. All stages of construction include:
- Installation and selection of foundation.
- Construction of the box.
- Roof.
- Interior decoration and landscaping.
Each of the stages can be done with your own hands. But if you don’t have the skill to assemble a bathhouse, you can reduce the cost of construction by preparing the foundation. In this case, the box is assembled by professionals. Let's consider all stages of assembly in more detail.
Foundation installation
The choice of foundation for a 4x4 bathhouse depends on the material from which it will be built:
- Beam - lightweight strip foundation, columnar or pile.
- Brick, blocks, logs - full-fledged strip foundation or monolithic.
Lightweight strip foundation for a bathhouse
The easiest way is to make a lightweight strip foundation. The choice of design depends on the groundwater level. If the bedding is high, then a pile or screw is used. We will look at a regular tape one.
To install it yourself, you need to choose a place for the bathhouse and make markings. A trench 50 cm deep will be dug along it, the bottom will be covered with a sand cushion. Formwork from unedged boards is mounted on top and a reinforced frame is attached for strength. Next, the foundation is poured and left to stand. Don’t forget about the foundation for the stove; it is made separately. It’s good if the finished foundation stands for more than 6 months, so it will fully mature and shrink.
Next, the foundation is waterproofed using bitumen mastic or roofing felt in 2 layers. At the installation stage, it is necessary to plan the septic tank for the bathhouse and communications.
Box assembly
Assembling a bathhouse box from timber
The bathhouse box is assembled according to the plan. We will look at timber.
The first link of the bathhouse is laid on top of the foundation. The first link should be of a slightly larger cross-section, made of moisture-resistant wood. Aspen or larch is suitable. The price of the timber will be higher, but over time the bathhouse will not begin to rot. The fact is that wood is hygroscopic and water from the foundation easily rises up the timber. And there’s no need to talk about the combination of wood and water again.
The walls are assembled in stages. It is easier to use profiled timber; it is easily connected using a lock - tongue and groove. A jute tape insulation is laid between each link.
The beams are connected to each other with wooden dowels. They can be made from scraps of building material or bought ready-made. We do not recommend using iron connecting elements; over time, the walls will dry out and the iron will become visible. The bathhouse will lose its aesthetic appearance.
If the bathhouse is assembled from ordinary timber or logs, then after assembling the box it is necessary to caulk the walls. Caulking is carried out along the perimeter of each row of logs. You can’t caulk first one wall and then the other, the bathhouse will warp.
Internal partitions are easier to assemble right away. Window and door openings do not need to be left; they are cut out at the very end of construction.
Bathhouse roof
You can assemble a gable roof with your own hands.
The roof assembly of a 4x4 m bathhouse can be made from any convenient material, even from spliced boards. The roof must be assembled clean or rough. A bathhouse assembled from chamber-drying material is immediately covered with a clean roof; natural humidity must be allowed to stand for 1 year.
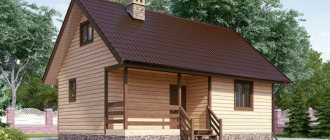
The roof structure for a 4x4 m bathhouse is suitable for a single-pitch or gable roof. It’s easier to assemble a lean-to with your own hands. It all depends on the owner’s imagination. Let’s just say that the simpler the design, the more reliable the roof will be.
The top of the roof is covered with any material you like: corrugated sheets, slate, andulin, tiles. We have already talked about the advantages and disadvantages of these materials.
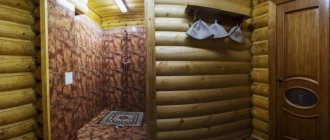
Interior decoration and landscaping.
A 4x4 m bathhouse can be easily decorated from the inside with any material you like. The square shape allows the use of all types: lining, imitation timber, ceramic tiles, etc. The main requirements for material for interior decoration:
- Environmentally friendly.
- Fire resistance.
- Easy to install.
The lining in the bathhouse is attached to the counter lathing, with foil insulation on top.
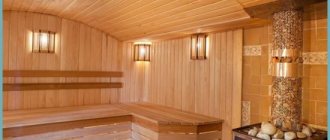
It is optimal to use linden or aspen lining. The lining is attached with your own hands to a sheathing made of timber with a cross-section of 40x40 mm. But first it is necessary to thermally insulate the walls of the steam room. For thermal insulation, mineral wool and ecowool are used. The inside of the steam room is lined with foil insulation. It will reflect steam and the thermal insulation will be higher. The ceiling of the bathhouse also needs to be insulated using sawdust, expanded clay or mineral wool.
Next, the stove is installed and the chimney is removed. For a small bathhouse 4x4 m, you can make both an internal and external chimney. The choice depends on the perseverance and experience of the owner. A low-power stove of 3.5–5 kW or a wood stove is suitable.
Floor
We insulated the floors in the bathhouse. The steam room and shower have tiled flooring, and the dressing room has laminate flooring. First, I’ll tell you about the steam room and shower; there are many more important nuances there.
Laying tiles
The tiles were purchased with a matte finish and rough so that they would not slip. We decided that tiles are much better than wooden floors - they don’t rot and are easy to clean. The glue was purchased with the best moisture resistance characteristics.
Waterproofing was laid on the subfloor, overlapping the walls. On top of the waterproofing, insulation was laid - EPPS (thickness 30 mm). For better adhesion of EPS to the waterproofing, assembly adhesive was used.
A screed was poured over the insulation along the beacons with a slope towards the drain funnel. Before pouring the solution, a reinforcing mesh and a set of beacons were laid. The photo shows that we attached the beacons not to the floor, but to an asbestos solution - we laid out piles and pressed profiles into them. The solution (cement with sand) was mixed in a rented concrete mixer, because
It was important to fill the entire floor in one day. The solution was laid out from the bucket with a trowel onto the grid between the beacons and leveled with a wooden plank - the rule
The floor was finally leveled with a wide trowel and grout.
The tiles were laid away from the drain gutter to make it easier to maintain the slope. Each one was pre-soaked in water. The glue was applied with a notched trowel onto the dried and primed screed. In this case, glue was not applied to the entire surface of the floor at once, but only to the space for laying 1-2 tiles. The glue hardens quickly and should not be used to cover a large area of the floor at once. The thickness of the adhesive layer was kept approximately equal to the thickness of the tile. I collected the excess glue around the laid elements with a simple narrow spatula.
First, all rows of whole tiles were laid out, then parts along the walls. We cut the tiles with a manual tile cutter. By the way, for precision masonry we pulled the fishing line and used crosses for the seams. And for better contact of the tile surface with the binder, immediately after laying, I lightly tapped each square of tile with a rubber mallet.
Laminate
The laminate flooring was installed very quickly. We covered the floor with film over the insulation, nailed down moisture-resistant plywood, and rolled out the backing.
I unpacked the package with a knife. He took out the first panel and laid it down, turning it with a small protrusion towards the wall. I inserted 2 plastic wedges between the wall and the board. I took the second strip and snapped it into the end groove of the first. I leveled it and placed the wedges again. When I reached the opposite wall, I used a circular saw to cut off the extra piece of the laminate panel. The next row began from the segment. The second row was assembled in the same way as the first, after which I lifted the entire floorboard at an angle of 45 degrees and carefully connected it to the latch of the first row, and then hammered it through the block with a mallet. The last row had to be sawed lengthwise, precisely measuring the cutting line.
Price for a sauna
The price for building a 4x4 bathhouse depends on what kind of work the owner is willing to do with his own hands. For our readers, we present the average cost of work and materials in the form of a table; using it, it is easy to calculate how much a bathhouse will cost on average.
| Bath installation | Price of materials, rub. | Price of work, rub. |
| Lightweight strip foundation | From 140,000 | From 100,000 |
| Timber box | From 300,000 | From 170,000 |
| Finish/rough roof | From 120,000/45,000 | From 110,000/70,000 |
| Insulation of walls, floors, ceilings | From 55 000 | From 30 000 |
| Finishing walls and ceilings with clapboard | From 60 000 | From 55 000 |
To save money, you can do some of the work yourself; the price will be significantly lower. You should not skimp on material and foundation. They must be reliable; if you do not have the skill to build a 4x4 m bathhouse with your own hands, we advise you to buy a ready-made box made of profiled timber. Even a beginner can assemble this with his own hands. But in general, the design of a 4x4 m bathhouse is quite budget-friendly and convenient for DIY construction.
Straight to the point: don’t confuse technologies!
If you think that a frame-panel bathhouse is the same as a frame bathhouse, just a more detailed and longer name, then carefully read the following sentences. A frame-panel building is built from ready-made panels, which are purchased from companies that professionally deal with them. A frame building can be built by any home craftsman with minimal construction skills and tools. The frame is erected, filled with insulation, sheathed and finishing work carried out. If you need such a frame bath, then go to the appropriate section. If you are still sure that you need information on panel buildings, then read on.
Photo: VIVA HAUS company
Buy or build
Building a high-quality bathhouse that holds the temperature well, has the required level of humidity, is properly ventilated and has other necessary qualities is not an easy task. For an experienced builder, building a real bathhouse on your own site will not be difficult. But you shouldn’t take on this without special skills, especially since today you can inexpensively order a bathhouse from professionals.
It is better to contact well-known construction companies with an impeccable reputation and a full range of services. Such organizations enter into contracts with their clients and are responsible for the quality of work performed. Professional builders will first approve the finished plan for a 6x4 bathhouse, and after that they will assemble the log house in accordance with all the rules of technology. Beautiful and successful bathhouse designs
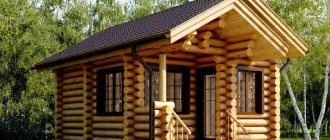
Having your own bathhouse next to the cottage is an opportunity to fully relax with the whole family or with friends. In addition, the bath is good for health. Another advantage is that it decorates the site and gives any home a respectable and luxurious look.
Bathhouse layout options can be anySource banya-ili-sauna.ru
Bathhouse project for those who like to run out of the steam room into the snowSource as-elit.ru
The base significantly extends the service life of the bath Source centermira.ru
Bathhouse project with a large veranda and a spacious steam roomSource ro.decorexpro.com
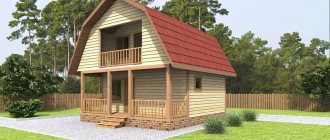
Layout of a 6x4 bathhouse with an atticSource rus-plotniki.ru
Having free space on the site, you cannot neglect the opportunity to build a beautiful, comfortable and useful bathhouse. The main thing is to choose the right layout option for the bath complex, its size and location.
Some more popular sizes
8 by 8
Pay attention to the photo of the layout of the 8 by 8 bathhouse - you can immediately see that there is a lot of useful space inside, which requires only one thing from you: use it wisely! It is obvious that such large baths today are rather an exception to the rule. Accordingly, the more possibilities, the more difficult it is to ultimately come to the only correct decision.
In this case, it is advisable to turn to professional specialists who can carry out the layout of such a bathhouse to the highest possible quality. However, you can get some good ideas from the photos below.
As a rule, in such large baths you can create a hammam: set aside a separate room for this purpose, equip it with the necessary sun loungers, and put a massage table. Women love the Turkish bath!
Options and photos of 4x6 bathhouse layouts with separate steam room and sink
Having determined the conditions in which the bathhouse will be used, you can begin to draw up a preliminary design. You need to put in it everything that you want to fit inside. To do this, display to scale all the furniture and equipment that are planned to be used in the building. This will allow you to understand what you need to keep and what you have to give up.
Bathhouse for a family of 3-4 people
If only family members will use it, there is no point in making the dressing room large - it will be more difficult to warm it up, it will cool down faster, especially in winter. As the air temperature drops, the relative humidity will rise, causing fog and condensation to form on furniture and clothing. It is uncomfortable to be in such a room; either additional heating or good ventilation will be required.
It is more logical to limit the room to the required volume in which to install a table and a couple of benches or chairs sufficient for all guests at the same time. Separate the rest of the area with a partition and make a vestibule in it, in which to organize a locker room. It will be more convenient to change clothes, since the air is dry and clothes do not stick to the skin. In winter, this will protect against cold air entering the dressing room when opening the front door. On the remaining area it is worth placing a toilet. Although the bathroom is not the main room in a family bath, if it is not nearby at the right time, it will cause inconvenience. There is no need to allocate a large area for it, 1-2 square meters is enough. m.
In the given task, the total area is 24 square meters. m. From the minimum requirements, it turns out that for a family of 3-4 people, 3-4 square meters is enough. m for the steam room, sink and dressing room. But if you increase each room to 6 square meters. m, it will become more spacious. It will be possible to receive a couple more guests, and there is enough space in the sink even for a small font.
Another 6 square meters will remain vacant. m, which is enough for a vestibule-dressing room (4 sq. m.) and a bathroom with an area of 2 sq. m. m. These rooms will be used for a short time, so there will be enough space to spare. In reality, the numbers will be slightly lower due to walls and partitions, but not significantly. The result is a spacious bathhouse for a family holiday, ready to accommodate two additional guests.
Bathhouse at a tourist base for 8-10 people
The number and composition of guests in such a bathhouse will be different, and you need to be prepared to accept the maximum number. Most likely, the main communication will take place at the table in the waiting room. There is no need to split the area of the dressing room into a vestibule and a locker room; lockers along the wall or hangers are enough. A bathroom is required.
So that guests do not feel cramped, the steam room and sink should simultaneously accommodate at least half of the total number. This means that their minimum area should be 4-5 square meters. m per room. Since part of the walls will be occupied by partitions, you need to take a small margin - 6 square meters each. m.
There will be 12 square meters left. m, from which you need to subtract 1.5 sq. m for a bathroom. The dressing room will be 10.5 square meters. m, which is enough for free communication at a table of 8-10 people at the same time. To store clothes and personal belongings, it is worth organizing lockers at the entrance. A small refrigerator and microwave oven for drinks and snacks would be useful. A TV and speaker system will not take up space on the floor, but will add comfort to guests.
The examples discussed show that there is no universal layout. Each owner must formulate his own wishes and requirements for the bathhouse. It is advisable to draw them up immediately in the form of a sketch, this will help in the future to communicate with the designer and builders. There is no need to try to fit many small rooms into a small building at the expense of comfort. When construction is completed, you may want to add a terrace or even an enclosed veranda to the bathhouse. In this case, do not worry - such extensions can be made at any time.