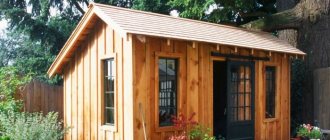
Of course, it’s good to have a spacious and large bathhouse that can easily accommodate a group of friends or the whole family. But not everyone can boast of a large area, especially when it comes to a bathhouse. Even if the area is quite small, this is not a reason to deny yourself the pleasure of visiting a Russian bathhouse - pay attention to the small bathhouses.
Baths made of other materials
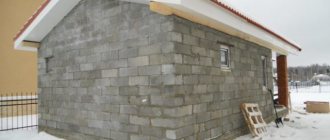
Bricks are rarely used to build a bathhouse on a summer cottage. This is explained by the high cost of the foundation for such a structure. In general, the construction of a brick bathhouse will require a lot of time, money and effort from the owner of the site.
The use of foam blocks is impractical due to their low resistance to moisture. When using such material, additional care should be taken to protect the walls from water.
A bathhouse made of wood concrete is characterized by its low cost, long service life and good ability to retain heat indoors. There are block and monolithic structures.
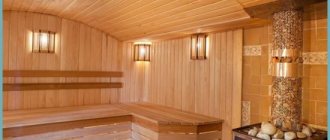
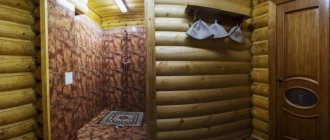
For the interior decoration of a country bathhouse, lining is most often used. This material has all the properties necessary for a bath room, is safe, and has a low cost.
To finish the ceiling in the area of the stove and chimney, it is recommended to use asbestos for the safety of the structure during operation.
Insulation of walls and roof
In order to make the bathhouse as warm as possible, you need to apply thermal insulation between the inner and outer lining. Mineral wool, synthetic boards and various insulation materials are often used as insulation.
Any insulation that has been used should be firmly and securely fixed in a cavity specially designed for insulation. We must not allow gaps to appear between the sheets, which could become sources of cold in the future.
When the insulation is completely fixed, it will be necessary to install a vapor barrier on the inside. Glassine is usually used for this. One side is equipped with a heat-insulating layer, and the other with metal foil, which also retains heat quite effectively. Glassine is installed with foil inside the room.
Materials for building a bathhouse
To build a bathhouse from timber you will need a whole set of different materials and devices, namely:
- timber Traditionally, material with a cross section of 150x150 mm is used;
Beam 150x150
- floor boards. The best option is a four-meter edged board 15x5 cm;
Floor board, pine
- boards for the ceiling. Typically, lining is used with a width of 10 cm and a thickness of 2 cm;
Floor ceiling in the bathhouse, click on the picture to enlarge)
- materials for interior decoration. The lining is perfect;
Lining for saunas and baths
- vapor barrier material. The best option is modern vapor barrier films;
Vapor barrier material
- waterproofing material. If possible, use penofol. Plastic film is also suitable;
Waterproofing bath walls
- insulation for the ceiling. Mineral wool materials are well suited;
Ceiling insulation
- sheet asbestos. With its help you insulate the wooden elements of the building from high temperatures. Insulation sheets must be attached to the walls near the sauna stove. Wooden elements installed in close proximity to the chimney also need insulation;
Asbestos sheets
- bulk materials for foundation construction. The set is standard: cement, sand and crushed stone;
Cement, sand and crushed stone
- roof finishing material. Focus on your preferences. The main thing is that the roof of the bathhouse looks good surrounded by the roofs of other buildings on the site;
Thatched roof - convenient, unusual and cheap
Bathhouse roof
For a small bathhouse, a similar polycarbonate roof is an ideal solution.
- insulation for inter-crown space. Use jute. Tow and moss are also suitable.
Flax fiber for caulking
Buy cement immediately before starting construction.
Communications
It is necessary to design the location of communications at the initial stage of developing a mini-bath. The wiring must be hidden under the casing, and it is laid in special metal sleeves. The cable should be taken with double braid. It is also necessary to make grounding. For lighting, choose sealed lamps. They can be mounted both on the ceiling and on the wall.
Ventilation is an important element in the design of every bathhouse.
It is more logical to use a tank in which the water will be heated from the heat of the stove. An important point is the arrangement of ventilation; for this purpose, ventilation grilles are made in the ceiling with exits under the roof slope. Don't forget to build a drainage hole where the water will flow. It should be of unusual size; a porous stone is poured inside, which serves as a certain filter.
Ventilation in the bath
There are two types:
- natural;
- forced.
Two windows will serve as a natural one. Fresh cold air will enter through one window, and heated moist air will exit through the second.
Forced - these are built-in wall fans that are powered by electricity and provide constant air circulation indoors. They don't cost much.
A modern alternative is automatic ventilation systems. Using the control panel, the required level of humidity and temperature in the room is set. They are more expensive, but much more convenient and efficient to use.
The recommended range of air renewal in the bathhouse is 2-3 times per hour. Ventilation is installed not only in the steam room, but also in other rooms. This is especially true for the shower room, where there is high humidity.
You can do the construction of a small frame bathhouse with your own hands, but it is better to undertake the construction of a massive structure made of bricks or blocks if you have experience in masonry
When choosing materials for a bathhouse, it is important to take into account the style of the house and yard itself, because the finished structure must fit harmoniously into the architecture of the site and be combined with other buildings
What to heat - choosing a stove
When choosing a stove for a sauna, first of all you need to pay attention to the power. This indicator must correspond to the volume of the steam room
The presence of uninsulated areas and the material used to make the door are also taken into account. According to the type of fuel, sauna stoves are as follows:
- Wood-burning. The classic version of the firebox allows you to create a special atmosphere. A ubiquitous tree does not require additional communications. You can independently prepare all kinds of varieties to create different effects.
- Gas. Units of impressive size can only be connected by a qualified gas technician. In such stoves there is no need to constantly add firewood and control the flame. They have no firebox or ash pan. Gas furnaces significantly increase the fire hazard of the entire structure.
- Electric furnaces. Miniature devices heat the room evenly and quickly. The installations are absolutely safe, with great functionality. Due to the high electricity consumption, the operating cost will be high.
Video
Bath frame
Sizes, of course, are up to everyone’s taste. The whole trick lies in how the bathhouse is designed. It's very easy to do. The main frame was welded from 25 angles. For transitions: floor-wall, wall-roof, the corners were welded with shelves to each other. Don’t forget about the corners for the entrance (steam room) and outer doors.
Lightweight design
To allow water to roll down, I made the roof of the bathhouse sloping and “broke” it into two parts. The first is the dressing room, has a slope in one direction, with a difference of 10 cm. The second part is the bathhouse itself, located at an angle of 90 degrees to the first with a slope height of 20 cm from the highest point of the dressing room.
Strengthening the structure
I also additionally strengthened the floor with one corner in the middle, along the steam room compartment, and to strengthen the structure - another one on top across the steam room. Another corner, for rigidity, in the middle of the partition between the steam room and the dressing room. Horizontally from the wall to the inner door. We drill as many holes for screws in the corners as you think necessary in order to hold the block on them.
Attaching wood to iron
Having cut the 50th beam - dry larch - to the size of the corners, screw the bars to the corners with screws. We nail one-inch dry boards, also made of larch, onto the bars, cover the floor of the bathhouse with them, not forgetting about the hole for the stove (what kind of bathhouse, even a small bathhouse, without it!), the inside walls and the roof. Without relying too much on the dryness of the boards (which I was convinced of myself after a couple of years - gaps appeared between the boards), to improve the insulation we glue cheap ceiling tiles to the walls.
External cladding of a bathhouse with wood
The outside of the bathhouse is lined with one-inch boards located parallel to the ground. We begin sheathing from the bottom up so that the boards lie, slightly overlapping, on top of each other. Your bathhouse at the dacha will greatly benefit from this. Don’t forget to varnish the boards twice later.
Stove, pipe and bath insulation
We install iron (can be made of stainless steel) in the bathhouse: a stove of the size you need, and a pipe, a hole for which we first cut in the roof. Take a pipe of such length as to maintain a distance of 1.5 meters from its end above the roof to the roof itself. And don’t forget about the spark arrestor on top of the pipe.
We install the stove on bricks with a two-centimeter gap from the wall. This gap is quite enough to install insulation between the wooden wall and the stove so that the wall does not burn.
Without further ado, I secured the insulation to the wall. I had it (at first - 25 years ago) in the following order: asbestos fabric, thickness 1 mm, galvanized sheet on it - 1 mm, asbestos sheet - 5 mm and galvanized again. Again - when replacing the stove - I left the first two layers adjacent to the wood, and put fire-resistant polymer fabric on top of them.
Both the initial and subsequent insulation are enough to prevent the boards from burning, even in a hot oven. We line the second, long wall of the stove with bricks the width of the brick so as not to get burned (a small bathhouse in the country is a hot business).
We make a hole in the roof with a diameter larger than the diameter of the pipe in order to lay insulation between the roof and the pipe.
I personally made a hole in the roof 4 centimeters larger, fixed it on the transverse ceiling corner, and so that the boards did not burn, I wrapped the pipe with insulation and lined it with pieces of asbestos board on 4 sides. It rains, of course, but the simple steel stove is like new for 14 years, without rust.
Sewing the internal partition
Having installed the stove, we sew up the frame of the partition between the dressing room and the steam room with a board. We install shelves in two rooms. Don't forget to install the doors. And the final touch. We cover the roof with roofing felt or any material that suits your taste. A small bathhouse in the country with your own hands is another way to get pleasure and cleanliness, naturally. Enjoy Your Bath!
To my shame, I want to admit that this building was the last to be built. There was everything: I made greenhouses with my own hands and such a structure as a pergola for grapes was already standing, but somehow I never got around to doing such a necessary task.
Layout examples
It’s possible to build a country house with your own hands inexpensively if you plan for everything from the beginning. First of all, you should choose a layout. So, if the house measures 6x8 m, then on the ground floor you can place:
- bathroom;
- kitchen-living room;
- hall.
There will be a terrace outside. The bathroom will occupy an area of 2.55 m2, the same space is occupied by the hallway. In the kitchen it will be possible to place furniture and other appliances on an area of 16.8 m2, and the living room will have the same area.
On the second floor there will be a bedroom in the entire area. Since the second floor is smaller, the bedroom will have an area of 25.6 m2. A summer country house can have dimensions of 6x6 m. On the ground floor there will be a hall with an area of 25.28 m2. On the second floor there will be a bedroom of 19.05 m2. There will also be a balcony, while on the ground floor there is also a terrace.
Do-it-yourself bathhouse at the dacha - instructions from the masters! 95 photos of ready-made design ideas!
Today, the bathhouse is increasingly gaining popularity among people rushing in the cycle of modern life.
The beneficial properties of bath procedures on the human body have long been proven by science, which is why many owners of personal plots strive to build this structure in their yard.
This article brings to your attention material with which you will become familiar with modern approaches used in construction for these premises.
For visual convincing, just look at the selection of photos that show ready-made solutions regarding the construction of the entire frame and interior decoration.
Types of bath projects
Any construction begins with a project that will allow you to imagine what the final appearance of this structure will be and how much necessary materials you will need for this.
In addition, the development of the project includes such parameters as the choice of location for construction, dimensions, as well as information about the decor and design used.
The most common types of bathhouse projects are:
- Construction of a 3*3 m structure, consisting of a standard set of premises - a dressing room and a steam room,
- Construction of a 3*5 m structure, here a recreation room with a small kitchen is added to the standard set of premises,
- A plan with dimensions of 4 * 4 m implies the presence of a terrace in addition to the type described above,
- The design of a bathhouse with dimensions of 5 * 4 includes the entire complex of premises of a modern steam room, which can also have a separate toilet, a games room, and a salt room.
Basically, the choice of project depends on the available space on the plot and financial capabilities.
Choosing a foundation for a bath
Often, during the construction of this structure, one of three main types of foundation is used. It can be a strip, column or pile foundation.
Tape. It is the most common type of foundation for the construction of most structures, including a bathhouse.
The advantage of this foundation is that it can withstand heavy loads, therefore, if your future building will have relatively impressive dimensions made of brick, then this foundation option is ideal for construction.
Columnar. It has distinctive features associated with the simple construction of this foundation and small financial investments; it is mainly used for relatively light structures made of timber.
It is erected exclusively in places where heavy loads occur, which mainly occur at the corners of the building and at the intersection of load-bearing structures.
Pile. This type of foundation is necessary for those who are forced to build their bathhouse on “moving” soil.
This is a reliable type with a rather labor-intensive construction process, and is justified precisely in those regions in which this type of soil dominates.
Mistakes made when building a bathhouse
Despite the existence of a developed project and the seriousness of the attitude towards this matter, mistakes still occur that are characteristic of a person when building with his own hands.
It is necessary to pay attention to the following points during construction. Proper planning of the size of interior spaces is necessary
A bathhouse designed for 2-3 people should not be less than 10 m2,
Proper planning of the size of the interior spaces is necessary. A bathhouse designed for 2-3 people should not be less than 10 m2,
An acceptable ceiling height for such a structure is considered to be 2-2.5 m. If there is a deviation from this figure to a lesser extent, visitors will feel discomfort, and if to a greater extent, there will be an overconsumption of coolants,
In order to reduce heat loss, it is recommended to use small windows, and select doors based on such dimensions as 0.75 * 1.8 m,
It is recommended to choose materials used to build a bathhouse in a country house or garden that are lightweight and energy-saving.
Particular attention must be paid to the main bath equipment. It should not only look beautiful, but also meet all safety standards for such structures
Do-it-yourself bathhouse at the dacha - instructions from the masters! 95 photos of ready-made design ideas!
How to build a bathhouse at your summer cottage on your own? What is needed for this? We offer instructions with detailed descriptions and photo examples of design!
Pouring the foundation
The construction of any structure begins with the creation of a foundation
When arranging a miniature object, this point should be paid special attention to. Due to the fact that its structure is made of wood, the weight of the building will be light
Therefore, it is unwise to spend money on a heavy foundation. A better solution would be to create:
- support-column foundation;
- strip base with a shallow burial level.
The second option is the most suitable if the site is dominated by loose, soft soils. The first is chosen for areas where hard soil predominates and digging a trench becomes a difficult undertaking.
To construct a lightweight foundation, it is necessary to lay stones over the entire area allocated for the construction of this facility. A layer of clay should be placed on top of them and then compacted. Upon completion of this work, you can proceed to the next step - laying waterproofing.
If you decide to build an object on a strip foundation, then the first step is to dig a trench. At its bottom it is necessary to arrange a sand cushion. The layer thickness should be 150 cm. After this, roofing material should be laid as a waterproofing material. Then the wooden formwork is installed. The next step is to fill the trench with concrete.
In order to build a high-quality foundation, you need to take care of purchasing concrete pillars in advance. They are buried in the ground at a distance of 1 m from each other. This type of foundation is relevant if the owner plans to build a frame-type building. A pile-screw foundation requires no less attention. Speed of installation is its main advantage. Proper design of this type of foundation allows, upon completion of the work, to obtain a high-quality structure characterized by high strength characteristics.
When creating it, a distance of 2 m should be maintained between the piles. They can be dug into the ground manually. To make this task easier, you should use a hole drill
In this case, it is necessary to pay attention that these elements are immersed in the soil below the freezing level, which is located at a depth of 200 cm from the surface of the earth
Project overview
Projects of timber baths
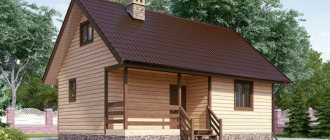
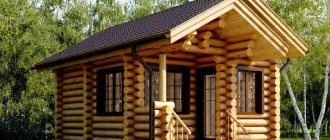
The construction of even a one-story small steam room will always be associated with the problem of freeing up the area near the house. For this reason, you need to look for projects for the smallest bathhouse buildings. The timber is distinguished by such a magnificent property as the fact that it is possible to build baths of any size, up to the size of a dog house. One of the options for a 2*2 meter bath is below. The steam room is made of logs, the rest of the parts are timber. The result was a one-story, inexpensive sauna, durable and warm. Walls made of timber do not retain heat well, and therefore the room is lined with traditional siding or they are lined with a block house. Another, more civilized option is to arrange a canopy and a small summer terrace. These designs are very popular for small country cottages and houses, where most of the area is occupied by fruit trees, beds and shrubs.
Every sauna in the yard will always have problems with melted snow, the formation of puddles, and, as a result, the need to deal with groundwater. This problem cannot be neglected, since the base part of the log frame rots in 3-5 years. It is required to at least make a full-fledged blind area of the base, lay drainage and cast a concrete walkway. If you need to install a small bathhouse in an unprepared area, then you need to immediately install the steam room box on a columnar base or even on piles.
Small bathhouse design projects
The most popular small bathhouse projects are those where the room is divided into three sections. The entrance to the building according to the project can be located from the front of the building or from the side. In the first option, convenient placement of the entrance door makes it possible to achieve maximum comfort for a summer holiday in the area near the steam room. In this case, the maximum area is allocated directly for the relaxation room and the attached terrace, and usually its area is no less than 4 to 7 square meters, and the remainder of the internal types of premises is allocated for a steam room and a small sink. The side entrance to the bathhouse room is used mainly for bathhouse projects with a “carriage” type room layout. The design will be very simple to manufacture, and you can use shorter logs or beams, which greatly reduces the cost of the construction process.
As practice has shown, tandem placement of rooms is considered a necessary measure. Such projects are used when it was possible to buy inexpensive materials for construction, or the format of the site does not allow the construction of a warmer and more economical bathhouse with a square layout. Even the smallest baths can be built according to a design in which the room is divided into only a couple of rooms - a steam room with a dressing room (dressing room) and a sink. Such simplification in the project is now considered a necessary measure; an increase in the number of rooms has almost no effect on the level of comfort or atmosphere in the steam room, and additional partitions in a small bathhouse only lead to pointless loss of useful space.
How to design small baths
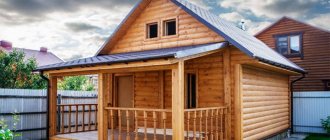
Experts recognized the project with a small covered terrace at the entrance to the building as the most convenient and practical. A project with a terrace can be developed and combine a bathhouse with a gazebo under one roof. The largest number of applications are received by projects of one-story bathhouses with an extension for a fireplace or barbecue. Essentially, this is a new format of a summer kitchen with a built-in small bathhouse for a plot outside the city. The developers tried to create a one-story building made of timber that would best satisfy the needs of vacationers.
Such a building looks very beautiful and unusual, and probably raises many questions among friends and neighbors. In fact, this is a new idea for drawing up projects where the bathhouse looks less and less like an old wooden “birdhouse”.
Waiting room
It is worth noting that in a small bathhouse, the dressing room can be used as a relaxation area and changing room. If you are placing a locker room, it is recommended to adhere to the rule that there is about 1.2 square meters for each person. m. area. If possible, it is worth increasing the area of the room and equipping a recreation area in it.
Please note that the stove is always located in the dressing room. For this reason, it is necessary to equip a place for firewood
Therefore, we have to increase the area of the room by about 30%. The minimum area value is 3.44 square meters. m. But if the stove runs on gas, then this will turn out to be unnecessary.
How to properly place a bathhouse on the site
Take a closer look at how the finished bathhouses are located at your neighbors’ dacha, or look at the site plans on the Internet: you will certainly notice that the place where the bathhouse is installed was not chosen by chance. Let's try to analyze the criteria for this choice.
There are the following fundamental rules that need to be taken into account:
- The optimal location would be the backyard; the place should be protected from winds and drafts;
- Do not install the sauna next to the road, the dust will be an unpleasant surprise during your vacation;
- If possible, choose the south side of the site;
- A well, borehole or other source of drinking water must be at least 20 meters from the bathhouse building.
If your site is located on the shore of a reservoir or you have an artificial one, place the bathhouse away from it, this will avoid flooding in the spring or during rains.
More information about insulation
Cheap modifications cannot be called useless; a budget DIY sauna will be quite warm and airtight with such materials
When choosing a specific manufacturer, you need to pay attention to permission to use such a component for buildings of this type.
Among environmentally friendly thermal insulation solutions, it is worth noting basal wool and penofol. The properties of both materials have proven themselves quite well, and the price will be affordable for every average family.
Thanks to convenient rolls and a wide selection of product thicknesses, you can easily choose the right option at an affordable price.
Bathhouse at the dacha: projects
A small-sized washing station at the dacha has always been a favorite object of creativity. Each private owner was looking for his own version of building a small bathhouse at the dacha with his own hands, projects for foundations and finishing of premises. There are many projects, but almost all of them are tied to the specific location of the site and the main building.
Among the universal options, the following schemes are most often used:
- The most affordable version of the washing department is a compact bathhouse for a summer residence in the form of an extension to the main building;
- The most common frame mini bath with insulation and wall covering with clapboard;
- A full-fledged timber building with a separate washing room;
- The most affordable mini-sauna for a summer residence to build with your own hands from edged boards is forty.
The last option is good because it can be built on almost any plot of a summer cottage in five to seven days. This design will last three to four years without any problems, until the time comes to build a real bathhouse.
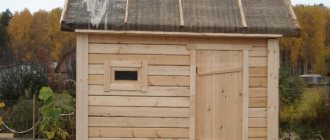
Small sauna for a summer house made from roofing boards
The main advantage of such a bath is its low cost and large interior space. Most of the box is allocated to the utility block, where firewood and garden equipment are stored; the steam room and dressing room occupy approximately 2/3 of the room.
The use of plank panels significantly weakens the walls, so according to the project, the bathhouse box at the dacha is supposed to be built on a strip or slab foundation. Such a temporary shed can be built on a purchased plot with an old dacha. While repair work is underway, you can steam in the bathhouse and store the necessary material and tools.
The walls inside the bathhouse are lined with thermal insulation, possibly mineral wool and aluminum foil. To prevent water from flowing inside, you can build a canopy or cover the boards with thick plastic film, at least 0.2 mm thick, on pre-stuffed counter-lattice slats.
The simplest version of a mini bath for a summer residence
Sometimes owners of a summer cottage prefer to build a steam room directly next to the wall of the house. Essentially, this is a universal cabin made of boards and timber, in which you can steam or shower at the same time.
It is clear that it is possible to build a single-seat sauna box only if a brick stove is built in the dacha room, in close proximity to the wall.
To heat up a mini sauna at your dacha, you can use a flame pipe made of thick stainless or alloy steel. The part facing the stove is laid with a bath stone to a depth of at least 40 cm. A water tank with a dropper is installed above the heater; a stream of steam warms up the cabin in 10 minutes.
What is interesting about this bathhouse project for a summer cottage:
- It can be built in a day, and the body of the bathhouse is best made from pine boards - forty;
- The cabin does not require additional foundation or insulation. You only need to build a shower tray with a wooden drain;
- The time to prepare the bath is no more than 10 minutes, during which time the walls and water in the shower tank have time to heat up.
Instead of a fire oven, you can build a steam generator or use an industrial model for apartment saunas. A tank with water for showering is installed in the upper part of the bathhouse cabin. A built-in electric heater is used for heating. It is most convenient to build a room with an exit from the bathhouse to the covered veranda of the dacha, then you can steam in any weather.
Classic mini bath project
For a dacha with a plot of at least 10-12 acres, standard frame and timber mini-baths designed for two to three people are most often chosen.
One of the options for planning a sauna room for a summer residence is shown in the diagram below.
For your information! A special feature of the layout of such a mini bath is the minimum number of internal partitions.
In small boxes of 2.5x2.5 m, building a rest room is useless and pointless, what kind of rest can there be?
You need to leave a small dressing room of 2 x 0.7 m. This is enough to fold things, sit, here you can store a supply of firewood, from which it is convenient to heat the stove.
Both types of bathhouses are built on a columnar or bored foundation. Building a frame bathhouse with your own hands for a summer residence is much easier and faster, although somewhat more expensive due to the large amount of insulation.
Building a bathhouse in a dacha from timber will cost 20% less, but you will need to build a pile foundation and seriously tinker with the shrinkage of the walls. At least once a season, the intervention seams will need to be stamped with tow. It is possible to build a box with a ventilated facade, but this type of bathhouse cladding is rarely used for a summer residence.
Location Features
In addition to a successful box design, you will need to choose the right place in the country where you can build a bathhouse without occupying the most valuable areas of the territory. On the other hand, the steam room should be located at a sanitary distance from the dacha house in order to ensure a fire safety distance and a minimum of smoke in the area in front of the house.
A typical design for a simple mini bath involves building a room in the space between the remote toilet and the dacha building.
The second option is the most common. In this case, the structure is placed as far away from the house as possible, preferably closer to shrubs or trees that shield the box from the wind.
A bathhouse can be built in the so-called sanitary zone of the dacha, and the site for the foundation, even without taking into account the height of the piles, must be located above the drainage pit or septic tank.
Ventilation device
Comfort when staying in a mini-bath will be ensured only if the owner takes care of creating a competent ventilation system. Without it, you will have to constantly smell an unpleasant odor. To get rid of it, you will have to make a lot of effort. The installation of an effective air exchange system will ensure maximum effect from taking paired procedures.
During the construction of a compact object, care must be taken to create a small glazed window. It is optimal to place it opposite the front door. You can also create a hole in the wall instead, which should be equipped with a damper. If there is no shortage of funds, then you can purchase an exhaust or supply opening of the required dimensions.
Building a mini-bath with your own hands on a country plot, the area of which is limited, is a good solution. Also, such a facility is suitable if there is a great desire to take paired procedures, but there is no money for the construction of a large facility.
A mini-steam room can be built with minimal time and money. Any gardener can easily cope with this task, even without serious skills in construction. The operations performed during the construction of the facility are simple, so it is enough to spend a little time to get a mini-bath on the site. It will not only provide an opportunity for bathing procedures, but will also decorate the area.
General information
Consider the types of saunas for an apartment
Types of mini-saunas for city apartments
The sauna in apartments should not be full-size, but miniature. We briefly talk about the features of the most popular four types of mini-saunas, and the important fact is that this small sauna can even be bought ready-made.
With electric heater
The construction of a sauna in an apartment usually results in the re-equipment of the sanitary unit, since modernization of communications is important. Consequently, such an event will be accompanied by the collection of permitting documents. But installation can be greatly simplified by connecting using a flexible hose. In this case, running around to the necessary authorities can be avoided, and all responsibility in this case will fall on the manufacturer.
Phytobarrel
If you don’t have enough free space, a compact phyto-barrel is an excellent alternative to the classic options. Such a small sauna in the bathroom can be placed in any free corner. The area it occupies is approximately 1 m2. It is no more tall than a person, and the power of the heating device used in it is approximately 2 kW. The most popular models include barrels made of cedar and equipped with their own steam generator. Although such a mini-sauna is very simple and compact to operate, its installation should be entrusted to the manufacturer. The phytobarrel is easily controlled using a special remote control, and certain models have special devices that make the procedure even more enjoyable, for example, a sprayer for aromatic balm.
Portable sauna
This type of sauna is made of a frame covered with fabric. The principle of operation is similar to a phyto-barrel, and when the head is in it outside the heat zone, such a device is inexpensive, has a low weight and is compact. The main advantage of a portable sauna is that it is easy to use, and the only thing required for operation is an outlet.
Infrared sauna
From experience, we can say that this type of sauna is the optimal solution for indoor use, and it, like an important steam room, can remove toxins and excess fluid from the body, and can also activate the functioning of human organs.
Finnish type sauna
If there is enough space in the apartment, you can completely think about arranging a Finnish sauna. Even in 1 session it can accommodate a couple of people, and the steam in it is dry, it heats up to +100 degrees. This point is the main difference from the saunas listed above.
Turkish steam room
Selecting a location - pantry, bathroom or balcony
A sauna in an apartment with your own hands must be designed correctly, and the first thing to start with is selecting a location and developing a project. The following options can be considered for its placement:
- Combination of a corridor and a sanitary unit that leads to the kitchen. You can even add a bathroom here.
- Balcony or pantry in the case where the sauna will have infrared heating. By the way, a sauna on the balcony is beautiful because it will not reduce the living space of the apartment.
Naturally, the size of the sauna will depend on the number of people
When making the appropriate calculations, it is important to allocate at least 2 square meters of space for each person. The ceiling height in the room should be 2 meters or more
If you decide not to buy a ready-made miniature sauna, but to equip it yourself, then you can leave the one you have. An excellent option would be tiles, and the room for the sauna should be at least 1.8 * 2 meters. This makes it easy to place a bench, and such a sauna will become a practical and also convenient solution for an apartment.
Construction options
Types of buildings:
- frame building;
- plank construction;
- barrel bath.
Frame
Tools and consumables needed to build a steam room:
- Rafter beams, slats, beams, lining.
- Roofing material.
- Insulation. You can use mineral wool for the relaxation room, and foam glass for the steam room with washing area.
- Vapor barrier film.
- Impregnations for wood.
- Shovels, cement, crushed stone, sand.
- Hand drill (for columnar foundation).
- Metal piles (for pile foundation).
- Jigsaw, miter saw.
- Hand hacksaw for wood.
- Set of chisels.
- Screwdriver, drill.
- Hammer, mallet.
- Fastening elements.
- Metal corners.
Construction:
Drawing up a construction project. On the drawing you need to indicate the area of the rooms, the general dimensions of the building, the location of the stove, windows, doors, shelves. Preparing the site for construction. It is necessary to mark the boundaries of the building with pegs with a stretched thread, and remove all debris from the designated area. Construction of the foundation. Since the structure will have a small mass, a pile or columnar foundation is suitable. Assembling the binding crown. A timber with a section of 150x150 is suitable for it. It is recommended to soak the lumber in advance with used motor oil. In the corners, individual elements are connected using a half-beam system. Additionally, they need to be secured from the inside with metal corners. Assembling a frame from beams used for the rafter system
It is important that the material is dried in advance. For additional stability, they are secured with spacers diagonally. Connecting individual racks into a solid frame using the top strap. Assembling the rafter system
It is better to assemble a gable roof. Stuffing of batten sheathing. Fastening the vapor barrier film. Stuffing slats to form a counter-batten. Next, you can fasten the roofing material. Wall cladding with OSB boards. Formation of a “pie” from a layer of insulation, vapor barrier film. Installation of windows and doors. Wall covering with clapboard.
It is important to use wood paneling with the lowest thermal conductivity
Plank construction
The outside walls are covered with unedged boards. The finishing technology is the same as for the construction of a frame building. For compact structures, you can choose a pitched roof.
Buildings sheathed with boards have high heat loss. To level out this drawback, you need to use high-quality insulation materials and stuff the boards overlapping each other.
For the exterior cladding of a building, it is better to use aspen boards. This type of wood has a low thermal conductivity and retains heat inside better.
Barrel sauna
When building a bathhouse, a rectangular frame is first assembled, and semicircular arcs are formed for each of the partitions. Tongue boards are placed on top of the frame.
If you do not have the skills to work with hand and power tools, it is difficult to build a barrel sauna yourself. If there are no financial problems, you can purchase a ready-made barrel sauna. Manufacturers completely complete the mobile structure. The owner of the site will only have to prepare the foundation, install a barrel sauna, connect a water hose, and power supply (if the stove is electric).
Buy a ready-made mini-bath from a certain manufacturer or assemble it yourself using frame technology - the choice is only for the owner of the site
It is important to take into account the fact that purchased structures are standard and may not correspond to the personal wishes of the owner of the site regarding the internal arrangement of rooms, shelves, stove
Wood sanding
Then we prepare the log house for painting. The log will be processed everywhere, from the end - this is the loosest area that can cause damage to the log.
Start with the simplest and smallest wall. It's worth tinkering with the corners, the circle of the grinder doesn't reach everywhere, you'll have to work with a chisel. The ends are processed at the end, they are sealed with mastic. It is convenient to use white; it will be easier to paint. Sanding allows you to show the beautiful structure of the wood and natural pattern.
Dry the base for 1 day, then apply glaze. After this, it is good to walk over the surface with sandpaper. Then the paint is applied in layers, the first one is dried for half a day, but it is better to leave it for a day, then a new layer is applied, which gives a matte shine.
Interior finishing work
The walls are covered with certain types of wood. Due to high temperature and humidity, chipboard and linoleum cannot be used. Natural wood - alder, larch, cedar, linden - is suitable for cladding. They retain heat indoors.
Wooden lining is considered the best option for finishing the room. It is mounted on the sheathing to prevent contact with the insulation and waterproofing.
Wood paneling is also used for the ceiling
In the steam room it is important to create the effect of a thermos. And this is achievable with proper installation of the insulating layer
It is attached to the underside of the floor beams and secured with a rough layer of filing. The foil insulation is mounted below and pressed with rolling slats - the basis for fixing the lining.
The stove is the basis for the bath. For small rooms, simple devices that you can make with your own hands or replace with an electric furnace will suffice. The second option is preferable due to minimal air pollution and high safety, but it costs additional and considerable costs.
Important! To avoid fire, the place for the heating elements is lined with non-combustible materials. Distance to wooden parts – from 20 cm.
Some useful tips
Since stones can crack greatly when heated and pieces will begin to fly off, you need to be careful. It is better to water them with hot water and then it will evaporate almost immediately. At the same time, cold water promotes the formation of fragments.
Regarding the tight-fitting material, it is worth noting that preference should be given to a tent - the whole point is that if you use film, you will need a lot of it and it will take up more space in a hiking backpack than a regular Soviet canvas tent
With all this, the tent will also serve as an excellent sleeping place in the future.
Advice. Prepare round, slightly elongated stones for the sauna stove, without any delamination (other stones may simply burst under the influence of high temperature). River/lake boulders with a diameter of about 20 centimeters are ideal (those that are too small in size will “give off” very little heat, those that are too large will simply not have time to heat up). 5. Advice. If you plan to use a tourist scarf as a bath structure, then in no case should it be of a modern type. The fact is that such tents are not designed for high temperatures; moreover, when heated, they can emit toxic