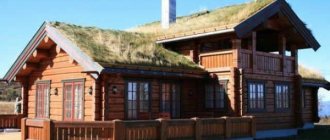
Wooden architecture has developed over the centuries in many countries. Today, for the construction of warm and durable houses, various types of logs and logs are used, which have successfully proven themselves in the northern regions of Russia, Canada and Norway.
Timber and rounded logs are widely used as building materials - strict geometric dimensions simplify and speed up the assembly of the log house, since a template can be used to mark the connecting grooves. Construction from chopped debarked logs is noticeably more difficult, since each connection is adjusted individually.
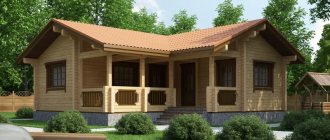
When it comes to houses made of wood for the private sector, we mainly mean either frame structures or ready-made turnkey log (timber) buildings. Is it possible to build log houses on your own, the way our ancestors did? The answer is unequivocal - yes, cutting a log house is within the capabilities of any skilled owner . You will learn about all its nuances from this article.
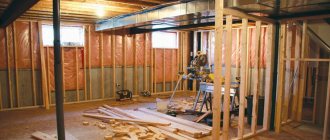
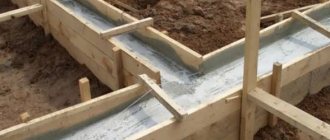
The construction of any building is a complex of various activities, including both preparation for construction and the phased implementation of individual technological operations. We will not consider them all, starting from the “zero” cycle, since the subject of conversation is precisely the felling of a log house. But one remark will not be superfluous. It concerns the most expensive part of the structure, the foundation, the costs of which can reach ⅓ of the estimate.
Which type should I choose? Considering the relative lightness of buildings made of wood, it is advisable to limit ourselves to a shallow-depth tape or a pile-grillage foundation. For any log house it is quite enough, if the presence of a technological (basement) floor is not an indispensable condition. Although in this case there is a good solution - to “raise” the house by installing a higher base.
The general order of work is unchanged: installation of the foundation - lower crown - laying wood samples in rows (from bottom to top) with simultaneous arrangement of openings for doors and windows. Next is the ceiling and rafter system. But what does “cutting a log house” mean? This is the connection of all blanks into a single structure with a preliminary selection of material at the designated “points”. The construction of the walls of a building is impossible without reliable fixation of all elements, therefore, when working with wood, cuts (cuts) are made in certain places of the log (timber).
But there is a difference in how the samples are fastened together. There are several ways to cut log houses. Each of the methods has both advantages and individual disadvantages, so we will give a general overview of the ones most used when doing DIY work, since there are quite a lot of them. And which one to choose is entirely at the discretion of the master.
Laying logs in a log house
Cutting walls. The log house begins to be assembled by laying the first crown of logs. For this purpose, the thickest logs are selected, hewn into two edges (from the bottom and inside). On the transverse and longitudinal walls, the logs are shifted relative to each other by an amount equal to half the height of the log. In order to lay the first crown on the opposite wall in this way, boards are placed under it or the structure is placed on an uneven-high plinth. The very first crown must be laid level. The rest can simply be fused into a longitudinal groove, which is located on the inside of each log. The evenness of the installation is controlled by periodic checking using a level. For the groove, it is better to choose a semicircular shape, which ensures the best fit of the logs. The worst groove shape is triangular. The crowns are fastened together with special insert spikes with the following dimensions: height - 12-15 cm, width - 5-7 cm, thickness - 2-3 cm. The spikes are located along the entire height of the wall at equal intervals in a checkerboard pattern (the distance between them should not exceed 2 cm). For better penetration into the prepared nest, chamfers are removed from the end of the spikes. In the walls, the spikes are installed strictly above each other at a distance of 15-20 cm from the edge of the logs. Remember that the height of the nest equipped for spikes should be 1.5-2 cm greater than the height of the spikes themselves. This is done taking into account the shrinkage of the log house
What should you consider when designing a connection?
When designing a dovetail, there are a number of considerations that will affect both its strength and appearance.
Interval between spikes . The distance between the tenons and their size determine the strength of the connection.
At equal intervals (ratio 1:1), the mechanical strength is the highest. But this configuration is rarely used. Because due to the larger number of elements, manufacturing the part takes corresponding time. The likelihood of making mistakes that will cause a loose fit is also higher. Typically a ratio of 2:1 or 3:1 is used. In these cases, the strength of the connection remains just as high.
When joining wide parts, additional tenons are made at the edges at small intervals. This solution helps to effectively combat wood warping.
The dovetail angle is an important parameter that determines the mechanical characteristics of the joint. If the angle is too small, the lock will not lock and the fastening will turn into a regular tenon joint. If the angle is too large, the tapered part of the dovetail may split during assembly and the tenon will fall off.
For soft wood, the dovetail angle is made steeper, since it is more susceptible to crushing and deformation under loads. The optimal ratio is 1:6. For hardwood, the angle is made less steep - 1:8.
The design principle of the dovetail shape is shown in the drawing.
4
Cutting walls and corners into a bowl
In traditional house-building, bowl cutting is the most common method of joining logs. The essence of this method is that the logs on each side of the house are released 25-30 cm from the corner (as a result, the dimensions of the wall are reduced by approximately 50 cm). On the one hand, this method increases the consumption of materials, but on the other hand, the house is reliably protected from wind, rain and other climatic phenomena by protruding parts of the logs. In addition, cutting “into a bowl” gives the entire log frame additional stability. It should be noted that when constructing a log house, builders use both simple and complex “bowl” connections. In the latter case, spikes are equipped at the ends of the protruding parts of the logs (in the bowls of the upper logs) and grooves for them (respectively, in the lower ones). In this case, you must first mark the places for cutting, which can be done using a special tool - “features”. To do this, the logs are stacked on top of each other, and a groove is marked on the lower surface of the upper log. The marking is done on both sides of the top log, which often gives it an equal side. After this, the grooves are cut directly and a trial installation of the logs is carried out. If the fit is not tight, the grooves should be modified. As for the depth of the groove. It should be such that the upper logs are raised above the lower ones by about half their diameter. In this case, the top of the logs already laid in the log house is leveled until it takes on an oval or rounded shape. The felling of a log house can be done either with the bowl down or with the bowl up. There are no fundamental differences between these methods, although some experts believe that when cutting with a bowl downwards, the wall of the future house will be less susceptible to precipitation and, therefore, more durable. Cutting “into a bowl” is good because it ensures a fairly tight connection of logs and does not require highly qualified performers. The disadvantage is that with such a laying of logs it is difficult to complete the external cladding of the log house. In this case, it would be better to use a “paw” cut. To give the log house stability, all its elements are connected to each other using dowels that prevent the logs from rolling out sideways. The best material for making dowels is dry, dense wood. The spikes must be installed from each other at a distance not exceeding 1.5 - 2 cm. Yes, and one more thing - the logs are laid in a log house with a clear level of horizontal ones next to each other. This can be achieved by alternately laying the butts in different directions.
Video description
In this video you will see how to caulk a log house with tow:
- Jute . An environmentally friendly type of insulation that retains heat well, but has a short service life (3 years) due to the fact that it strongly absorbs moisture.
Old jute is difficult to get out of the cracks, so it is rarely used. There are also differences between types of jute. For example, tow is too hard and has low density. Because of this, it is necessary to caulk the log house in several stages to achieve the desired density.
Flax-jute contains 50% flax fibers, so it requires additional treatment to prevent insects and rot. Jute felt consists of 10% flax fibers, but has high flexibility and good density. It also requires additional insect repellent treatment.
- Lnovatin . Due to heavy treatment with insect repellent chemicals, it is not environmentally friendly. It has a service life of 3 years and is attached to the structure using a construction stapler.
Felt made of jute Source drevtorg.rf
See also: Catalog of house projects made from hand-cut logs and timber
- Synthetic compounds . They cost more than other materials, but are easier to use.
Such substances are used in combination with natural material (cord). To do this, the thread is placed in the gap and filled with sealant, which is leveled with a small spatula.
The disadvantage of this method of sealing log cracks is that when exposed to sunlight, the sealant will dry out and begin to crumble. To do this, the place of putty must be covered with planks.
Also, synthetic compounds harden and can expand and contract with temperature changes, which can lead to cracks in the wood. To avoid this, it is necessary to use elastic compounds.
The right combination of sealing materials helps avoid the formation of damage and fungus, and also increases the thermal insulation of walls. This is necessary when constructing buildings in cold regions or when assembling a bathhouse, since in such rooms rapid cooling of the air can be critical.
Synthetic sealant for log houses Source td-artemov.ru
Chopping walls and corners with your paw
Cutting walls “in the paw” is considered the most optimal way to connect logs. It can be simple and complex. The difference between the methods lies in the choice of spikes. In the first case, inserted tenons are used, and in the second, root tenons are used. When cutting “in the paw”, the ends of the logs do not extend beyond the corners.
This means that the process of joining a log frame will be more labor-intensive, but at the same time it will save building materials. It also requires fairly high qualifications of the performers, since the logs must be laid very carefully, and any deviations lead to the appearance of cracks, which violates the thermal insulation of the house.
Laying a log house begins with the most accurate marking of logs. The trunk with the smallest diameter in the area of the upper cut is used as the first log, which, in fact, becomes the reference sample. The ends of the remaining logs are also marked according to the size of the “foot” of this log. Of course, incorrect markings will lead to a violation of the geometry of the log house, so all work must be trusted only to professionals who can maintain the required dimensional accuracy.
As in the case of “bowl” cutting, two edges are made on the logs. The inner edge is hewn out along the entire side of the log, and the edge opposite to it is hewn to a length equal to one and a half to two diameters of the log. The surface processed on two parallel sides is called a “blank”, the untreated part is called a “wane”, and the resulting planes are called “cheeks”. The length of the remaining two edges is equal to a distance slightly larger than the diameter of the log. After the “feet” are prepared on all the logs, the frame is pre-assembled and, if necessary, adjustments are made.
Main types of wood for felling and their processing
To know how to cut down a bathhouse, you need to select the appropriate types of wood for production. Most often, coniferous types of wood (pine, spruce, larch) are used for the manufacture of such structures. It is best to choose material from cold regions (for example, Siberia), since in winter the flow of sap along the trunk is least. This reduces the risk of cracks forming when drying the material.
Also, trees that are felled in winter have a higher resin content, which increases its resistance to rot. The diameter of the logs must be at least 21 cm (but not more than 35 cm), and the length of all elements must be approximately the same to simplify processing and assembly. All wood must be smooth and free of knots. The area from the root to the beginning of the crown of a pine tree is best suited for this.
Wood for a log house Source sm-news.ru
See also: Catalog of companies that specialize in log baths and sauna vats
When laying structural elements, it is recommended to make the first 2-3 crowns from larch, as it has high resistance to moisture. When choosing a material, it is not recommended to use crooked trunks or wood with cracks and rot. The bark should be removed with a scraper, as it hardly touches the working surface underneath. After this, you need to let the material dry for 3-4 days. Also, before cutting, the wood is treated with an antiseptic and impregnated with a fire retardant.
Processed wood for a log house Source im0-tub-ua.yandex.net
Cutting down walls and corners
Joint cutting is one of the simplest ways to connect the elements of a log house. It involves releasing logs from each corner. Two rectangular recesses (cuttings) are made on the lower trunks, the depth of which is slightly less than a quarter of the diameter of the log, and the width is equal to the size of the cutting in the log that will be laid on top. Installation of a log house begins with the installation of all recesses. After this, the accuracy of the landing of the logs and the coincidence of the lower and upper cuttings are checked. During preliminary assembly, the size of the trench and the location of the cokes are determined. It should be noted that after removing the trench, the recesses must be adjusted taking into account how much the log will sink. When assembling a log house, moss is placed between the logs and they are fastened together using cokes. When chopping “in the middle”, the connections of the log house elements are strong and reliable, but the tightness of the nodes leaves much to be desired. It is for this reason that this cutting method was used in the construction of sheds and other outbuildings, where the tightness of the joints does not play a significant role. In a number of cases, the framed crowns of houses are also connected “in an okhryak” manner, since they are also not subject to high requirements in terms of tightness.
Manufacturing of window crowns
The next stage is the production of window crowns. First, having noted where the window frames will be placed, the final crown is laid. Logs that are cut for window and door frames are also fastened with dowels to secure them.
The production of a log house ends with the stage of laying the upper structure of the log house. The window crown is assembled and placed on the ground. Next, two levels are placed on the crown above the window and rafters are assembled onto which the rafters will be attached. The last stage is laying the rafters prepared in advance. The roof is already being laid on them. This concludes the production of the log house.
Cutting down walls and corners
The “hollow” cutting technology almost completely repeats the “bowl” cutting technique, with the only exception that the recesses are cut in the upper, and not in the lower, log. To begin with, the cutting depth is calculated based on the simple contact of the logs, and only then it is adjusted to the exact dimensions, taking into account how much the top log should sit. As a result, it turns out that the very top log seems to slam down the bottom one, which is where the actual name of the cutting method comes from. If the recesses are cut out accurately, then when installing the logs, a characteristic “pop” sound occurs. This technique requires a certain level of qualification from the performers and is most likely the most practical way to connect the elements of a log house. All units fit tightly together, so moisture does not get between the logs, and the house can be used much longer. In addition to houses, the log houses of barns and baths are connected “to the hood”.
Material calculation
How to make a log house and calculate the amount of money spent, if the dimensions of the proposed structure are known - this is an important point in the manufacture or ordering of a finished building. For example, for a bathhouse with dimensions of 3x4 m and a height of 2.4 m with a frame in a bowl.
Due to the fact that the corners of such a structure will protrude 25 cm on each side, when calculating the length and width of the building, 50 cm is added.
If the diameter of the log is known (for example, 24 cm), then the volume of wood can be calculated using the formula 3.5 x 4.5 x 2.4 x 0.24 = 9.072 m³. During assembly, a groove is made in each log, which differs in width from 0.5D to 0.67D. This reduces the final volume of wood, so this formula requires further refinement.
Wide logs for a log house Source promdrevo.ru
Cutting walls and corners into igloos
The peculiarity of cutting into an igloo is the alternation of joints at the corners. On one side, the top stacked log is connected to the bottom one using a regular “bowl”. On the other hand, it is tightly inserted into a vertical groove, which is made in a perpendicularly laid log. Of course, the end of the top log is cut to fit the groove. In this case, the gutter is also selected in the upper log. For additional strength, all elements of the log house are fastened together with cokes. In general, cutting into an igloo is a fairly simple method of joining, which also saves building materials, but it should also be noted that it is insufficiently strong. Apparently, this is why in modern house construction the technique of cutting log houses “into igloos” is practically not used, although in some cases it can be used when constructing outbuildings or extending canopies.
State standards
The main standard that establishes the rules for the manufacture of fastening elements for wooden parts is GOST 9330-2016. It specifies the sizes of teeth, grooves, dowels of various types of assembly. The standard provides diagrams with examples of such fastenings. The rounding rules and symbols used in the drawings are indicated.
The rules for gear connections are specified by GOST 19414-90. It shows the sizes of the teeth, the order of their arrangement and methods of connecting them.
When constructing wooden houses, GOST 30974-2002 is used. It defines the rules for preparing dovetail cuts for logs in low-rise construction. It details the types of structures, classification and dimensions of each element.
More complex shaped connections
A variety of shaped tenons can be made using a router and a special tenon-cutting device - a tenon cutter
But such connections can only be made with special templates
using a tenoning device - a Leigh tenoner:
Coniferous timber harvesting
In our area grow the best ecologically clean coniferous forests (pine and spruce), most suitable for the production of log houses and bathhouses.
The presence of significant forest areas allows, before the craftsmen begin construction of the log house, to make a high-quality selection of wood. Rented forests are located deep in the forest fund of our region, which in turn affects the quality of the wood. Wood is less susceptible to environmental pollutants. The trunk of these trees is longer and more even, unlike those growing along the edges of fields and roads, which makes it possible to cut large log houses without using “joint” logs. An important advantage is the environmental friendliness and low natural radiation background of our forest, which has a beneficial effect on the human body.
Craftsmen set aside a plot in coniferous forests. This procedure is very important. You need to select an even stand of trees approximately from 23 to 32 cm in diameter. Then this forest is felled by fellers and hauled with a tractor to an area specially designated for debarking and cutting logs from logs. Wood intended for felling should not be affected by fungus. To check, the logs are carefully tapped with the butt of an axe, and a clean and clear sound should be heard.
Photo from the plot: loading timber with a manipulator:
Video. Loading winter timber for log houses, plot in Velizh
Fastening timber: tool
Connecting timber is not the most difficult and difficult task. But you should prepare. To do this you will need:
A measuring tool (tape measure, carpenter's corner, level) and a pencil, with their help the marking of the forming surfaces of the fastening is carried out.
Saw, possibly a hand saw
or chain with electric drive,
but it is better to use a mechanism with a gasoline engine;
Hammer, drill and screwdriver.
Is it necessary to paint the facade?
Facade paint should not only be decorative, decorate and give a finished look to a wooden house, but also have protective properties. The choice of facade paint must be approached responsibly, because it is very easy to make the wrong choice in the variety of facade paints offered.
If you chase a lower price, you may suffer from purchasing a low-quality product. Definitely, if the paint can says “For interior and exterior use,” you can’t expect quality and durability of such paint. There will be no protection, and under the influence of precipitation, the house will have to be repainted in a couple of years.
Modern high-quality facade paints last several times longer and at the same time retain their properties and qualities of the painted material better than outdated cheap compositions.
What is the main component of façade paint? The presence of two main components is important here: the quality of the binder, which during the drying process forms a film on the surface to be painted, and a liquid ingredient that improves the action of the binder and protects the coating itself from the destructive effects of fungi, bacteria and insects that penetrate the wood. But it is known that any wooden product needs not so much painting as protection.
It is recommended to use a three-component system, which includes the following:
- Anti-tar primer - when applied pointwise along the knots where the resin comes out, it blocks its development and prevents the formation of stains on the paint.
- Protective layer – from fungi, bacteria and bugs.
- Dye – gives the required color and protects from atmospheric influences. Here, opaque paints provide the greatest protection than weaker clear varnishes and stains, which are exposed to ultraviolet radiation and darken and become less durable over time.
For high-quality painting, it is necessary to take into account certain points: matching the wooden surface to be painted with the chosen paint, choosing the right tool (for water-based paints - a synthetic brush or roller, for solvent-based paints - a brush made of natural bristles), maintaining the temperature regime in accordance with the paint manufacturer's instructions.
When choosing paint, you should also distinguish between the type of paint you are going to use on the logs or boards you are going to use. Wood absorbs a large amount of moisture. And in order to preserve its breathability and prevent it from cracking due to frost in winter, it is better to paint logs with breathable, film-free materials (for example, “Valtti Color”, “Valtti Aquacolor” in a system with an antiseptic primer).
To paint boards, on the contrary, it is advisable to use paint that forms a film, and the more elastic it is, the better. Nail heads are treated with a special anti-corrosion primer.
Facade paints are divided into two groups: organic and water-based. Recently, there has been a noticeable increase in the popularity of the latter. The main advantage of water-based facade paints is their high environmental friendliness and increased wear resistance under temperature changes. Cheap organic solvent paints do not differ in quality, do not have protective properties and are subject to the greatest destruction and low durability.
The choice of paints for exterior use in painting the exterior of the house is now extremely large. It is not at all necessary to choose only imported ones.
Domestic manufacturers of decorative and protective coatings for wood “Senezh” and “Rogneda” have developed high-quality modern facade paints. Among protective and decorative coatings, the acrylic “Senezh aquadecor” holds the lead, which contains a composition of special protective waxes and natural oils for long-term protection from atmospheric influences. Tikkurila also has Vinha antiseptic, which protects against the harmful effects of ultraviolet radiation and preserves the natural beauty of the wood texture.
Floor installation
Correctly lay a double floor in a wooden house. The bottom layer is rough, it is made from edged boards. A clean, high-quality board is laid on the second layer, on which finishing material can be laid.
Important! The most reliable method of installing a subfloor is laying it on a skull block. It is attached to the joists on each side. And the subfloor is nailed onto the cranial block from the outside.
A cushion of insulation is laid on top of the subfloor. In order for the material to last a long time, it must be protected with a moisture-proofing film. It is laid on top of the subfloor, after which the insulation is attached. A vapor barrier is laid on it, in turn. To prevent wood rotting, a ventilation block is attached to the logs (a board 3-5 cm high and wide, matching the width of the logs). A finishing board is laid on top of this entire cushion.
Benefits of technology
The method of such a connection as a warm corner, in fact, has a significant impact on various aspects of construction and operation, namely:
- with high-quality assembly, the junction of the corners of the walls is so strong that you can do without inter-crown insulation;
- a building erected using this technology is not threatened by force loads and impacts in the form of soil movement or earthquakes, since it is strengthened several times;
- this method eliminates such unpleasant moments as corrosion, fungus, mold, and the penetration of insects into the interior;
- significantly reduced costs for fasteners, since these fittings are irrelevant for fastenings with residue;
- Pre-prepared beams with grooves and tenons cut into them allow for quick assembly.
Profiled timber - it would be good to start with this
Since when constructing buildings from timber with your own hands, the likelihood of minor mistakes and generally insignificant defects increases, special requirements should be placed on the characteristics of materials. Profiled timber is an ideal option. The manufacturer pre-provides grooves on the surface of each element that will subsequently protect from rain.
There are also disadvantages. Profiled timber is not always convenient. It is more difficult to put markings on the surface without making mistakes. It is easier to work with a smooth surface without grooves. However, it is worth working hard for the result. Care and accuracy will save you from serious consequences in the future.
A do-it-yourself timber building can last for several centuries, and profiled timber will help with this. It is the profiled timber that has a sufficient degree of protection. Corner joints made of profiled timber do not imply gaps or cracks. The main thing is an even cut. You can try to make it with an ax, or you can arm yourself with a saw: it’s up to the owner to decide.
A layer of insulation between the timber and putty will save you from cold and moisture in many cases. If the building ends up with a lot of cracks, this is understandable at the initial stage of construction, it is this kind of insulation of the corner joint of the beam, the entire facade, that is worth choosing. A layer of insulation and putty will not spoil the appearance. Appearance is not so important when money is invested and you rely on your own strength.
The house should turn out well, it’s worth making every effort to achieve it. Then the investment will not be in vain, and the appearance of the building will be aesthetic. It will be warm inside. The appearance of the seams, processed carefully, is a harmonious ensemble of the building without loss.