By the way, speaking in strict terminology, the roof is the entire structure that crowns the house. And the roof is the roof deck itself - slate, tiles, planks, etc. Also: what is commonly called a pediment is, strictly speaking, a gable - a continuation of the end wall of the house, that part of it that is limited by the slopes of the roof. The pediment is an architectural decoration, and it is usually separated by a cornice from the main facade.
Classic pediment
Pediments
And this is not a pediment!
And here is the pediment.
How can roofs differ?
- According to the form.
Log houses, as a rule, have pitched roofs of various shapes. The most typical and simplest one for private houses is a gable (or gable) one. This is exactly what we will talk about in this article.
Some common roof shapes
Also in low-rise construction, attics and, accordingly, mansard roof shapes are popular. However, for the attic it is not necessary to construct a broken-shaped roof. You can make a so-called “half-attic” if you raise the walls by approximately 1/3 or half of the floor and install a regular gable roof. You can even get by with a regular gable (triangular) roof if it is wide and high enough.
Scheme of architectural solutions for the attic floor
- According to the degree of insulation.
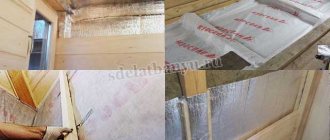
In principle, you can cover the sheathing with slate, and you’re done. And to insulate the ceiling - the ceiling between the attic and the living floor. This is, of course, the simplest and most brutal option. Many people prefer to tinker more thoroughly with a roof, even a cold one - especially now, when so many materials have appeared, and according to the assurances of their manufacturers, you cannot take a single step without all kinds of steam, hydro and other insulation and insulation. But the key idea is that it is much easier to structurally insulate the attic floor (ceiling) than the roof itself. Especially if we are talking about a log house with chopped pediments, and then it will be clear why.
On the other hand, you can make an insulated roof - for the attic, or in order not to make a separate ceiling (for example, in a bathhouse - in a relaxation room).
- According to the design of load-bearing elements:
- Many people know that the main load-bearing elements of the roof are the rafters. But there is also...
- roofing on slabs
These horizontal logs are logs, cut into males
and...
- mixed slab-rafter structure.
Rafter-slab roof structure
Rafters can be rigidly connected to the frame of the house, or they can be sliding (“floating”) - an independent rafter structure. Hard ones are traditionally divided into:
- hanging - exert bursting pressure on the walls when the weight of the roof is transferred to the building; acceptable with a width between supports (external walls) of up to 6 - 6.5 meters;
- layered - connected to each other by a tie - a beam - at the lower ends, and thus exert vertical pressure; mandatory when the step between supports is from 7 meters.
Designs of hanging and layered rafters
In the pure version, hanging rafters are rare; they are often reinforced with crossbars, additional racks, jibs and other structural elements. The entire structure of a pair of rafters with other elements is called a truss. In addition to suspended and layered structures that are assembled on site, there are roof trusses that are assembled in a factory and delivered ready-made.
Ready-made roof trusses
- Of course, roofs also differ in the type of roof covering, but this is understandable.
Functions and types
A rafter system is a roof frame, a set of supporting elements that together give it shape, slope and significant load-bearing capacity. The “backbone” of the roof is made of dry, durable wood, treated with antiseptic preparations, or a metal profile. It serves as the basis for fastening the roofing, and also evenly distributes the load between the load-bearing walls. To cover a log house, the following types of rafters are used:
- Hanging. Hanging rafters have only one support point - on the mauerlat, with the free end of the leg they rest against each other, forming a three-hinged triangular arch. This design is used if the log house does not have load-bearing walls inside on which racks can be installed. The hanging rafter system is subject to expansion load, so it includes various kinds of ties that compensate for this stress. Rafters of this type are massive and difficult to install.
- Layered. Layered rafters have two points of support - the mauerlat and the ridge girder, which is supported by vertical posts. This design can only be used if the inside of the log house has at least 1 load-bearing wall or a number of columns on which the ridge can be unloaded. The layered rafter system experiences load only in deflection, which is why it is easier to install.
Note! The log house is made from natural building material – wood, which has unique properties. After assembling the structure, the moisture content of the wood begins to level out, so it shrinks during the first 3-5 years of operation. The most significant changes in size occur in the first year of service, so it is recommended to fasten the rafters only after this time.
Types of rafter systems
Installation of a gable roof of a log house
What kind of roof should be installed on a log house?
For a log house roof with chopped gables, only the option with sliding rafters is suitable.
All this is due to significant shrinkage of the log house. Now we are talking about gable roofs. It's simple: if some part of the frame is higher than another, then the geometry between these parts will change after shrinkage. Each log loses up to 15% of its diameter in the process of shrinkage, but this is a fairly large amount. For rounded logs the standard is 6-8%.
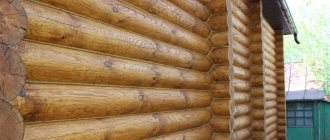
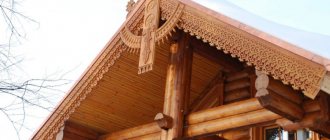
A chopped pediment is like this:
Chopped or male pediment (and in terminological terms - gable)
The logs in the gable (gable) part are called “males”.
If the log house is a flat box, then all its walls will settle equally. But if some parts (gables) are higher than others (longitudinal walls), then the difference in height between them will change, and if you build a roof on rigidly fixed rafters, then it will literally be torn off the frame, the males may fall out... In general, this is fraught with a serious emergency situation.
Here's how the chopped pediment shrinks:
Dynamic shrinkage pattern. It is important that not only do the rafters slide down and the ridge go down, but the angles of the entire geometry of the pediment change
For which log houses are rigid rafter structures suitable? For those without tongs! When the roof is placed on a flat frame box - for example, a hip roof. Or you can make a frame pediment (with boards, a blockhouse, etc.) ... But this will not be quite a log house in its pure form.
The hip roof can be placed on a full-fledged log house on rigid rafters
A full-fledged log house with a gable roof can only have a chopped pediment. Why? Because the pediment is also a part of the house, and a considerable one at that. If you make it frame, it turns out that half the house is a frame assembly. Maybe this is practical - because it is simpler - but in this case, it is practical to build the entire house using frame technology. Log houses are erected for their special merits, and if they are to be done, then do it sensibly and without half-measures.
Here's an example. Well, it costs money to install such a log house. Well, you can fly to the resort. Well, why do you need a bathhouse, because you can wash yourself in the shower? Well, if a person wants it! Maybe all his life he dreamed of building a house, building a log bathhouse. Well, I could do it! So, at the last moment, the attic was filled with boards, like some kind of barn? Well, just be patient and do it right so that there is candy! For the soul, for yourself!
Mauerlat attachment technology
The Mauerlat is one of the outermost elements of a log house roof. It bears pressure from the large weight of the entire roof, which should be equally distributed among the load-bearing elements. The Mauerlat is fastened with rafter elements, which provide this pressure. Mauerlat can be made from solid logs laid around the perimeter, or in meter-long pieces that are placed directly under the rafter elements.
For the manufacture of Mauerlat, only logs, beams and boards with minimum dimensions of 100x100 mm, 100x150 mm and 150x150 mm are used. If logs are used, then one of the sides is cut for maximum contact with the top crown of the log house. The Mauerlat can be secured using several methods.
Scheme of rafters with a sliding support.
When the log house is made of logs or timber, the mauerlat is mounted along the top row and installed on the logs. You can pin:
- using wooden or steel dowels;
- steel staples;
- metal corner;
- using galvanized wire with a minimum diameter of 4 mm.
When to put a roof on a log house?
Immediately after the walls are erected and before installing windows and doors. Sometimes there are recommendations: wait until the shrinkage takes place, or make a temporary roof. It's all nonsense. A house without a roof is not even a house yet. The geometry of the log house is formed during the shrinkage process with all the loads, that is, the house must be completed and the roof too. It makes sense to do temporary roofing only if you have difficulties with the construction of a permanent roof.
Technologies that make it possible to build a log roof that will survive shrinkage exist. There are no objective reasons to postpone construction.
Sequence of work
The main factors for the quality of the rafter frame are the accuracy of calculations of the height of the ridge and the length of the rafters and detailed adherence to the technology for the construction of the roof. In order for the roof to properly protect the frame from the penetration of precipitation, it is necessary to fasten the rafter legs as follows:
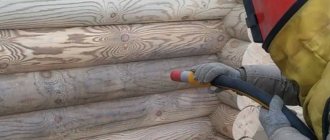
- First you need to take smooth boards of coniferous wood without cracks or knots. To increase the service life of rafter legs, they are treated with an antiseptic and fire retardant. To reduce the consumption of impregnation, it is better to plan the wood.
- Then a rafter leg template is made, which serves as a template for the production of the remaining rafters.
- First, install the first and last pair of rafters, and then stretch the lace between them to align the remaining rafters.
- They fasten the remaining rafter pairs, trim the ends of the legs so that they are even, and then install the sheathing.
Experienced craftsmen recommend checking the correct fastening of the rafter legs using a building level so that the roof is level and without distortions.
About the attic and attic
It is clear that the attic is a living space, but the attic is usually not. The attic requires major roof insulation, the attic does not.
If we talk about the construction of a load-bearing roof structure in log houses with chopped gables, then it is much easier to make an attic. More precisely, an uninsulated roof. However, this does not mean that the attic space cannot be used as a living space. There you can arrange a summer attic.
Fact: In the old days in Russia they did not make “warm” roofs, but summer rooms were built in the attic. This part of the house was called “terem”.
Terem (attic) in the attic part of the house. Otherwise, why is there a balcony if no one lives?
To create a warm, all-season attic, you will have to tinker a lot with the roof. In this case, if there is a need and opportunity, wouldn’t it be better to build another full floor?
What are the advantages of a house with an attic:
- easier to build;
- the attic becomes a climatic buffer between living quarters and the external environment;
- therefore, there are fewer problems with condensation, ventilation, etc., there are no zones of sudden changes in temperature and humidity in the ceilings, due to which the durability of the roof increases;
- the attic can still be usefully used - as a utility room, or as a summer guest room;
- it is easier to monitor the condition of the roof, carry out routine repairs, etc.
What are the advantages of an attic? The living space of the house increases, but it’s not for nothing that you get it! Setting up a spacious attic will not cost much less than building another floor.
What are the rafters made of?
What to make rafters from
Most often, rafters are made of coniferous wood. This is a relatively inexpensive, fairly durable and easy to process material.
If you make your own rafters, it is best to use timber with a section of 10x10 or 15x15 cm.
Also, when choosing wood, you need to pay attention to its moisture content. The maximum allowable rate is 20%. At higher values, the material will shrink, which will lead to disruption of the configuration of the entire roofing system.
Anti-shrinkage roof structure for chopped gables
There are two fundamental solutions:
- roof on slags - close in technology to traditional nailless roof structures of traditional Slavic log houses;
- installation of sliding rafters.
There is also a rafter-rafter system, but these are the same sliding rafters, only with the addition of side rafters.
This is generally “modern” - a rethinking of the system of beams and rafters. But effective!
Rafters on slabs are often too much
In fact, this is butter oil, because in the first version the load-bearing beams are located horizontally, and in the second version vertically. Both structures are powerful enough to withstand the heaviest roofing, such as a tile roof. There is no point in duplicating them.
Another thing is that in addition to holding the roof, the sleds also rigidly connect the gables. And when rafters are added to such a structure, they do this in two cases:
- to lay sheathing on the vertical rafters;
- to make a thick pie of a warm roof for the attic.
It is likely that engineering solutions for arranging a warm roof on a slab base are quite possible, but they have not yet been developed, since for now developers have enough rafters. Therefore, if you plan to build an attic, you cannot avoid installing rafters if you do not want to experiment.
How the roof structure works
In order to competently build a roof on a bathhouse with your own hands, you need to study its structure in detail, which includes the following functional elements:
- Rafters and purlins.
- Lathing.
- Steam and waterproofing.
- Roofing covering.
Rafter structure
It is designed to properly distribute loads over the entire roof surface. The rafters on the bathhouse are mounted using crossbars, ties and spacers to ensure the strength of the finished structure.
The rafter system can be assembled on a finished building or on the ground with subsequent installation on the bathhouse. Rafter supports must be securely fixed to load-bearing walls and supports to prevent deformation or collapse of the roof when exposed to strong air masses.
Wooden sheathing
The sheathing can be assembled with a solid panel or a cellular base of wooden beams. The choice of the appropriate lathing option depends on the type of roofing material. Rolled roofing felt requires a continuous sheathing, while corrugated sheeting requires a cellular sheathing.
Vapor barrier and waterproofing protection
An obligatory stage of arranging the roof of a bathhouse is to provide protection against the penetration of moisture and steam. To create a waterproofing layer, tiles or slate sheets are used, for a vapor barrier layer - roofing material or parchment paper.
Roof coating
Practical and safe materials are used as roofing: rolled roofing felt, metal tiles, ondulin, asbestos-cement or bitumen slate, roofing steel.
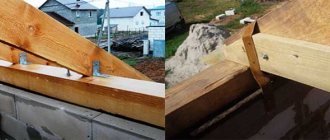
Rafters on sliding joints
The rafters are attached above the ridge beam (in the old fashioned way: “prince’s slega”, “knes”) to the upper crown of the longitudinal walls by means of sliding joints, the so-called “sliding joints”. It looks like this:
Installation of slides and grooves for rafters in the upper crown of the log house
This mount has two parts:
- guide strip (mounted on the rafter leg);
- support corner (attached to the upper crown).
The length of the guide strip can be different, the maximum will allow the rafter leg to move down by 16 cm. This is more than enough to shrink the highest roof.
Sliding fastener for rafters
It is recommended to attach the guide bar along the axis of the rafter, and this is correct. However, then one wonderful nuance arises. In most photos found on the Internet, you can see that the corner is installed and secured perpendicular to the plank. Moreover, the top of the angle loop is located close to the top edge of the guide. It is not right!
The fact is that when shrinking, the rafter will not only move down, but also the angle between the rafter and the horizontal line between the top points of the walls will change (see above for the dynamic shrinkage diagram). If the rafter rests on a log, then the part of it that goes down to the plumb roof will rise relative to the wall, and the lower part of the fastening guide bar will rise up. But the position of the corner will not change, and the bar will cut into the corner with one edge. As a result, the movable connection unit is deformed.
True, if you cut out grooves for the rafters in the upper crown with a margin for the angle at which the rafter is lowered, then there will be no distortion, the plank together with the rafter leg will simply fall a little lower and will slide normally. But this point must be remembered when installing the rafters, and cut out the groove with a margin so that the rafter fits, or do not adjoin the support corner at the top closely to the guide strip, but it is better to do both.
Description of the dynamic scheme: 1. this is how the rafter will go 2. this is where this part of the rafter will rise, and with it the guide bar 3. this is how this part of the rafter and the guide bar will go down, only at an angle of 3°-5° 4. but this is enough so that here the bar crashes into the corner loop and begins to pull out fastening 5. However, if a cut is made that allows the rafter leg to lower in this direction, then there will be no problems
One more thing: attach the corner to the supporting log closer to the inside of the log house - so that there is room for the board, which you will then use to cover the space between the rafters.
And the third important point. As a result of shrinkage, the rafters will not only move down, the angles of the roof will also change, not by much - by 3-5 degrees - but this is enough to create problems. One problem - in the sliding fastening - has already been noted. The second is in the connection of the rafters at the ridge. It must be hinged.
In many photos on the Internet you can see this:
You cannot connect the rafters of a sliding roof this way!
And this is an example of fastening a rafter pair in a sliding structure! A slope angle of 3° with a shoulder of about 4 meters (the length of the rafters of a not very wide roof) can seriously affect the geometry of the roof. Rigid fastening of rafters in the ridge is unacceptable! Otherwise, the slippers will be of no use!
You need to fasten the rafters on the ridge either with an overlap, like this:
Overlapping rafter ridge connection
or this way:
Hinge connection on the rafter stud on the ridge
Scheme of hinged ridge connection of rafters
Watch this video to, as they say, “see once” what we’re talking about:
Features of the rafter system of a wooden and stone house
They say that the roof of a house is the fifth facade.
Any owner of a country cottage knows well that the overall perception of the building depends on how well the roofing is chosen. We have already told users of our site about the features of choosing a roofing covering.
But the roof is only the visible part of a complex system called the roof. The basis of any roof is a reliable and properly designed rafter system.
In this material, FORUMHOUSE experts will talk about the main nuances of constructing a rafter system for a wooden and stone house.
From this article you will learn:
- Where does the construction of a rafter system begin?
- What nuances need to be taken into account when installing the rafter system of a stone and wooden structure;
- What structural elements of the rafter system compensate for the shrinkage of a wooden house;
- What features does the rafter system of a log house have?
- What is a Mauerlat and why is it needed in a stone structure?
- What are the requirements for the materials of a wooden rafter system?
- What is a rafter system built using LSTK technology.
General principles for choosing a rafter system for a stone and wooden cottage
Often, novice developers believe that the choice of rafter system design can be left “for later,” when the walls have already been erected. Practice shows that this is fundamentally wrong. The roof of even a country house is a complex system consisting of many elements. The design of rafters must begin at the design stage of the house.
Manager Vera Vavilova, Moscow :
– The rafter system is the basis (skeleton) of the roof of the house. The quality and durability of the roof directly depends on how well it is done. The manufacture of this structure, especially complex ones, must begin with its design. This is the only way that will allow you to take into account all the nuances and install it efficiently.
The service life of the roof largely depends on how well this structure is chosen and installed. It is also necessary to maintain a balance between functionality and design delights.
Head Pavel Orlov:
– Designing a rafter system begins with choosing the type of roof - attic or cold attic. For mansard roofs, the angle of the rafters is 35 degrees and above. For a cold attic, the base angle of the rafters is 25 degrees.
The simpler the roof shape, the simpler the design, the faster it is to manufacture, and the less likely builders are to make mistakes. Therefore, it is cheaper to build and easier to operate a roof that has a simple shape. The large roof area, the presence of bay windows, and the complex polygonal shape of the building significantly complicate and increase the cost of the design of the rafter system - it requires competent design and calculation.
The most cost-effective rafter system is for a simple gable roof with a slope angle of at least 25 - 30 degrees.
The main factors that influence the complexity of manufacturing and the final price of the design:
- Type of finishing roof covering. The choice of one or another coating determines the composition of the roofing pie, the type of sheathing and the load on the rafter system. The most popular roofs are metal tiles, soft roofing, CPC (cement-sand tiles), ceramic or seam roofing;
- Roof inclination angle. It determines the loads, which is a major factor in structural design;
- Will the structural elements (decorative element) be visible or will it be completely hidden behind the ceiling cladding;
- Large overhangs on the roof significantly increase the cost of the rafter system. If the design of the last floor of the house provides for large unsupported spans, this entails an increase in cost and complexity of the structure. In this case, depending on the distances, the rafter system is performed using trusses.
- The presence of large fireplace chimneys, skylights and other passage elements in the project significantly affects both the complexity of manufacturing the structure and its price.
The design of a rafter system (especially a complex one) should be carried out by a person with relevant experience. This design is always calculated for a specific building. The common approach – “I’ll make a rafter like my neighbor’s” – leads to disastrous construction results. The rafter cannot withstand the loads, which ultimately leads to expensive alterations.
Design begins with collecting the expected roof loads.
These loads include:
1. Constant values, including the total weight of the roofing covering, thermal insulation material and fastening elements;
2. Temporary quantities. These are the loads that climatic conditions, especially snow and wind, have on the roof.
Designers set the design pitch of the rafters in accordance with the expected load. Let's see how true this is.
Pavel Orlov:
– In my opinion, it is better to choose the pitch of the rafters for attic, well-insulated roofs based on the size of the insulation - so that the distance between the rafters is 1 cm less than the width of the insulation. This will make it easier to install.
The main load for which the rafter system is calculated is snow. Usually, all such structures are designed with a margin, but if in doubt (it is planned to install a heavy roofing covering - natural tiles, etc.), you can slightly reduce the pitch of the rafters.
Although the snow load is variable, the rafter must be calculated taking into account the totality of all loads acting on it. The calculation must be carried out not “back to back”, but with some reserve in case of heavy precipitation (prolonged snowfall) or increased wind load.
The “work” of the rafter system is significantly influenced by the choice of material for the walls of the house.
Features of the rafter system in a wooden and stone house
The main difference between the rafters of a stone house and a wooden one is that stone walls have a structure that is not subject to shrinkage and deformation.
Pavel Orlov:
– The rafters of a stone house do not need deformation elements, since a stone house practically does not shrink. The main feature of the rafter system of a stone house is the need for reliable fastening of the Mauerlat. In wooden houses, the role of the mauerlat is played by the wall.
Mauerlat is a roofing element (paired boards 50x150, timber sized 100x150 or 150x150), which is laid along the entire perimeter of the upper wall of the house. The lower part of the rafters rests on the mauerlat. Thus, the Mauerlat redistributes the point load transmitted from the rafters to the entire area of the upper part of the wall.
Also, when designing the truss system of a stone house, it is necessary to take into account the thickness of the walls.
Pavel Orlov:
– The design requires calculation of the permissible lateral load of the rafters on the wall with a fixed Mauerlat.
A thin and tall wall can withstand less lateral load. This requires the use of additional elements for the supporting structure of the rafters - supporting posts and purlins.
Wooden houses also have their own nuances that must be taken into account when manufacturing the rafter system.
Vera Vavilova:
– The main feature is that the walls, which are the basis for the rafters, shrink and change their geometry as the weather, temperature and humidity change outside and inside the house.
The main element that compensates for the shrinkage of the walls relative to the rafters is a sliding support (also called a sliding support). A sliding support is necessary in order to compensate for distortions of the rafter structure resulting from shrinkage of wood due to natural moisture.
A sliding support is a composite fastener that includes a bent plate and an angle with a guide.
When the house shrinks, the rafter slides along the guide, thus compensating for all distortions in the overall structure of the house's rafter system. The sliding part of the support is attached to the rafter beam so that there is a gap between it and the rafter. And the corner with the guide is screwed to the beam.
The slide must be installed strictly perpendicular to the rafters, with a notch in the timber for installation of its base. In order to ensure the maximum stroke of the slide during shrinkage of wooden structures, when installing it, it is installed in the most extreme position.
The degree of shrinkage of a wooden house (and therefore the amount of movement acting on the rafters) depends on the material used in the construction of the walls. Timber with natural moisture shrinks more, dry profiled timber shrinks less, and laminated veneer lumber gives minimal shrinkage, etc.
The walls of a house made of dry timber can shrink by 6% of their total height. If we are talking about the walls of a house made of timber with natural moisture, then the shrinkage can be even greater. Our article talks in detail about the pros and cons of dry profiled and regular timber.
Construction of a roof on a log house
In addition to timber, wooden houses are built from so-called hand-cut logs. Practice shows that the rafter system of such a house has its own characteristics.
Dmitry Filippov, specialist:
– In log houses based on a log frame, a male-slat roofing system is used plus a “sliding” rafter part.
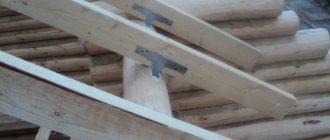
Roofing in a house made of logs, installation.
The roof for a log house has its own design features. Sledges - horizontal logs cut into a log gable (the top of them is the ridge) - are seated together with the log house. Afterwards, a board lining (aka ceiling) is laid on the logs (lay down). Next, the rafters are mounted (in gable roofs they are attached to each other at the ridge with sliding fasteners). Then a roofing pie is formed - vapor barrier, insulation, waterproofing, counter batten, sheathing, roofing material is laid on top.
Dmitry Filippov:
– Thus, the rafter part with the roofing pie is not tied to the log house, but, as it were, “lies” on it, which allows the roof to retain its shape and integrity when the log house shrinks.
From our article you will learn about the features of choosing a material for building a wooden house, about the types of structure and shape of roofs of log houses.
Materials going to the rafters
In addition to taking into account the characteristics of wooden and stone houses, when designing a rafter system, it is necessary to understand the requirements for lumber.
Vera Vavilova:
- Pine and spruce will do. These are inexpensive wood types that meet the basic strength characteristics of rafters.
It is important to ensure that the lumber meets grade 0-2 according to GOST 8486. The rafter elements should not contain large falling knots, rot, wane and cracks. These defects weaken the load-bearing capacity of the rafter system.
Pavel Orlov:
– Edged coniferous wood with a moisture content of up to 20% is used for the rafter system. All lumber used must be treated with certified fire-retardant impregnations.
If you place freshly sawn, raw wood on the rafters, then during the drying process the already installed rafters will move. This will cause deformation of the roof and roof covering.
To avoid this, it is better to make rafters from chamber-dried calibrated lumber.
Another option for materials used to make rafters can be trusses and glued beams.
The use of these materials is determined by the project, based on the size of the spans and the expected load on the structure.
Vera Vavilova:
— In this case, the elements of the rafter system are manufactured at the factory and brought to the site in the form of parts ready for assembly.
This eliminates the so-called “human factor”. It also saves time, because such a structure is assembled faster than one made on site with inevitable sawing and fitting of parts on site.
Factory rafter systems are manufactured strictly according to the design and technical specifications. Thanks to this, a high quality of the base of the future roof is achieved, because the wood has already been treated with antiseptic agents, and the entire rafter system is assembled according to the principle of a designer.
Another material used in the construction of rafter systems for a stone or wooden house can be light steel thin-walled structures (LSTS). Such rafters do not need to be treated with antiseptic agents; they are light in weight, have a long service life and are highly fire resistant. Let's consider the main features of the rafter system built using this technology.
Deputy Commercial Director Andrey Usachev:
– The roof truss system, made using LSTK technology, includes galvanized rack and guide profiles. If it is necessary to install a warm roof, a thermal profile is used (a profile with perforations along the entire length), which will remove the cold bridge and avoid heat loss.
The thickness and cross-section of the profile used in the design depends on the load expected on the rafter system.
Each element of the system has strictly specified dimensions according to the project.
This significantly reduces assembly time and also avoids waste on the construction site.
Each profile is marked in accordance with the drawings and assembly instructions.
Andrey Usachev:
– Thanks to markings, assembly is simplified. Each profile has an embossing (extrusion) applied to it. Because the metal frame is fastened together with self-tapping screws, then thanks to the extrusion it is clear where the connection should be. The dowel increases the rigidity of the assembled assembly, reducing the shear force on the self-tapping screw.
In the FORUMHOUSE topic you can find out where roof construction begins. Also here you will find all the information about rafter systems. Read how to build a roof truss with your own hands.
Look at the detailed photo report on the modification of the rafter system of a wooden house. Find out whether improper installation of rafters can destroy the walls of a stone house. Familiarize yourself with the design features of truss systems for wooden and stone houses.
Watch our video about roofing in Russian wooden architecture.
Roof on slabs - ideal for chopped gables
Slegs are horizontal log beams that connect and rigidly fix the gables of the log house; are not only a natural constructive, but also an architectural element. For example, long logs (pomochi) protruding from the gables fit elegantly into the design of a “wild log house” - you can put a wide console on them.
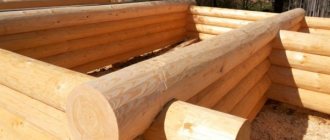
A slab roof structure looks something like this:
Log house with natural slab structure of the future roof
What's good about this decision?
- Why rafters if there is already a main supporting structure for the roof? Additionally, there is no need to nail or install anything. If you lay them down often enough, then they are a ready-made sheathing on which you can lay, for example, tiles or shingles. In any case, slate or metal tiles will lie on the floor.
- You can put a continuous sheathing (boards end-to-end) on top of it, which is almost a finished roof!
- The legs are cut into the males, and, therefore, when shrinking, they are lowered along with the gable of the log house - there is no need to do anything with sliding fasteners.
Layers are laid so often that it is practically a ready-made sheathing for any solid roofing material!
Generally speaking, the slab structure appeared much earlier than the rafter structure.
All of the above advantages of slugs are valid if nothing is rigidly attached to them so that this fastening prevents shrinkage. That is, if you nail the sheathing on the legs, then shrinkage will become a problem - the purlins will sink along with the males, but the sheathing and everything that you nailed to them will not.
But! You can lay boards on the beds without fixing them rigidly. Thus, we get either lathing or wooden - for example, plank roofing.
How to do it? It is possible, in principle, to nail the edges of the boards to the ridge beam (knes) along one line parallel to the axis of the knes - so that with a slight change in the angle at which the boardwalk will lie, it will not be torn off. But even this is not necessary.
The old technology of Russian wooden architecture suggests a solution.
Preliminary calculations
Roof rafter system
We calculate the optimal length of the rafters. The standard length of factory-made products is 450 or 600 cm. If necessary, the length of the rafters can be changed.
To determine the optimal cross-section of timber you need to know the following:
- rafter length;
- element installation step;
- estimated indicators of future loads.
The required information is shown in the following table.
| Rafter length, m | Distance between rafters, cm | Rafter beam cross-section size, cm |
| Until 3 | 120 | 8x10 |
| Until 3 | 180 | 9x10 |
| Up to 4 | 100 | 8x16 |
| Up to 4 | 140 | 8x18 |
| Up to 4 | 180 | 9x18 |
| Until 6 | 100 | 8x20 |
| Until 6 | 140 | 10x20 |
The remaining elements of the roofing system should have the following sections:
- Mauerlat - 10x10 or 15x15 cm. It is also possible to install a Mauerlat from timber with a section of 10x15 cm;
- diagonal rafter legs and valleys - 10x20 cm;
- puffs – 5x15 cm;
- purlins – 10x10, 10x20 cm;
- struts - 10x10 or 15x15 cm;
- hemming boards – 2.5x10 cm;
- crossbars – 10x15 or 10x20 cm.
Calculation of the load on the rafters
Knowing the length and cross-section of the rafters, as well as the step of their installation, you can easily calculate the required number of elements, focusing on the length of the building wall.
Calculation of the rafter system
Additionally, the rafters must be calculated for deflection. That is, you need to find out how much the rafters can bend before they break. For example, when designing an attic roof structure, the calculation of the truss must be done so that the deflection is no more than 1/250 of the length of the section that is subject to pressure.
Based on the above, if the length of the rafters is 500 cm, the maximum permissible deflection value will be 0.2 cm. The indicator seems insignificant, but if it is exceeded, the deflection of the roof will be visually noticeable, and this will not have the best effect on the reliability of the structure.
Shed roof rafters
Roof "without a single nail"
From the antiquity of traditional Russian wooden architecture - a roof “without a single nail”
The chickens were cut into several side slats. The chickens themselves were cut down from spruce trunks, and the hook was made from the root system. The hens supported the stream - a hollowed out log, against which rested the boardwalk - the roof plank. The upper part of the plank was laid freely on the ridge beam in such a way that during shrinkage the upper ends of the gables could freely converge. For this purpose, space was left during installation. The ridge beam (knes) was hewn on both sides so that the gorges would fit more tightly.
If you leave 10 cm for lifting the gorges along the Knes, then this will be more than enough, because when shrinking, the chicken will also fall, and therefore the gorges lying on the beds. From above, the gorge was pressed against the ridge beam with an ohlupnik - a heavy hollowed out log. In this way, the gorges were fixed both at the top of the roof and on the plumbs.
Of course, now no one forces you to meticulously follow the ancient technology; where appropriate, you can use nails, screws, etc. The main thing is to grasp the principle. What is it?
Here's what:
In the same way, today you can attach a continuous sheathing to a slab roof. If you don’t want to bother with chickens (although this is no more difficult than with a rafter system), then you can rest the boards against a hollow hollowed out in the upper crown. Moreover, you can do the opposite - attach the boards to the ridge beam, so that they then fall into the hollow in the upper crown. This is exactly how they work when installing a warm roof using “Norwegian” technology, which I will briefly discuss below.
We mount the Mauerlat
Due to the significant weight of the roof structure, it is not recommended to install rafters directly on load-bearing walls. To evenly distribute the load and prevent deformation of the supports, before placing the rafters on the bathhouse, the upper part of the box is equipped with a Mauerlat. This name applies to a strong, even beam having a cross-section of 100x100 mm or 150x150 mm. It is installed on top of the frame to soften the load on the walls from the rafters.
Installation of the Mauerlat includes the following steps:
- Sawing the support beam into small sections, according to the number of roof slopes. The length of the Mauerlat is taken as the length of the bathhouse.
- An antiseptic liquid of deep penetration is used to impregnate the Mauerlat. To achieve a positive effect, it is advisable to apply the impregnation in two layers.
- The place where the Mauerlat is laid is the top row of load-bearing walls. Metal studs or anchor bolts are used for fixation. The attachment points must be positioned so that they fall into the space between the rafters, since in this case it will be much more convenient to attach the rafters to the bathhouse.
- After installing the Mauerlat, the assembly of the rafter roof structure begins.
In cases where the bathhouse is made in the form of a log house, the role of the mauerlat is performed by the upper crowns, for fixing which metal brackets are used. On complex and heavy roofs it is impossible to do without a Mauerlat.
“Disadvantage” of the slug design
This is a very conditional “disadvantage”. The point is that since the rafter system is now in fashion, no current engineering solutions have been developed for arranging a warm roof on slabs. Although such solutions are undoubtedly possible.
However, if you are interested in a roof with a “cold” attic, or a summer attic, then a slab roof is the best option. The roof in this case is better - traditionally - planked.
This is a plank roof, but it looks like steel, right? Will last for half a century 100%!
Mounting methods
Attaching rafters to a wooden frame is a technologically complex process, the correct execution of which determines the strength, integrity and durability of the roof. When working, you need to take into account that the wood settles during the drying process, so the geometry of the structure changes. In addition, this material is subject to thermal expansion, so fastening the rafters to the frame too rigidly causes deformation. There are two types of rafter leg fastenings:
- Movable. Movable rafter fastenings are called special “sliders” made of metal. Thanks to them, the rafter legs do not experience deflection loads, and also react to the slightest temperature fluctuations, adjusting the geometry of the log house. The sliders allow you to fasten the rafter system until the house shrinks without the risk of deformation.
Swivel mount
"Crawlers"
Movable mount design - Stationary. Fixed fasteners do not provide a small margin of mobility when fixing the rafter legs, however, they guarantee the rigidity and strength of the structure. Nails, self-tapping screws, wooden dowels, metal staples and overlays are used as fastening elements.
Fixed mount
Important! A wooden frame has a unique ability to “breathe”; it regulates the humidity in the room itself, so it does not have rigidly fixed dimensions. Movable fasteners that respond to wall shrinkage and thermal expansion of the material are the best option for fixing the rafters to the log house.
A little about wooden roofing
It would seem: wooden roof? she'll rot!
This is wrong. A roof made of aspen shingles (similar materials are shingles, ploughshares), or planks can last 40-50, or even more years. An additional advantage is that such a roof is easy and cheap to repair - you only need to replace the damaged elements. In the case of a major renovation of a plank roof, only the top layer of the gorges will have to be changed; the underlay, as a rule, remains intact.
What is a plank roof? This is the first layer of hewn boards, on top of which is the second layer. Birch bark (“rock”) can be laid between them for additional insulation, waterproofing and an antiseptic effect. Birch bark has powerful antiseptic properties, and extends them to those materials that come into contact with it. There is no point in impregnating such wooden roofs with anything - the rain will quickly wash it away anyway, and there will be no special effect.
I recommend a very high-quality video about roofing in Russian wooden architecture:
As for the “warmth” of such a wooden roof, think for yourself. This, of course, is not 20 cm of some “Rockwell”, but two layers of tightly fitted wood covered with birch bark. In any case, it is warmer than bare slate, tiles, or metal tiles, etc. That is, for an attic or summer attic that is completely protected from severe cold and moisture - excellent. Yes, such a roof does not allow water to pass through. It does not need a vapor barrier (after all, it breathes, just like the walls of a log house!). Therefore, by the way, there is no need to fill a wooden roof with bitumen, or shove roofing material there, as some strange people sometimes advise. Due to such attempts at “modernization”, the roof may, on the contrary, rot – because natural ventilation will be disrupted.
Similarly, a shingle roof has the same properties.
Simple and to the point about aspen shingles:
The difference between a gorge and a regular edged board is that when cutting a log into boards, the natural structure of the wood is disrupted - the fibers are torn. During the production of planks and shingles, splitting occurs along the fibers, making these building materials better resistant to aggressive environmental influences.
Selection of roofing material
The modern construction market offers a wide range of reliable and durable roofing materials. The following materials are suitable for covering a sauna roof.
Corrugated sheet
For the production of corrugated sheets, non-ferrous metals (zinc, aluminum, titanium alloy) or galvanized steel are used. The main difference between the material is the thickness of the metal base. Corrugated sheeting is characterized by high strength, wear resistance, low weight and affordable cost.
Metal tiles
Suitable for organizing a gable roof, subject to an inclination angle of 35 degrees. Metal tiles are resistant to corrosion, provide good sound absorption, have a long service life (over 45 years) and an attractive appearance.
Soft tiles
Roofing material based on ceramic and bitumen is suitable for creating single- and double-slope structures, easy to use, practical and durable. Roofs made of soft tiles look aesthetically pleasing and attractive.
Ruberoid
The available roofing material is inexpensive, easy to install and has a short service life (no more than 15 years). Roofing felt is laid while maintaining an inclination angle of 5 degrees. This is the most budget option for roofing material.
Slate and Euroslate
Regular slate sheets are an affordable and cheap material used for roofing. It has a long service life (up to 40 years) and does not require special care. Laying sheets is easy and quick. The disadvantages of the material include high moisture absorption and fragility.
Euroslate is a more expensive and practical roofing material, which has an attractive appearance, good performance characteristics and high cost.
Ondulin
A popular material with high ductility, strength, wear resistance and durability. It is ideal for covering curved roofs. In addition, ondulin is easy to install and affordable.
Warm roof for the attic using “Norwegian” technology
In this case, the point is not in this specific technology - I won’t explain it in detail now - it’s in the principle of constructing such roofs. The general principle is the same everywhere.
As I already said, if you want to make an attic, then you will have to tinker with the slab-rafter structure of the roof. In addition, a broken mansard roof and a chopped pediment of a log house are a bad combination. If there is a log house and male tongs, then it is better to build a semi-attic.
House with a semi-attic
Let me briefly highlight the main points of the general scheme:
- We have a ledge and a ridge ledge, which is hewn in order to place boards on its hewn edges.
The sheathing is attached relatively rigidly (with nails) to the ridge beam
- We have a lower crown with a hollowed-out groove into which the boards fit (they don’t go in all the way - a good margin is left for shrinkage; that is, this sheathing will slide down).
- The boards are laid end-to-end in a checkerboard pattern so that the second layer overlaps the joints of the first, and fastened together to form a wooden shield. On top it is a continuous sheathing, on the bottom – that is, inside the house – there is an attic ceiling.
A groove in the top crown of the side wall so that the sheathing can slide when shrinking (similar to the “flow” in a traditional log house without nails, don’t you agree?)
So far, everything is very similar to a wooden roof on slats, isn’t it?
- A vapor barrier is placed on the shield.
- The rafters are placed on sliding fasteners.
- Mineral wool is laid between the rafters.
- (It’s interesting here - after all, polystyrene foam is possible! And why not? Mineral wool is not at all more environmentally friendly and not “more natural”, and for that matter - polystyrene foam is not afraid of condensation, which means there is no need for the hassle with insulation films. But for some reason more often we are talking about mineral wool in the recipes for such “pies”.)
- On top of the insulation is a waterproofing membrane.
- And this is where the meaning of the rafters comes in! Another sheathing is attached to them.
- The finishing roofing material is attached to it.
Get the basic idea: in this whole scheme, sliding rafters appeared only because it was necessary to put insulation, for example. In order to get a “warm” roof for the attic. In any other case, the roof could be laid directly on the first sheathing, or even immediately on the bottom!
This is the general principle:
For the construction of log house roofs with chopped (male) gables, if it is possible and even necessary to install powerful massive slabs, the installation of rafters is only necessary in the case of arranging an attic.
In general, you need to think creatively so as not to do bad, unnecessary work. And now many people have a strange and irrational belief that no matter what kind of roof there is, rafters are a must! But this is far from true.
Video description
The process of manufacturing and installing rafters is shown in a very detailed and accessible video:
Roofing device
All that remains to do on the finished rafter system is to fill it with sheathing and cover it with the selected roofing material. If the roof needs to be insulated, then the insulating material is laid between the rafters, and on the inside it is covered with a vapor barrier film, securing it with transverse slats that will hold the insulation.
A waterproofing roll material is attached on top of the rafters, thus protecting the insulation on all sides from moisture penetrating into it. To create a ventilation gap, counter-lattice slats are fixed to the rafters, and the sheathing is mounted on them.
Diagram of an insulated roofing pie Source stroyvopros.net
Finally, the ridge is attached, the gables are sewn up and the eaves overhangs are formed.
Some creative and typical tips
- Do not try to make a roof with a steep slope - they say, so that the snow melts and the rain does not fall. The rain will still hit the roof, and snow is a natural insulation in winter. Without snow, the roof is colder. Remember, if the snow does not fall on time, then winter crops freeze - from school biology.
A normal roof will also have a slope of 18-20 degrees. For shingles and planks - from 28. The lower the slope, the less materials and work will be required on the roof.
Siberia, frost, snow, and the angle of the slopes to the horizontal is no more than 20° - and it’s excellent!
- Rafters are usually made from beams 50x150 (200) mm. You can often take a width of 40mm. According to regulations, the roof structure must support the weight of the roofing material plus 200 kg per square meter of area.
Table of correspondence between types of sheathing and types of roofing, depending on roofing material and weight
- It is enough to attach the sliding connection to the rafters on one side; if you attach them on both sides, they will be in the same place! - wear out the rafters.
- You can perfectly use unedged boards in roof construction, but it is important to remove the bark from it and plan the sapwood. Under the bark there are areas of moisture accumulation and decay.
Finally, a video about making chickens - the structural elements of a “roof without nails” - is not so difficult:
We turn wooden beams into rafters
We are making a template with which further work will be performed. The rafters have the same design, so the template will save you time and effort.
Use a template to mark and trim rafters
We connect two boards along one edge with a nail. The result should be a design that resembles scissors.
Making a template
We place the free edges of the “scissors” on supports at the points of future placement of the rafters. This will allow you to determine the slope of the roof slope.
We take an extra pair of nails and fix the angle set between the boards. The template is ready. Additionally, secure it with a crossbar. To ensure that the set slope angle of the roof slope does not change under the influence of loads, fasten the crossbar with self-tapping screws.
Be extremely careful when creating the template. Even the slightest deviations can cause the entire structure to deteriorate.
Next, we make a new template for preparing mounting cuts on the system elements. Use plywood 0.5 cm thick. For reinforcement, use a 2.5 cm board. Select the dimensions of the cuts taking into account the cross-section of the rafters used.
Using ready-made templates, we make cuts and begin to assemble the truss.
Marking the opposite end of the rafters