Greetings to all! Today we will talk about such an important element of the roofing system as the connection of the rafters with the mauerlat. But let's start with a brief definition.
Mauerlat is a massive beam or log mounted on top of the load-bearing walls of a building. In the manufacture of metal roofing, a channel or I-beam can serve as this material.
This is a kind of “foundation” of the roof, its main supporting part (and in the version of hanging rafters the only one), therefore the connection of the rafters with the Mauerlat is considered the most important element of the roof frame. In a wooden house, the upper crown of logs or beams is used as a mauerlat.
Attaching the rafters to the mauerlat: a little “materiel”
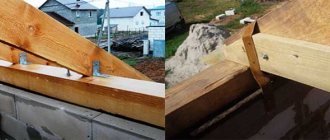
To begin with, we suggest looking at an illustration that shows two types of rafter systems:
The place where the rafter leg is attached to the base is called the support node. There are many such units in the system, but we will touch in detail on the lower fastenings of the frame with the rafters. The mauerlat and rafter legs are almost always made of wood, less often - of metal. It is more profitable and convenient to use wood, since this material is light in weight, easy to install and durable with proper installation and operation.
Types of support units by level of rigidity
Support nodes are the places where the rafters are attached to the roof elements:
In the case of iron connections, the nodes are fixed and rigid (welded or bolted). Wood is a softer and more dynamic material that can swell, dry out and deform. In this regard, experts recommend making support units with allowances for possible changes in the shape of the wood. Such nodes can have different degrees of mobility:
- Zero mobility unit
- rigid fastening with corners on both sides, in which the fastening of the rafters to the mauerlat remains motionless. - Connection of the first degree of mobility
- the beam can rotate in a circle. - The connection of the second degree of mobility
is circular rotation with displacement; the installation of special sliders or slides is provided. - Third degree movable joint
– possibility of horizontal, vertical and circular movement.
For any node, whether it is movable or not, at least two types of fixation should be used. For example, notched planks are additionally fixed from the inside using a support beam, and dynamic connections are strengthened with bolts and special steel angles.
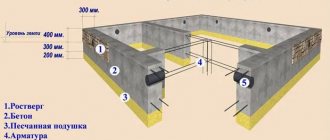
Reinforcing belt
Scheme of fastening the Mauerlat to the armored belt.
This design requires additional labor and financial costs, but ensures maximum reliability and durability of the structure.
The most common method of making a reinforcing belt involves installing wooden formwork. A frame made of steel reinforcement with a diameter of 12-14 mm is mounted inside the formwork. The main rods are placed along the wall, and connecting elements made of rod or wire with a diameter of 6-8 mm are attached between them in the vertical and transverse direction. Vertical threaded studs are welded to the metal frame to install the Mauerlat. The stud installation step is 120-180 cm. After installing the reinforcing elements, concrete is poured. The mauerlat bars are attached to the studs using nuts.
When constructing a reinforcing belt, you can use standard U-shaped concrete blocks. Such elements are installed using cement mortar on the walls. A reinforcing frame is mounted inside the gutter using the described technology. After the frame is made, concrete is poured.
About the types of fastening of rafters to the base
Let's talk about modern fasteners. For the strength and durability of the support units, a variety of metal fasteners are used: beam holders, equilateral, fastening, anchor, reinforced corners, plates, supports, profiles, connectors, anchors, etc. All these parts are made of high-quality metal. For dynamic units (types 1, 2 and 3), sliders, angles and perforated plates are used. For rigid fastening, stationary connectors, anchors and corners are used.
Such fasteners for the rafter system are most often used:
For self-assembly, perforated fasteners are more suitable than others, since they have many holes for self-tapping screws and bolts.
Basic Rules
If we talk about the basic rules when installing such a system, the following aspects should be taken into account.
- When using bolts and studs, it is necessary to place washers under them. Such actions will make it possible to significantly increase the strength of the connection of any rafter leg.
- To attach the rafters to the Mauerlat, special fasteners are used - corners . They are attached using suitable screws or nails.
- The rafter cut to the mauerlat is created at 25 percent of its thickness. It would be better not to destroy the integrity of the wood, because it will need to withstand quite serious loads. A more rigid type of fastener is usually used for a hanging type mechanism.
- When installing rafters on walls made of aerated concrete or brick, the beams must be secured to the Mauerlat using sliding-type fasteners . This solution will be extremely popular for mechanisms with a massive roof. For example, for a hipped roof.
- Fixing the mauerlat and rafters using self-tapping screws and nails does not always provide the opportunity to obtain a high-quality result. To make the connection really reliable, you can take a metal corner with several holes on the slats.
There are also some rules for creating a good fastening of rafters to the Mauerlat.
- Any metal fastener must reliably and efficiently fix all the necessary elements.
- The dimensions of the cuts need to be carefully measured. The best quality fasteners will be if their depth is at least 1/3 of the thickness of the timber. This usually applies to material with dimensions of 15 by 15 centimeters or more.
- The depth of the cut in the rafters cannot be more than 25% of the width of the boards. This type of knot is often used for hanging legs, and therefore requires additional fastening with metal corners.
- To connect all the wooden parts, in addition to the bolt, you also need a special metal plate or washer . Such elements prevent the fastener head from sinking into the wood, which will prevent the structure from weakening.
- You should not use only nails or self-tapping screws, because the reliability of such fastening will be low . Be sure to reinforce them with plates, corners and other metal elements.
- If the roofing material has a large mass, then, regardless of the type of rafter mechanism, sliding type connections should be used.
The next point is to choose the correct distance between the beams. It is usually calculated based on the space between the timber section, support points and the roofing design.
But if problems arise with this, then you can calculate it according to SNiP, which contains the required calculations.
Rigid or flexible connections: what to choose
So, we noted that the support nodes connecting the Mauerlat to the boards can have different degrees of mobility: from “0” to “3”. Zero degree - these are rigid fastenings that exclude any changes in the position of the beams.
Rigid connections: when they are needed
The Mauerlat is installed when it is necessary to transfer the thrust load from the rafters to the load-bearing walls. This is done mainly in houses made of bricks, panels and blocks. In this case, they try to eliminate deformation and shrinkage of the roof in order to prevent changes in the load on the supporting walls. This is where the need arises for a fixed connection of the rafter system with the Mauerlat.
Fixed units secured with a notch
Many experts recommend making appropriate cuts at the point where the rafters are attached to the floor beams for greater strength and immobility of the connecting nodes. These cuts should fit tightly with the Mauerlat. Additionally, such units are strengthened with bolts, anchors and metal plates:
Or with long screws:
And one more important point: the size of the cut of the bar should not exceed 1/3 of its cross-section. Otherwise, the rafter system may lose its load-bearing capabilities:
Hard knots without notching rafters
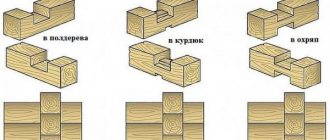
The fastening method using a hemming block is used in layered rafter systems. The rafters are cut according to a template and beveled (to give the roof the desired slope) at the point of contact with the mauerlat. From the inside, such rafters are reinforced with support bars and reinforced with corners on both sides to the base frame:
Another option for a non-joint joint is a rigid fastening of the rafters, reinforced with overlay beams on both sides. Two boards at least a meter long border each rafter leg. One end of such supports is cut at an angle that corresponds to the slope of the roof slope (including rafters). The boards are fastened with a cut to the Mauerlat using long bolts and reinforced steel corners. The bars are attached to pre-marked places, first one at a time. Then the rafters themselves are mounted close to the overlays on one side, which are immediately reinforced with the same overlay on the other side. There is an option to install two beams at once, and then rafters, but this method is used less often, since it requires more accurate calculations.
Methods for creating the ridge of a rafter pair
There are three main methods used in the ridge run.
- The first is the butt joint. Its essence lies in cutting off the upper part of the rafter leg at an angle equal to the angle of inclination of the slope, followed by connecting it to its pair, also processed using a similar method. The best way to obtain identical rafter attachment points is to use a ready-made template. In this case, long nails are used for fixation.
- The second option is to secure the rafter beams to the ridge girder. It resembles the first method. The difference lies in the presence of a ridge beam with this method. The result is a fairly reliable design. In some cases, it becomes necessary to use additional supports, the presence of which significantly reduces the functionality of the attic space. Naturally, the use of such technology is impractical when planning the insulation and installation of a living room in the attic space.
- The third method is to overlap the rafters. The method is similar to the one described above. The difference is that in this case the upper joint of the rafters overlaps. The resulting connection is characterized by significant strength, since the contact area of the rafters increases, and the studs used pass simultaneously through two elements.
When do you need to make moving connections?
Here we come to dynamic support nodes - connections that can change their position. What is it for? Let's remember the physical properties of materials - many of them shrink or swell. First of all, this applies to buildings made of pure wood - timber, logs, etc. Natural wood necessarily shrinks, due to which your roof can not only be deformed, but also completely collapse. To avoid such fatal consequences, craftsmen recommend sliding fastenings of rafter legs with a mauerlat (or the upper crown of a log house).
A prerequisite when installing sliding units is to support the rafter frame on a strong ridge beam. Since the supporting lower nodes are dynamic, maximum rigidity should be achieved at the roof ridge. The upper edges of the rafters are sawed down for a tight connection between themselves and the ridge beam, connected and reinforced with crossbars, metal strips, plates and corners. It is better to connect the rafter element already fixed in the ridge to the crown of the log house.
How to create the ridge of a rafter pair with your own hands?
The roof is considered a rather complex element, and not everyone knows how to construct it correctly, even with experience in building houses. The ridge of the roof is the horizontal upper edge of the roof, which is formed by the intersection of its slopes. The ridge also consists of other elements attached to this rib.
Making a roof ridge with your own hands, calculating its height - this is all you need to know when designing and building a roof with your own hands.
The manufacture of the corner from which the roof ridge is made is carried out as follows: a piece of zinc sheet is laid along the marked line on a solid base and tapped with a mallet until the required profile is obtained. A hammer should not be used because it may damage the zinc trim.
For a gable roof, the corner can be 2000 millimeters long and 240 - 300 millimeters wide.
Mounting method
Now you will need polyurethane foam. It needs to be used to foam the area between the roof and the corner of the zinc sheet. Previously, a special solution was used for this.
A skate is needed for:
- Preventing precipitation;
- Ventilation of insulated roofs.
What is a sliding mount?
The movable connection is made by installing sliding fasteners called “slides” or “sliders”. Such a unit provides a certain freedom for the rafter legs, which helps prevent deformation of the roofing system after the natural shrinkage of wooden buildings:
Here are the types of sliding supports:
Should I make a gash on the rafters if the house is made of timber: an alternative expert opinion
I still suggest cutting down, but not the rafters, but the top crown. Firstly, in this case, the risk of rafter bending is reduced, secondly, the “cold bridge” is reduced, thirdly, the tangential pressure on the mauerlat (top beam of the log house) is reduced, and fourthly, the insulation of the roof in the future is simplified. The disadvantage of this method is that when cutting down the upper crown of the beam, the height of the ridge decreases, therefore, if in the future it is planned to raise the height of the ceiling, one more crown should be provided. But! Such schemes are only suitable for houses made of wood, since in brick and concrete buildings the mauerlat must be intact in order to maintain its load-bearing qualities.
Why do you need a Mauerlat?
The rafter system absorbs the load from external forces and transfers it to the walls through the support beam - the Mauerlat. Its functions are to create a flat plane for attaching rafters and distribute evenly point forces on supporting structures.
As a rule, in private construction the mauerlat is made from softwood lumber - timber or boards. The size of the section and the method of attachment to the walls depends on the type of rafter system:
- With layered rafters, large bursting forces are transferred to the walls. The cross-section of the Mauerlat is powerful enough - 150x150-200x200 mm - to ensure load absorption. It is attached to the walls as firmly as possible.
- In hanging systems, the rafter legs are rigidly connected to a horizontal tie, forming a geometrically stable truss. Only vertical load is transferred to the walls, so the Mauerlat acts as a support pad. In this case, timber or boards are laid either on the entire surface of the walls, or in sections for each truss.
Lumber for the Mauerlat must be at least grade 2, dried to a moisture content of no more than 15%, and treated with antiseptics and fire retardants. To prevent wood from rotting, waterproofing is installed when laying on brick or concrete walls.
How to properly attach rafters to beams?
In simple houses, mostly frame ones, the Mauerlat can be abolished. In this case, the rafters are attached to the floor beams. The most reliable option for assembling such a system is the preparation of roof trusses. Each truss consists of two rafter legs, a connecting crossbar and a bottom tie. For strength, the trusses are reinforced with central beams and struts:
The floor beams are laid in such a direction that the trusses intersect them perpendicularly in different planes. The tie performs the main load-bearing functions, is attached to the floor beams with anchors, through bolts, studs and reinforced with plates and metal corners.
It is possible to attach the rafter legs directly to the beam, which will additionally serve as a tightening. To create high-quality support units in such a system, two fastening methods are recommended:
- Connecting the rafters to the beam with a double tooth - cuts are made on the beam and the bevel of the rafter leg (two butt notches on each).
- Fastening with bolt and clamp. Through fastening may be provided, but if the boards have a large cross-section, notches are made and the parts are connected with long bolts.
Complex roofs
The more slopes and, accordingly, their intersections a roof has, the more complex the rafter system becomes. Thus, in multi-gable structures, part of the rafters rests not on the ridge (purlin), but on the valley beam. Such beams are called sloped valley rafters; they must be adjusted to the location and firmly fastened to prevent distortion of the structure as a whole.
For a hip roof, not only straight rafters are used (located at right angles to the ridge and mauerlat), but also diagonal rafters - along the lines of intersection of the slopes. Some of the straight rafters rest on them. A rigid fastening unit is also optimal here.
In hip roofs, most of the rafters are diagonal, and all straight ones (springs) rest on them. Due to this, precise fit of cuts and reinforced fastenings are especially important.
In arched roofs, instead of straight rafter beams, curved frames assembled from individual lamellas are used. The number of vertical posts with this design increases noticeably, since it is necessary to more evenly distribute the load over the curved composite element. The support of such arched rafters is only rigid, with a notch.
Attaching the rafters to the mauerlat: step-by-step description
As an example, we will describe the process of rigidly attaching rafter connections to the Mauerlat on a simple gable roof.
I. Preparing the mauerlat and rafters for work
At this stage, it is necessary to cut out the rafter legs of a given length and mark their step on the base. The optimal step length of the rafter legs is 60-200 cm. You should also accurately determine the angle of inclination of the rafters.
Master class on installing the Mauerlat:
II. Creating a gash
We make a gash on each rafter leg for a tight connection with the base. To increase strength, you can provide an additional notch on the frame or rafter and install a thrust beam under each rafter leg.
III. Installing rafters on the mauerlat
The rafters must be laid carefully so as not to damage other elements of the building (windows, walls, etc.). We place the boards with a cut on the beams and rest them on the ridge beam. First, we install the outer rafter legs, between which you need to stretch a thread to align all the other rafters.
IV. Fastening each rafter to the mauerlat
Now that all the trusses are in place, you need to firmly secure the support units. For this we use several of the mounts suggested above:
- Nails
+ steel angles along the left and right sides of the joints between the board and the base. - Through bolts or studs
+ support beam for rafters. - Anchors or bolts
+ angles or steel plates, etc.
Two overhead boards on both sides of the rafter leg, installed on pre-marked places on the mauerlat, will help to strengthen the fastening. You can also use wire fastening as a strength enhancer for connections. To do this, you need to prepare a steel wire twist of 2-3 wires. Its length should be enough to wrap around the rafter leg at the junction with the Mauerlat and secure the ends of the twist to a metal crutch. As a crutch, you can take a long steel bolt, which is mounted into the wall 30-40 cm below the Mauerlat, strictly under the support unit.
We will also consider one of the old-fashioned methods - fastening with staples:
And finally, we suggest you watch the video:
Fixing the Mauerlat using wire
Before attaching the Mauerlat to aerated concrete using steel wire, it must first be fixed in the thickness of the wall. This should be done while laying the last rows of gas blocks - the wire is placed under them.
The installation technique in this way looks like this:
- A couple of rows before the end of the masonry, a twisted wire of several thinner wires with a cross-section of 6 mm is placed between the blocks.
- In this case, the central piece of wire will be placed in the thickness of the masonry, and the ends will hang down on both sides of the masonry. The length of the ends is made such that they are enough to wrap freely around the beam.
- There should be so many pieces of wire that it is enough to tie all the rafter legs.
By chemical anchor we mean a liquid injection mass made on the basis of a polymer resin, which quickly hardens and firmly fixes the metal rods in the thickness of the Mauerlat.
The advantage of this material is the absence of bursting stress, so fragile aerated concrete does not collapse. If mechanical anchors fix parts by expanding the dowel, then the adhesive composition of a chemical anchor fills the pores of aerated concrete and holds the rod motionless.
The process of attaching liquid dowels looks like this:
- A recess for the anchor is drilled in the gas block. The size of the recess should be larger than for a regular anchor bolt.
- Remove dust and debris from the hole, for example, with a vacuum cleaner.
- The adhesive composition is poured into the hole.
- Next, a threaded metal rod is inserted into the glue - an M 12-14 pin or a piece of reinforcement.
- Complete crystallization of the polymer composition occurs in 1/3 hour if the ambient temperature is above 20 ℃.
- Once the glue hardens, the pin will be securely fixed. It is noteworthy that such fasteners are stronger than mechanical ones.
We suggest you familiarize yourself with How to sheathe the outside of a bathhouse with your own hands. Installing a roof plate on a wall made of aerated concrete using liquid dowels has a number of undoubted advantages:
- The fastening does not lose strength for more than 50 years.
- Due to the polymer structure of the glue, this method of fixation is widely used at the edges of walls, where there is a risk of the gas block splitting.
- The chemical anchor has good chemical resistance.
- Even damp weather and wet surfaces of the joining elements do not prevent the installation of these fasteners.
- The installation of the roof mauerlat on aerated concrete blocks can be carried out without pouring an armored belt, since the reliability of fastening a chemical anchor is much higher than that of a mechanical one.
- The chemical composition of the anchor is ideally combined with the porous structure of aerated blocks.
- To install liquid dowels, holes of a shallower depth are required than in the case of mechanical anchors - there the depth is 2-3 rows.
However, welding work cannot be carried out on anchors installed by this method - overheating of the metal rod will lead to disruptions in the polymer structure of the material, causing it to lose strength.
Before attaching the Mauerlat to aerated concrete using steel wire, it must first be fixed in the thickness of the wall. This should be done while laying the last rows of gas blocks - the wire is placed under them.
By chemical anchor we mean a liquid injection mass made on the basis of a polymer resin, which quickly hardens and firmly fixes the metal rods in the thickness of the Mauerlat.
The advantage of this material is the absence of bursting stress, so fragile aerated concrete does not collapse. If mechanical anchors fix parts by expanding the dowel, then the adhesive composition of a chemical anchor fills the pores of aerated concrete and holds the rod motionless.
However, welding work cannot be carried out on anchors installed by this method - overheating of the metal rod will lead to disruptions in the polymer structure of the material, causing it to lose strength.
What is the secret of the quality of the rafter system: three main rules of the master
- High-quality lumber is half the battle on the path to successful construction. The mauerlat and rafters should not have cracks, wormholes or knots.
- The accuracy of measurements, cuts and uniformity of the position of the fasteners is an equally important point. If all the rafter legs are the same length and cross-section, then it is better to prepare a template for making cuts and notches.
- Gaps on the Mauerlat – loss of the load-bearing functions of the base by 50% or more. The percentage of strength reduction depends on the depth of the notches.
When the rafter system is ready, it’s time to install the sheathing, insulation and roofing material. But this is another interesting topic, which we will definitely talk about in the next article. In the meantime, we wish you good materials, easy work and good helpers!
Calculation of rafter sizes by length and cross-section for the correct selection of lumber
At the design stage, the rafter system considers the options for lumber and the layout of their arrangement in the rafter structure. Further work on laying insulation, insulation and roofing depends on correct calculations. Resistance to loads during operation of the facility, resistance to atmospheric changes and tectonic influence also play a significant role. Therefore, the calculations and selection of high-quality lumber are approached very responsibly.
To calculate the required length of the rafters, determine the angle of inclination of the roof slope and calculate the height of the roof. The small size of the house will allow the use of solid boards and timber to create a rafter structure. With a wider bevel in a large structure, the length of the lumber may not be enough. Then they use splicing of two pieces of wood to make a rafter leg of the appropriate size with a small margin.
Calculation formula for calculating the length of raftersSource orchardo.ru
The size of the span between the ridge of the house and the top of the wall corresponds to the length of the rafter. The cross-section of the beam is determined based on the size of the loads and the distance between two adjacent rafter legs.
The load on the elements is created by the weight of the roof, for example, made of ceramic tiles or asbestos-cement slate. Such materials require an increased cross-section of the timber.
Example:
- The length of the beam is 6 meters.
- The end section is 10X20 cm.
- The distance between adjacent bars is 140 centimeters.
Tools and materials required for work
To make a Mauerlat, the following tools are required:
- Hacksaw;
- Grinder with attachments for cutting metal and wood;
- Screwdriver or drill;
- Level;
- Roulette;
- Pliers and hammer;
- Cue balls for self-tapping screws and drills.
You may also need a welding machine if the Mauerlat is secured using anchor bolts embedded in the reinforced belt.
When making a Mauerlat, you should stock up on the following materials:
- Nails;
- "L" shaped studs or anchor bolts.
- Self-tapping screws;
- Wooden beam;
- Washers and nuts;
- Waterproofing material (roofing felt or similar material);
- Bolts and metal plates.
- Steel wire (in case the fastening will be carried out using wire).
The amount of materials needed to construct a mauerlat directly depends on the size of the building.
Installing rafters on the Mauerlat: useful tips
So, now let’s summarize everything that we previously described and consolidate it in the form of tips that will be useful when installing the roofing system. The stability of the roof, its durability, its ability to withstand strong hurricane winds and heavy precipitation depend on the work carried out correctly.
- Be sure to use roofing felt when installing the Mauerlat to avoid rotting of the wood.
- When connecting the mauerlat beams along the length of the wall . Do not use too short sections. It is necessary to connect the longest beams possible.
- The length of the support board can be no more than one meter.
- It is necessary to ensure maximum adherence of wooden elements during installation. This will ensure a good fit.
- When fastening with bolts, be sure to install washers . as well as metal plates. If they are missing, the nut may eventually be sunk into the wood, causing the fastening to become loose.
- Instead of roofing felt, other waterproofing materials can be used . It can be cheap polyethylene or another expensive one. No difference.
- After the installation of the Mauerlat is completed . start attaching the rafters. It can be rigid or articulated.
- Rafter beams are fastened taking into account the most dangerous weather conditions and the expanding effect, which one way or another will be reflected in the tree over time.
- The entire roofing system is first constructed on the ground . Measurements are taken, cuts are made in the mauerlat, and cuts are made on the rafter legs. In the end everything fits together.
General recommendations
When creating a rafter system for a roof, it is important to remember the following
- All wooden elements are treated with an antiseptic and fire-resistant compound before installation.
- The thickness of any wooden part should not be less than 5 cm.
- Rafters without posts and struts are not made longer than 4.5 m.
- The Mauerlat must be positioned strictly horizontally.
- It is recommended to make the racks and struts as symmetrical as possible.
- You cannot add elements to the calculated rafter system - this can lead to the appearance of loads where they are not needed.
- At the junction of wood and stone (brick) masonry, waterproofing is needed.
A properly made rafter system is the key to the reliability of the roof. It is the rafters that take on the entire weight of the roofing materials and resist wind loads
Therefore, it is very important to build a rafter system in compliance with technology
Discuss the article on the forum