Let's start with the fact that using a lampshade in a bathhouse automatically assumes that a point light source .
Because LED strip lights don't need anything like that. The following clarification concerns rooms in which lampshades can be used. So the main function of this part of the lamp is to slightly dim the light from the lamp; it is appropriate to use them in any of them, especially since the lampshade is also one of the varieties (however, now we use this word not only for round ceiling shapes, but many glass products scatter light).
Since the choice of item is determined by such factors as the style of the interior, the taste of the owner and his financial capabilities, we will limit the topic of our article to the decorative elements of the lamps that are used in the steam room - there are a number of restrictions associated with them that you should know.
Requirements
IMPORTANT! Specific lampshades in the bathhouse are used only in the steam room; in all other rooms they can be used as in the corresponding rooms of a residential building.
The lamp as a whole should not be afraid of moisture. Since you are conducting electricity into a damp room, you should take utmost care to ensure that it does not come into contact with water. And for greater safety, you should connect an RCD (if you have questions about the theory of bathhouse electrics or its practical application in a bathhouse, follow the links, we have detailed materials on these topics).
So, tightness comes first. heat resistance is also important - the lamp should not be destroyed by high temperature.
Well, it’s also environmentally friendly - it’s impossible for any harmful organic matter to evaporate from it under the influence of temperature.
And fire safety - it should not support combustion.
You will learn about which lamps can be installed in a bathhouse and which ones can be installed in a sauna by following the links. A separate material combines information about the light in the steam room.
We also have material entirely dedicated to LED light sources.
Material
In principle, the material can be stainless metal or glass, but we are talking about a bathhouse, or rather, even a steam room, so metal can be immediately rejected, because it will heat up and can burn. Glass…
Glass
Using glass in a steam room and washing room is quite acceptable if we are talking about a matte lampshade that hermetically protects the light bulb inside from water. Actually, there is not much choice here - you need a translucent material that transmits light well. Plastic is not suitable for a steam room (we note in parentheses that it is not suitable even if it is produced by Harvia).
ATTENTION! However, we are not talking about decorative lampshades, which also have a protective function. Only the cap that directly covers the light bulb can be glass.
Decorative parts are made from other materials, which are discussed below.
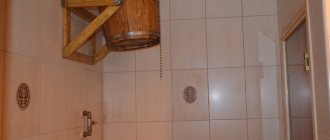
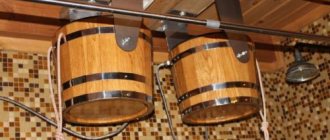
Wooden
In this case, wood should be considered the optimal material, given that the vast majority of owners choose it as a finishing material. So, in a log house or in a clapboard-lined steam room, a wooden structure will look best.
The tree differs by wood species . Of course, there is not always a choice, but listen to our words:
ADVICE! Do not use coniferous species when making a wooden lampshade for a bathhouse, because lamps, in addition to light, also emit heat, and coniferous ones have the unpleasant property of releasing resin when the temperature rises.
Any deciduous tree will do . Only if you are going to do something delicate, then softer species, such as linden or aspen, are suitable, and any tree is suitable for a more simple design.
With Himalayan salt
Himalayan salt in this case is used as a light-diffusing screen. This is possible both when choosing plates from it, and when filling the container with lump material.
Rock salt , of course, is harder than table salt, but its composition is approximately the same (with the exception of various additives such as iron, which gives it a reddish tint, and other salts - for example, sulfates, borates). What this means, first of all, is that under the influence of moisture and heat, halite (the name of the mineral is the same as “rock salt”) will slowly but steadily dissolve .
Regarding the fact that the effect of salt is healing... Well, NaCl (sodium chlorine) there is exactly the same as in a salt shaker. Other supplements are somehow not necessarily useful, like vitamins. Why do you need sulfur or boron salts? Microelements - if they are really released as actively as they say - will not interfere, we will not argue.
Salt plates or irregularly shaped pieces are very beautiful, especially when light filters through them. So the main argument in favor of choosing such a lampshade, after all, will be beauty.
Preparatory work
It is not at all necessary to have carpentry skills to make a beautiful wooden bath lamp with your own hands. The most important thing is to choose the right material and determine the type of model. Bath lampshades can be wall or corner. In addition, it is important to determine the size of the product so that the lamp performs its functions well. To make the work easier and more accurate, it is worth drawing everything out on paper. Using these blanks, the drawings will be transferred to wood or other materials from which the bath lampshade will be made.
Experts recommend that beginners take a closer look at wooden products; these materials are the easiest to work with. Lamps made of wicker and birch bark are quite popular, but this is a job for experienced craftsmen. All these materials have one thing in common: they are optimally suited for steam rooms, that is, they can easily withstand high temperatures and high humidity.
When choosing a suitable material for making a lampshade for a bathhouse lamp with your own hands, you need to pay attention to such characteristics as low thermal conductivity, safety, moisture and heat resistance, as well as durability. In addition, ease of processing, decorative qualities and compliance with the overall style of the interior play a huge role.
Professional craftsmen recommend choosing linden, aspen, cedar or larch. The last 2 types of wood are highly durable, but the price of such material is quite high. If you have no experience working on a bath lampshade, you can choose cheaper wood.
The use of pine and spruce is not recommended. When heated, they emit a strong pine aroma, which may not be to everyone’s liking. Moreover, pine is very resinous, so you can get burned on it. If the master decides to choose spruce or pine, they should be dried by about 15%.
The easiest and most convenient way to choose wood for a lampshade is to use leftover finishing materials. Thus, the finished lamp will fit perfectly into the overall design and style.
In addition to the wood itself, you will need sandpaper, fasteners and glue. It is also important to treat wooden parts with special solutions that will extend their shelf life.
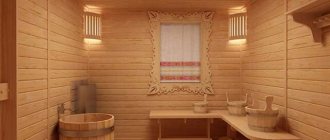
Sauna lampshade: design
Regardless of the chosen material and shape of the future lamp, there are two standard types of design that are designed to be placed either along the wall or in one of the corners.
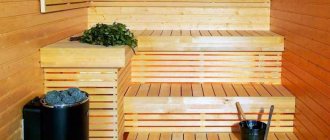
Corner
This design is considered more compact, as it occupies space that is usually empty during soaring procedures. Therefore, there are fewer options for awkwardly touching or breaking, and the light spreads along two walls at the same time.
In the “top view” projection, it is either a triangle or a trapezoid. This allows it to be mounted on both walls , providing greater stability.
Wall-mounted
The corner location is not always optimal. Then you can use the option of placing the lampshade on the wall surface.
ADVICE! If possible, step back some distance from the ceiling; in a steam room, it is not advisable to mount lamps on the ceiling or directly below it, because the hottest air and steam collects near the ceiling.
Wall-mounted options can be quite varied in design, but when placing it, it is worth considering the convenience of steamers and the direction of light on the objects used in the steam room.
Lamp made of wicker
While it’s quite easy to make a lampshade for a steam room from wooden blocks or clapboard, then using wicker is a task for professionals. Here you need to be able not only to choose the right material, but also to know the basics of working with it.
Most often, specialists work with willow twigs. They are quite flexible, but at the same time they are highly durable. First of all, the material needs to be steamed. This will make the twigs soft and pliable. Next, take several thick rods for the stand. It is best if there are 3 of them. The height of the stands will be equal to the height of the wicker lampshade. After fixing the twigs, weaving begins.
An approximate type of wicker lamps can be seen in baskets and furniture made of wicker. These options look very good and last a long time. It is important, after finishing work on making a wicker lampshade, to treat the product with a special solution and varnish it. This will extend the life of the lamp. It is attached, like the lampshade-grid, to galvanized self-tapping screws. You should not glue the lamp to the wall, as problems may arise if the need to replace the light bulb arises.
These are not all the possible options for making wooden lampshades for a bathhouse lamp with your own hands. If the owner of the steam room has skills in working with wood, you can create more original options. Here everything will depend solely on the imagination of the master. For those who have no experience working with wood, you can choose the first and simplest option.
Bath lampshade: shape
An interesting point: somehow it happened historically that there are two main forms - a grille and a screen. We will assume that other options, if they existed, died out due to some kind of unsuitability or inconsistency. Or the survivors turned out to be the simplest and most practical. (Of course, no one forbids doing something original; we are talking about the most common.)
Lattice
The question arises: what else could be made from slats or solid planks? The simplest and most effective way is to assemble a lattice, a kind of “fence,” leaving slits for light.
IMPORTANT! The brightness of the lighting depends on the width and number of slots.
However, even with the simplicity of the idea, variations can be sufficient - the slats can be attached to bases that will give the structure a cylindrical or conical shape, or they will be combinations of simple shapes, if you like.
BY THE WAY! The slats may not be solid - if you make a slotted pattern in them, then there will be a combination of a lattice and a screen.
The attractiveness of this form is that it harmonizes perfectly with walls finished with clapboard, or with log walls or timber. Overall, a lattice wood lampshade looks great on a wood wall. And the material for it can also be the remains of the same lining, unused during construction.
Screen
It differs from the previous version in the absence of slots between the slats . And also because some recognizable outline is usually carved into the central element. However, here, too, various variations are possible - there can be as many slotted elements as you like, not necessarily one central one.
Combinations are possible , when a lattice is made on the sides, and in the center there is a solid strip with a cut out outline.
The slot can be left as is, without any inserts, or you can experiment - put a decorative or practical diffusing material on the back side, for example, mesh or frosted glass (we’re not talking about plastic, because it’s hot in the steam room). Without the matte material, the light may be too harsh.
ADVICE! Instead of matte material, you can use a plate with numerous small holes.
Do you need a lampshade in a bathhouse?
Traditionally, in all rooms of the bathhouse, including the steam room, lighting sources are located in the corner. This allows you to get high-quality lighting with a small number of light bulbs. Considering that in most steam rooms there is very little free space, it is very easy to touch a hot lamp. To avoid burns and other troubles, you should cover the light bulb with a lampshade. You can create a beautiful corner or regular wall option with your own hands.
Experts recommend installing several light sources in the steam room at once. You don't need to use them all at once, just have one as a spare in case the first bulb burns out. This lamp also needs to be covered with a lampshade.
For baths and saunas - is there a difference?
The difference between one and the other type of national bath is the temperature and amount of moisture . In a Russian bath there is high humidity and a relatively low temperature (no higher than 70 degrees), and in a sauna the humidity is low (5-15%), but the temperature is not less than 90 degrees, and sometimes even higher than 100!
Therefore, those varieties that are more sensitive to high humidity should not be placed in a Russian bath. This primarily applies to the Himalayan salt lampshade for the bath. As mentioned above, it consists of the usual soluble salt NaCl, so moisture will ruin it.
protected from moisture using impregnations and varnishes, which you can read about in the corresponding article.
High temperatures are contraindicated for most types of plastic, so it is strictly forbidden , but moderately in Russian baths, and this does not apply to lamps, because there the heating comes from the lamps themselves.
Otherwise, there is not much difference - the same wooden models can be used as lampshades for baths and saunas.
Decorating the lamp
It is not necessary to make the lighting for the bathhouse from scratch; it is easier and faster to modify a ready-made lantern. For example, you can decorate a finished lampshade with overlay strips made of birch or linden veneer.
The yellow-white texture of linden wood looks boring, so wooden cases and slats are treated with toners, a pattern is applied that imitates fibers, for example, rosewood or ash, and they are opened with acrylic varnishes.
If the lamp will be located in a bathhouse or steam room in close proximity to a pipe or stove, then it is best to use high-quality silicone oils or varnish coatings. Otherwise, over time, the body of the flashlight will turn yellow and lose its appearance.
With your own hands
Even a beginner can handle making a corner screen like this:
To work, you will need a jigsaw/jigsaw, sandpaper/sander. Actually, you won’t even need a hacksaw if the bars are not very thick. The material is moisture-resistant plywood or thin furniture board and thin timber , self-tapping screws, wall fasteners - lugs, for example.
- First of all, decide on the size and cut out a screen from a sheet of plywood or panel.
- Mark the outlines of the future design on it and cut it out using a jigsaw or jigsaw.
- Sand the finished screen.
- Cut a thin beam as follows: the hypotenuse of the future triangle will be the width of the screen, and to it you can easily calculate the lengths of the legs, taking into account that the angle with the hypotenuse is 45 degrees. You need to make two such triangles to attach the screen at the top and bottom.
- The finished triangles are fastened with self-tapping screws and then attached to the screen.
- Ears are placed on triangles.
- All that remains is to protect the tree from moisture and you can hang it.