The standard procedure when visiting a bathhouse is to cool the body. In this case, use a pool, lake, font or snowdrift if it is winter. Such procedures have a large number of benefits: they improve health, improve mood, and tone the skin. Unfortunately, not everyone has the opportunity to take a dip in a lake or pool after a bath. A dousing bucket for a bath is a simple type of font that is accessible to everyone, and you can make and install the device yourself.
Features of using a dousing bucket in a bathhouse
The list of bath pleasures is incredibly wide. A place of honor among them is occupied by the process of cooling a hot body in a cold body of water, a snowdrift or under an invigorating dousing bucket. All these procedures not only provide physical pleasure and intense sensations, but also provide invaluable benefits to the body: they accelerate blood circulation, tone the skin, and cleanse it of toxins. In a word, they strengthen and rejuvenate the body.
It’s good if there are objects with cold water for immersion in or near your bathhouse. Otherwise, we recommend that you make a dousing bucket and enjoy all the delights of the original Russian bathhouse.
The shower bucket for a bath is a modernized, improved version of a wooden bucket, movably mounted on the wall of the washing room. This is a kind of container of significant size that instantly throws cold water onto the head of a visitor who pulls a cord or chain. Due to its functional purpose and similarity of shape, such a device has acquired several more popular names. For example, a waterfall bucket for a bath or an upside-down bucket.
On a note! For the first time, the primitive form of such a bucket was invented by ancient Russian bathhouse attendants. At that time, birch bark or a solid log was used for manufacturing, from which the middle was hollowed out. Only over time, coopers began to create them, using smoothly planed dies and metal rims.
Overview of species
Tilting hanging upside-down bucket
This simple shower design consists of a bracket attached to the wall or ceiling. On its axis there is a container in the form of a bucket or basin. The volume of water placed in the container can be from 10 to 30 liters. The compact pouring bucket moves around its axis.
Flaws:
- the volume of water is not enough for one adult;
- if the water in the bucket is cold, a temperature imbalance occurs between the doused and heated areas of the body;
- the flow of water is too wide, and part of it cannot reach the body and is poured out “in vain”;
- collection cannot occur simultaneously with draining, so you have to wait until the container is filled again.
Waterfall bucket for rinsing with valve type of drain IBAAT
In this design with a bottom spout, the container is rigidly connected to the bracket. At the bottom of the bucket there is a drain hole, closed by an automatically opening valve. A person can regulate the flow of water by pressing the lever with different forces.
Advantages:
- the flow of water is narrowly directed, thanks to which it all falls on the bathing lover without loss;
- when liquid is discharged, the inlet valve opens and the water supply is turned on;
- the duration of filling the bucket is 3 minutes;
- the level above which water will not accumulate can be changed.
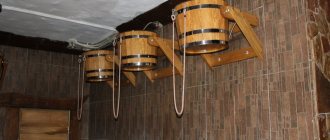
You can find different models on sale - from classic buckets to cylinder-shaped containers. The latest version of the waterfall is attached directly to the ceiling and covered with decorative panels. Its advantage lies in its small size.
The design is complemented by an anti-vandal system and an insulating layer, thanks to which condensation does not form. The usual material for such buckets is steel, but there are designs from the manufacturer lined with wood.
Design of a shower bucket for a bath
Regardless of what material was used to create the pouring mechanism, its design will always be the same. A bucket for pouring into a bath consists of the following components:
- Brackets for securing the vessel to the wall;
- Wooden or other container for water;
- Systems for monitoring the level of water supplied from the water supply;
- Rope, with which the bucket is tipped over if necessary.
In fact, the design is both ingenious and simple.
Even a novice master can create one. There are many design options, among which making a bucket from wood is considered the most problematic. The finished product will require special care, but at the same time it will look more aesthetically pleasing than all other options. Some inconveniences of a wooden bucket are associated with the need to fill it with water in advance. The bucket must swell, otherwise cold water will simply seep through the cracks. However, you cannot regularly leave the container filled. Over time, the wood will become covered with mucus, and the water will become cloudy and begin to stink. A solution to the problem can be a plastic insert mounted in a wooden vessel. It will help to avoid unwanted hassle of caring for the system, while leaving the appearance of the structure completely presentable.
Simplicity and practicality
There is another option for creating a high-quality dousing system. Any person can make such a performance, even those who are far from carpentry. You will need to find a good container, such as a plastic bucket. Next, it should be finished with special wooden planks. Before using them, they should be sanded to smooth the surface. It’s good if a person can find a metal hoop that will be installed around the perimeter. But if it is not available, you can always use a sealant. It is better to choose transparent versions.
The next steps are practically no different from the previous execution. You will need to find a liquid level control device and make a plumbing system; a high-quality hose is suitable for this.
Requirements for installing a dousing bucket in a bathhouse
If the size of the dousing bucket can be chosen personally by the owner of the bathhouse (large and tall or small and wide), then its location must certainly meet special requirements.
In most cases, the upside-down bucket is installed in the washing room: water is supplied there and the drainage system is set up. Although the presence of running water is not at all a prerequisite for the functioning of the “Russian shower”. Water can be brought to the container using a flexible hose or simply poured manually while standing on a bench. Sometimes a dousing bucket is installed directly on the street near the bathhouse. This option allows you to collect and use healthy rainwater for good purposes. But it is worth remembering that drainage on the street is no less necessary than inside.
The most difficult stage of installing a bucket in a bathhouse is correctly determining the required height. For people of average height, the recommended height is 2 or 2.2 m. For tall owners, it is worth setting the mark at 2.6–2.8 m. In any case, a person should be placed under the dousing bucket with their arms extended to the top. Do not forget that the vessel will turn over. Therefore, it is worth adding the height of the bucket itself to the planned mark.
Calculation of the level for a person with average height will look something like this: 170 cm (height) + 40 cm (at arms length) + 40 cm (tank height) = 2.5 m.
Regardless of the choice of location for installing the bucket, the mount must be strong enough and durable. Keep in mind that the fasteners must be able to withstand at least 60 kg! In the traditional version, the container is secured to the wall using metal brackets (even better, stainless steel). To create a movable connection, special ears can be welded to the barrels of the container. And it’s even easier to install a stainless steel rod that passes right through the wooden boat.
What it is
Device and principle of operation
Almost every person, at least once in his life, has dumped cold water on himself from a bucket or other vessel. Such a simple procedure gives a simply amazing effect: the flow of cold water will take your breath away.
And accordingly, many people come up with such an idea as installing a dousing device for a bathhouse. After all, this is not difficult, because it has a simple design that allows it to be installed anywhere in the bathhouse, as long as there is a water supply and a sewerage system.
A pouring device is a type of cooperage product that includes a wooden bucket with hoops, a rotation system and brackets that allow you to attach the entire product to the wall or ceiling of the bathhouse. This axis allows you to tilt the bucket around its axis; it is located horizontally, above the center of gravity of the bucket of water.
What is included with the device
For greater convenience, the bucket can be equipped with a system that automatically supplies fresh water. This system is identical to the water supply system in the toilet cistern.
In order for a bucket filled with water to be tilted or overturned, a rope or thin chain is attached to it. Depending on the force applied to the rope, the amount of water poured out is regulated. You can make the water flow out in a small stream, or you can make it all flow out at once, like a waterfall.
Pull the string and you'll get a cold shower
What are dousing devices made of?
Most often, such bath accessories are made from the following types of wood:
- cedar;
- common larch;
- stained larch;
- common oak;
- stained oak.
It is these materials that have the greatest resistance to water, and therefore they have the longest service life, at the same time, their price is also higher. Of course, dousing systems can be made from other types of wood, in particular birch, alder or linden, but they no longer have the same resistance to moisture.
In some cases, to prevent the wooden bucket from drying out, the inner surface is covered with special plastic.
Modern shower devices for saunas have a very diverse design and range. Therefore, choosing the right type to fit into the interior of the bathhouse is not difficult.
What stands out in particular is the ease of use and compactness of these devices. Regardless of whether they are 10-liter or 30-liter, the principle of operation is the same - pull the string and get an ice shower.
And of course, the availability of a variety of designs and a wide range of colors can satisfy any bathhouse owner, no matter how demanding he may be. The dousing system will not only play the role of a means by which cold water is poured over, but will also serve as an addition to the interior of any sauna or bathhouse.
Well, very diverse design
Bath bucket with plastic liner
You can make a doused bucket in the most primitive way, accessible even to people who have not previously had anything to do with wood.
To do this, it is not necessary to become familiar with the basics of cooperage and learn to use special tools. A couple of simple steps will help you quickly make a wooden container that costs a lot of money on the market:
- To begin, select an ordinary plastic bucket of the most successful color. For example, white or azure blue. Water in such a container will look very advantageous.
- Next, remove the handle and any other parts present from the bucket. You don't need them at all. Don’t rush to throw them away; perhaps they will come in handy in the future.
- Prepare 25–30 not too wide sanded wooden planks. Their exact quantity depends directly on the size of the plastic bucket.
- Using super-resistant glue, attach the strips to the outer walls of the plastic container, imitating a wooden bucket. Coat the joints with transparent silicone.
- Cover the “wooden” container with a suitable varnish and strengthen it even more firmly with metal rings.
The wooden dousing bucket with a plastic liner is ready. Externally it is difficult to distinguish it from natural, but internally it meets all the requirements.
general characteristics
So what is a waterfall for a bath? This is a wooden bucket held together with metal rings. Its volume can be very different, but most often there are buckets of 12-20 liters. It is attached to the wall with brackets. A hose passes over it, from which cool water flows into the container. Usually the bucket is filled before visiting the steam room. It is recommended to choose containers made from environmentally friendly, high-quality material. The most popular materials include stained oak, which is strong and durable.
If there is a pool, then after leaving the steam room they cool down in it. But if such luxury is not available, then a waterfall bucket is perfect for this purpose. This procedure is not only a tradition, but also a way to strengthen the body, while receiving a sea of positive emotions.
The waterfall system was invented thousands of years ago, but has not yet lost its relevance. For a complete relaxation in the bathhouse, you need all the attributes, not just a steam room and a stove. The pouring bucket has long been present in all baths. The essence of this procedure is to instantly cool the body after warming up in the steam room. The original appearance of the waterfall will decorate the interior of the bathhouse, creating a special atmosphere. In addition, such a structure can be installed not only in a steam room, but in the courtyard of a private house in order to be able to cool down in the hot summer.
Wooden sauna bucket
This method of creating a wooden bucket will be more to the taste of those who have previously dealt with the processing and use of wood.
For a high-quality pouring device, you will need a piece of iron strip for two rims (about 3-5 cm wide) and a board of the 1st grade 1 cm thick. As a result, we get a 10-liter bucket with a height of 40 cm. The manufacturing process is a little more complicated than the previous one method, but the result is correspondingly much better and more aesthetically pleasing:
- Prepare a template for the bottom parts and rivets (side strips).
- Cut the existing board into pieces that match the stave pattern. Treat them thoroughly with a plane and sherhebel.
- Bring each detail to a state similar to the template. That is, carefully cut off the excess, giving the rivets a slightly trapezoidal shape.
- Mark the outside of each stave. Cut the ends at an angle of 3 degrees so that when connecting the planks together, you get a circle.
- Also, on each rivet, make a 4 mm indentation at a distance of 4 cm from the bottom edge. This recess is necessary to install the bottom of the container.
- Do your first fitting. Gather all the parts into a pile, holding them with metal wire. Number all rivets. Determine the size of the bottom part.
- Using the template, cut out the piece for the bottom. Cut off the top and bottom of the ends, forming a circle, so that the diameter is 1 cm less than the originally measured one.
- Measure to excess and cut a piece of metal strip for the bottom rim. Use a hammer to give it the desired rounded shape. Make holes at both ends and rivet them (with wire in fives).
- Make two tight clamps from pieces of metal strips.
- Attach two opposite rivets to the rim, securing them with clamps. Next, insert all the other parts, trimming them as necessary. Thus, completely fill the entire clearing on one and the other half of the bucket.
- Place the workpiece in its natural position and install the bottom piece.
- Measure the top circumference of the bucket and make a second rim at a distance of 10 cm from the top.
- Sharpen and file the product if protruding areas are visible anywhere.
Sauna bench
In the wash room there will be a wide bench to wash with all the amenities. As an example, one of the simplest drawings of a bench is presented.
During the work you will need:
Step 1. Take one board 1500 mm long, lay it flat on the work table and secure it with clamps. Using a cutter, a longitudinal groove 10 mm deep is cut in the side surface for the entire length of the board. Exactly the same groove is made on the second board, and on the third board grooves are cut out on both sides.
Read also: How to set up an iPhone like new
Step 2. The milled boards are again laid on the work surface in a row, with a board with two grooves in the middle. All grooves and both planks are coated with glue, after which the planks are inserted into the holes, firmly connecting the boards into a shield, and the product is clamped with clamps.
Assembling the shield for the bench
Read also: Banana pancakes step by step recipe
Step 3. While the seat panel is drying, cut out the sides with a jigsaw. On the sides and in the lower part it is enough to make semicircular cutouts with a depth of 50 mm, and at the top, exactly in the middle of the workpiece, you need to select a groove for a longitudinal beam measuring 100x30 mm. To do this, first take preliminary measurements and mark the cutout lines with a pencil. The second sidewall is made in exactly the same way.
Step 4. Prepare a longitudinal beam: take a board 1240 mm long, lay it flat on the work table, measure 10 cm on each side and draw 2 parallel lines across the workpiece with a pencil. From the middle of the line a perpendicular is drawn to the end of the board and the resulting square is cut out with a hacksaw. On the other side they do the same. The result should be a workpiece with two protrusions, which can be rounded with a jigsaw for greater decorativeness.
Step 5. The sidewalls and longitudinal beam are ground, the cut edges are processed with a radius molding cutter. Next, all elements of the future bench are primed with an antiseptic composition and dried.
Step 6. Assemble the bench: the protrusions of the longitudinal beam are threaded into the grooves on the sides, fastened with screws on the sides. The seat panel is placed on top, aligned in the center, screwed with self-tapping screws along the line of connection with the longitudinal beam and to the upper ends of the sidewalls.
Bench assembly diagram
Supplying water to a dousing bucket in a bathhouse
A factory-made drenching bucket is usually sold already equipped with a water level control system.
In most cases, the principle of its operation is identical to the system in the cistern. In fact, the system for supplying water to the dousing bucket is as simple as the design of the mechanism itself. The pipe is brought into the room at the height of the container. The crane cuts in at a level of one and a half meters from the floor. A rubber, plastic hose or stainless steel braided tube is connected to the pipe itself. A water level control system (if available) is connected to its second edge. In most cases, it is similar to the mechanisms installed in toilet flush tanks. This completes the simple process of supplying water and connecting the dousing bucket.
The technology for making a wooden bucket for a bath is presented in the video:
The shower bucket for a bath is ready! You can ignore small cracks, as the wood will swell upon contact with water. All that remains is to supply water to the selected place in the bathhouse.
general description
A dousing bucket is a large wooden container fixed to the wall. The device is called a flipper because by pulling the existing cord or chain, it is easy to turn it over so that water can flow.
This device has been used since time immemorial. It was made from birch bark or a whole log with a hollowed-out recess. Later, the container began to be made from wooden planks fastened with metal strips.
Features of using the equipment: a tap is opened, filling it with water, after which the flow must be shut off with a float switch. When the chain or cord is pulled, the float is lowered and the liquid splashes out and is adjusted again.
Components of the device:
- storage tank;
- supports that provide attachment to the wall;
- structure with water supply;
- a rope that ensures the container is turned over.
A bucket shower will not take up most of the space, so it is not necessary to equip another room for it. It is located in the washing area at a height of approximately 200-220 cm and is a cheap alternative to a swimming pool or shower.
The main disadvantage of the device required for dousing is that it has to be filled in advance, since the container must swell so that water does not leak through the cracks.
We are modifying feeder feeders
A rod stand is a necessary accessory when fishing with a feeder, because you need its correct installation, which facilitates the process of signaling a bite, for which the quiver tip is responsible. If the feeder rod is positioned incorrectly and is not in a stable position, it is impossible to clearly distinguish whether the quivertip is reacting to a fish bite or whether it is swaying due to the wind or waves present in the reservoir.
Price issue
You can buy a dousing bucket in a store, but the prices are, to put it mildly, quite high. The cheapest option is a pine bucket with a plastic insert with the smallest volume of 10 liters. A 15 liter bucket will cost only 20 percent more, and a 20 liter bucket will cost another 5 percent more. That is, perhaps it makes sense to overpay a little and take a bucket with a larger capacity. Without a plastic insert, such systems will cost a little less, about 20%. There are dousing buckets with a stainless steel insert. Many people prefer this combination of materials. Linden is most often used as wood. Such systems cost much more, on average 50%. Well, the most expensive types of such devices are products made from larch or oak. Among the highest quality companies, it is worth paying attention to BendWood. But you will have to fork out and pay three times more money compared to the cheapest solutions.
DIY wooden bucket: materials and tools. Making a bucket
Modern materials and technologies have replaced traditional wood from many industries, but in some cases it remains indispensable. If you need antique-style utensils for a bathhouse or a country house, then you can’t do without wood. We will tell you how to make a wooden bucket with your own hands.
You can make a wooden bucket yourself.
Footrest
You will need 5 planks 600x70x20 mm, 2 planks 400x70x20 mm and a block 50x50 mm for making the legs.
Step 1. Well-polished planks 600 mm long are laid out in a row on a flat surface. Gaps of 10 mm are left between the slats and aligned along the length.
Step 2. Place two transverse planks on top, placing them along the edges of the planks, flush with the ends. The product is secured with screws.
Step 3. The block is cut into pieces 3-4 cm high; these will be the legs for the stand. They are applied to the transverse strips at the corners and secured with screws. Finally, treat the stand with stain or colorless wood primer.
You can make the stand not with a straight surface, but with a rounded one, which is much more comfortable for the feet. How to do this is detailed in the video.
Continuity
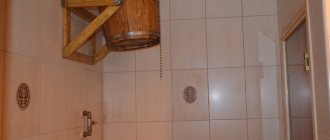
The photo shows an option for installing a dousing bucket in the shower for hardening procedures.
Today, many of the attributes and traditions of Russian baths are being actively revived. True, a modern bucket for pouring into a bathhouse is much more convenient than the buckets of our ancestors.
Nowadays, more than ever, people need to relieve stress and improve their health. Bath procedures help remove harmful toxins from the body. They help improve metabolism and help harden.
A contrast shower has always been considered the best procedure that hardens and strengthens the nervous system. It is actively used for rehabilitation treatment in sanatorium and resort institutions.
Pouring ice water gives amazing results. The person becomes cheerful, the mood improves, and sleep is restored. This procedure can be used by all age groups.
Important. It is advisable to consult your doctor to see if you have any contraindications against such procedures.
The photo shows an option for installing a dousing bucket in the shower for hardening procedures.
Pouring ice water gives amazing results. The person becomes cheerful, the mood improves, and sleep is restored. This procedure can be used by all age groups.
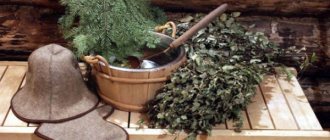
Washcloths
There is a wide range of sets of bath accessories, which include brushes, washcloths, peeling stones, etc. If you want an original product that satisfies all your preferences, make it yourself.
A washcloth is necessary for body cleansing and wet massage. This procedure is not only pleasant, but also beneficial for the body. Sponges can be of different hardness, sizes and shapes. You need to choose a washcloth based on your personal tastes.
To knit a washcloth from natural materials, choose the wool of goats, sheep or any other farm animals. You can also use linen. The yarn for the washcloth must be thick, since the product itself is subject to mechanical stress, so choose the appropriate size of knitting needles or hook.
Most often, washcloths are knitted using the “checkerboard” or “tangle” pattern. The main part of the washcloth is knitted after the handle is ready. The handle must be tight, otherwise it will lose its appearance immediately after the first use. The product will not be so tough if you pour boiling water over it.
Basic criteria for choosing bath accessories
A rack with bath accessories is available in almost every supermarket with a department offering household goods. Specialized stores offer a wide range of bath accessories. Buckets for soaking brooms, tubs and basins for water will come in handy and make visiting the steam room efficient and convenient.
The main thing you need to pay special attention to when choosing bath accessories is the quality of the products. The bathhouse is characterized by high temperatures and high humidity. The accessories you choose must withstand regular use in extreme conditions, so it is not recommended to skimp on them.
Bath accessories are made from different materials, the most popular of which are:
Each of the above materials has its own advantages and disadvantages.
Video
The standard procedure when visiting a bathhouse is to cool the body. In this case, use a pool, lake, font or snowdrift if it is winter. Such procedures have a large number of benefits: they improve health, improve mood, and tone the skin. Unfortunately, not everyone has the opportunity to take a dip in a lake or pool after a bath. A dousing bucket for a bath is a simple type of font that is accessible to everyone, and you can make and install the device yourself.
If you make it yourself
It is possible to make a dousing bucket for a bathhouse with your own hands, but it is not easy. Naturally, this formulation of the question concerns a classic wooden bucket, made in the best traditions of quality and reliability. And if there are no problems with the supporting frame, the hanging and tipping system, standard metalworking techniques are used here for assembling metal structures, then there may be a hitch with the manufacture of the wooden container itself.
A pouring device for a bathhouse with a wooden container can be made in the form of a simple cylinder with a straight riveting and equal diameters of the neck and bottom, or in the more practical form of a jug, where the riveting is also straight, but the diameter of the neck is smaller than the diameter of the bottom.
By the way! This design allows for more dosed dousing, but at the same time requires greater effort on the chain or rope. Do you want the effort to be reduced? Make the neck wider than the bottom.
The most difficult thing is the manufacture of individual elements - rivets, design of the chimney and assembly of the structure, with adjustment to the location. In production conditions, manual labor is replaced by milling processing based on numerical control. This solves a lot of problems, from complex radius cutting to the design of a tongue-and-groove system with a given mating angle. In the conditions of home handicraft production you need:
Article on the topic: How to make wooden steps to the house
- Jigsaw;
- Hand-held milling cutter with a device for radius milling and a set of cutters, with a shank mounted in a collet chuck;
- Electric drill or screwdriver;
- Welding inverter for tension welding of tie hoops.
The sequence of work is as follows:
- In a calibrated board 20x50x250 mm, in the center of the side surface along the entire length, we use a cylindrical cutter to make a 5x8 mm groove.
- We produce planks 5×15×250 mm. they will play the role of a double-sided tenon, which will fit into the reciprocal grooves of the boards.
- We assemble the shield, carefully gluing the joints with polyvinyl acetate glue. We tighten the shield with clamps and leave it under tension until the glue completely polymerizes and gains the necessary bonding strength.
- On the plane of the shield we mark a circle according to the estimated area of the bottom.
- Using a jigsaw, cut out a circle along the contour. For this operation, it is convenient to use a blade for figured cutting, which has a smaller tooth size and pitch, as well as a smaller width relative to a standard cutting blade.
- The edge of the circle is processed with a profiling cutter to a thickness of 10 - 12 mm.
- We make a typesetting strip for the walls of the bucket. Its dimensions should be within 20×50 mm and a length that determines the height of the bucket. The side of each plank should be cut at an angle of 10 degrees, directed inward. Trimming can be done with the side edge of a cylindrical cutter, having previously given the angle to the workpiece using substrates of the required thickness.
- At the bottom of the planks we mill a 5x11 mm groove at the same distance from the edge, approximately 25 mm
- We collect all the planks around the bottom, stuffing them “pull” onto its edge. You can temporarily unfasten the set using twine.
- From a metal strip 30x2.5 mm we tie the set from below, determining the length. Let's cut it off. At the edges of the future hoop, we drill two holes on each and screw two corners with a hole in the shoulder in the middle, into which a tightening bolt is inserted. We bring the edges together end-to-end and weld. We repeat the operation for the middle ring and the top one.
- We weld or screw metal ears on the top ring.
- We place the hoops on the bucket, tapping them evenly with the nose of the hammer, avoiding distortions.
- We process chamfers on sharp edges.
- Check the bucket for leaks. If necessary, wax or soak.
- We fasten the bucket on a suspension, equipping it with the necessary fittings to fit the location.
Considering the prices for industrially made buckets, especially if you have wooden blanks, the necessary tools and desire, then it’s definitely worth a try.
Flower pots
Every gardener has flower beds, and an old bucket is ideal as a pot for them. It will be enough to sand the surface a little and paint it in your favorite color. The imagination here is limitless - you can decorate the buckets with drawings, tie them with decorative mesh, attach thin twigs around the perimeter and many other options.
Photo from the site https://
Models on stands
Counter-mounted washbasins are containers with taps mounted on a frame. The frame has “legs” at the bottom that go into the ground. Thus, the washstand on the stand moves freely and is installed in any part of the garden plot. For ease of installation, a crossbar is installed above the support legs - this is a kind of “pedal”. You can quickly and securely install the structure by pressing the crossbar with your foot.
The frame structure of the washbasin on the counter must be reliably protected from moisture, especially its supporting parts that are immersed in the ground.
A tank with a tap can be purchased or made independently. Please note: the immersion depth of the legs for reliable stability increases in proportion to the weight of the structure. This is an important factor when choosing the tank material and its volume.
Installation rules
The dousing bucket is attached to the outside using metal rings. For fastening, a special inclined system of metal brackets is used.
The container should be installed where there is a constant supply of water and proper drainage. The bucket has valves, and its operation is similar to the flush mechanism in toilets. After the container is completely filled with water, the valve floats to the surface, and when the bucket becomes empty, the valve sinks to the bottom of the container.
Traditions
The bathing traditions of our people have always helped people not only cleanse their bodies, but also relieve fatigue after a week of work, strengthen their bodies, and drive away all sorts of ailments. Along with body massage with a broom, contrasting water procedures were always used.
Having had a good steam, it was customary to jump out into the street and throw ourselves into the snow, or even into an ice hole. And if there was no such opportunity, then the people happily doused themselves from head to toe with ice-cold water from gangs and buckets.
Later, they began to strengthen wooden buckets for the bath on the wall in such a way that they could be overturned sharply and pour water on the person standing below. This is how a contrast shower appeared, which to this day is considered the most useful procedure for hardening the body.
Application
A wooden bucket is a container unique in its range of uses. It is made from environmentally friendly material – wood.
This container is ideal for pickling vegetables, and for use in a sauna and bathhouse, where you can steam brooms, carry and store water. A wooden bucket does not emit harmful fumes. On the contrary, the healing substances contained in the wood will give the water beneficial properties and softness, and add elasticity to the brooms.
For pickles, you can purchase a bucket with a lid. Since such products are made without the use of adhesives, the products in them will be tasty, aromatic and healthy.
A wooden bucket is also used to create a certain atmosphere and surroundings. These products are popular:
- In restaurants, clubs and cafes, whose interior is designed in the style of old taverns or hunting lodges.
- In holiday homes and hotels in the style of family estates, estates or castles of yesteryear.
- In baths and saunas. This is the most extensive area of their use, since it is rare to find a Russian bathhouse that does not have a wooden bucket.
- For all sorts of themed events, reconstruction of past events, shooting music videos, movies, advertising and various programs, you may also need a new or old wooden bucket.
- There are owners of log houses who love to decorate the premises in the style of ancient Russian chambers.
- This product will be an excellent gift. It is not only very useful in everyday life, but also looks very attractive.
A wooden bucket is a container unique in its range of uses. It is made from environmentally friendly material - wood.
A wooden bucket is a container unique in its range of uses. It is made from environmentally friendly material - wood.