To perform bath hygiene procedures and comfortable rest in the dressing room, all rooms must be equipped with the necessary furniture. A bath stool is a universal piece of furniture that is suitable for installation in different rooms. To save money, you can do it yourself; in this article, IVF Heart will tell you how to do it.
Sizes that are comfortable for a person
There is no way to get around this point: there is a certain relationship between the size of the table and how many people can comfortably (or not) fit behind it.
Therefore, each bathhouse owner should estimate in advance how many people will most likely gather at the table in the recreation room or on the veranda at the same time. The second important factor in choosing the size (and, possibly, shape) will be the area of the room. After all, you need not just to place a table, but to make sure that a person can sit down and get up from the table freely, that there is room for passage, etc. To do this, you need to add a few more parameters to the table dimensions - the width and depth of the seat, the width of the seat for one person at the table, and also the minimum width of the passage.
For our part, we will present the standards of ergonomics, which is the science of how to adapt things to human anatomy.
REMEMBER! To sit comfortably at the table, a person needs 70 cm of space. This is called the seat depth (see picture). Add these 70 cm to the dimensions of the table on all sides - you will get a spot that you allocate for this area. The minimum passage behind the seated person, if necessary, must be at least half a meter.
Now the dimensions of the countertops themselves (according to the estimated capacity):
A person is comfortable at a table if he is provided with at least 60 cm of table space in width. It's minimum.
A two-seater table of square or round shape should be 60 cm on the side or in diameter. However, the “spot” of the zone together with the chairs is calculated as 120 by 210 for a square and 120 by 200 for a circle.
A three-seater table is only possible for a round shape, but the dimensions increase: the table diameter is 80 cm, the spots are 220 cm.
The four-seater can be either cross-shaped or parallel. The side of the square is 85 cm, the side of the spot is 225 cm. The diameter of the circle is 90, the spot is 230 cm. The rectangle is 85 by 125 cm, the spot is 185x225 cm.
Five-seater – circle 100 cm, spot 240; rectangle, size 135 by 85 cm, spot – 235 by 225 cm.
Six-seater – three types. Circle: diameter 120, spot 260, rectangle parallel seating – 85x175, spot – 235x225 cm, perimeter – 85x145 cm, spot – 285x225 cm.
We'll probably stick with eight-seaters. The circle is 140 cm in diameter, the spot is 2.8 meters. Rectangle: parallel seating – 80 by 250 cm, spot 220x285 cm around the perimeter – 85 by 195 cm, spot 225x285 cm.
Also worth mentioning is a design called a “corner”. It looks cozy and fills the space well. The module of the proposed scheme is a seat measuring 55x55 cm. A corner measuring 220 by 165 cm is folded out of them. The table is also square in shape with a square side of 85 cm. Single seats in front of the table are the same dimensions as the module.
Design selection
Material and design can be selected in parallel, although one does not depend on the other in any way. The table shape can be any, but still the number of basic options is limited:
- square;
- rectangular;
- round;
- oval;
- polyhedron.
This concerns the shape of the tabletop.
In addition, it can be sliding. The number of legs on the table may vary:
- one;
- two;
- three;
- four.
As for three legs, this option is, of course, rare, but possible. If the number of legs is less than three, then their stability will directly depend on the crossbars on the floor on which these legs are installed. For a one-legged person this will be a cross, for a two-legged one it will be a single perpendicular on each leg.
In addition to the tabletop and legs, there may be other structural parts. These include a transverse beam that connects the legs, if the table has two of them, as well as strips that mask the junction of the legs with the frame, which at the same time impart rigidity to the structure.
Yes, and it would also be worth mentioning folding tables that can be used not only in the rest room, but also in other rooms. This table is mounted on the wall, when folded it takes up very little space, and when unfolded it is no worse than a stationary table.
BY THE WAY! Those who love the original may recall hanging tables, like on a ship.
Features of manufacturing furniture for a steam room in a bathhouse
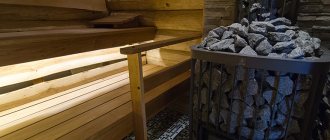
There should be nothing unnecessary in this room so as not to interfere with proper air circulation. Therefore, only shelves and a bench are traditionally installed as furniture here. You can make them yourself by making the right calculations and choosing high-quality wood.
Selection of materials for furniture in steam baths and preparation
Furniture for the steam room is made exclusively from wood. It is environmentally friendly and has low thermal conductivity. In this case, the boards for the shelf and bench are selected without cracks and knots. Wooden furniture for a bath should be made of even and smooth material.
It is undesirable to use coniferous wood due to its high resin content. At high temperatures, they are released, which can result in burns. The best option is aspen, linden, African abashi tree.
When purchasing lumber, be sure to pay attention to shrinkage. Damp wood will rot and warp
Only galvanized fittings are used for fastening individual elements. Such fasteners are resistant to moisture.
After choosing materials, you need to decide on the design of the future structure and the location of its installation. To do this, you can familiarize yourself with existing drawings of bath furniture or come up with your own. First of all, the shelf should be comfortable. Its optimal width is 0.6-0.8 meters, and its length is 1.8-2.2 meters. You can make it with one, two or even three tiers. However, please note that the height from the top shelf to the ceiling must be at least 1.2 meters. At the same time, in three-tier structures, it is advisable to make the upper and lower steps removable, and the middle one fixed.
Separately, you should take care of sanding the wood. It is performed twice: the first time with a grinding machine, the second time it is cleaned by hand.
Instructions for making a two-tier bath shelf
Bath shelf - diagram
Shelves for a small steam room Before making shelves for a bath, you need to take some measurements. The shelves should not cause inconvenience. Its device can be either single-tiered or three-tiered. It is believed that the heat is higher at the very top. The design resembles the shape of steps.
Once the required dimensions of the boards have been determined, you can begin to work:
- It is necessary to mount a frame of wooden posts. For this, a timber is taken.
- The racks are fastened together. You can even use metal screws here, because the body will not come into contact with this part of the shelf. The distance between the two posts should be about 50 cm.
- The frame must be attached to the walls of the bathhouse.
- Then the boards are attached to the frame. When installing them, you can no longer use metal. The distance between two adjacent boards should be about 1 cm. This is necessary so that the water can drain freely. In addition, this device allows the structure to dry faster.
Technology for making a bench for a steam room in a bathhouse
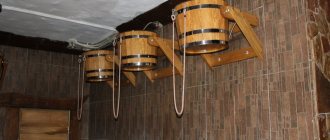
The bench in the steam room can be used to place a bucket, a tub on it, or just for relaxing. To equip it yourself, we adhere to the following algorithm of actions:
- We prepare four legs 0.6-0.7 meters long and two struts from a beam with a cross-section of 5 cm2.
- We sand two boards 0.4 meters wide and connect them together along the edges with slats.
- We fix the legs with crossbars at the top and bottom.
- We nail the resulting structures to the seat.
- We attach the struts with one side to the bottom of the seat, the other to the crossbars of the legs.
Before use, shelves and benches in the bathhouse must be treated with a special oil composition that will prevent the wood from drying out.
Specifics of installing bath furniture in a steam room
When placing furniture in the steam room, it is necessary to take into account some safety rules. It is better to mount the shelf on the wall opposite the stove, but not immediately opposite it to avoid burns. The distance between the benches and the stove should allow you to steam freely without touching the hot surface. Also keep in mind that it is not advisable to sew up the space under benches and shelves. This will lead to wood rotting due to poor drying. The distance from furniture to walls should be at least 3 cm for good ventilation.
Surface treatment
The final stage will be treating the resulting shelf with special compounds that will make its use more comfortable and also provide it with a longer service life. It is generally accepted that in a traditional steam room the wood should not be processed in principle; it is enough to sand it thoroughly.
The benches, first of all (in fact, many craftsmen recommend doing this procedure with boards at the very first stages of preparing the frame in order to saturate the wood from all sides) must be soaked with powerful antiseptics. After all, constant contact with humid and very hot air will inevitably contribute to the destruction of the tree. In addition to rotting, mold can form on the tree and develop fungi and many harmful organisms.
One of the impregnation options can be natural impregnations; for example, the most budget-friendly and affordable option is simple linseed oil.
Often, antiseptic agents are used as impregnations, which make the wood moisture-resistant and permeate it through and through. An unexpected solution at first glance may be the use of bleaches: these special compounds not only protect the wood, but also, in case of darkening, return it to its original color. In addition, there are special compositions intended for direct use in the sauna.
After assembling and installing the canopy, it must be treated with a composition specially designed for steam rooms. Such products are oil-based, they protect wood from moisture and steam, rotting, and also increase fire resistance.
Wood impregnations
After installation of the canopies, you will need to worry about protecting their surface from destruction, as well as giving the finished structure a more attractive appearance. But before treating the surfaces of the shelves using any of the known methods, you need to carefully sand them using a special grinding tool.
Thus, standard paint and varnish impregnations are completely unacceptable for steam rooms, since at high temperatures they form a film on the surface of the wood.
Important conditions for creating an interior
When decorating the interior of a relaxation room in a bathhouse, several specific conditions and rules are observed. So, to create a beautiful design, they use finishing materials that do not contain metal parts and are moisture resistant.
This room is equipped with a good ventilation system.
Important! The dimensions of the rest room are determined by the dimensions of the bathhouse. The minimum area is considered to be 10 sq.
m.
Also, when creating a beautiful room design, perform the following actions:
- install hooks for drying several bathrobes and towels;
- construct storage areas for a variety of personal items;
- put a mirror.
This place is not cluttered with massive furniture or decor. This way the passage remains clear.
Zoning Features
The rest room usually has 3 zones:
- place for cooking;
- dining area;
- relaxation area.
Bath curtains create a feeling of security. Sometimes zoning of this place is carried out at the stage of construction of the bathhouse. Then they make a special partition wall.
The kitchen is separated from the dining area by a bar counter or a wide countertop. A fireplace is placed in the center of the room, which decorates the interior design.
Color spectrum
The rest room is decorated with light and pastel colors. These tones create a light and cozy atmosphere that relaxes guests.
Orange, light brown or yellow shades bring peace of mind and warmth to this zone. Furniture for such a place is selected according to the color of the cladding.
Variety of materials
When carrying out the interior decoration of this room, only high-quality building materials are used, which are moisture resistant and tolerate temperature changes well. When arranging the design of a relaxation room in a bathhouse, the following materials are used:
- decorative stones - artificial or natural;
- various types of tree species;
- fiberglass or non-woven wallpaper;
- majolica or ceramic granite tiles;
- decorative plaster;
- plastic.
When decorating walls, the following materials are used:
- lining made of oak, aspen, alder, pine or linden;
- various stones - cobblestone, marble, granite or sandstone;
- non-woven wallpaper;
- plasterboard moisture-resistant sheets.
When finishing a room ceiling, wooden panels and linden or cedar lining are used.
When installing floors, the following building materials are used:
- wooden boards 3.5 cm thick, the finished coating is covered with stain or colorless fixing varnish;
- ceramic granite.
After finishing, the recreation area becomes a stylish and comfortable place that gives guests homely warmth and comfort. This area is also a good place for winter holidays or a regular family vacation.
Selection of furniture
When choosing the right furniture for the rest room, perform the following steps:
- buy furniture that suits a certain design and fits well into the room interior;
- the table, chairs and other furniture items are placed as far as possible from the steam room, thus preserving the appearance of the room and increasing the life of the furniture;
- do not clutter up the resting place with various objects - make the space free;
- buy furniture made of durable, moisture-resistant material.
Comment! Wooden furniture is considered the best option when designing a relaxation room. After all, tables and chairs made of wood are covered with antibacterial impregnation.
More often furniture made of beech, oak, alder or larch is placed here.
Lighting in the bathhouse in the relaxation room
In order to create proper and pleasant lighting in the recreation area, perform the following actions:
- Small lamps are placed around the perimeter of the room, from which a lot of diffused light comes;
- install bright but unobtrusive light in the center of the room and dimmer light along the edges of the room; such lighting relaxes the bathhouse guests;
- Several spotlights are placed under the ceiling, which emphasize the youth style, this can be seen from the photo of the interior of the bathhouse and relaxation room.
There are also several narrow windows here, through which direct rays of the sun do not penetrate. This creates natural, pleasant lighting.
Decorating the relaxation room in the bathhouse with decor
Decoration of the rest room is carried out after completion of all other construction work. This completes the design of the room.
Various textiles are hung on the windows and walls, which make the room more comfortable and soft. Window curtains, sofa throws, soft pillows and tea towels create a feeling of home.
The walls are decorated with paintings or individual photographs, and open shelves are installed in the corners. Small souvenirs are placed on them: cups, figurines or vases.
Homemade furniture for the heart of the bath - steam room
In a good, proper steam room, apart from places to lie down and a few handy accessories (rest for head and feet, basin, ladle), there should be nothing superfluous
It is important that hot air circulates freely in the steam room, so you should not clutter the steam room. You can make shelves for your bath or sauna yourself
Before you start making sun loungers for the steam room, you need to decide what you need. What shape, width or size should the shelves be, how will it be located: in the form of steps or along the perimeter of the steam room; what it is intended for: for sitting or lying - all this depends on the desires and imagination of the owner, as well as on the characteristics of the room.
Before you start making furniture, prepare drawings
The first stage of making a shelf for a bathhouse is measuring the room and sketching the future lounger. It is necessary to measure the steam room as accurately as possible and draw a schematic drawing of it, where you must indicate the location of the boiler and door. Then draw the future shelves on the drawing, indicating its dimensions and attachment points.
- After all measurements have been taken, boards and timber have been purchased, you can begin to work. We assemble a frame from timber (section 100 x 50). The racks can be fastened together with metal screws, so they will not be on the surface. The distance between the posts is no more than 45-50 cm.
- Next we make seats for the shelves. They can be made from well-sanded boards or from lining. The boards must be fastened at a distance of 1-1.5 cm from each other. This will allow water to flow down smoothly and also allow the seats to dry out faster. It is better to fasten the boards for the seat with wooden dowels, since you can subsequently get burned on the metal heads of nails or screws.
Advice! Do not treat wooden products in the steam room with anything: varnish, paint, chemical impregnations. At high temperatures this is fraught with toxic fumes and poisoning.
We make bath furniture with our own hands
Actually, the whole process consists of three stages:
- production of blanks;
- pre-assembly, adjustment;
- final assembly.
From the purchased boards, according to the drawings, we cut out all the necessary blanks, then we carefully process them with a sanding machine. Surfaces intended for sitting must be sanded with special care - there should be no burrs, roughness or irregularities on them. If necessary, we mill the edges, blunt the sharp edges - for this you can use a sander or plane, you can also round the edges of the boards with a milling cutter.
Basic drawing of a table for a bathhouse: all dimensions can be changed and adjusted according to individual needs
We do preliminary assembly. During preliminary assembly, we do not recess the screws into the wood; the task of this stage is to check all dimensions, the coincidence of the parts with each other, and their joining with each other. If everything is in order, we disassemble it and reassemble it completely using wood glue and recessing the screws. If not, we disassemble, correct errors and shortcomings, and do preliminary assembly again.
If you wish, the table top and seats for benches and stools can be made not from separate boards, but made into a furniture panel for them. To do this, we mill the boards along the edges - on one side we mill a groove, and on the other, the corresponding tenon. You need to position the cutter very carefully so that there are no “steps” between adjacent boards. We mill the edge boards on one side only. Then we coat the tenons and grooves with glue, connect them together on a flat surface, and tighten them with carpentry clamps until the glue dries completely. Then we remove the clamps and carefully sand the surface - ideally, the joint between the boards should be almost invisible.
Basic drawing of a bench for a bathhouse: all sizes can be changed to suit individual needs
If you are making shelves or benches for a steam room, then it is not recommended to make a furniture panel for them - here, on the contrary, you need a gap between the boards for air circulation.
It should also be noted that it is strictly not recommended to varnish or paint furniture intended for use in a steam room - most paints and varnishes for wood are not intended for use at elevated temperatures, and, among other things, this can simply be harmful to health.
How to care for shelves
Despite the fact that making shelves does not require serious financial investments and labor costs, any bathhouse owner does not want to redo them every few years due to loss of appearance, mold or other problems. Simple rules for caring for bath furniture will help you avoid them:
- Each time after completing the bath procedures, the steam room must be ventilated by opening the door and window, if any.
- To speed up the drying of the shelves, wipe them with a dry cloth that absorbs water well.
- During drying, all water from containers must be poured out or closed with lids.
- Things remaining on the surface should be removed, and traces of dirt and soapy compounds should be washed off. You cannot use abrasive or chemically aggressive products for this.
Regular cleaning and ventilation are required to extend the life of bath furniture Source scontent-cdg2-1.cdninstagram.com
In general, the interior of the bathhouse should be kept clean and dry, periodically carrying out general cleaning. It is better to make the beds of the shelves in the steam room removable, and in hot weather take them out to dry in the sun.
shelves
Bath shelf - diagram
Shelves for a small steam room
Before making shelves for a bathhouse, you need to take some measurements. The shelves should not cause inconvenience. Its device can be either single-tiered or three-tiered. It is believed that the heat is higher at the very top. The design resembles the shape of steps.
Once the required dimensions of the boards have been determined, you can begin to work:
- It is necessary to mount a frame of wooden posts. For this, a timber is taken.
- The racks are fastened together. You can even use metal screws here, because the body will not come into contact with this part of the shelf. The distance between the two posts should be about 50 cm.
- The frame must be attached to the walls of the bathhouse.
- Then the boards are attached to the frame. When installing them, you can no longer use metal. The distance between two adjacent boards should be about 1 cm. This is necessary so that the water can drain freely. In addition, this device allows the structure to dry faster.
Layout
Typically, canopies are made of two or three levels to allow you to choose a more comfortable temperature zone. In the classic three-stage version, the middle tier is made stationary. The collapsible design, where the upper and lower shelves are removable, allows for better drying of the wooden parts of the bathhouse.
We suggest you familiarize yourself with How to assemble a bathhouse from a log
Along one wall there can be stepped and compartment options for the arrangement of shelves. The most economical option for arranging the canopy is like in a sleeping car compartment, one shelf above the other. They are attached with the ability to fold, freeing up space in the bathhouse if necessary. With the third L-shaped method, one of the shelves is located on the adjacent wall.
Wooden splendor
The wooden bath table continues to be an unfading classic of the genre of domestic bath interior. Wooden objects have many advantages:
- High ecological purity of the product, its naturalness and naturalness in the interior decoration;
- Low thermal conductivity and heat capacity, which is a very valuable quality in relation to the realities of a Russian bath;
- A wooden table for a bathhouse has the necessary margin of strength and natural durability with relatively simple and unpretentious maintenance;
- Wood is easy to process and to work with it you need a fairly small list of available tools.
To be fair, it is worth mentioning the use of other materials from which it is theoretically possible to make a bath table:
- Plywood and MDF are unique substitutes for solid natural wood, in the production of which various chemicals are used, including alkyd resins;
- Plastic - some of its types, manufactured to food grade tolerances, are suitable for the production of furniture and tables in particular. Products based on plastic masses are durable, lightweight and sufficiently strong. Caring for them is easy. However, the presence of plastic in the bathhouse interior negates the charm of the bathhouse itself;
- Metal - due to the characteristics of steel, cast iron and tables made of non-ferrous metals and their alloys, their presence in the bathhouse is appropriate in the form of individual elements, but not the structure as a whole.
Types of wood for making bath tables
A wooden table for a bath is made from certain types of industrial wood that have the necessary consumer qualities. These include the following:
Linden. A pleasant, easy-to-work wood with well-structured wood of uniform color and a pleasant aroma. Retains its original qualities for a long time; Alder. Wood of this species should also be classified as a priority. Easily and predictably processed, satisfactorily resistant to warping under conditions of frequent temperature changes
The texture of the wood has an attractive appearance with minimal decoration and processing. When choosing commercial raw materials, special attention should be paid to the degree and quality of its drying; for alder raw materials this is fundamental and important; Aspen. It is distinguished by good quality solid wood, in which knots and other serious defects are rarely found. Materials of this type are affordable and well processed
Among the disadvantages, it should be noted the tendency to warping and drying out. It is worth remembering that aspen tabletops do not withstand significant mechanical loads very well; Poplar. In terms of their characteristics, materials made from this type of wood are close to aspen. However, despite being cheap and accessible, poplar products are not particularly durable; Oak. It’s especially nice to make a table for a bathhouse with your own hands from this wood. Its noble color, deep original texture, and spicy oak aroma distinguish it from a host of other species. Excellent strength and record durability put oak furniture beyond competition. The disadvantages include the high cost of conditioned wood and the tendency to split when fastened with self-tapping screws.
It is worth mentioning separately about the use of coniferous wood in our carpentry practice. Spruce and pine are among the most affordable lumber on the domestic market. However, making a table for a bathhouse with your own hands from such raw materials is not always rational. Firstly, all conifers are quite resinous, secondly, it is unlikely to obtain a beautiful and bright texture without subsequent processing and, finally, using them in conditions of high humidity means dooming them to a short life. From coniferous wood, it is worth using cedar and larch, and the latter is more preferable in terms of the cost of raw materials.
To summarize this section, we present a table reflecting the hardness of various types of wood, which directly determines the durability of the countertop and the resistance of its surface to mechanical stress:
| Wood type | Compliance with its hardness class, according to current industry standards |
| Boxwood, dogwood, white acacia | I class, very hard |
| Hornbeam, pear, ash | II class, hard |
| Beech, English oak, European maple | III class, moderately hard |
| Birch, elm, larch | IV class, moderately soft |
| Pine, spruce, alder, chestnut | V class, soft |
| Linden, aspen, poplar | VI class, very soft |
Layout
The area of the bathhouse is an important factor for determining the location of the canopy and the number of its tiers. After all, when they create a canopy in a bathhouse with their own hands, they focus on the longest wall. But with the obligatory consideration of the absence of direct steam from the stove into the steaming space, as well as drafts. Depending on the size, the bath canopy allows you to sit, recline or lie down.
Typically, canopies are made of two or three levels to allow you to choose a more comfortable temperature zone. In the classic three-stage version, the middle tier is made stationary. The collapsible design, where the upper and lower shelves are removable, allows for better drying of the wooden parts of the bathhouse.
Along one wall there can be stepped and compartment options for the arrangement of shelves. The most economical option for arranging the canopy is like in a sleeping car compartment, one shelf above the other. They are attached with the ability to fold, freeing up space in the bathhouse if necessary. With the third L-shaped method, one of the shelves is located on the adjacent wall.
The ideal length for the canopy so that the average person can lie on it freely at full height without bending their legs. Typically the minimum bench length dimensions used are:
- sun lounger – 180–220 cm;
- recliner – 150 cm;
- seat – 40–90 cm.
The most important dimensions for the height of the canopy tiers are the distance from the floor and ceiling of the bathhouse, the optimal location of the upper and lower shelves. The main point of these dimensions is that there is enough space so that an average adult can sit down without hindrance when taking a steam bath. And also so that the steamer or massage therapist does not take uncomfortable, crooked positions during the procedures. Recommended height:
- from the ceiling to the top canopy – 110 cm;
- interlevel height – 60–80 cm.
The standard width of the canopy is considered to be 60 cm, but the upper bed should have a larger transverse dimension - 90 cm. It is quite acceptable to reduce or increase all dimensions to suit the existing standards of the bathhouse room. If the width of the main canopy is designed for two steamers, then this will already be paid. How to make a canopy in a bathhouse to suit the needs of a particular family is up to the owner to decide.
The constituent elements of any standard canopy are:
- frame - support post made of beams;
- the surface of sun loungers, seats made of boards;
- backrest for sitting on the top bunk.
All parts of the canopy must be from the same type of wood.
It is not advisable to use material made from coniferous trees, since with constant heating they begin to release resins that will stick to the bodies of vacationers. The minimum resin content of such popular hardwood species in our country:
- Linden - healing properties, homogeneous structure, darkens over time under the influence of steam and humidity.
- Aspen is relatively inexpensive, has a healing effect, is resistant to moisture, and never rots.
- Alder is a dense wood with healing properties.
- Poplar has a uniform texture; after drying, the wood becomes hard.
The wood of these trees tolerates high humidity, frequent temperature changes, and has a low level of thermal conductivity. Despite all these wonderful properties, they are additionally treated with special natural oils to protect against mold. Under no circumstances should it be impregnated with any chemicals or varnished.
Experienced craftsmen know that wood material is classified by quality. We recommend making your own canopy only from “Extra” or “A” quality wood. In appearance, this smoothly planed wood is distinguished by the absence of knots, chips and cracks. The more knots there are on the material, the more susceptible it will be to rapid destruction under extreme steam room conditions.
In sanded wood, all sharp corners should be smoothed with a chamfer to protect the skin of bathhouse visitors from possible cuts. Boards for flooring sunbeds and seats will last a long time if their width does not exceed four times the thickness. That is, in order for the boards to dry quickly and not crack, they must be thin enough.
To prevent the structure from swaying and creaking, the racks-bars for the canopy frame should have a cross-sectional size of 50×70 mm or 65×15 mm. Fasteners must be made of galvanized iron. When choosing the old fastening method, it will be necessary to drill holes at the joints for oak wedges - tenons. To avoid burns, the heads of metal screws - self-tapping screws or anchor bolts - are buried deep in the wood and protected with special decorative caps.