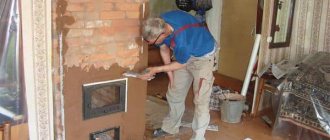
Many private homes have a stove or fireplace that can be decorated with tiles, but not every tile will be suitable for this purpose. Cladding a stove with tiles puts forward a number of requirements both for the technology of facing work and for the material.
We will figure out which tiles are suitable for lining stoves in a house, country house or bathhouse within the scope of this article. Before you start choosing tiles, you should figure out what kind there is, what properties it has, and determine which one is best to use so that it is reliable and beautiful.
Tiles for cladding stoves and fireplaces
Preparation for lining the stove with ceramic tiles
Before purchasing and preparing materials for work, it is necessary to take into account the type of main structure and operating conditions:
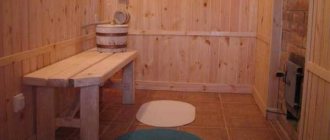
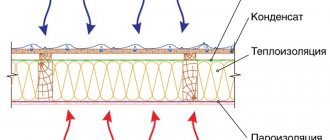
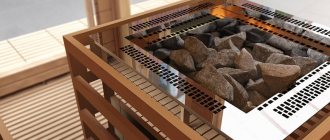
- single-circuit brick kilns are characterized by strong surface heating, so the facing material and mortar must be temperature resistant. Devices of this type are used in rooms with high humidity and temperature fluctuations (baths, saunas), which also affects the careful selection of tiles and adhesive composition;
- double-circuit brick devices. The external contour of the furnace, in contact with the facing material, has a lower degree of heating than the internal one, and is characterized by the absence of local overheating points. Such characteristics make it possible to install one type of tile using one type of mortar;
- ovens with a metal surface. Furnace finishing is complicated by differences in the heating and cooling rates of metal and tiles, which can lead to deformation or destruction of the lining. Installation of lamellas is possible in a “dry” way - on a special frame.
Before starting work, calculate the total surface area of the heating device, including horizontal and vertical planes.
Take measurements of the tiles and determine the number of elements required for cladding; be sure to add 10-15% to the result obtained - the reserve may be needed in case of damage to the material during installation or to replace a surface area that has become unusable during operation.
Also decide on the installation method: straight rows (with exact alignment of the sides of the elements), diagonally, offset (type of brickwork).
The use of solid fuel for the stove requires the presence of tiles that will withstand temperatures up to 1600 ⁰; wood combustion occurs at a temperature of 700-800 ⁰, which significantly expands the choice of facing material.
Briefly about the main thing
There are several types of facing tiles: based on clay, natural or artificial stone. The material must be fireproof, heat-resistant, durable, not absorb moisture, conduct heat well and at the same time have an attractive appearance.
The building materials market offers models for every taste and budget: pretty terracotta and harsh fireclay tiles, amazing majolica and delicate faience, majestic marble and modest tiles, strict porcelain tiles and luxurious brooms.
There are two cladding technologies: glue and metal frame. The choice of tiles is made according to technical characteristics, taking into account markings, design and colors, and cladding technology according to the expected operating conditions.
Ratings 0
Materials and necessary tools
Tile selection
The material used for finishing stoves must have the following characteristics:
- resistance to mechanical loads, strength;
- wear resistance;
- heat resistance;
- the thickness of the elements must be at least 8 mm to prevent deformation of the coating;
- environmental friendliness - during heating, toxic substances will evaporate into the surrounding space;
- moisture resistance - the water absorption coefficient should be less than 3%.
Types of tiles used for finishing stoves:
- clinker - in the production process they use the method of pressing and firing a mixture of several types of clay, fireclay and dyes. The products are durable and come in a wide range of beige shades;
- porcelain stoneware - made by pressing under high pressure and temperature of a complex composition (clay, sand, granite chips, metal salts, marble). The material is highly resistant to mechanical and thermal loads;
- terracotta - the basis of the tile is clay. The surface of the lamellas is not susceptible to scratches, the tiles are impact-resistant and can withstand temperature changes, which makes it advisable to use them for lining stoves in cold rooms;
- majolica – terracotta products covered with glaze. Used to implement unusual design solutions with elements of luxury. For the same purposes, tiles are used for finishing - high-strength, fire-resistant clay tiles, which are quite expensive.
Artificial and natural stones are in demand as facing materials: marble, sandstone, granite
Pay attention to the appearance of the products: surfaces must be the same color and not have chips or cracks. The product certificate must include a note indicating the permissibility of operation at high temperatures.
Selection of adhesive composition
Cement mixtures
They consist of highly refractory cement, sand with the addition of mineral and synthetic additives that provide the necessary thermal resistance characteristics. Dry mixtures can be purchased on the building materials market; if desired, you can make your own solution:
- take clay or fireclay, refractory cement, sand in a ratio of 1:1:3, respectively;
- displace cement and sand;
- in a separate container, dilute the clay with a small amount of water and
- add to dry mixture;
- Mix the glue thoroughly until a homogeneous mass is obtained. If necessary, add a little more liquid.
Fireclay mixtures
They have high heat resistance and are used for laying tiles on the internal and external surfaces of the stove.
Terracotta
The composition includes fireclay dust and astringent additives. The solution has high moisture resistance and can withstand heating up to 400⁰. Glue can be purchased ready-made or made: mix 2 parts of fireclay powder with 1 part of koalin clay and pour the dry mixture into a container of water, stir until smooth.
Fireproof adhesives
They are made on the basis of potassium or sodium silicate with the addition of clay and modifying additives. Maintain operational properties at temperatures of 1200-1650 ⁰С
Adhesive mastics
Silicate and phosphate compounds with mineral additives and fillers. They are moisture resistant and can withstand heating up to 1400 ⁰C.
Experts recommend choosing a cement mortar that contains salt: the component is capable of accumulating existing moisture.
Auxiliary materials
To complete the work, you will need a metal mesh, screws or dowels for fastening it, plaster to level the base, heat-resistant adhesive, plastic separating crosses or drywall cut into strips, grout, and primer.
Tools for work
- straight, serrated metal and rubber spatulas;
- tile cutter;
- metal brush;
- hammer drill or chisel;
- rubber mallet;
- level, vertical plumb line;
- construction mixer;
- container for mixing the solution.
Types of adhesive composition for the glued cladding product
In second place, after examining the surface, the composition of the tile adhesive is selected, taking into account the product itself, which will be used to cover the surface.
There are many products themselves and they differ not only in size and weight, which place a colossal load on the adhesive layer, but also in material.
At the same time, the material has a certain porosity and roughness, which determines its water absorption and adhesion (adhesion), which is also used to select one or another adhesive composition. Based on all these properties of facing materials/products, the following types of adhesives have been developed for their installation:
- standard (primary) tile adhesive;
- reinforced tile adhesive;
- heavy duty tile adhesive
- adhesive for transparent facing products.
As a rule, all these types of cladding compositions are made on the basis of a polymer-cement binder with an admixture of selected fine-grained filler, and the modifiers contained in their composition also play a special role.
Primary tile adhesive, also known as standard tile adhesive, is intended for tiling with small products in the form of simple tiles with dimensions up to 30x30 cm.
The greatest use is for tile adhesive when tiling indoor walls; it is not recommended for floors.
There are many varieties of it, but the most popular brands are Polimin (in Ukraine), Ceresit, Kreisel. “Standard” cladding compositions can also be used for small concrete tiles, but not all are designed for frost resistance and other qualities; they are all very different.
Reinforced tile adhesive is intended for cladding products that are large in size and quite heavy in weight, such as small-sized porcelain stoneware and concrete tiles, as well as ceramic tiles measuring over 30x30 cm.
The most popular adhesive for porcelain tiles, which is classified as reinforced.
It is also commonly used for laying floors and walls indoors and outdoors. It differs from the previous one in a greater degree of adhesion to the surface, strength after setting and is generally frost-resistant, which determines its use in facade cladding of small and medium-sized products.
Adhesive for transparent facing products is a solution for laying tiles, including adhesive for mosaic tiles, as well as facing blocks made of glass.
In addition to the fact that it itself is a polymer/polymer-cement composition of the highest adhesion, it also has a uniform color (there is a wide choice of colors), due to the presence of pigment in its composition.
Its decorative property (uniform color) is clearly visible through glass, so the difficulty when working with it lies in the uniform application of the layer, and this is a matter of the plasticity of the solution. Due to this property, it is also used as a composition for grouting joints.
Heavy-duty tile adhesive is intended for cladding large-sized products made from artificial or natural materials that are heavy.
The most striking example of this is a mortar for laying stone cut into large slabs, as well as a mortar for laying natural stone for the installation of small monuments (monuments, obelisks, balusters and other architectural products, etc.).
This composition has the highest strength and adhesion to the cladding; it can be used to lay ceramic, concrete, porcelain stoneware and stone products of any size and weight. Large floor coverings in public halls must be made using this composition.
Start of main work
Preparing the base
- remove the old paint layer with a wire brush. If tiles were used as cladding, remove them with a chisel, starting from the bottom of the stove and moving upwards;
- deepen the seams of the brickwork to ensure high-quality adhesion of the mortar by 5-10 mm;
- secure the construction mesh with slight tension along the plane of the surface. Fix with dowels or self-tapping screws so that the caps protrude 10-12 mm above the wall.
Screw the fasteners not into the masonry joints, but into the brick - this will make the structure more durable
Applying plaster
Treat the base with ready-made plaster or prepare it yourself by mixing 0.2 parts sand with 3 parts clay and 1 part cement. If the surface has significant depressions (up to 10 mm), apply the solution in two approaches. Check the evenness of the surface with a level.
After the plaster has dried, apply a heat-resistant deep penetration primer.
Before leveling the walls, heat the oven and place the solution on the base, the temperature of which is 30-35 ⁰C.
How to cover a stove so it doesn't fall off?
- make markings using a plumb line and level for the desired laying pattern, take into account that work should begin from any lower corner;
- spread the adhesive with a notched trowel on the back surface of the tile or apply it to the stove;
- press the element to the base, lightly tap it with a mallet;
- lay the remaining tiles, inserting crosses or plasterboard between adjacent lamellas;
- After finishing the work, leave the decorative coating to dry for 1-2 days.
It is not advisable to make more than 3 rows at a time: for better setting of the solution, take hour-long breaks during the laying process.
Working with seams
To mask the seams, you can use the remains of the solution used for installation or a special, heat-resistant composition of various colors:
- Using a rubber spatula, spread the mixture at the joints and level it;
- inspect the seams and, if necessary, grout again to fill all voids;
- Use a damp sponge to carefully remove excess grout; do the final cleaning of the surface of the tiles after 2-3 hours, when the grout has hardened slightly.
You can start using the oven after 6-8 days.
Video description
Watch the video on how to attach the reinforcing mesh to the wall of the stove, if the solution is not applied.
After carrying out a set of preparatory work, you can proceed directly to the installation of the facing tiles.
Cladding with glue
Before starting installation, you must prepare the correct adhesive solution. The main components are PVA glue and cement compounds. You can add salt. The main thing is to maintain the proportions correctly.
For a person who does not have experience in preparing the solution, preparing the glue can be quite a difficult task. There is another option - buying a ready-made adhesive solution at a hardware store.
Ready-made glue Source stroyfora.ru
Classic finishing of the stove in the house with facing tiles begins with cutting the tiles. This is a complex process, but with all the necessary tools, the cutting process can only take a couple of hours.
When the glue is prepared and the tiles are cut, proceed directly to installation:
- Work begins with laying the first row. This is done using a building level and a horizontal marking cord.
- The adhesive is applied to the tiles and leveled using a notched trowel.
- A tile with an adhesive composition is applied to the furnace wall and pressed with force. The first tile must be aligned not only vertically, but also horizontally. Subsequent ones are aligned relative to the first.
Attention! The glue begins to set within 7-10 minutes. The position of the tiles must be adjusted immediately during installation.
Applying cladding to glue Source standart40.ru
How to cut tiles?
Before the trimming process, you need to make markings using a marker and ruler. Then fix the tile in the tile cutter so that the line is located under the cutting roller. To avoid chipping, lubricate the guide frame and roller with machine oil. When the lever is lowered, the tile breaks.
It is possible to cut with an angle grinder and a stone or steel disc coated with fine-grain diamond. The grinder should be operated at low speeds.
Plastering the surface is a simpler option for finishing a stove, but a ceramic coating has great advantages: a heating device with this design is easier to keep clean, and maintenance does not require the use of special detergents. Also, due to the properties of ceramics, the heat transfer of the furnace increases.
Selection of glue
In this case, you should choose exclusively from those glue widows that are resistant to high temperatures.
It is important to remember that even such glue for normal setting is applied and left until completely dry on a non-heated surface, i.e. the stove does not light up for at least a day
It is better to do this in the warm season. Adhesives, in turn, are divided by type of application:
- Soil resistance - a practical guide on how to determine the main parameter (75 photos)
- Sanding timber - modern mechanical and manual processing of wood (80 photos)
- Insulation of facades - selection of materials and instructions for creating ventilated facades (85 photos)
- to continuous, i.e. the composition is applied to the surface, without leaving bubbles or empty spaces, approximately 1 cm thick, smoothed with a special notched trowel, and tiles are attached to it row by row;
- and spot application, such application is more economical, but does not guarantee either high-quality fastening of the tiles or their preservation from heat. It is better to cover the surrounding space in this way, but not the stove itself;
Overview of methods
Grouting joints
After completing the furnace lining, the joints are grouted. The ceramics must be completely dry. You must allow at least 24 hours for this. The average drying time is 24–72 hours. A spatula is used to apply the grout. You can tint the mixtures with colors, in which case the seam can become both less noticeable and more contrasting.
The technique for performing the work is quite simple:
- adding water to the dry grout mixture;
- rubbing into the gaps using a rubber spatula;
- cleaning the surface with a sponge or damp cloth;
- re-cleaning the tiles from the remaining film after the composition has completely dried.
Stages of tiling the stove
After finishing the stove, at least 3-4 weeks should pass. This period is necessary for complete drying of all types of solutions that were used for cladding. After this period, the heating device can be tested. As soon as the oven heats up, it needs to be cooled down again. After this, the system is ready for use.
Color spectrum
The color of tiles for stoves and fireplaces should be matched to the overall design of the room. Clinker plates are presented mainly in natural shades - from pure white to chocolate. The range of shades of porcelain stoneware is simply huge. With its help you can create a designer unique finish for a heating unit.
If it is necessary to emphasize the naturalness of the hearth, to bring the structure as close as possible to a rustic stove, choose terracotta of a natural clay shade for cladding. Marble plates, majolica, and tiled elements are produced mainly in light colors, complemented by painting and various patterns.
Finishing features
Here's what a novice master needs to know:
- The setting time of tile adhesive is usually 30 minutes, and it cannot be restored simply by diluting it with water. Therefore, during finishing work, the mixture must be prepared in small portions, based on the area that you will have time to cover in this half hour.
- It is better to start laying from that part of the stove that is in the most visible place.
- The cut tile should be placed at the edge, with the cut being in the inner corner or against the wall, where it will be least noticeable.
Clinker tiles can be coated with a special heat-resistant varnish, which will give it shine and make it easier to remove dirt and soot. You can treat terracotta tiles in the same way, but you need to take into account that in this case the stove will lose its ability to “breathe”.
It doesn’t matter that we are now in the twenty-first century and progress has reached unprecedented heights, stoves and fireplaces still have the same relevance today and are experiencing a new surge in popularity. But now stoves perform a more decorative function, but it is difficult to replace the warmth from a home fire with current heating devices. Quite often it is possible to meet them not only in a bathhouse, a private house, a country cottage, but even in a city apartment.
Covering a fireplace with ceramic tiles is also an art; not every designer can do it beautifully.
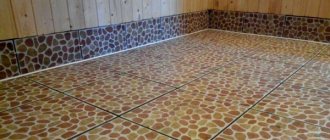
| The photo shows the interior of a home with a stove lined with real tiles. Today, what type of country house is not only outdated, but also very expensive | Oven cladding with ceramic tiles in various bakeries is often done to match the overall interior; here the oven is framed with ceramic mosaics |
| Option for complex design of stove and kitchen tiles | Covering the stove with ceramic tiles (tiles) in the room |
As an option, decorating the stove with ceramic tiles.
Installation of the stove consists of:
- choosing ceramic tiles for finishing the fireplace;
- technologies for finishing the stove with ceramic tiles;
- surface preparation;
- installation of metal mesh;
- preparing glue for laying ceramic tiles for the stove;
- laying ceramic tiles for the fireplace.
A simple and laconic design of the fireplace is allowed and recommended for any home that loves a laconic interior design
In various styles
Clinker has long and deservedly enjoyed consumer popularity. Using this unique material, you can recreate absolutely any idea and give the room an individual design. Modern manufacturers are constantly updating their collections of clinker tiles, so you can find an option for every taste and budget. Let's look at some key design areas where clinker tile cladding can be used.
Minimalism
This design is characterized by laconic simple lines, clear geometry, preferably a black and white color scheme. The excessive severity of the interior can be diluted with a small amount of the same heat-resistant clinker of dark red or brown color. This will add a certain amount of extravagance to the design.
Loft
Repetition of the environment of production workshops or factories. Models with a rough texture that imitate brickwork, as well as other untreated surfaces, would be appropriate here.
High tech
If you have some imagination, even an old Russian stove can be used in a modern interior by covering it with clinker elements that imitate a metal or chrome texture. To complete the picture, you can add several rows of fireproof glass tiles to the design. This solution will look most appropriate in the kitchen.
Country
This design is suitable for country houses, country houses, and small kitchens.
This design direction is characterized by various floral patterns, so when decorating the stove wall, you can lay out one or several rows with a repeating floral pattern.
Classical
For such an interior, you can choose the option of rustic facing tiles. The texture has an uneven rough surface, as if it has aged over time.
Vanguard
Any non-standard solutions are appropriate here: surfaces with uneven edges and broken lines look quite unusual and interesting. This design looks good in small areas; this tile is good for finishing, for example, part of a wall.
Gothic
To convey the atmosphere of medieval castles, you should choose models with imitation of natural stone and wood. This style involves the use of natural materials, so you can play with the contrast of different textures (for example, dark, gloomy tones of tiles and thin, elegant crystal of a chandelier).
Stylistic directions
An indoor fireplace is a multifunctional unit. In addition to heating, it performs important aesthetic functions and is an original decoration of the central room. The finishing method and the shape of the tiles have a significant impact on the overall style of the room. You can make your fireplace attractive in a variety of ways. Using facing tiles you can decorate a stove or fireplace in the following styles:
- Under Gzhel. They use majolica and tiles of various shapes. A unique design is created individually for fireplaces in rustic, ethno, country styles;
- Imitation of brickwork. Decorating a fireplace in a modern style using brick-like tiles allows you to create a unique atmosphere. Minimalist design involves completely hiding the heat source behind a brick false wall;
- Under a stone. Modern production technologies make it possible to decorate the fireplace with tiles that imitate the texture of natural stone. This material looks great in the English style, chalet, Provence;
- Mirror tiles. The finish is suitable for modern interiors in Scandinavian style, minimalism, hi-tech. Elements with reflective glossy surfaces are often placed inside the hearth to create the effect of flame reflection;
- Panel. You can lay out an original panel over the hearth using porcelain stoneware, clinker tiles, or tiles. Patterns with natural motifs and original drawings will fit perfectly into the oriental, eco style.
Cleaning masonry from mortar
The appearance of the masonry is also important and in order for it to look neat, you should take care of it during the construction of the casing. To do this, every few rows of not yet hardened drops of mortar from the bricks need to be cleaned off and wiped with a damp cloth.
If, however, in some places the drips have not been removed in a timely manner, then after completing the work, you can walk over the surface of the casing with a grinder with a grinding attachment or a stiff brush. Then, if the brick was not chosen to be decorative, plaster or whitewash is performed. It is recommended to wait at least 24 hours before starting finishing work.
You should start heating the stove no earlier than two weeks later; it is forbidden to try the stove before, otherwise insufficiently dried seams may crack, so all work should be carried out before the start of the planned operation.
As a first test, paper is burned in the firebox to check the draft.
Such a metal sauna stove, lined with brick in accordance with the rules described above, will provide soft, uniform heat, delighting its owners for many years.
Plastering the stove
Design
The determining factor when choosing a stove cladding design is not the type of material, but the interior of the room in which it is located. A characteristic feature of the design of facing tiles specifically for stoves is the almost complete absence of geometric patterns. It is not found in almost any style.
But the design of such products is replete with complex ornaments:
- Floral patterns, characteristic of majolica or tiles, can be used in almost all styles - from classic to modern. Faience with its famous blue and white Gzhel color scheme would also be appropriate.
- For a classic interior, you can choose porcelain stoneware; its possibilities are almost limitless. With it you can create entire paintings.
- A modern interior does not imply too colorful decoration. Elegant monochromatic tiles with small splashes of decor would be more appropriate here. Various imitations of malachite and marble, as well as wood, will look good.
- In a hunting lodge or country cottage, you can use natural stone. In order not to reduce the cost of the interior, you should not mix natural material with other types of finishing; it works well alone.
- Real stoves are rarely found in techno or futurism style interiors. However, if elements of such design trends are still present, a plain tile would look good here.
- In a country house, terracotta and clinker would be appropriate. Images of plants and flowers in the Khokhloma style will be especially good.
Advantages of a brick casing
Why is it worth making a brick casing around the stove? If you still doubt the need for such modernization, we suggest that you familiarize yourself with the following advantages of brickwork:
- heated brick retains heat for a longer time than metal;
- for a steam room, a heated brick or stone is optimal because it produces more humidified steam;
- the casing around the stove will protect you from burns if you accidentally touch its surface and is good for a home where children live;
- a brick-lined stove is much more economical, because it will require less fuel to maintain heat;
- brick has more possibilities for decoration and looks more aesthetically pleasing in the room.
A brick-lined stove is a guarantee of warmth and comfort
Finishing features
In order to improve a brick stove, there are many ways. One of the most popular is finishing the stove with tiles.
This is how you can decorate an ordinary home stove with tiles
Tile is inexpensive, and the appearance of the fireplace will change significantly. Stove tiles weigh less than facing bricks.
The use of natural materials is at the risk of customers. After all, the strength of marble may have natural defects obtained during quarrying. Ceramic tiles and porcelain tiles are now produced of much higher quality than ten to twenty years later. They can be used without fear of cracking and crumbling.
Tile for stove photo.
If a different foundation was installed for the stove, then such tiling of the stove would be perfect. A high-quality stove will operate under difficult temperature conditions, so a metal corner is pulled over the body of the fireplace to prevent cracks.
But I would like to remind you that everything depends primarily on the hands of the master
Before tiling the stove, you need to prepare the following tools:
- meter level;
- two spatula - serrated and flat, about one hundred millimeters wide;
- lace;
- tile cutter;
- rubber hammer;
- plastic crosses;
- rubber spatula 50 mm wide;
- protection for corners, because they are decoration and reinforcement for masonry.
This type of stove requires mandatory decoration with ceramic tiles.
Before tiling the stove, it is important to know which tile is best for the stove. Stove tiles come in different sizes.
Craftsmen recommend taking tiles for fireplaces and stoves measuring 20x25 centimeters or less. You need to choose the tiles for the stove based on its size, so that you can use less cut tiles. However, you can’t do without using pieces, so you will need a tile cutter or glass cutter. Laying tiles on the stove with your own hands will be successful if you choose the right glue to which the tiles will be glued.
Do you think the craftsmen made the wood blank correctly?
If the stove is located in a country house that is not always used, then the lowest temperature for the glue should take into account the minimum temperature in the house. The plane of the fireplace on which the stove tiles will be laid must be straightened in advance and without any bumps. If the brick starts to crumble, the best option would be to plaster the fireplace.
With normal masonry, it is possible to polish and tile the stove beautifully. The first row of tiles for lining the stove is laid out without glue. After you have done the fitting, you need to mix a little glue until it becomes thick and creamy and lay the tiles on the stove from top to bottom. Before tiling the stove, a layer of mortar is evenly applied to each tile using a spatula, which should be thick, but be able to cover the entire part of the tile on the back side.
The ceramic frame can be transferred to the stove itself
Laying tiles on the stove is done with a seam width of three millimeters.
Particular attention must be paid to the seams. After the glue has set, the tile must be wiped and left to dry for 2 days. Then the seams must be finished with grout.
In this version, the ceramics are just decoration, they do not provide any functionality.
Before covering the stove with tiles, it is necessary to carry out some testing work to improve the result. Before placing tiles on the stove, it is necessary to determine whether it heats any rooms.
This fireplace surround was made using regular tile adhesive.
Tiles
This material was first invented by the ancient Babylonians, who also decorated stoves with it. Each tile is prepared individually from ceramics and then covered with glaze with a pre-selected pattern. As a result, you can get a very beautiful and unique stove that will look exquisite. It is believed that tiles produce the most environmentally friendly heat.
Covering a stove with tiles is very expensive and difficult, so you need to call special craftsmen for this, who are not so easy to find. But it’s worth it, because tiles have the highest heat transfer - 0.3 kW more than other materials.
Another disadvantage of the material is that you need to wait about a month until the solution completely dries and the oven is suitable for use. Thus, tiles are a choice only for those who want to stand out and create a unique interior.