Laying floor tiles in a bathhouse is practically no different from work in any other room. All features are a special adhesive composition and grout for seams. These components must have water-repellent characteristics and be able to withstand temperature changes and exposure to aggressive environments. There is one more feature - a slight slope towards the drain, but this is rather a feature of the floor, although this should not be forgotten during finishing work.
Important! Before laying the tiles, the floors in the steam room and washing room should already have a slope towards the drain. The surface must be flat. When pouring concrete screeds, you can use guide rails - this way you can ensure the required slope. When laying tiles on a surface that is not properly prepared, the adhesive consumption will increase significantly. Moreover, on a thick layer of glue, the tile will “float”, which will create additional difficulties when laying it.
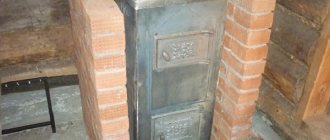
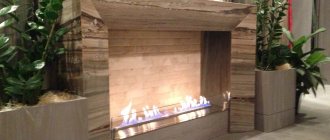
The process of laying tiles in a steam room. Please note that the base for the metal stove is made approximately 50 mm higher than the main floor
The tiles for the floor in the bathhouse should be matte with a rough surface so that they do not slip. Its base should be non-porous so that it does not absorb moisture (in relation to the dressing room, you can choose any tile with a rough surface, since the humidity in the dressing room is low).
There are several more selection criteria - frost resistance and abrasion resistance, but whether you need to take these parameters into account depends on the type of bathhouse (all-season or not, how many people there will be, how often it will be visited, etc.). The sizes of ceramic tiles can vary, as can the shape, but it is easier to work with medium-sized square or rectangular tiles.
Kinds
Before tiling the sauna sink, you need to choose the type of decorative material.
Each variety has certain advantages and disadvantages. Positive aspects of porcelain stoneware:
- Possibility of use for finishing walls, floors, stoves;
- resistance to low temperatures;
- immunity to moisture;
- high strength.
There are no serious disadvantages to porcelain stoneware.
Advantages of clinker tiles:
- high density;
- immunity to high temperatures;
- resistance to water.
Clinker tiles are not recommended for cladding walls above the stove, as they will quickly peel off.
Advantages of the coil:
- attractive appearance;
- presence of medicinal properties;
- Possibility of use for cladding walls, stoves.
Tiles on the floor in the dressing room
The tile does not tolerate sudden changes in temperature.
Positive aspects of soapstone:
- heat preservation;
- high strength, durability;
- ease of operation;
- no slipping when wet.
The only drawback is the high price.
Advantages of tiles:
- availability;
- high strength;
- waterproof.
Since tiles have no serious drawbacks, they are considered the most popular material for finishing showers.
A separate variety is mosaic. Working with it is difficult and time-consuming, but the finished surface will surprise you with its appearance.
What is glue for stoves and fireplaces?
A viscous solution that provides quick bonding of tiles and decorative elements of a fireplace installation is called glue. It can be sold in a ready-made version and in the form of a dry mixture. The first should be used when there is some skill in cladding and the process will be quick.
Because the liquid solution tends to harden quickly, and if the laying of tiles is delayed too much, it may deteriorate and be unsuitable for further use. In addition, ready-made glue will cost several times more than the dry mixture, which is not difficult to prepare; you just need to mix it with water in the right proportion.
Preparation of mortar from dry building mixture
How to dilute the dry mixture is indicated on the packaging or in the instructions. You can make the solution in small volumes, which will be consumed within an hour of work. This way, the glue will not have time to harden and the quality of the masonry will not deteriorate.
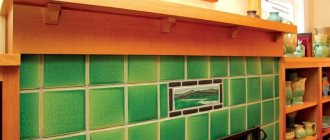
What are the benefits of ceramic tiles in a bathhouse?
Ceramic tiles in the bath
Moisture-resistant wooden tiles that have undergone special treatment have appeared on sale: “thermo-birch”, “thermo-aspen” and other types for laying floors in bathhouses. Treated wood has unique properties: it is not subject to deformation, cracking, drying out, does not absorb water and is lightweight.
Such products are quite expensive. Nowadays, ceramic tiles are increasingly used for bathhouse floors and baseboards, under which a heated floor system is installed.
This tile has a number of useful qualities that make it indispensable in conditions of high humidity and can please connoisseurs of beauty and aesthetics:
Tile structure
- high resistance to moisture;
- resistance to any detergents;
- heat resistance;
- environmental friendliness and safety - contains only natural materials and does not emit harmful substances when heated;
- distinguished by a variety of colors, textures and patterns;
- durable and inexpensive;
- makes it possible to make a heated floor using modern systems.
Stage three. Laying tiles in a bathhouse
The procedure is not much different from creating a tiled floor in other rooms; the only difference is in the grout and adhesive mixture used. In addition, a slope towards the drain hole is necessary, but this is rather a feature of the floor itself; however, this should also be kept in mind during finishing work. If the surface is not prepared, then to obtain a slope you will have to significantly increase the consumption of the adhesive composition. In the case of a dressing room, everything is much simpler: no slope is needed, the main thing is to maintain the horizontal and align the tiles relative to each other.
Correct laying of tiles in a bath
First you need to do a “try-on” to determine how best to lay the tiles. Trimming will have to be done in any case, although it is advisable to place the cut elements along the periphery of the room. The number of tiles that will be cut is determined in advance. If it is insignificant, then it is quite possible to use a tile cutter for cutting; It is more convenient to perform multiple cuttings with a grinder.
Cutting ceramic tiles
The algorithm for further actions is the same as in the case of traditional installation technology.
Prepared base for laying tiles
Step 1. In a room of the correct shape, installation should begin from the most visible corner. In case of incorrect geometry, you need to determine the middle by crossing the diagonals and start from there. To do this, the room is divided into 4 identical segments. And if we are talking about a steam room or a sink, then it is better to start installation from the drain hole - this will make it more convenient to maintain the slope.
Laying tiles with a slope under the drain
Step 2. After this, glue is prepared in accordance with the manufacturer's instructions. The composition hardens quickly, so you need to dilute it in small portions - about 1 m² each.
Preparation of glue
Step 3. Using a spatula, apply the diluted solution to the surface.
Applying adhesive and laying tiles
Step 4. Tiles are laid on the floor treated with glue, and special plastic crosses are inserted into the joints (the latter, in extreme cases, can be replaced with ordinary matches). Levelness is periodically checked.
Laying tiles with your own hands
Checking the tile position
How to make a plinth from ceramic tiles in a bathhouse
Skirting for tiles
Step 5. Adjustments and alignment can be done before the glue hardens. Longitudinal/transverse directions are corrected by slight shifts. “Sunken” elements are removed, the required amount of mixture is added, after which they are placed back. Use a damp rag to remove adhesive from the tile surface. After hardening, you can begin grouting.
Handmade production
You can make a heat-resistant adhesive composition with your own hands. The advantages of heat-resistant adhesive for fireplace tiles and its production include low costs for creating the material and the safety of the composition for human health. But keep in mind that at home it is not always possible to maintain the correct proportions when mixing ingredients. The main components that are used to make heat-resistant tile adhesive at home are cement and clay. If the base for the glue is clay, then table salt should be added to this mixture. Such a component will improve the moisture resistance properties of the finished material, and will also prevent the formation of cracks on the adhesive surface after drying. It is better to mix homemade clay mortars using a trowel. A construction mixer sometimes makes the quality of the adhesive mixture even worse. To lay tiles, make a mixture that requires 1 measure of clay, 3 measures of sand and 1 measure of cement. It is also advisable to add 1 cup of table salt to this composition, and when creating the mixture, you should pay special attention to the degree of fat content of the clay. To determine the quality of the material, it is not necessary to create laboratory conditions.
There are several simple methods for determining the fat content of clay.
- You need to knead the material in your hands, and sandy inclusions will not be noticeable in the oily clay.
- You should form a ball of clay with a small diameter and leave it to dry. Cracks appear on the oily clay surface, and its clay is “skinny”, then the ball will not be deformed.
- Clay should be added to water and mixed to a creamy consistency. You can use a wooden stick with a smooth and even surface for mixing. Depending on the thickness of the clay layer that adheres to the stick when mixing, it will be possible to determine the quality of the clay. The thickness of a layer of material with normal fat content will be 0.2 cm, the thickness of adhered fatty clay will be 0.3 cm, and lean clay will be less than 0.1 cm in thickness.
Before making the adhesive mixture, it is necessary to bring the clay to its normal fat content. To add fat (if the clay is thin), you should resort to the elutriation procedure, and the essence of this process is that the material should be soaked in water. For 1 measure of clay you should take 3 measures of water, and the resulting mixture should be left for 10 hours. After this, the solution should be mixed until smooth and left to infuse until a layer of water forms on the surface. The water that has flaked off must be drained and then the clay must be scooped out. It is better not to touch the bottom layer, because it contains unnecessary components (sand or stones). To finish horizontal surfaces, you can make a high-temperature cement-based adhesive composition, and to create it, it is important to mix sand and cement in a ratio of 3 to 1.
Bathroom floor tiles
To tile the floor of a bathhouse, the following materials are required:
- ceramic tile;
- tile adhesive;
- composition for grouting joints.
Conditions that the characteristics of these materials must meet:
- mechanical loads;
- high humidity and prolonged direct contact with water;
- exposure to chemicals;
- significant temperature changes;
- requirements of sanitary and hygienic standards.
Based on operating conditions:
- Strength and hardness (according to PEI classification – group I).
- Low moisture absorption coefficient (less than 10%).
- Moisture resistance – any ceramic tile is moisture resistant.
- Resistance to chemicals (classes A or AA).
- Frost resistance – group I or II.
- Resistance to significant temperature changes (cracking) - tiles of grade 1 or 2 (red and blue markings, respectively).
- Antistatic.
- Ease of daily care.
- Safety (friction-sliding coefficient 0.75 and above, assessment group C - “slope angle” more than 24 degrees).
Properties of tile adhesive and grout mixture for bath floor finishing:
- High degree of adhesion;
- Water resistance;
- Elasticity after curing;
- Frost resistance;
- Antifungal properties.
Based on the requirements, the right choice of material for finishing the floor in a bathhouse would be the following types of ceramics:
- Single fired terracotta (monocottura) from 6 mm thick with a matte or grooved surface (image of a foot on the back of the product);
- Metlakh tiles with an unglazed surface;
- Clinker tiles;
- Porcelain stoneware with a thickness of 4 mm (due to its high density and thermal conductivity, it is recommended when installing heated floors).
When choosing tiles, relying only on decorative qualities is not enough; ceramics must meet certain requirements.
- Choose low porosity tiles. Tiles with a large number of pores absorb liquid, which, under conditions of temperature fluctuations, leads to the destruction of ceramics. The best solution in this situation is porcelain stoneware or clinker. Their water absorption is extremely low, they can withstand both severe frost and African heat. Plus, these materials are also very durable. Conventional ceramics with low moisture absorption are marked with the letters “A I” and “BI”. The first letter denotes tiles made by extrusion, the second – those made by pressing.
- If you prefer regular tiles, choose glazed ones. Enameled ceramic tiles are fired twice, while unglazed ones are fired once. Double furnace treatment hardens the material more.
- Bath tiles must have a rough surface. Slippery ceramics in bath conditions are too dangerous for injury. First of all, this point concerns floor tiles, but it is also better to choose wall tiles in secondary rooms taking into account compliance with safety regulations.
As an option, individual sections of the bathhouse can be lined with salt tiles, which are a translucent fragment of salt rock. In addition to the impressive interior (colored lighting is a big help in this), you will receive a unique healing microclimate.
Therefore, when choosing a floor covering, you must be guided by a very important rule: the building material with which the specified surface will be covered must be extremely resistant to high temperatures.
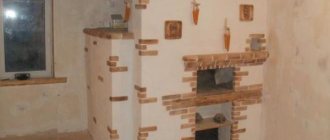
Bathhouse with tiled floor.
If you want to follow all the technologies and lay tiles at the highest level, we recommend using the products of the Finnish company KIILTO, which produces the entire range of products that may be needed when laying tiles:
- Tile adhesives;
- Waterproofing materials;
- Grout for tile joints;
- Sealants;
- Primers.
How to lay tiles with a slope towards the drain - technology and procedure - in the video.
Manufacturers rating
The manufacturer's reputation is very important when choosing an adhesive. Most popular brands that have been on the market for a long time produce high-quality adhesives that can be safely purchased for laying porcelain tiles. The following brands have proven themselves well:
- Unis (Yunis),
- Ceresit (Ceresit),
- Litokol (Litokol),
- "Hercules",
- Mapei (Mapei),
- "Osnovit"
- Weber Vetonit (Vetonit),
- "Plitonite"
- "Volma-ceramic"
- "Sartexim" (KP A2 glue),
- "Bergauf" and others.
Popular brands
It is worth taking a closer look at the most famous brands of adhesives for porcelain tiles, which are sold in construction stores.
"Volma Keramik"
Moisture-resistant adhesive for tiles and porcelain stoneware "Volma Keramik-plus" is produced in Russia. It has high adhesion to various substrates, is plastic, and is intended for small and medium-sized porcelain tiles.
"Unis Granite"
This mixture is useful when laying large, heavy slabs, including on the facade of a building. Suitable for installing heated floors. Eco-friendly, can be used in children's rooms.
Unis 2000
It has high adhesive ability, suitable for porcelain tiles and stone. Allows you to decorate with porcelain stoneware all external walls, facade, except the base. Can be used as a basic leveling agent and easily tolerates temperature changes.
Bergauf Keramik
It is considered a reinforced mixture, has high moisture resistance, and is excellent for bathrooms. The product is intended only for simple bases, although it is quite strong and flexible.
Ceresit CM 11
Ceresit CM 11 adhesive has an average adhesion level of 0.8 MPa; it is most often chosen by beginners due to its long drying time and the ability to correct the position of the tiles. Glue is often used for small and medium-sized porcelain stoneware slabs. If you have to work outside the building, it is better to choose glue from the same line - Ceresit CM117, which is intended specifically for outdoor work.
Litoflex K80
The product is considered professional, has high adhesion, and can even reliably glue porcelain tiles over tiles. Often used for installing heated floors. The adhesive is elastic and suitable for use indoors and outdoors.
Knauf Fliesen
Knauf brand adhesives are the leaders in terms of purchase among analogues. They are suitable for tiles of different sizes, including large ones. The thickness of the glue can be small (up to 7 mm), which is enough for reliable adhesion to the base.
Founded Mastplix T 12
The adhesion of the composition is low (0.5 MPa), so it is used only for simple surfaces and small tiles. The solution is viable for 2 hours, dries slowly, allowing you to adjust the position of the porcelain stoneware.
Required Tools
Before starting any work, you must prepare all the necessary tools in advance. You need to work concentratedly and measuredly, and not rush around headlong in search of missing equipment. What you will need for this job:
- Crowbar, nail puller, heavy hammer, hacksaw for dismantling the old floor or its fragments for subsequent replacement.
- Rule, level and tape measure for arranging a new coating and marking it.
- Glass cutter, tile cutter and grinder with discs for cutting ceramics.
- A drill with a mixer attachment and a container of sufficient volume for stirring assembly mixtures.
- Roller or brushes for priming.
- Convenient spatulas, trowel and comb for applying adhesive.
- Rubber hammer for shrinking and leveling tiles during installation.
- A set of rubber spatulas and rags for working with grout.
When selecting a comb, remember that for tile sizes from 5x5 to 15x15 cm, the tooth width should be 3-6 mm. For squares with a side of 25 centimeters, the tooth will be 8, and for 30 - 10 millimeters. If you need anything else, think about it in advance and put the tool so that it is always at hand.
Popular brands
When choosing a heat-resistant adhesive, it is important to consider its quality. Before purchasing a suitable adhesive mixture, it is recommended that you familiarize yourself with popular manufacturers of such materials, as well as their products and customer reviews
Stove maker
Pechnik glue is available in dry powder form. It is intended for finishing stoves and fireplaces. This composition is suitable for materials such as:
- ceramic tile;
- porcelain stoneware;
- tiles made of natural and artificial stone;
- tiles.
The Pechnik adhesive mixture can withstand temperatures up to two hundred and fifty degrees Celsius. The time for complete drying of the solution is seven days. Buyers highlight the following advantages of this composition:
- good heat resistance;
- high plasticity rates;
- slow drying, so the speed of laying tiles may not be too high;
- durability.
Terracotta
Heat-resistant Terracotta adhesive is used for finishing stoves and fireplaces, as well as heated floors. Work can be done with materials such as ceramic tiles, natural stone and facing bricks.
Terracotta glue has a high level of moisture resistance and heat resistance. The mixture can withstand temperatures up to four hundred degrees Celsius. Other advantages of the solution include good plasticity and high adhesion rates.
PalaTERMO-601
PalaTERMO-601 adhesive mixture is suitable for interior and exterior finishing work. The glue can be exposed to temperatures ranging from minus fifty to two hundred and fifty degrees.
Using PalaTERMO-601, you can seal cracks on the surface of furnace structures. Buyers highlight the following positive qualities of this composition:
- good ductility;
- reliability (the adhesive layer does not crack or crumble);
- preventing deformation of the tile covering;
- high strength;
- economical consumption.
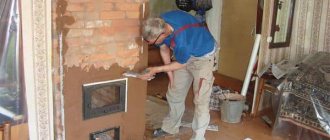
Usage
Before you begin finishing work, it is worth cleaning the base from dust and dirt, which significantly improves adhesion (i.e. adhesion). Cracks, chips and other defects on the base should be repaired. If the surface structure has a high degree of absorbency, then before finishing it is important to treat the base with a primer mixture. Before finishing work, it is recommended to briefly immerse the tile materials in water to ensure even better adhesion to the adhesive. If you bought powdered glue, then before you start finishing, you should make a solution according to the package instructions. Finishing work is not particularly difficult. Adhesive mixtures should be applied to the surface with a special notched trowel. The applied adhesive layer should be no more than 1 cm thick, and then the tiles are laid on the surface. The tile materials should be glued within 10 minutes after the adhesive has been applied to the base. Before you start grouting, it is advisable to wait 2 days after finishing. You will learn how to lay tiles on a warm floor from the video.
Grouting and wall installation
After laying the tiles, grout is applied to the floor. Its composition is identical to the adhesive mixture, but contains pigments of different colors. Its purpose is to strengthen the seams; it prevents dirt from getting between the joints. Grouting is used at the final stage after the cement solution or adhesive mixture has dried.
The walls of the baths on the inside begin to be finished from below. For horizontal installation, a beacon strip is placed on the floor surface. When laying tiles on the walls of a bathhouse, the technology for applying the solution changes. It is not placed on the surface of the wall, but on the back side of the material being glued. All other procedures are carried out similarly.
Composition of facing adhesive
Installing tiles using heat-resistant cladding adhesive
- heat resistance;
- moisture resistance;
- plastic;
- heat exchange;
- linear expansion;
- environmental friendliness.
To do this, various synthetic components are added to the composition, ensuring the performance of the above functions with a predominance of several. Those compositions that meet all the criteria are considered universal, for example, Profix, Scanmix Fire, Terracotta, their cost will be correspondingly more expensive. We can distinguish the main components that are present in all adhesive mixtures:
- cement;
- sand;
- fireclay fibers;
- mineral components;
- synthetic additives.
Technical characteristics of cement
Cement provides strength, minerals provide plasticity, fireclay fibers provide heat resistance, and synthetic components provide moisture resistance, heat transfer, and linear expansion. The predominance of a certain component can increase one characteristic, but at the same time negatively affect others. Therefore, there are two types of glue for fireplaces:
- for finishing the portal;
- for basic brick or stone masonry.
Preparing the base for laying tile material
Before laying the tiles, it is necessary to level the floor surface and make a slope towards the drain. To ensure the required slope when pouring a concrete screed, guide rails are used.
Preparation of the base is an important stage of cladding. You cannot skimp on materials - the base must be strong. It is necessary to waterproof the floor and slope to the drain.
Stages of work:
One of the options for preparing the floor for laying tiles
- the slope towards the drain hole is made at the rate of 1 cm of height difference per 1 meter of laying area;
- the drain hole must be made when constructing the foundation;
- to prevent air from the sewer from entering the steam room, water seals are installed in the sewer pipe;
- the concrete base is poured with a cement-sand screed, and the wood requires more complex preparation;
- when preparing a wooden base, you need to make sure the strength of the floorboards and replace them if necessary;
- there should be a gap of 1 cm along the perimeter between the boards and the walls. If there is no gap, the movement of the boards during temperature changes will destroy the cladding;
- All existing holes must be filled with putty and the wood treated with heated drying oil. This will be the first layer of waterproofing;
- the second layer is made using roofing felt;
- a reinforcing mesh is laid on top of the roofing felt and the screed is poured;
- When laying floor tiles on a mortar, the slope can be created during the tiling process.
Video
This video will help you understand what tiles you need to purchase for a bath:
This video will answer questions about how to make a floor with a slope to a drain and how to lay tiles on the walls in a bathhouse:
When selecting finishing materials, first of all, it is necessary to proceed from the specifics of the building’s operation. In the steam room, wood is traditionally used, but in other rooms the best option is tiling. It is resistant to temperature changes, high humidity, easy to maintain, not susceptible to insects and fungi, non-toxic and harmless to health.
Generalization on the topic
Choosing the right materials for renovation work today is a real art. The rich assortment forces you to learn to distinguish not only the brands of manufacturers, but also the features of each product presented in the line of stated concepts. The correct choice of fire-resistant adhesive for the tiles with which stove equipment is lined is to ensure your own safety and the safety of the whole family. That’s why the story about how to glue tiles to a fireplace or Russian stove will be relevant for a long time.
Work process
In a room of regular shape, installation begins at each corner. If there are unevennesses, then it is best to start from the middle. The same should be done in the case of heated floors. This makes it easier to work around the ridges when cutting tiles, and the edge panels will look nicer.
If you start from one wall to the next, the end wall may end up with a lot of cut tiles that will stand out. Well, if you decide to start from the wall, then you need to mark it in half. The first tile is placed to the right of the applied markings.
Now you should put the required amount of material to the right and left of it. This will be the first row of masonry. On the side of the slope, the tiles need to be slightly recessed; this can be helped by a specially cut strip, with which you can control the work. For more information about installing a tiled floor in a bathhouse, watch this video:
Safety regulations
Despite the fact that it would seem that there may be threats during ordinary tile laying, they still exist.
Let's study the basic rules that need to be followed:
- Protect the skin of your hands and face - such substances contain many chemical elements. When dry mixtures are mixed with water, alkali is formed. In case of contact with human skin, there is a risk of burns.
- Use a respirator - dust emanating from dry mixtures can enter the respiratory tract, which can also cause permanent harm to a person.
- Wear glasses - if dust and grains of chemical elements get on the mucous membranes of your eyes, they can cause burns.
If dust does get in somewhere, follow these instructions:
- Rinse the area where the pollen has landed. If you find deep damage, immediately seek medical help from specialists.
- If you swallow dust, you should immediately leave the room for fresh air and try to cough. Be sure to rinse your nose.
If you start to feel unwell or experience pain in your lungs, immediately call an ambulance and seek help from specialists.
How wood and tiles combine
The very first question that comes to mind is: is it possible to lay ceramic tiles on a wooden base? There are a number of factors that can become an obstacle to completing this task:
- One of the main requirements for tiles used in rooms with high humidity is moisture resistance. Consequently, the boards under the ceramics will be deprived of air access. And in the absence of ventilation, they will quickly rot.
- Depending on the state of the environment, the tree “plays” - it can change its shape and volume. Tiles are hard and cannot deform to the same extent as wood. A hard and static surface is another condition for installing tiles.
- Changing the size of the gaps between the floorboards can cause cracking or even destruction of the adhesive layer and the tile itself.
In contrast, we note that the floor in a bathhouse made of tiles will be much more durable and practical, and with the right choice of ceramics, it will be resistant to mechanical damage and shocks. The moisture-impermeability of the material will stop the access of moisture to wooden structures, thereby increasing their service life.
Professional tile laying
If you want to follow all the technologies and lay tiles at the highest level, we recommend using the products of the Finnish company KIILTO, which produces the entire range of products that may be needed when laying tiles:
- Tile adhesives;
- Waterproofing materials;
- Grout for tile joints;
- Sealants;
- Primers.
How to lay tiles with a slope towards the drain - technology and procedure - in the video.
*Review of the best according to the editors of expertology.ru. About the selection criteria. This material is subjective in nature, does not constitute advertising and does not serve as a purchase guide. Before purchasing, consultation with a specialist is required.
Tile materials are widely used in the finishing of residential, industrial and office premises. Since this type of cladding is expensive for property owners, tile adhesive plays a huge role in the durability of the coating. The construction market offers a huge range of compositions, among them there are universal products and mixtures with highly targeted specialization. Many domestic and foreign manufacturers are fiercely competing for the Russian consumer. When it becomes necessary to purchase an adhesive composition, it is best to consult with a professional tiler who will design the facing surface. Otherwise, you will have to choose the material based on the recommendations of experts.
The role of technical characteristics of tiles when choosing
When determining a suitable material for a bath, it is necessary to take into account its decorative and operational properties. Dimensions, texture and colors are important when developing interior concepts.
Technical characteristics of the tiles:
- The porosity of the base determines the ability of the tile to absorb water - it should be minimal (preferably up to 10%).
- Frost resistance, which is marked with the image of a snowflake, is important for seasonal use of the structure - temperature changes (resistance to them - the sun icon or “T”) can lead to cracking of the cladding. To be used in a bathhouse, the tiles must have both designations.
- The number of firings is indicated on the marking with numbers - double firing (“2”) products can only be placed in the rest room and dressing room; for other rooms single firing (“1”) is required.
- The surface slip coefficient directly affects safety. This indicator is marked with the letter R with a numerical value of 9-10 for glossy material and 11-13 for matte. The second option is preferable, since leaning on a slippery wall can also cause injury.