For any admirer of good steam, the use of a stainless steel tank for a bath is considered an unrecognized standard, an indicator of a high-class heater and steam room in general. In addition, this concerns the appearance of the container and the safety of using the stove. The only worthy competitor to stainless steel water tanks are copper and brass soldered structures. They are rarely found on sale, at exorbitant prices, so most owners make do with alloy steel containers.
Application options
Storage tanks are relevant in places where there are interruptions in water supply. Indoors, water tanks are most often installed in a horizontal position.
The tanks are used to store rainwater and tap water. With their help, you can organize an outdoor shower or keep them for fire safety purposes so that you can extinguish the fire.
They can store water for watering plants, gardens and vegetable gardens. Often round tanks are installed in a bathhouse to store water. There are many designs that can be round, rectangular or other shapes.
It is important to understand what the tank is for. If it is used inactively, the water in it promotes the growth of algae and microorganisms. Moreover, if the container is constantly located in an open area under the sun's rays.
Therefore, choosing the volume of the tank is one of the main tasks before starting its manufacture. Ferrous metal tanks must be primed and painted to prevent them from rusting.
The main condition for high-quality cleaning is filter media
The working container is selected so that all the necessary filling fits into it. A variety of components are used for absorption: artificial and natural. The latter have higher filtration capabilities. These include:
- sand from a river or quarry;
- gravel;
- zeolite;
- Activated carbon.
For initial rough cleaning, cotton fabric materials or even paper are usually used. According to hygienic requirements, they are very impractical: they are constantly in a humid environment, subject to rotting, and an unpleasant odor appears. The very structure of such filters contributes to almost instant contamination, which requires frequent replacement.
Read also: Red eyes in a child
The best material for filtration is activated carbon
Artificial materials have the best performance in this regard. One of the most preferred is lutrasil. It is not afraid of moisture, dirt accumulates to a lesser extent than on cotton. Of the other fabric filters, the synthetic one used in coffee machines is the cheapest.
Zeolite is also a mineral, but has a disproportionately greater filtration effect. It cuts off metal and salt impurities - everything that comes into the water from the agricultural industry: pesticides, herbicides, mineral fertilizers.
Zeolite used in homemade structures
Welding stages
At the initial stage of welding, boards must be placed under the corners of the sheet, which will serve as the bottom. It is important that the thickness of the substrate is the same. This will give an even plane along the entire length and in the corners of the structure.
During the welding process, it is necessary to constantly check that the sides do not extend beyond the base. You can immediately grab all sides together, then weld them to the base.
The sheets should fit tightly to each other. The next stage is the final welding of the seams. Welding can be done inside the tank or outside.
There should be no lack of penetration. Self-welding takes about 7-8 working hours.
It is recommended to make the structure rigid. To do this, use squares inside the tank and on the outside. To drain the water, a pipe with a control valve is welded into the lower part.
You definitely need to put aside your laziness and check the structure for leaks . After completing the work, you should prepare a chalk solution and apply it to the seams from the inside.
When it dries, use a cloth soaked in kerosene to go along the seams of the tank from the outside. Purpose: identifying “lack of penetration” clogged with slag. It only takes a few minutes to control.
If the liquid does not appear, then everything is fine. If stains appear, the problem area should be boiled again. It is best to check and re-weld immediately before painting.
Installation can be done on pre-laid bricks, but it is better to use a stand. Next, fill the tank with water and observe for several days: no liquid appears on the walls of the structure.
Principle of operation
Any plastic container functions simply. Waste accumulates in it and gradually settles. In the sludge that has settled to the bottom, natural decay processes begin - anaerobic bacteria begin to work. As a result, a characteristic smell appears near the sewer drain - this is one of the obvious disadvantages of such a system.
As the tank fills, the liquid and bottom sludge are pumped out using sewage disposal equipment. To save on calling specialists, you can install a structure with several sections that allow the water to settle several times and be purified as much as possible. From the last container, the liquid flows by gravity to the filtration field or into a filter well with a reliable natural filter at the bottom (sand, crushed stone, peat, etc.).
Filtration into the ground is prohibited if the wastewater contains harmful chemical impurities or fecal matter. The entry of hazardous substances into the soil can cause infectious diseases or poisoning among residents of the house.
Made of stainless steel and aluminum
When making a stainless steel tank yourself, it is recommended to use 1.1-2 mm metal. To prevent swelling of the filled structure, expansion tanks must be installed to protect against excessive pressure.
You can use food or technical steel as a working material. It is clear that food grade stainless steel will cost more.
Common welding methods include working with tungsten electrodes in argon or ground electrodes. A semi-automatic argon welding option using stainless wire is possible.
Aluminum tanks can be welded independently, but the process involves fulfilling a number of technical conditions that are only subject to specialists:
- it is necessary to calculate the dimensions of the water tank;
- choose the right grade of stainless material;
- calculate the wall thickness to avoid swelling of the structure;
- when using a hatch or roof, determine its type;
- determine the presence of partitions, frame and edging;
- possess welding skills.
Much in this process depends on the welding machines used and the skill of the welder. If welding is done incorrectly, microscopic cracks may appear, through which liquid will leak over time.
Typically, water storage tanks are made from stainless steel. It is better to order containers for a bath made of stainless steel from a permanent production facility. There is no need to paint them, because when heated, the paint will evaporate, polluting the air and water.
Correct operation
Homemade septic tanks require regular inspection and maintenance just as much as industrial models of treatment plants.
Repair work may be necessary if the drain is clogged. Overflow and sewer pipes will need to be cleaned. For such work it is better to hire a professional plumber. To avoid problems with clogging, it is necessary to periodically add biological preparations containing special cultures of bacteria to the storage container, which are capable of breaking down fat plugs and deposits.
Maintenance includes:
- Regular pumping out of the contents of the container. The frequency depends on the intensity of use of the sewer system and the volume of septic tanks. Usually this is from one to three pumpings per year using special equipment.
- Insulation of the lid during the cold season, which speeds up the processes of decay and wastewater treatment.
- And, of course, you must follow the simplest rules - do not dump large mechanical waste and hygiene items into the sewer.
general information
Why are water containers made of metal or any other material needed? The answer to this question is obvious, but for some it remains open. The fact is that everyone uses storage tanks differently. Their purpose is to collect and store water for later use. How and in what form you will do this is up to you to decide.
The tank can have different shapes, depending on its purpose. A regular rectangular large tank can be used to collect rainwater. For a summer shower, you can use a flat, low tank that can be easily mounted on top of a metal frame. It all depends on the purpose of use.
Often, ordinary metal barrels are used as such a storage tank. This is a practical and inexpensive option, but not always convenient. Especially because of its open top, through which insects enter the water, and plants and rust form on the walls of the tank. It can also be used to collect rainwater only if you have drains and it is possible to lead the pipe directly to the barrel.
In order not to have to worry about barrels, craftsmen make homemade metal tanks. They have a simple design and low cost. Below you can see one of the possible drawings of a storage tank. This container is small in size, but quite spacious and holds up to 200 liters of water.
How to weld a metal water tank on your site
Most people living in apartment buildings have a very vague understanding of the problems and concerns of private home owners. For example, the independent process of manufacturing a water storage tank from steel can become a reason for an ironic smile from an apartment resident. Although in fact, the possibility of welding a steel water tank with your own hands is an interesting and relevant question for many.
So, which approach should you choose, weld the tank yourself or order a ready-to-use tank?
Of course, you have the opportunity to seek the help of professionals. Prepare a competent drawing of the structure for them, and the water tank will be made in accordance with your wishes. If you don’t want to spend time drawing up a drawing, you will most likely be offered several types of designs to choose from. This is all great, but you will have to pay accordingly for quality work. In this regard, many homeowners opt for the second option - making the tank themselves. It's not very easy, but the real savings and moral satisfaction are worth it.
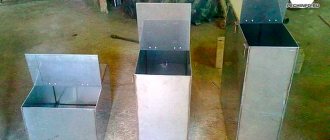
Homemade water tank
Preparatory stage
First of all, you must have a drawing according to which you need to cut out the necessary blanks from metal in advance. The Internet is full of drawings, you can use any of them, or the one listed above.
It is better to make a tank for the home and a tank for the bath from stainless steel. Stainless steel is resistant to corrosion and the formation of plants on the walls, which is important when the container is not used regularly (for example, only in summer). The material you can use is metal with a wall thickness of about 2 millimeters, this will be enough.
The container must have an expansion tank into which excess liquid will be drained. Otherwise, the storage container may become deformed due to excess pressure. The expansion tank can be made from the same materials.
If finances do not allow you to use stainless steel, you can purchase steel (technical or food grade). It's cheaper. But it copes with corrosion much worse. Keep this in mind.
Tank welding
Let's move on to the question of how to properly brew a tank.
It is better to work with a partner. One will cook, and the other will hold the workpiece at the desired angle. We also recommend placing bricks or boards under the future bottom so that the surface is level.
It is not easy to cook stainless steel; you need to have at least minimal experience. Then the work can turn out to be more or less high quality. Use argon welding with tungsten electrodes or stainless steel wire.
This will make the seams better and more reliable. In theory, a tank can be welded using a conventional inverter paired with consumable electrodes, but in this case you need to be not just an amateur, but at least a practicing welder.
Join the bottom and one of the walls, make tacks. In general, the entire structure can be assembled using tacks, and then go through again and make normal seams. It’s easier and faster than immediately welding a high-quality seam at home.
Plastic containers
Plastic containers and barrels are increasingly popular because:
- their cost is much less than that of their stainless steel counterparts;
- plastic barrels can be purchased in various sizes;
- their designs do not require additional tightness;
- they do not rust;
- barrels do not require priming or painting the surface;
- The plastic case has a high level of resistance to temperature changes.
Containers can be made of plastic. Food grade plastic has additional benefits:
- high level of strength;
- high frost resistance;
- high level of reflection of ultraviolet rays.
Thanks to these features, the water in such containers does not spoil for a long time.
Most food-grade plastic barrels are equipped with holes the diameter of which allows taps to be installed in them.
Plastic barrels can be vertical or horizontal. Also very popular are Eurocubes, which are placed in a metal frame for additional strength and stability.
Recommendations from the experts
We've collected some tips from professional welders. They will be useful for beginners and garden craftsmen.
It is better to use stainless steel grade 8-12Х18Н10 or AISI 430 08Х17 as a material. These brands are best suited for storing water, including long-term storage. However, it is still better to drain the water before winter.
Before welding a stainless steel water tank, you need to decide on its volume and make a drawing based on this. For a bathhouse, a tank of up to 60 liters will be enough for two or three people. On average, about 20-30 liters of water are needed per person.
If you are cooking a tank for household needs, it is better to stock up on a volume of 100 liters or more. 200 liters is just right for watering gardens and collecting rainwater.
It is better to abandon the idea of welding a water tank from aluminum. It is not easy to make high-quality sealed seams at home. Stainless steel is also not easy to cook, but this task is quite doable. But to work with aluminum you will need experience and a good welding machine.
Depending on the size of the tank and your experience, the entire process can take anywhere from a couple of hours to several days. If you have never cooked before, it is better to practice on unnecessary pieces of metal. After all, stainless steel is far from a cheap material. And you are unlikely to be happy if, out of ignorance, you weld a tank with defective seams, and it turns out to be unusable.
Manufacturing materials
The shower tank can be metal made of galvanized sheet steel, stainless steel or carbon (black) iron and plastic. In order to consciously choose the best options, you should familiarize yourself with the real comparative table of manufacturing materials.
| Material of manufacture | Advantages | Flaws |
Stainless steel | Almost unlimited service life. But this advantage is unlikely to be critical for shower buildings in suburban areas. | Technological complexity of production. Professional tools and the ability to weld with stainless steel are required. Another very unpleasant drawback is the high price. |
Cink Steel | Service life up to fifty years. The tank is lightweight and can be installed even on fragile supporting structures. | Complexity of manufacture, you need to have special tools and skills for soldering. In terms of cost, they occupy an average position. |
Black (carbon) iron | For most cases, the best option both in terms of price and performance. | They require periodic cleaning of the inner surface; the paint layer on the outer surfaces should be restored. |
Ordinary plastics | They are cheap and there are no problems finding containers. | They are afraid of negative temperatures and harsh ultraviolet radiation. |
UV-resistant plastics | The service life is several decades. | Not all users are satisfied with the price. |
Plastic tanks for summer showers
Experienced practitioners advise making a shower tank from used plastic or metal containers. Such containers are easy to find, and in most cases you won’t have to pay anything.
Metal water tanks
For one washable one, up to 40 liters is enough; depending on the number of family members, you can calculate the optimal sizes. For information, it is worth saying that when manufacturing shower tanks, industrial companies base it on a calculation of approximately 20 liters per person; 40 liters allows you not only to take a shower, but also to fully wash yourself without the need to save water.
How to choose a tank for a summer shower
Choosing a location for installation
Almost always, the location of the storage tank depends on the purpose of use.
So clean water needs to be stored in good quality tanks installed directly near the house. This water can be used as drinking water, for washing and washing dishes, etc. Containers can be filled in several ways - from a water supply, a standpipe, a well, etc.
It is more rational to install containers for watering the garden directly on its territory. They can be used as a backup irrigation system or as part of a drip irrigation system.
Tanks for storing rainwater have a narrow direction, so they are installed near the drainpipe. The material from which they are made does not necessarily have to be of high quality. The accumulated water can be used for various purposes - for watering the garden and ornamental plants, washing, washing the car, etc.
How to build a stove with a tank with your own hands?
As noted above, such a stove can be purchased ready-made, but many bathhouse fans make such a device with their own hands. This, by the way, is not difficult, especially since everything necessary for production is sold in the same stores. Now we will tell you exactly how such stoves with tanks are made.
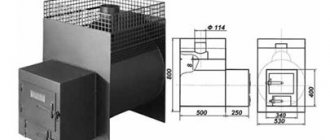
Stage one
. You should start by preparing all the required details. The main part is a pipe, the thickness of which is 50 cm and the length is 150 cm. The pipe should be cut into two parts - 90 cm long (for the combustion chamber) and 60 cm (for the tank).
Stage two
. Next, a stove is made from the pipe. To do this, a rectangular hole 5x20 cm is made in its lower part, which will serve as a blower, then a steel plate 1.2 cm thick is welded above it. A grate is placed in the blower and carefully fixed.
Stage three
. The remains of the pipe will be a niche for the door and combustion chamber, so the latch is attached here. A piece of pipe about 35 cm long is welded above the combustion chamber - it will serve as a heater. It should be taken into account that the distance between the top and bottom must be at least 10 cm. At the end, the back part is welded and a door is constructed.
Stage four
. Kamenka on ? it is filled with pebbles, after which a steel rod is welded - it will prevent the contents from spilling out. A coupling made of a steel tire is attached to the top of the structure. This tire will simultaneously serve as a base for a water container.
Stage five
. A steel circle 0.8 cm thick is welded to the end of the container, and a hole is made in it for the chimney. The bottom of the pipe must be welded to the bottom to prevent moisture from penetrating into the combustion chamber.
Stage six
. The upper part of the tank must be closed with a semicircle made of steel, and a chimney must be welded to the hole. There should be a hole at the top through which water can be poured. Additionally, a lid with a handle is available.
That's it, the homemade oven is almost ready! More detailed information is in the video below.
Video - Making a sauna stove
We make a heat battery ourselves
You have decided that you cannot do without a buffer tank and want to make it yourself. Then get ready to go through 5 stages:
- Calculation of the volume of the heat accumulator.
- Choosing a suitable design.
- Selection and preparation of materials.
- Assembly and leak testing.
- Installation of the tank and connection to the water heating system.
Advice. Before calculating the volume of the barrel, think about how much space in the boiler room you can allocate for it (in terms of area and height). Clearly decide how long the water heat accumulator should replace the inactive boiler, and only then proceed to the first stage.
How to calculate tank volume
There are 2 ways to calculate the capacity of a storage tank:
- simplified, offered by manufacturers;
- accurate, carried out according to the formula for the heat capacity of water.
The duration of heating a house with a heat accumulator depends on its size.
The essence of the enlarged calculation is simple: for each kW of boiler installation power, a volume equal to 25 liters of water is allocated in the tank. Example: if the productivity of the heat generator is 25 kW, then the minimum capacity of the heat accumulator will be 25 x 25 = 625 l or 0.625 m³. Now remember how much space is allocated in the boiler room and adjust the resulting volume to the actual size of the room.
Reference. Those who want to weld a homemade heat accumulator often wonder how to calculate the volume of a round barrel. Here it is worth recalling the formula for calculating the area of a circle: S = ¼πD². Substitute the diameter of the cylindrical tank (D) into it, and multiply the resulting result by the height of the tank.
You will get more accurate dimensions of the heat accumulator if you use the second method. After all, a simplified calculation will not show how long the calculated amount of coolant will last under the most unfavorable weather conditions. The proposed method is based on the indicators you need and is based on the formula:
- Q – amount of heat that needs to be accumulated in the battery, kWh;
- m – estimated mass of coolant in the tank, tons;
- Δt – difference in water temperatures at the beginning and end of heating;
- 1.163 W•h/kg•°C is the reference heat capacity of water.
Tags
for water under the water with its constant water supply. that water can under the water with its source of water. storing water can additional water storage storing water can for water can make a container for the Capacity you will need the container you need there will be a container under Types of containers Capacities from Capacities from Make containers from Varieties of containers case container for water. A tank for an additional water tank of a metal tank is selected a similar tank is required a wooden tank should be If the tank is prepared a tank should be a regular tank for with your own hands with your own hands for with your own hands. with your own hands for with your own hands can with your own hands. with your own hands with your own hands.
literswater supply pumpproducts
Where is a heat accumulator used and how is it designed?
A thermal energy storage device is nothing more than an insulated iron tank with pipes for connecting water heating lines. The buffer tank performs 2 functions: it accumulates excess heat and heats the house during periods when the boiler is inactive. The heat accumulator replaces the heating unit in 2 cases:
- When heating a home with a stove with a water circuit or a boiler that burns solid fuel. The storage tank works for heating at night, after wood or coal burns out. Thanks to this, the homeowner can relax in peace, rather than running to the boiler room. It is comfortable.
- When the heat source is an electric boiler, and electricity consumption is recorded using a multi-tariff meter. Energy at the night rate is half the price, so during the day the heating system is completely powered by the heat accumulator. It's economical.
On the left in the photo is a 400 liter buffer tank from Drazice, on the right is a Kospel electric boiler complete with a hot water storage tank
Important point. Tank - hot water accumulator increases the efficiency of a solid fuel boiler. After all, the maximum efficiency of a heat generator is achieved with intense combustion, which cannot be constantly maintained without a buffer tank that absorbs excess heat. The more efficiently wood is burned, the less it is consumed. This also applies to a gas boiler, whose efficiency decreases in low combustion modes.
A storage tank filled with coolant operates on a simple principle. While the heat generator is heating the rooms, the water in the tank is heated to a maximum temperature of 80-90 ° C (the heat accumulator is charging). After the boiler is turned off, hot coolant from the storage tank begins to flow to the radiators, providing heating for the house for a certain time (the heat battery is discharged). The duration of operation depends on the volume of the tank and the outside air temperature.
How does a factory-made heat accumulator work?
The simplest factory-made storage tank for water, shown in the diagram, consists of the following elements:
- the main tank is cylindrical in shape, made of carbon or stainless steel;
- thermal insulation layer 50-100 mm thick, depending on the insulation used;
- outer skin – thin painted metal or polymer cover;
- connecting fittings embedded into the main container;
- immersion sleeves for installing a thermometer and pressure gauge.
Note. More expensive models of heat accumulators for heating systems are additionally equipped with coils for hot water supply and heating from solar collectors. Another useful option is a block of electric heating elements built into the upper zone of the tank.