It’s impossible to imagine a bathhouse without hot water, and you can’t wash yourself, and you need to put warm water on the heater. Typically, iron containers (tanks) are used for heating, which are heated by heat exchangers or stove heating. And before you make a tank for a bathhouse with your own hands, you need to choose the right design and know the installation methods, which will be discussed in this article.
Today there are three main types, which differ in installation method and heating:
- remote,
- on the pipe,
- built-in
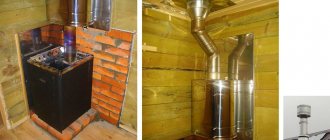
Tank on a pipe
On the pipe
This version of the sauna tank is mounted directly to the pipe that removes smoke from the stove. It plays the role of a heat exchanger and from it the water is heated.
This tank also has positive aspects:
- The heating area, given the height of the pipe, can be large, which helps to quickly heat the water and maintain its desired temperature.
- Another positive argument is security. The installation of tanks on a pipe protects the bathhouse from unwanted leakage of carbon monoxide.
conclusions
All methods of heating water in a bath described in this article are widely used. They are structurally thought out, safe and comfortable. It is only necessary to ensure their high-quality implementation. Like any other water systems, sauna water heaters must be sealed.
The tank for heating water in the bathhouse is installed in one copy. Using one tank with a large capacity, which is designed with a margin, is more profitable than several smaller tanks. In the construction of a bathhouse, we recommend that you read other articles on our website.
Built-in
Built-in tank
This is a kind of budget option. It is placed above the firebox, from which the water is heated. Water is drawn from such a tank directly or the tap can be removed from it in advance. This tank is easy to install - it is installed when laying the furnace.
Now all that remains is to choose the metal from which the tank will be made. The main materials used to make tanks are cast iron, stainless steel, enameled metal and steel. The choice of material also plays an important role in the design of tanks.
Metal
Made of metal
In their own way, such tanks are good, but they still have more disadvantages. The main advantage in choosing such a material is its low cost. The thermal conductivity of the metal is good, so the water will warm up quickly.
If you decide to install a metal tank, then be prepared for constant maintenance. After each washing procedure, it must be completely drained and wiped dry to prevent corrosion, which will directly affect the purity of the water.
Stainless
Stainless steel containers
This is the most popular material for tanks today. And all because it has several advantages over other options.
- When installing a stainless steel tank, you will not need to additionally protect it from moisture.
- Due to good thermal conductivity, the water in such tanks warms up quickly.
- Stainless steel does not undergo deformation even at very high temperatures.
- Increased resistance to corrosion.
Note! Along with all the positive aspects of this material, there is one small drawback - the rapid cooling of water. This is due to the high thermal conductivity of the material.
Material for production
are also considered productive today . This kind of substance has many advantages; it is resistant to changes in temperature and pressure, retains and conducts heat well. It is resistant to rust, corrosion and deformation. Cast iron products for water have similar properties although it is worth noting that they are much heavier in weight, despite the fact that they maintain temperature for a long time and take a long time to build up the required level of heat.
As experience shows, devices have long been widely used in practice, but they also have their own characteristic disadvantages. If you install the container incorrectly, the water will boil faster than the room begins to fill with steam. Subsequently, the steam room produces moist, heavy air, which does not act as effectively on the body as dry steam.
Enameled
Enameled samovar type tank
Also a good option for making tanks. This material is also not susceptible to corrosion, provided proper handling is taken into account. If, due to an accidental impact, a layer of enamel breaks off from the surface, then rust may appear in this place. This can be corrected if you paint the area with heat-resistant paint in time.
The specifics of the material must be taken into account, and before making a tank for a bath, you should think about this method of arrangement so as not to accidentally damage it.
Cast iron
Cast iron container
Until recently, the most popular material for making water tanks was cast iron. It has all the qualities that allow you to maintain high water temperatures for quite a long time.
But gradually the demand for cast iron tanks decreased. First of all, this is due to the fact that heating requires more wood or gas (depending on how the sauna is heated). It is also quite heavy compared to other materials, so installing cast iron tanks and other containers is more problematic.
Diagram of mobile tanks
Mobile containers are much more convenient and practical, especially with constant use. These tanks allow you to install them directly in the washing compartment. But in this case, you should behave with extreme caution, since contact with the tank can lead to burns. This especially applies to families with small children. The use of remote sauna tanks requires the installation of a heat exchanger in the stove, which communicates with the tank through a system of brass or copper pipes.
Stages of work
Welding work
To begin with, you need to finally decide how the water will be heated - with a stove, or with electric heating elements that are mounted in the tank. An important factor such as the number of people may influence the decision-making process. If 50 liters of capacity is enough for one person, then for several people it needs to be made larger - at least 70 liters. This difference in volume affects not only the amount of metal purchased, but also its thickness. In the first case, 0.8–1 mm is enough, and for a tank with a capacity of more than 50 liters you need to purchase metal no thinner than 1.5 mm.
Now let's touch on the installation moment. If the tank is located on a chimney pipe, then it can be quite large and long - up to the ceiling, so the water in it will warm up quickly and evenly. If the water is heated by heating elements, you should not make the tank too large, since the water will take a long time to heat up, which in turn will lead to excessive consumption of electricity.
If you have chosen a cast iron or enamel tank, then these products are purchased ready-made. Let's talk about those that you can make yourself.
Depending on the chosen design, you need to purchase the required amount of material. To do this, you will have to sit with a pencil, drawing a tank and calculating its dimensions. For different shapes of the tank there are different formulas for calculating, just count not the total volume, but only the level to which the tank will be filled.
To work you will need tools and accessories:
- Welding machine (preferably DC).
- Electrodes Ø2.5–3 mm.
- Metal brush.
- Hammer.
- Pliers.
For those who are not professionals in welding, the easiest way is to weld a rectangular (or square) tank and weld elbows into it for supplying and discharging water.
If the tank is mounted on a pipe, then you will need the ability to make a ceiling seam, and not just any seam, but one so that water does not flow out through it. If you are not confident in your abilities, then entrust this matter to a specialist.
Note! To weld stainless metal, special electrodes are required.
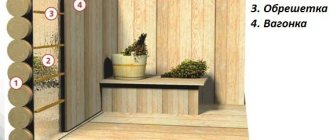
Features of the manufacturing process
The easiest way is to make a container of a rectangular or cubic shape; to work, you only need a grinder with a disk, a measuring stick, several bench clamps and the welder itself. The cut wall blanks are joined in pairs using clamps and secured with welding points or small seam strips.
After the side walls and bottom have been assembled, the stainless steel body is finally assembled with clamps and heated with a blowtorch. As soon as the sliver applied to the metal begins to smoke, you can begin to completely scald all the seams. Upon completion of the work, the welded block must be immediately covered with any heat-resistant, non-flammable material and allowed to cool slowly for a couple of hours.
Connection options
Connection diagram
Depending on what conditions you decide to create in your bathhouse, there are several options for connecting containers.
- The simplest option is to locate the tank directly above the stove or on a pipe. To do this, you will need a conventional tank design and outlets with taps.
- If water supply is supplied to the bathhouse, then the best option would be to install a coil in the stove. In this case, water will be constantly supplied under pressure, and, passing through the coil, will be heated to the desired temperature.
If we talk about the second option, then the correct connection will be required. Ideally, the heating circuit works as follows:
- The water, warming up in the register, rises, and through the built-in taps it can be used for washing.
- When the unused liquid cools, it falls back down, where it is again heated to the required temperature.
Connection instructions
- The container is mounted in the steam room and connected to the coil using pipes.
- For good circulation, the upper outlet from the tank is connected to the upper coil. Accordingly, the lower one with the lower one.
- A safety valve is installed at the cold water inlet.
Choosing a design
To date, three main types of construction have emerged that form such a system as a tank in a bathhouse.
Built-in tanks
In this option, the container for heating water is built directly into the body of the sauna stove and the liquid is heated from direct contact of its walls with the flames and outgoing high-temperature flue gases. What's good about this option:
- Very efficient use of thermal energy. Fast heating and the ability to replenish the supply of hot water - due to the location of the container in the zone of direct generation of thermal energy - furnace and near-furnace.
- Compactness of the system. It can be placed even in small baths, while the size of the stove increases, to a greater extent, in the vertical projection.
- Simple and, as a result, inexpensive design.
- Water can be drawn either from the upper open neck or from the tap.
Among the disadvantages it is worth noting the following:
- Due to direct contact of the surface of the container with an open flame and flue gases, the material from which it is made must be heat resistant, resistant to scale formation and temperature deformation. As a rule, stainless heat-resistant steels and cast iron have such qualities;
- A cast iron tank for water in a bathhouse must have walls about 5 mm thick, which determines its weight, which negatively affects the installation and maintenance of the system;
- Bath tanks placed directly on the stove increase its weight and, if it increases dramatically, they oblige to reconsider the requirements for the foundation of the stove;
- Placing an open tank on the stove makes it difficult to obtain a dry-steam bath mode. A steaming cauldron will create conditions more reminiscent of an oriental bathhouse - hammam.
Mounted tanks
This design is also called a samovar-type tank for a bath. The essence of the design is as follows. The outgoing flue gases have a high temperature, about 400 - 470 degrees Celsius, so if you place a container with water enclosing it in the first third of the chimney, then as a result of heat exchange processes the liquid will heat up quite quickly, and the gases, in turn, will cool down somewhat. What positive aspects does this design provide:
- The weight of the furnace and, accordingly, the requirements for its base are reduced;
- The oven itself is made more compact, especially in vertical projection;
- Reducing the smoke temperature has a beneficial effect on overall fire safety when the chimney passes through the ceilings and roof;
- By placing the container at a certain elevation, it is possible to achieve its reliable supply even to a certain distance, for example, to the washing compartment, exclusively by gravity. This makes it very easy to completely empty the system of water to prevent it from freezing during the cold season.
By the way! With this arrangement, you should be concerned about the convenience of filling the tank. Moreover, such a system, for objective reasons, cannot have greater capacity.
Remote tanks
In this case, it is not the surface of the tank that directly contacts the combustion space area, but the heat exchanger, through which water naturally circulates due to thermosiphon processes, which, however, does not exclude the possibility of using forced circulation through pumps.
In this case, it becomes possible to completely remove the water container outside the steam room and use one of the technical areas to place it. The absence of an open container with steaming water has a beneficial effect on the possibility of more flexible control of the microclimate of the steam room, up to the creation of the conditions of a classic dry steam bath. In addition, the separate placement of the tank is more rational during its installation and, especially, maintenance and repair.
A word from Experienced! A remote tank for a bath, due to its location in a normal temperature zone and the absence of the influence of flue gases and flames, does not require the use of special heat-resistant steels. Naturally, the corrosion vulnerability of structural non-alloy steel remains relevant, but monitoring and repair of containers becomes simpler and more convenient, and the cost is reduced by several orders of magnitude. The absence of the need to use massive cast iron has a positive effect on the weight of the product.
If the remote tank for hot water in the bathhouse is located in a technical room, then a solution to thermally insulate it from the surrounding space in order to maintain a sufficient temperature of the heated liquid seems quite rational and necessary.
How does it work
Boiler with heat exchanger and tank
The filled tank is heated by a coil, and when the hot water drops below the level, the valve will open and cold water will fill the required level.
If the hot water is not drained for some time, the safety valve will operate, causing the pressure in the tank to drop.
With the right choice of material and proper connection, the required level of hot water will be constantly maintained in your bath, and washing will be as comfortable as possible.