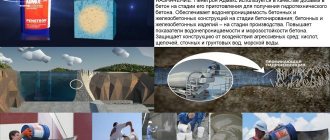
The deep penetration composition Penetron is used for waterproofing the thickness of concrete, reinforced concrete structures and cement-sand plaster layers of a grade of at least M150. It is applied to thoroughly moistened surfaces that have been previously cleaned of materials that would prevent the penetration of Penetron components into concrete. The use of impregnation significantly increases the water resistance of concrete, and also eliminates defects and microcracks with an opening width of up to 0.4 mm. Can be used on any side of the structure, regardless of the direction of water pressure.
Impregnation to reduce water permeability of concrete and porous surfaces
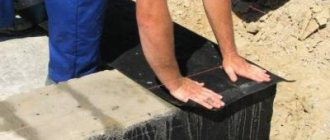
Preparing the concrete surface before using the Penetron system
Clean the concrete surface from dust, dirt, oil products, cement laitance, efflorescence, shotcrete, plaster layer, tiles, paint and other materials that prevent the penetration of active chemical components of the Penetron system materials.
Clean concrete surfaces using a high-pressure water jet or other suitable mechanical method (for example, a wire brush). Treat smooth and polished surfaces with a weak acid solution and rinse with water for an hour. Remove excess water formed on the horizontal surface after using a high-pressure vault jetting unit using a special vacuum cleaner.
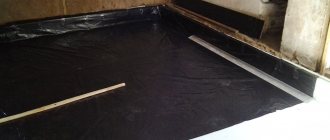
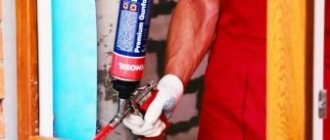
Before applying penetrating waterproofing, the surface must be thoroughly moistened: the process will go faster with enough water
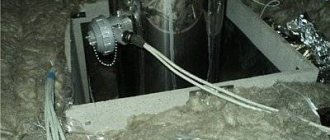
Along the entire length of cracks, seams, joints, interfaces, abutments and around the communications entry, make U-shaped fines with a cross-section of at least 25x25 mm. Clean the fines with a brush with metal bristles. Remove the loose layer of concrete (if any).
Use a jackhammer to cut cavities of pressure leaks to a width of at least 25 mm and a depth of at least 50 mm with an expansion inward (if possible in the shape of a “dovetail”). Clean the internal leak cavity from loose, peeling concrete.
Attention! Before applying Penetron system materials, it is necessary to thoroughly moisten the concrete until the concrete structure is completely saturated with water.
The procedure for installing the material yourself
It is quite possible to insulate the external walls of a house with polystyrene foam yourself. At the same time, you will have to spend a lot of time to complete the work. In general, do-it-yourself installation of the material occurs in the following order: the walls are first prepared for the installation of insulation, then foam is glued onto the leveled surface and strengthened with fastening material.
Elements of auxiliary reinforcing mesh are mounted on it, then perforated corners are installed. At the final stage of work, the main reinforcing layer is applied and the final finishing is performed. Thus, the work performed is divided into the following stages:
- preparatory – consisting in repairing and leveling the base;
- strengthening the starting profile;
- gluing foam sheets;
- fixing the insulation with fastening material;
- strengthening corners with strips of reinforcing mesh;
- installation of perforated corners;
- performing basic reinforcement;
- final finishing.
All work should be carried out at a positive ambient temperature, and it is unacceptable to leave the foam exposed to direct sunlight. Ultraviolet radiation causes the material to decompose. A well-installed coating will not only last for several decades, but will also create a pleasant microclimate inside residential premises. If the load-bearing elements are made of concrete, corrosion of the steel reinforcement is prevented.
First we prepare the surface of the walls
Preparing the surface for installing insulation is a rather labor-intensive and time-consuming operation. The service life and operational efficiency of the heat-insulating coating directly depend on the quality of its implementation. To ensure its maximum adhesion to the surface, it must be thoroughly cleaned of dirt, leveled, primed, and so on. The procedure is as follows:
- Before starting work, all elements that may interfere with its implementation, such as air conditioners, spotlights, and ventilation grilles, are removed. If there are moldings, they are carefully knocked down, and their location is cleaned.
- A visual inspection of the surface is carried out to determine the presence of coating defects. Detected cavities and cracks are covered, protruding elements are cut off and leveled. The difference in the wall surface should not exceed fifteen millimeters.
- Oil paint significantly impairs the quality of adhesion of mating surfaces, so it must be removed. The old plaster can be left if it holds well, but all uneven surfaces will be removed.
- At the final stage of preparing the walls, their leveled surface is covered with a primer. Almost any primer can be used. It is applied with a spray or paint brush.
To improve the adhesive properties, the surface of the insulation is made rough. To do this, cuts are made in the form of grooves using a knife blade. For the same purpose, you can use a metal brush or a roller with needles.
Convenient to use the starter profile
When working on applying a thermal insulation layer, it is convenient to use a starting profile. It is a base in the form of a strip for attaching the bottom row of foam sheets. The plank encircles the entire perimeter of the building and prevents the insulation from moving during the curing of the adhesive composition. If a galvanized corner of the required size is not available, it can be obtained by cutting off one wall of a common U-shaped profile.
Installation of the starting profile is carried out according to the markings previously applied using a building level along the bottom of the wall. To make work easier, you can tighten the nylon cord. Anchors or dowels are used as fastening materials, butt joints are fixed with angles.
Note that the starting profile made of galvanized metal is very inconvenient for mice. If you neglect the installation of this element, rodents can easily penetrate the insulation through its lower end, make their nests there and damage the thermal insulation.
We glue the insulation according to the rules
To install the insulation, you need to prepare an adhesive composition. The said glue will need to be used for a fairly limited time so that it does not have time to dry, so only the required amount of glue is prepared at the work site. To do this, water is poured into a container of suitable volume and the adhesive mixture is poured into it. The solution is stirred with a construction mixer until the composition is completely homogeneous. Ready-to-use glue should not contain lumps. Methods for applying the adhesive composition depend on the degree of evenness of the wall covering. If the wall is flat, without significant differences in height, the glue is placed directly on the foam sheets. To prevent the formation of air pockets, the composition is applied in intermittent strokes along the perimeter line of the insulation, not reaching its edge about three centimeters. Several patches are randomly located in the central part. With this method of application it becomes more difficult to work, as the weight of the material increases.
If there is a significant difference in height on the wall, the insulation sheets will not adhere well to it, worsening the thermal insulation qualities of the installed layer. In this case, the glue is applied directly to the surface to be treated. By decreasing or increasing the thickness of the adhesive solution, unevenness in various areas of the coating is corrected.
After applying the adhesive to the foam sheet, it is applied to the installation site with a sideways shift of about three centimeters. It is then pressed against the adjacent sheet, and any excess glue that has protruded is immediately removed. The construction level controls the correct installation of each insulation element.
Work begins from the bottom of the building structure with sequential progress to the top. The insulation sheets are laid as tightly as possible, the distance between them should not be more than two millimeters. If the gap is too large, it is sealed with thin strips of polystyrene foam or polyurethane foam.
For better adhesion, each subsequent row is laid offset from the previous one; it is best to place them in a checkerboard pattern. Butt joints should be located under and above door or window openings. At the corners of building structures, the insulation sheets are connected using cut teeth, and the protruding parts are cut off with a sharp knife.
When choosing an adhesive for installing insulation, certain difficulties arise: the range of materials is wide, and the cost of adhesive for a large volume of work varies significantly. To solve the problem, you can purchase one bag of different materials and glue prototypes of the same size to the insulated structure. After the glue has completely hardened, you need to slowly tear the samples from the wall with your hands. The glue that is good is where the rupture occurred in the structure of the insulation itself. In practice, it turned out that one of the budget options turned out to be the best!
We fix the sheets with dowels
After the adhesive composition has completely cured, which occurs within three days, the foam sheets should be securely fixed with dowels. This fastening material is best used from elastic plastic with a wide umbrella cap. The dowels are secured using nails or screw pins. To prevent heat leakage, plastic elements must be used.
The sheets are fixed with dowels in all four corners of the sheet and at the geometric center point. In general, one square meter of insulation requires six to eight fasteners. To install them, holes are pre-drilled that exceed the length of the dowels by approximately one and a half centimeters.
Then the pins are screwed into the holes cleared of dust. The installed dowels should not rise above the heat insulation layer to a height of more than one millimeter; they should be positioned strictly perpendicular to the surface of the foam plastic.
We install elements of the auxiliary reinforcing mesh
Auxiliary mesh layers increase the reliability of the structure. The functional purpose of the auxiliary reinforcing mesh is to prevent the occurrence of cracks in the corners of door and window openings. For this purpose, mesh elements measuring 200-300 mm are installed in the indicated locations.
In addition, to prevent the destruction of the walls from below to a height of about two meters, an additional layer of protective mesh is laid. The methods for laying it are no different from installing the main reinforcing layer, that is, during installation, the material is embedded in a fixing compound and pressed tightly against the base on which it is applied.
We install perforated corners
The installation of perforated corners is carried out in order to strengthen the corner elements of the building and the decorative elements of its decoration. Perforated corners with pieces of reinforcing mesh attached to the edges are made of aluminum or plastic.
The corners coated with adhesive are pressed against the foam with a metal spatula and thus secured. Any excess glue that has come out is smoothed out using a spatula. Surfaces are controlled using a building level. Apply the main reinforcing layer
After securely fastening the perforated corners, the main reinforcing layer is applied. It is performed using a durable facade mesh made of fiberglass. It practically does not stretch and perfectly resists the effects of aggressive chemical environments. The technology for applying the main reinforcing layer is as follows.
The facade mesh is cut into strips corresponding to the height of the wall. A special solution is applied to the insulation with vertical strokes, which is prepared in exactly the same way as adhesive, but differs from it in chemical ingredients. A metal grater is well suited for applying the composition.
The main reinforcing layer is embedded in the mortar mass and pressed against the wall surface with a metal tool. The facade mesh is carefully smoothed from the center to the edges; it should not be visible on the surface. Without waiting for the solution to harden, another layer of façade mesh is applied and also completely covered with a fixing compound. On a flat surface it is preferable to use a hard mesh for reinforcement; at corners and turns - a soft one.
The next day, all uneven surfaces are removed using putty. Painting it or finishing it with decorative plaster will help give the structure an attractive appearance. Decorative elements of the façade can be installed on top of the insulating layer.
Dear reader! Your comments, suggestions or feedback will serve as a reward to the author of the material. Thank you for your attention. The following video has been carefully selected and will definitely help you understand what is presented.
Preparation of PENETRON composition
Mix the dry mixture with water in the following proportion:
- 400 grams of water per 1 kg of Penetron material
- 1 part water to 2 parts Penetron material by volume.
Pour water into the dry mixture (not vice versa).
Add water to the dry mixture. Not the other way around
Mix for 1-2 minutes by hand or using a low-speed drill. The type of prepared mixture is a liquid, creamy solution. Prepare a quantity of solution that can be used within 30 minutes. During use, stir the solution regularly to maintain the original consistency.
Mix with a drill at low speed
Attention! Re-adding water to the solution is not allowed.
Briefly about the main thing
Penetron is a deep penetration waterproofing mixture with a service life of 75-100 years.
The effectiveness of the solution reaches 90-110 cm, minimum 30-40 cm.
The main components are Portland cement, fine-grained quartz sand and active additives.
Along with Penetron, the manufacturer’s line includes a water repellent for solution, a sealant and a filler for gaps with cracks, including instant setting.
Ratings 0
Waterproofing of concrete elements and structures
Attention! Thoroughly moisten the surface before applying Penetron system materials.
Use the Penetron material to eliminate and prevent capillary filtration of water through vertical and horizontal (including ceiling) concrete surfaces.
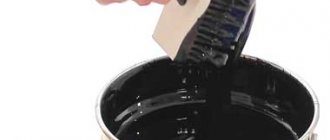
After preparing the surface, apply a solution of the Penetron material in two layers with a synthetic fiber brush or using a mortar pump with a spray nozzle. Apply the first layer of Penetron material to wet concrete. Apply the second layer on top of the fresh but already set first layer.
Apply the composition with a brush with synthetic bristles
Before applying the second layer, moisten the surface.
Attention! The application of the Penetron material solution should be carried out evenly over the entire surface, without gaps.
The consumption of Penetron material in terms of dry mixture when applied in two layers ranges from 0.8 kg/m2 to 1.1 kg/m2. An increase in the consumption of Penetron material from 0.8 kg/m2 to 1.1 kg/m2 is possible on uneven surfaces with significant cavities or potholes.
Attention! All cracks, joints, seams, junctions, service entries should be insulated using Penecrit material. If there are pressure leaks, use Peneplag or Waterplug material.
The mechanism of action of penetrating waterproofing "Penetron"
Calculation of the required foam thickness for external wall insulation
For high-quality insulation of the house from the outside, it is necessary to correctly calculate the dimensions of the foam sheets. If the thermal insulation layer is too thin, the walls will freeze in extreme cold. This will lead to a shift of the so-called dew point into living spaces, at which moisture-saturated vapor is converted into water. As a result, condensation will be deposited on the internal surfaces of windows and rooms, and mold and mildew may appear.
It is clear that the thinner the walls of the house, the thicker sheets of foam plastic should be used to insulate it. However, it is not economically feasible to install an excessively thick layer of heat insulation, since you will have to spend money on purchasing more expensive material. In addition, in this case, the dew point may be inside the thermal insulation layer, and it will quickly become unusable. As a result, for high-quality thermal insulation of the house outside, the optimal thickness of the insulation should be calculated.
The optimal thickness of the material depends on many factors. It is necessary to take into account the climate zone in which the building is located, the thickness of its walls, and the material from which they are composed. An important parameter is the thermal resistance of external walls; this value is constant for each climatic zone, and its value is available in standard tables.
In turn, the thermal resistance of the insulation is determined by dividing the thickness of its layer by the thermal conductivity coefficient, which is also a tabular value. From here you can determine the optimal thickness of foam plastic, which is necessary to insulate a particular building in a given climate zone. For example, for the northwestern region, the value of the thermal resistance of the walls should not be less than 3.08 m2*K/V.
For example, for a house made of one and a half ceramic bricks, this parameter is 1.06 m2K/V. The difference in values must be compensated using insulation. Thus, in this case, the value of its thermal resistance should be 2.02 m2K/V (3.08-1.06). The thermal conductivity of high-quality polystyrene foam is 0.039 W/(m K), multiplying this value by the calculated value of thermal conductivity (2.02), we obtain the required thickness of the insulation sheet (2.02*0.039=0.078), that is, the foam plastic should be seventy-eight millimeters thick .
When planning to insulate a house with your own hands, it is important to know what the sizes of polystyrene foam are. As we have already found out, the most commonly used material is 50 and 100 mm thick. The dimensions of foam plastic for insulating walls of the named thickness are most often: one side - 1000 mm, the second - 500, 1000 or 2000 mm.
Waterproofing brick and stone walls
When waterproofing structural elements made of brick or stone, the surface must be plastered and treated with a solution of the Penetron material. The following conditions must be met:
- Plastering should be done with a cement-sand mortar of a grade not lower than M150. The use of lime mortars and gypsum plaster is unacceptable.
- Plastering should only be done using a masonry mesh (mesh size 50×50 mm or 100×100 mm) firmly fixed to the surface. The gap between the masonry mesh and the brick base must be at least 15 mm.
- The thickness of the plaster layer must be at least 40 mm.
- The structure of the plaster layer should be dense, without air gaps. It is recommended to carry out plastering continuously to avoid the formation of a large number of working seams.
- Leave plastered surfaces for at least 24 hours before applying the Penetron material (according to the requirements for plastered surfaces).
Brick walls and walls made of foam concrete are coated with impregnation after plastering
The consumption of Penetron material in terms of dry mixture when applying two layers is 0.8 kg/sq.m.
Attention! Insulate all cracks, joints, seams, junctions, service entries using Penecrit, pressure leaks with Peneplag or Waterplug materials.
Safety precautions
When working with Penetron, follow these safety rules:
- wear rubber gloves;
- do not forget about safety glasses, since Portland cement can negatively affect your eyesight and the skin of your hands;
- When mixing the mixture with water, do not allow it to come into contact with the skin and eyes; rinse with plenty of water if this happens.
Now you know in what cases Penetron is used, and you have briefly read the instructions for its use. This will make it easier for you to choose from a construction supermarket when you plan this or that type of work.
Care of the treated surface
Protect treated surfaces from mechanical influences and negative temperatures for 3 days. Make sure that the treated surfaces remain damp for 3 days; there should be no cracking or peeling of the coating.
The following methods are usually used for moistening: water spraying, covering the concrete surface with plastic film.
When caring for a surface treated from the water pressure side, it is recommended to increase the moistening period to 14 days.
The composition gradually penetrates deep into the concrete. Approximately 90 cm
The principle of action of the drug.
Penetron consists of the following elements:
1.high quality Portland cement, which has special properties.
2.quartz sand.
3. chemical elements that improve the quality of the solution and modify the product. These components, seeping through the pores of concrete, form crystals that do not dissolve.
The crystals fill all the voids, thus blocking the path for water particles to penetrate. The crystals allow vapor and air molecules to penetrate inside, and the base continues to breathe. By protecting the surface from dampness and moisture, the service life of treated structures increases.
When processing products, a large amount of material is not required, but the layer must be sufficient to protect basements and the surface of the foundation from water.
Attention! Treated concrete forms a stone material that guarantees maximum protection.
The Penetron layer on the surface is approximately three millimeters, it is highly durable, is not washed away by strong water pressure, so moisture will not seep inside.
Application of decorative coating
It is recommended to apply painting and finishing materials to the surfaces of structures treated with Penetron system materials after 28 days. The holding time can be reduced or increased depending on the requirements of a particular type of finishing material for the maximum permissible moisture content of concrete.
Attention! Before applying a decorative coating, surfaces treated with Penetron system materials must be cleaned mechanically to improve adhesion using a high-pressure water jet (for materials applied to wet concrete) or a brush with metal bristles (for materials applied to a dry concrete surface).
Basalt wool is a stone that retains heat
Recent publications
- What modern finishing materials are suitable for decorating the facade of a building?
- Extruded polystyrene foam: selection of material for home insulation and installation process
- Which insulation is preferable for a ventilated facade?
- The main reasons for using vapor barrier when insulating with polystyrene foam
- Bark beetle plaster - the original appearance and color of the facade of your house
© 2021 All about the facade, its finishing, plaster and much more on 1PoFasadu.ru · The site is dedicated to facades, or rather its external decoration, cladding and everything connected with it. This website uses cookies in order to offer you a more personalized and high-quality web service. By clicking "Accept", you agree to the use of ALL cookies. Cookie settings ACCEPT Privacy and Cookie PolicyClose
Sources
- https://FB.ru/article/301453/kakoy-budet-imet-rashod-penetron-na-m-norma-rashoda-osobennosti-primeneniya-i-naneseniya
- https://utepleniedoma.com/materialy-dlya-utepleniya/penetron
- https://uteplitel-x.ru/gidroizolyaciya-penetron-rashod-harakteristiki/
- https://baniwood.ru/pronikayushhaya-gidroizolyaciya-penetron-instrukciya-po-ispolzovaniyu.html
- https://stroy-podskazka.ru/gidroizolyaciya/pronikayushchaya-penetron/
- https://postroibanu.ru/raznoe/penetron-instrukciya-po-primeneniyu.html
- https://www.tproekt.com/penetron-gidroizolyatsiya/
- https://FB.ru/article/249912/penekrit-instruktsiya-po-primeneniyu-rashod-otzyivyi
- https://SamoDelino.ru/fasad-i-uteplenie/tolshchina-penoplasta.html
- https://1pofasadu.ru/uteplenie/tolshhina-penoplasta-dlya-utepleniya-sten-snaruzhi.html
[collapse]
Advantages
Penetrating waterproofing, and Penetron in particular, have many advantages. Let's name some of them that influence the choice in his favor.
- It is possible to increase the strength and protect already erected structures from moisture without destroying them or changing their design.
- After using Penetron, the service life of a concrete structure increases, and its waterproof properties remain unchanged.
- It has the ability to heal newly formed small cracks.
- The degree of water resistance increases to W20. This is the highest figure for concrete.
The technological process of preparing and applying the mixture is quite simple. It is important to follow the instructions and all the manufacturer’s recommendations in order to protect the structure from water exposure as effectively as possible.
Quality control of work performed
First of all, you need to carry out a thorough inspection. The surface must be smooth, without gaps. 24 hours after waterproofing, there should be no signs of peeling on the surface.
When 28 days have passed since the waterproofing of concrete and reinforced concrete objects, the quality of the work performed is checked.
Using the AGAMA device, the water resistance of concrete is determined, this happens in a quick way that eliminates any destruction. The section “Regulatory and Technical Documentation” describes all possible options for carrying out such procedures.
The OMSH-1 device carries out testing with shock pulses. With its help, the strength of the structure is established. This method is accelerated, it eliminates the possibility of any destruction during testing.
Absolutely all changes are recorded in the technical control journal from the very beginning of the work until 28 days after its completion.