An integrated approach is important in everything: when every detail receives due attention. The process of insulating a bathhouse was no exception. Proper insulation of the ceiling is of no small importance. Not the roof, but the ceiling: its thermal insulation not only prevents heat from escaping, but also protects the ceilings from damage as a result of the formation of excess moisture. (For insulation of bathhouse roofs, when necessary, see here).
From physics course we know that heat always rises. Therefore, if you take a good approach to insulating the walls and floor, but do not insulate the ceiling, the bathhouse will not keep warm. Don’t forget about the features of insulating bath walls made of different materials: wood, brick, blocks. Various types of materials are used for internal and external thermal insulation; foil and insulation technology between the crowns, used for timber baths, are popular.
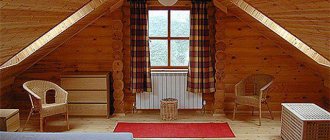
Now the market offers a variety of modern heat-insulating materials: from rolls to tiles; bulk insulation is no less popular. But traditional means for insulating baths and ceilings in particular do not lose their fans. This is explained by the fact that classic natural materials are distinguished by their environmental friendliness and the absence of allergic reactions to them . And such a requirement is not surprising: since the bathhouse is intended not only for hygienic water procedures, but also has health benefits.
A significant advantage is the low cost of insulation made from natural materials, and in some cases the possibility of obtaining them completely free of charge.
This article will be devoted to the use of clay and its mixtures with other materials (insulating the ceiling of a bathhouse with clay and sawdust is especially popular on this list).
Planning work
Before you buy materials and take up tools, you should carefully plan your actions.
A clearer understanding of the matter will save you from annoying mistakes and the need to redo everything in the future. Wooden ceiling insulation scheme
The first question is: is it possible to insulate the ceiling in a bathhouse yourself? Or should we entrust this matter to a team of builders? The process of insulating the ceiling itself is not something complicated, so it is not difficult to do it yourself, even without much experience in repair and construction. The main thing is to carefully follow the technology and approach the matter responsibly.
The second question is: what exactly needs to be done? Insulating the ceiling in a cold bath consists of three stages:
- vapor barrier;
- thermal insulation;
- waterproofing.
The result should be a kind of “layer cake”, the bottom layer of which is the ceiling covering, and above it, vapor barrier, thermal insulation and waterproofing are located sequentially from bottom to top. More details about why this is necessary and how to do it will be discussed below. Now it's time to think about the choice of materials.
Example of a ceiling insulation scheme
Advice from professionals
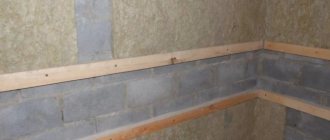
- It is better to hem the beams with tongue and groove floor boards. The material with the selected quarter will also work. The boards must be smooth and well dried.
- Nails should not be driven straight into the board, but at a slight slope, the direction of which should be different for adjacent nails.
- All wooden structural elements must be pre-treated with specialized solutions that will increase the fire safety level of the material and protect it from insect attacks and mold development.
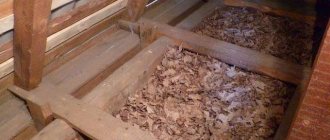
- The outer side of the ceiling in an unused attic is covered with dried sawdust, the layer thickness of which should be from 15 to 20 centimeters. Either a vapor-tight material is installed on top, or a layer of ash or waste slag is backfilled. This layer will serve as a replacement for film. For thermal insulation of the ceiling in a bathhouse, this option is one of the most recommended.
- The ideal option would be to install an insulating layer during the construction of a bathhouse or residential building. If at this stage it was not possible to carry out these measures, you can always take up insulation during the operation of the building.
- If the ceiling is built on the basis of wooden logs, you can resort to thermal insulation using bulk materials that are light in weight. One such material is sawdust. When using them, you need to take into account an important nuance - they cannot be used to insulate buildings with residential or attics used for storing things.
We invite you to familiarize yourself with a bathhouse made of gun carriage, polystyrene concrete, polycarbonate, and tongue-and-groove boards
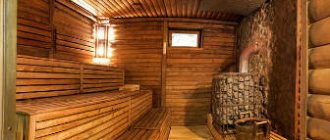
For the proper functioning of the bath, it is very important to maintain the temperature regime, to create which it is necessary to provide high-quality thermal insulation of the room. In this case, insulating the bathhouse ceiling with your own hands plays an important and special role, since it is poor thermal insulation of the ceiling that causes the loss of precious heat
Bathhouse with a self-insulated ceiling
And cold walls will become hotbeds of steam condensation, which can lead to the development of pathogens and negatively affect human health. In this article we will try to explain in as much detail as possible how to avoid these problems and competently carry out the process of insulating the ceiling surface of a bathhouse, and in conclusion we will watch the video in this article.
High-quality insulation of the ceiling in a bathhouse depends on the roof structure itself, which can be divided into two types: buildings with an attic ceiling and those without an attic. Thus, a feature of the attic ceiling is the fact that the heat-insulating material is installed in it during the construction process, and the air flow will be obstructed by a fairly thick ceiling covering.
Selection of building materials
If you decide to build a building made of wood, then you will need the following materials:
- A square beam with a standard size of 15x15 cm or 18x18 cm. Also suitable with dimensions of 20x20 cm.
- Floor covering board with parameters 15x5 cm, length – 4 m.
- Cladding board for arranging ceilings and walls. A lining with a width of 10 cm and a thickness of 2 cm is suitable.
- Vapor barrier material. Films are usually used. They come in two types: polyethylene and polypropylene. They are also divided into single-layer and multi-layer. It’s up to you to decide which type to use in building a bathhouse.
- Waterproofing material. The rolled variety is suitable for baths. For example, roofing felt.
- Insulation for the ceiling. This can be basalt or glass wool, slag wool, ecowool, expanded clay, sawdust, sprayed polyurethane foam, cork boards, extruded polystyrene foam. Mineral wool is considered one of the most common options.
- Sheet asbestos. It will be needed to sheathe wooden walls next to the stove structure and chimney. Thanks to this, high temperatures will not be able to destroy the wood.
- Cement, crushed stone, sand and water are all that is needed to build a reliable foundation.
- Material for roof installation. The choice depends on personal preferences, financial capabilities and the need to maintain a certain style. For roofing, you can use slate or euro slate, metal tiles, flexible bitumen shingles, rolled material, shingles, polycarbonate and even straw. The main thing is that the finished roof fits into the overall appearance of the site.
- Insulation for the space between the rows: jute, tow, moss.
There is no need to purchase materials in advance. If stored improperly, timber can deteriorate: mold, rot, and fungus will appear. It is better to purchase it immediately before starting work.
Recommendations and common mistakes
Often, insulation of ceilings and walls is performed without an additional layer of vapor barrier. As a result, a huge amount of water vapor penetrating through the ceiling from inside the bathhouse is absorbed by sawdust. During the cold season, condensation freezes and often flows through the ceiling into the bathhouse.
The second mistake is not preparing the sawdust deeply enough before laying the insulation on the bathhouse ceiling. As a result, the material decays and sometimes rots.
Advice! If you don’t want to bother with processing sawdust, you can replace it with more effective sunflower husks. It does not rot, does not cake and does not lose its properties, even if a vapor barrier has not been laid on the ceiling of the bathhouse.
The most effective material is considered to be birch bark or birch bark; it is laid on the ceiling with whole leaves, the outer part down, towards the inside of the bathhouse. Such insulation does not require any preparation at all and can last at least two decades.
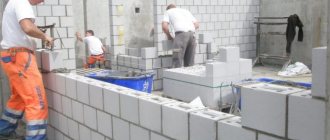
Choosing material
When purchasing a construction gasket, take into account the technical properties of the raw materials and look at the integrity and quality of the block itself. There are a number of mandatory and additional criteria.
Photo from the site Stroiplaneta.com.ua
The first include:
- environmental friendliness;
- high moisture resistance;
- thermal conductivity;
- the presence of antifungal and antibacterial impregnations;
- ability to withstand loads without deformation;
- durability.
These requirements apply to most building materials for aquazones. But consider other characteristics:
- compatibility with other finishing elements;
- water-repellent properties;
- compliance with sanitary standards and fire safety regulations.
The thermal conductivity index affects which layer the sheet will be laid. Correct insulation of the ceiling in a bathhouse with a cold roof with your own hands depends on taking into account the ergonomic properties of the gasket.
Photo from the site Ural-him.ru
The origin of the material is especially important:
Each of them has its own advantages and disadvantages. Folk remedies, mostly of natural origin, will help to insulate the ceiling on top of the bathhouse. Their main advantage is safety during use.
Photo from the site M.prom.inforico.ua
Types of roofs for baths, their advantages and disadvantages
The design of a bathhouse roof usually includes one or two slopes.
A bathhouse with a pitched roof is a simple and budget option. Typically, this type of roof is chosen for a summer or small bathhouse. The main advantage of a pitched roof is the low cost of construction.
A gable roof is the most common type of roof. It is chosen if the bath area is more than 12 square meters. This roof looks more aesthetically pleasing and has high functionality.
If the bathhouse is an extension to the house, then the best choice is a pitched roof. If you want to make a spacious attic or additional living space, then choose a gable roof.
Below are photos of bathhouse roof projects:
How to insulate a bathhouse ceiling inexpensively
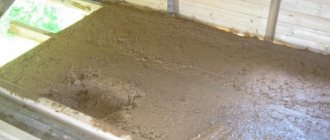
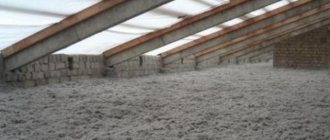
The most economical, but labor-intensive option for insulating the ceiling in a bathhouse is the use of sawdust, clay and sand. Roofing felt or isolon is laid in the attic with an overlap of at least 10 centimeters.
Then a thick layer of sawdust of at least 20 centimeters is poured, and the top is insulated with earth or clay. It is better to take sawdust from carpentry, as the shavings are drier and lighter.
The use of mineral wool is also considered one of the inexpensive ways to insulate the ceiling.
The presence of an attic is not necessary. The main thing is the presence of floor beams on which the material can be attached.
Thus, we can conclude that not all insulation methods are expensive and require special training. Subject to the availability of high-quality material, as well as compliance with technological recommendations, you can be sure that the necessary heat in the premises will be maintained.
Hemming of floor beams
Work related to how to insulate a ceiling in a private household with sawdust should begin with filing the ceiling; it is performed in a certain sequence:
- Prepare boards approximately 2.5-3 centimeters thick - this parameter depends on the distance between the beams. It is desirable that the lumber be tongue-and-groove or with a quarter, and certainly planed and dry, even if their cost is higher than unplaned edged products.
- On top of the assembled vapor barrier layer, boards are attached solidly with nails 10 centimeters deep or screwed with screws 5-6 centimeters long, 2 pieces at each fixation point. In this case, the nails are driven in at an angle relative to the wooden plane. It is necessary to ensure that the direction of the adjacent nails driven in does not coincide, and then the fastening will be strong and most reliable.
- Before starting installation work, boards and beams must be treated with special compounds - antiseptic and fire retardant. This will protect the wood material from fungus and various pests, and will also help reduce its flammability.
The relevance of using sawdust for thermal insulation
Current insulating materials are constantly being improved; moreover, more and more new thermal insulators appear on the market every year. But technological progress inevitably leads to rising prices. Often people save money for many years to repair their home (including insulation) or even take out a loan from a bank. And if we remember what materials our ancestors used to insulate walls and roofs, we can come to the conclusion that the “old-fashioned” methods are still relevant and effective. At the same time, it is difficult to predict what the condition of, say, polyurethane foam will be after 20 years of operation. But the sawdust has successfully passed the test of time.
Using sawdust as insulation
So, the main advantages of insulating the ceiling with sawdust include:
- widespread dissemination of this material;
- symbolic price;
- environmental cleanliness;
- extreme ease of installation;
- long service life.
Moreover, the savings here consist not only in reducing capital investments, but also in caring for natural resources, which contributes to a significant improvement in the environment and a reduction in the cost of heating a home.
Sawdust prices
sawdust
How to make sawdust
Modern thermal insulation materials
Table. Prices for popular insulation materials.
| Type of heat insulator | Price, per 1 m² (in rubles) | Installation cost, per 1 m² (in rubles) |
| Styrofoam | 100 | From 70 |
| PPU | 350 | 300 |
| Glass wool | 150 | About 100 |
| Mineral wool | 190 | 120 |
| Sawdust | For free | About 50 |
It turns out that insulation with sawdust will cost almost free. In fact, wood companies can even deliver sawdust to your home for a small fee. But here it should be clarified: not all varieties of this material are suitable for thermal insulation.
Preparation before insulation
The clay is filled with water, soap is added, and about a teaspoon of grated powder is added to a bucket of water. After 5-6 hours, the clay mass is beaten to the state of very thick sour cream, all debris and unsoured lumps are removed.
The sawdust is mixed with salt and steamed in a metal container for an hour. A dark solution will come away from the sawdust mass; it needs to be poured out. This removes hemicellulose, the main source of food for pathogenic microorganisms; this is extremely important for a bath. You can, of course, treat it with a mordant, but such reagents often penetrate through the ceiling of the bathhouse into the steam room.
Birch sawdust for bath insulation can be prepared by hot drying or calcination in a metal tank without air access. The material acquires a characteristic brownish color, moisture is removed and the remains of pathogens - pests - are destroyed. The method is excellent, but it requires some experience; if you overheat it to more than 350°C, the sawdust can thermally decompose into coal and water.
Do-it-yourself insulation of a bathhouse ceiling
Bathing procedures have long and deservedly regained their popularity, but not as a daily hygiene procedure, but as a good way to spend time, which is also beneficial for the body.
At the same time, even on a small plot you can build a bathhouse on your own.
Bathroom ceiling insulation with foam plastic
Polystyrene foam, the most common insulation material of artificial origin, is largely due to its affordable cost compared to other similar insulation materials.
The disadvantage of polystyrene foam is its flammability and reaction to high temperatures in the form of an unpleasant odor and the release of harmful volatile compounds, therefore experts do not recommend using it to insulate the ceiling of a bathhouse.
The advantages include very low weight and ease of installation, therefore, if no other insulation options are available, all measures should be taken to avoid discomfort.
In addition to the fact that the joints of boards or wooden ceiling panels must be reliably sealed, a layer of polyethylene film is made from the attic side, this will prevent the passage of steam, and a layer of foamed foil polyethylene is laid on top of the film, reflective side down, and polystyrene foam is laid on top of it.
The total thickness of the insulation must be at least 20 cm, therefore, installation is carried out in several layers.
Foam plastic is not placed around the chimney; according to standards, the distance between the heated parts and the insulation must be at least 20 cm, so the pipe is enclosed with a square board box, inside of which non-flammable insulation is poured - sand, expanded clay or earth.
Insulation of a bathhouse ceiling with earth
The most economical option for insulating the ceiling in a bathhouse is to use improvised materials. If you still need to get clay, sand or sawdust somewhere, then you can get the soil completely free of charge.
The use of earth as insulation a hundred years ago was the only available option, not only in bathhouses, but also in residential buildings, so it is not surprising that today, when building bathhouses on a limited budget, they turn to it.
Before embankment, the prepared soil is well dried in the open air, and in order to avoid the germination of plant seeds, the establishment of rodent nests and the appearance of insect colonies, the soil is mixed with lime.
It is necessary to protect against moisture coming from below, since the soil absorbs it quite well and dries for a very long time, so before filling, the entire insulated surface is covered with plastic film, and the top is covered with a vapor barrier with foil, the latter should be facing down.
The soil is poured on top and leveled, the height of the layer should be at least 15 cm, due to the non-flammability of the material, no additional work needs to be done near the chimney. Unlike other materials, an earth-insulated surface can be used, and a deck can be laid for ease of movement.
How to insulate a bathhouse ceiling with clay
Clay used for coating stoves and other household work is also perfect as insulation for the ceiling of a bathhouse. Inexpensive and sometimes completely free material, does not contain any chemically aggressive substances, is not demanding in terms of installation and has no service life.
It is advisable to use clay that has lain in the open air for a year, then the solution has the best qualities, but if this is not available, then any one can be used. Add lime or sawdust to the clay, about ten parts of clay, one part of lime and the same amount of sawdust, then mix well, achieving a homogeneous mass; it is advisable to have a concrete mixer at your disposal, since the clay has a high viscosity.
The surface must be waterproofed; for this, a polyethylene film is used, a layer of foamed polyethylene with foil is placed on top of it, after which a solution is applied. Laying clay is done with a shovel or by hand, but it is imperative to compact it and allow it to dry.
To make drying go faster, you can create a draft if there is a window in the attic, and only after drying can you lay the floor, if provided.
Insulation with sawdust or floor shavings
Insulating the attic floor with large sawdust
Environmental friendliness, safety, cheapness and simplicity are the main indicators of using sawdust for floor insulation. In addition, the option will create comfortable conditions in the house, reduce thermal energy costs and improve sound insulation qualities. What to consider when choosing materials and carrying out work:
Sawdust needs processing. But if lime, vitriol and borax are enough for the ceiling, then broken glass is added to the mixture for the floor
You need to work with the composition carefully. If, when filling the ceiling, it is possible to add insulator, then this option will not work with floors, which means that it is necessary to choose in advance a method that will not allow the mixture to significantly decrease in volume and begin to lose its quality characteristics. In practice, this means one thing: backfilling is done with a non-flowing mixture
That is, not just sawdust, but already mixed with additional components that promote hardening of the composition. In particular, gypsum or cement is used. Proportions: 85% sawdust, 5% gypsum or cement, 10% lime or lime dough (it requires exactly twice as much as dry fluff).
Drying of sawdust is not required, the insulation is prepared in small doses, and it is important to thoroughly mix the composition. The readiness and sufficiency of water is checked as follows: squeeze the lump in your hand, unclench it - it holds its shape and does not crumble, it’s ready. When insulating the floors in the room being used, it is necessary to dismantle the covering, treat the ceilings and joists with an antiseptic, primer, mastic to remove moisture, and only then lay the mixture on a backing made of vapor barrier material or cellophane film.
Sawdust and clay - features of insulation
A mixture of clay and sawdust requires the installation of waterproofing.
This method requires the mandatory installation of a waterproofing layer. For example, films of sufficient thickness (150-220 microns). The peculiarity of the method involves insulating only the floor, not the ceiling or walls, since in this case the material must breathe, allow water vapor to pass through and not form condensation.
The film is glued to a concrete or wooden base, which will avoid displacement. Moreover, the material must be glued with a wide overlap, otherwise the fluid mixture of sawdust and clay will drip down. The following steps follow:
- As with sawdust concrete, the mixture requires water. The consistency of the solution is liquid sour cream. For 100 liters of water, 5.5-6 buckets of clean clay are used. The density needs to be adjusted depending on the sawdust fractions. Mixing by hand is not possible; it is better to use a concrete mixer or a construction mixer (drill with an attachment).
- The kneading is done gradually; per serving, it is customary to take 1-2 buckets of clay diluted with water and add sawdust to the desired thickness;
- Sawdust and clay are applied in a layer of no more than 10 cm. The pressing material is a flat object of large area: a board, a shield;
- Ripening is achieved on days 13-15, but it all depends on the temperature, humidity and thickness of the mixture. As it dries, cracks form and must be repaired with the same clay.
Dry floor insulation
Laying a waterproofing film before using the wet sawdust insulation method
This option assumes the presence of a raised floor. To begin with, the sawdust is treated with antiseptics (water and stir), and then you can begin installing the subfloor. To do this, all floors and joists are also treated with protective agents, then a rough board floor is laid, and a layer of waterproofing material is laid on it. In addition, sawdust is poured in a layer of at least 10 cm.
Before laying the finishing coating, the insulation must dry. This will take at least 2-4 days. In this case, the sawdust will settle, and you will either have to add a layer, or immediately make a thickness of at least 14 cm. Over the next 12-14 months, the sawdust will still settle, so a layer of 14 cm will not be unnecessary.
Insulation for bathhouse ceilings: which one to choose from a wide range
As already mentioned, it is impossible to unequivocally answer the question “which insulation is best for a bathhouse ceiling,” because the choice of the type of insulation primarily depends on the design of the ceiling in your bathhouse. Mandatory requirements for thermal insulation materials include compliance with environmental friendliness and safety parameters.
The bathhouse has a special temperature regime during its operation, therefore all insulation materials:
- must be resistant to high temperatures (including temperature changes);
- must be fireproof;
- should not emit toxic and harmful substances when heated;
- be resistant to mold, mildew, etc.
Ecowool
Ecowool, as thermal insulation for a bathhouse ceiling, is a type of environmentally friendly insulation, due to the presence of cellulose in its composition. Boric acid, which is part of it, ensures the material’s resistance to rot and insect damage. In addition, it is fireproof, because Fire retardants are used in its production. The disadvantages include the difficulty of applying the “wet” method, which is considered the most effective (fills all cavities and crevices), because requires specialized equipment.
Useful video
The following video shows how easy it is to insulate with ecowool yourself:
Mineral wool
It is considered a classic option, providing high heat retention performance. The downside is that the insulating properties are lost when the cotton gets wet.
REFERENCE. We recommend laying a layer of waterproofing to protect the mineral wool. In addition, we recommend limiting the use of mineral wool in the part of the ceiling above the steam room.
ATTENTION! Formaldehyde and other resins may be released.
Foil
A bathhouse insulated with foil heats up faster and cools down more slowly. The foil additionally serves as a vapor barrier, because does not allow steam and moisture to pass through, can withstand high temperatures and does not emit substances harmful to humans. The disadvantages include difficulties in installation: jams and breaks should not be allowed. The foil must be overlapped and the seams taped with aluminum tape.
Foil insulation
The ease of foil to tear influenced the appearance of foil materials on a substrate of paper, fabric and other heat-insulating materials. The advantages include the low weight of such insulation, good insulating and reflective properties. Like foil, they can act as a vapor barrier.
The downside is the installation method: even specialized glue does not always cope with its task. It is not advisable to use nails, staplers and other fasteners that pierce through - the insulating properties of the insulation are lost.
Expanded clay
It has good heat-insulating properties, is relatively inexpensive, easy to install, environmentally friendly, does not wrinkle and retains its properties, and is not affected by low temperatures.
The disadvantages include a high ability to absorb water, which can become a problem if there is no vapor barrier on the side of the premises. In addition, as water is absorbed, the weight of expanded clay also increases. Therefore, it is necessary to carefully consider the design of the foundation of the bathhouse and its structures.
Useful video
Watch a video about how to properly use expanded clay for ceiling insulation and what mistakes to avoid:
Vermiculite
It has high fire resistance, does not attract rodents and insects, and is biologically stable. Easy to install (high flowability ensures filling of the entire space), not subject to shrinkage or temporary changes. There is no use of harmful substances or materials in its production. Hypoallergenic.
Minus - requires hydro- and vapor protection to ensure ventilation. Unfortunately, it has a high cost.
Folk materials for insulating bathhouse ceilings
Traditional and time-tested insulation materials include such materials as: clay, sawdust, earth, slag and their combinations. An undoubted advantage is their availability, price (low cost, or the ability to get it for free).
The disadvantages include the labor-intensive process of use: sawdust requires an additional layer of earth (to ensure fire safety), and over time it shrinks. In addition, such materials for insulating the bathhouse ceiling can crumble through the ceiling, forming permanent dirt.
Useful video
Watch a video about how the above-mentioned shortcomings can be eliminated by adding a little cement to the sawdust:
What tools and materials will be needed
To create insulation for the ceiling of a bathhouse, you will need a fairly impressive arsenal:
- A container for soaking clay, a bayonet shovel with cut sides or a spade. The clay will have to be beaten several times to achieve more or less tolerable plasticity;
- Metal tank for processing sawdust with a heating device;
- If lime or disinfectants are used, then a container will be required for additional reagents;
- Construction trowel;
- Plastering rule;
- Tamping is manual;
- Maklovitz brush;
- Carpentry tools – saw or jigsaw, chisel, hammer, nails.
The materials you will need to purchase are fatty clay, table salt, disinfectants, sawdust, possibly slaked lime, laundry soap, plastic film and wooden slats.
For your information! When forming a layer of insulation on the ceiling of the bathhouse, you will also need several boards, 25-40 mm thick, or sheets of plywood. They will be used to assemble a platform on which you can move, or formwork for insulating the walls of the bathhouse.
What sawdust is best to use for insulating a bath?
For the ceiling, it is best to use pine or birch shavings. Aspen, linden, fruit and hardwood species are used less frequently due to the relatively high scarcity of the material. Poplar sawdust can be used together with clay to make block insulation. In this case, the molded bricks, like adobe, are dried in the sun and then fired until the sawdust burns out completely. The results are light and durable blocks with huge pores, reminiscent of shell rock. It can be used to insulate residential premises, but it is not suitable for a bathhouse.
To insulate walls, it is better to use sawdust from hardwood, oak or larch. Due to the high speed of the cutting tool, the chips are small, so chopped straw is often added to the batch to prevent the insulation from cracking.
Bathroom ceiling insulation options
Advantages of home insulation with clay
Obviously, insulating a house with clay has many positive aspects that you should know about. And the advantages are as follows:
- Cheapness. This material is significantly cheaper than analogues that are currently available on the market. Thus, if any problems arise with the clay insulation process, you can safely abandon this idea. Like clay, sawdust can be obtained with a minimum of effort. The main concerns lie in the arrangement of insulation, and this must be remembered.
- Light weight. Again, unlike its analogues, clay has a fairly modest weight. This, in turn, has a positive effect on the insulation process. Quite often, insulation materials are heavy, and this can negatively affect the condition of the ceiling. Accordingly, there should not be such problems with clay, but just in case, you still need to carry out some tests that will allow you to establish the strength of the ceiling.
- Fire safety. There is no doubt that clay is a material that certainly will not cause a fire or its spread. If you need to choose safe insulation, then clay is an ideal option. You should not pay attention to the presence of sawdust in this insulation, since they certainly do not pose any danger.
Well, I would like to repeat again that the process of arranging clay-based insulation is quite simple. In this case, we do not need to have any original devices, much less specialists who deal with such activities. Everything can be done by yourself. Of course, an assistant in this matter will not hurt.
What does clay mortar for plaster consist of?
So, how to prepare clay plaster? It turned out to be very simple. There are three recipes:
- sand-clay;
- sand-clay with the addition of fiber (sawdust, straw, pine needles);
- clay with fiber.
Also, the strength of the clay mortar can be increased by adding lime to it. Lime is a natural component - it is obtained from limestone or chalk. In addition, it has excellent antibacterial properties, which prevents the formation of fungus.
Sand percentage
Sand is very important for our mortar, but there are no clear instructions regarding its quantity. It all depends on the plasticity of the clay. It is only known that there should be quite a lot of it - at least half of the total solution. But it is also not recommended to put more than 80%. You will have to find your own share through experience. Don’t forget to also rinse the sand thoroughly before adding it to the solution so that there are no foreign bodies or any debris in it.
Why is fiber needed?
To a modern city dweller, the process of adding straw, pine needles, sawdust or horse manure to the solution (there is such a recipe) seems like shamanism and prejudice. But in fact, fiber has many functions, it reinforces the mortar (not only the front part, like a mesh, but in all directions), increases the stability of the plaster, and its wear resistance. In traditional recipes, the role of fiber is played by straw, which also serves as an excellent insulation material due to its thermal conductivity properties. Of course, you can choose fiber to suit your taste, or even buy industrial fiber if you are not too keen on environmental friendliness and naturalness. If you decide to go with straw, make sure it is very fine; this will have a positive effect on the final smoothness of the wall. An alternative to straw, just as natural and cheap, is regular sawdust. They should also be small.
When working in urban environments, it is sometimes wiser to buy polypropylene fiber - a synthetic fiber. It is made from thermoplastic polymer. This fiber significantly improves the technical and operational characteristics of mortars and mixtures.
Sawdust processing
In order for a homemade heat insulator to meet standards, the first step is to prepare sawdust. They should be cleaned of any impurities (sifted, washed and dried), if any.
Next, you need to impregnate the sawdust with special agents in order to increase their fire-resistant qualities and protect them from rotting processes and the effects of pests.
As you know, each type of wood has its own characteristics. Oak sawdust is highly resistant to bacteria and is practically not susceptible to rotting; its size and density do not change under the influence of moisture.
Softwood sawdust contains a large percentage of essential oils - a natural antiseptic that will protect walls from mold.
How to choose sawdust
It would seem that experts divide even such simple material into several varieties according to fraction size:
- small;
- average;
- large.
The middle fraction is best suited to create an insulated layer. The fine fraction creates difficulties when preparing the solution, and the large fraction has insufficient thermal insulation properties.
Sawdust of medium fraction
Wood sawdust is best suited for thermal insulation of the ceiling. They are obtained from already dried wood and do not require further drying. In addition, they suffer less from rot.
If sawdust is obtained from sawing wood with natural moisture, it will have to be dried. To do this, they are laid out on a flat, dry surface in a place with good ventilation. An outdoor canopy is perfect. In dry weather, sawdust is dried in several months; if it rains and air humidity is high, you will have to add another week.
If you have a choice of wood species, conifers are best. They contain a lot of resinous substances that repel insects.
An excellent choice for a bathhouse is larch. This unique tree practically does not rot. To completely avoid rotting of the insulation, 5-10% ash is added to it and left for up to six months.
If sawdust contains debris or other foreign inclusions, they should be carefully sifted through a construction sieve.
Before you start mixing the solution, you need to make sure that the following requirements are met:
- middle fraction;
- humidity below 10%;
- no mold.
The selection of high-quality source material guarantees a warm ceiling and a long service life of the insulation.
Insulation of walls with straw and clay
Today in the modern building materials market we have a wide selection of thermal insulation. Each of the materials has certain features and individual properties, as well as certain requirements for installation technology. But since we are looking for a more environmentally friendly and at the same time effective way to insulate a wooden house, we will focus on an old, but not forgotten method and consider insulating a wooden house with straw.
The popularity and relevance of insulating houses with clay is explained by the following advantages of this method of thermal insulation:
- The insulating clay mixture is easy to prepare and apply. To insulate a frame house with straw and clay, you do not need special construction skills; you can organize the entire process and bring it to its logical conclusion yourself. This insulation can be done with your own hands without any problems.
Low cost clay insulation. The comparative cost of clay insulation is significantly lower compared to synthetic materials. High thermal insulation performance. This is a fairly reliable way to insulate rooms. Can be used to insulate floors, ceilings, roofs, etc. Prepared in accordance with the technology, this composition is not attractive to rodents and insects. The environmental friendliness of this insulation is beyond doubt. All residues are of natural origin, which means they are not toxic.
The disadvantages of this method of thermal insulation include certain labor costs and duration of work.
Differences between the thermal and steam conditions of a bathhouse and a home
Despite the fact that many perceive a bathhouse to be the same structure as a house, its insulation differs from the insulation of a house due to serious differences in thermal and steam conditions.
Read more about home insulation in the article Home insulation.
In a residential building, humidity rarely reaches dangerous levels leading to mold and rot. However, in the bathhouse the humidity exceeds this threshold many times over.
In addition, in a residential building you can install a ventilation system using a recuperator, this will allow you to constantly supply fresh heated air to the rooms. In a bathhouse, this method of ventilation is unacceptable.
After all, it is impossible to heat the air so much that it does not cool down the interior space of the steam room without intense heating from the stove, and the recuperator will only slightly raise its temperature.
Therefore, when using the bathhouse for its intended purpose, some of the excess moisture is absorbed into the walls, penetrating very deeply.
It is very important that the moisture accumulated in the walls can escape not only inside the room, but also outside, leaving immediately into the atmosphere. For this reason, it is highly undesirable to build bathhouse walls from materials that do not allow moisture to pass through well, and you should not use insulation that prevents the free movement of water vapor.
Due to its ability to quickly absorb and release moisture without losing its thermal insulation properties, sawdust is the most suitable material for insulating a bathhouse.
Choosing a frame for a bath
The frame of the bathhouse consists of wooden racks 3-3.5 m long with a lower frame made of boards, an upper frame made of hewn poles and braces at the ends of the frame. Then the frame is sheathed on both sides with a hewn slab or well-hewn poles. As the sheathing is completed, its space is filled with cheap dry insulation (sawdust, peat) with the addition of lime or gypsum. In the process of backfilling the walls, the insulation should be lightly compacted layer by layer to prevent its settling and the formation of voids.
Rice. 1. Bathhouse with backfill walls: a – general view; b – plan of the bathhouse; 1 – dressing room; 2 – steam room; 3 – stove-heater; 4 – hot water tank; 5 – support under the floor joist.
Types and nuances of vapor barrier
Regardless of the type of bathhouse chosen - a sauna or a wood-burning Russian bathhouse - the room will be constantly exposed to high humidity and temperature. Installing waterproofing in the ceiling area will help maintain a healthy microclimate in the room and will also minimize the likelihood of moisture condensation. If polystyrene foam or polystyrene foam is used as insulation, you can skip this step, since such materials are moisture resistant.
Types of vapor barrier
The simplest and most obvious option is to use film. Budget materials can be either rough or smooth; more expensive ones include reinforcement.
- Membrane material. Its woven surface retains moisture and eliminates the formation of condensation.
- Foil is one of the best options for use in a bathhouse. The material not only provides a vapor barrier, but is also an excellent thermal insulator.
- Izospan is a combined material with high vapor barrier properties. Enjoys increased popularity.
How to properly install a vapor barrier?
First of all, you need to decide on the choice of the base material, and then proceed with the installation of the vapor barrier layer of the bath ceiling. A correctly installed ceiling of a steam room looks like a layer cake, with the following layers:
- The top finishing layer is often linden lining.
- The lathing, which serves as a support for the finishing, also serves as an additional ventilation duct.
- Vapor barrier laid over the entire area of the ceiling and extending onto the surface of the walls.
- The ceiling itself and the logs are made of wood.
- Vapor barrier film.
- Insulating material of the selected type - clay with sawdust, mineral wool, polystyrene foam, expanded clay, etc. The minimum layer is 10 centimeters.
- If the attic is needed for storing household items. equipment, installing flooring.
- In the case when the attic space is not used, it is enough to simply cover the insulating material with film. This is necessary in order to protect the insulator from possible heat loss, as well as accidental ingress of moisture and condensation.
Material selection
When considering various insulation options, you should understand that there is no material that is absolutely best in all respects. Modern insulation materials are good, but expensive. "Old-fashioned" methods are economical, but not always easy to install. In addition, one should not strive for unification. When choosing how to insulate a bathhouse inside, you can insulate the walls and ceiling with various materials. The same applies to vapor barrier films.
Insulation materials
These are materials that are designed to bear the main load of heat retention inside the bathhouse building. But in addition to the insulating layer, they require insulation from moisture and steam, which will be discussed further.
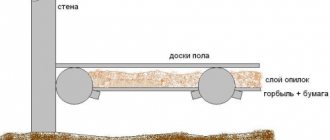
Ceilings can be insulated with natural bulk materials – sand or clay. They have been used for insulation of upper floors for a long time and are still used today. Their main advantage is the low cost of the material itself. But they can only insulate the ceiling from the outside, from the attic space. They are poured from above onto the subfloor, into the spaces between the floor beams. Sand is placed in its pure form, while clay is used in a mixture with sawdust or straw. Layer thickness 10 – 15 cm.
Laying clay mixture on subfloor
- Expanded clay. Also bulk, but a more modern material, made from baked clay. Expanded clay “cushion” provides good thermal insulation, and in addition it is light and does not create an external load on the ceiling. Expanded clay is an environmentally friendly insulation material and is almost ideal from a fire safety point of view. It does not burn and does not emit any harmful substances when heated. The disadvantage of expanded clay is its ability to absorb moisture. Insulation with expanded clay requires careful insulation both from the steam room and from moisture from the upper space.
- Styrofoam. An excellent heat insulator - lightweight, not afraid of moisture. It can be installed both outside and inside. Installation of foam plastic thermal insulation is simple - the foam can be easily cut exactly to size and inserted into the sheathing without fastening. The remaining small gaps are filled with polyurethane foam.
- The disadvantage of polystyrene foam is its low fire safety. At high temperatures it melts, releasing toxic elements.
- Ecowool is a cellulose-based insulation material. Recommended for use in rooms with high humidity. But over time it decreases in volume, so initially it is advisable to lay it in excess. Insulation with ecowool on your own is difficult. Its installation requires specialized pneumatic equipment.
- Mineral wool. Thermal insulating material made using fibers from various materials. Insulation with mineral wool is the most modern method, since most of its characteristics are superior to other insulation materials. It is non-flammable, does not absorb moisture and has a low thermal conductivity value. It is produced both in the form of rigid slabs of various sizes, and in a roll version.
Moisture-proofing materials
Choosing the right way to insulate the ceiling in a bathhouse is only half the battle. In addition to this solution, you need to correctly select insulating layers that will protect the insulation from moisture penetration. There are different types of waterproofing and vapor barrier films.
Waterproofing materials are designed to protect insulating layers from moisture coming from above - from the roof or from the attic. In budget options for these purposes you can use:
- Polyethylene film.
- Ruberoid.
- Aluminum foil.
- Wax paper.
- Pieces of cardboard soaked in drying oil.
But the market also offers a large selection of waterproofing films made from polymer materials. They are resistant to high temperatures and have great strength.
But it’s unlikely to be possible to reliably insulate ceiling insulation from hot steam inexpensively. It is worth investing in modern films specially produced for this purpose. When there is a large amount of steam, it condenses on the surface of the film, which negatively affects the humidity in the room.
Various structures of vapor barrier film
Modern polypropylene vapor barriers are produced with a special layer consisting of viscose fibers. It absorbs moisture without forming water droplets on the surface of the film. After the steam room stops operating, the moisture from this layer evaporates naturally. Membranes with such layers should be attached so that these fibers are directed inside the bathhouse. There are also double-sided membranes that can be installed on either side.
Insulating a cold attic with sawdust. Advantages of sawdust as insulation
Sawdust does not require large financial outlays to purchase. You can always get them at any sawmill for free, or you can prepare them yourself if you practice working with wood. High-quality sawdust has the property of retaining heat well. A thick layer of this natural material is not inferior in heat preservation to mineral wool.
Insulation of attic floors with sawdust
Sawdust is light in weight and does not create a load on the attic floor. Sawdust does not cause allergies, does not emit odors, and does not enter the respiratory tract or eyes like mineral wool fibers. They are easy to use. They do not create problems with transportation to the attic; they can be delivered there in small portions, which can be done by one person.
Sawdust insulation completely covers all non-standard places in the attic and gaps. It is convenient to level them and increase the thickness of the insulating layer as necessary. They dry well and quickly, while the volume of natural material does not decrease, and the quality of sawdust is not lost over time. For insulation, it is better to use small sawdust; their positive qualities are much higher than large wood shavings. Sawdust insulation is a time-tested method of insulating attic floors.
The disadvantage of using this type of insulation is the inability to further use the attic space. There is only one way out - lay a wooden board on top. Therefore, before you start insulating the floor, you need to think carefully about the future.
Creating ceiling insulation from sawdust
There is nothing particularly difficult about how to insulate a ceiling in a private house with sawdust. After completing the preparation of the ceiling surface, they begin laying thermal insulation in small layers, leveling and compacting each of them. The height of the insulation should be level with the top of the ceiling.
A thin layer of ash is poured on top of the mixture of sawdust and additives. It will protect the insulation from pests and fungus. A couple of weeks after completing the insulation of the ceiling with sawdust in a private house, when the mixture is completely dry, a vapor barrier layer is laid on top of it. It is necessary to prevent wood waste from becoming saturated with moisture present in the air.
Vapor barrier material, usually polyethylene film, is attached to the floor beams using a mounting stapler. The result of the work done will be a thermal insulation layer covered on both sides with a vapor barrier.
Ceiling insulation options
When insulating the ceiling with sawdust, you should be careful not to miss the cracks that are always present on the surfaces. To eliminate them, polyurethane foam is used.
There are several options for arranging thermal insulation of the ceiling using sawdust, both using pure wood raw materials and by adding additional additives to it, such as clay, lime, etc.
The most popular methods are:
- use of sawdust in its pure form;
- the use of additives - cement and lime;
- the use of additional components - clay and lime.
Stage one. Selecting raw materials
The best option for use as insulation is sawdust of the middle fraction. The reason is extremely simple: it is difficult to work with fine starting material, and coarse sawdust has insufficient thermal insulation properties. Sawdust from cutting in carpentry production is considered the best, because it has low humidity, so it does not require additional drying, and will not begin to rot when used.
If sawdust is available exclusively from round timber, which has natural moisture, then before laying it should be spread out under some kind of canopy and dried thoroughly. There is no need to cover, otherwise they will start to rot.
Choosing sawdust for ceiling insulation
What types of sawdust are more suitable? Give preference to coniferous species - they contain a lot of resin, which creates a lot of inconvenience for various types of pests. But if you are insulating a bathhouse, it is preferable to use sawdust from deciduous trees.
Also, before laying, sawdust should be left to rest for up to 1 year - during this time the level of sugars, which provoke rotting, will noticeably decrease
Pay attention to ensure that the raw materials are free of debris and other foreign impurities; if any are present, sift the sawdust and remove large debris manually
Sifting sawdust
Installation of thermal insulation
Sawdust prices
sawdust
How to make sawdust
Here, as in the case of a private house, the ceiling needs to be covered with wide boards. To install a chimney pipe, you need to make a ceiling cut - this can be purchased ready-made or made with your own hands (cut a sheet of stainless steel that completely covers the hole, cut a circle in the middle for the passage of the chimney, seal the edges of the cutout in the ceiling with basalt wool, and on top lastly fill the strips of metal;
Step 1: First, take care of the vapor barrier layer in the attic. Do not use roofing material, because at high temperatures it will soften, begin to emit unpleasant odors, or even catch fire. As for PVC film, it is also unacceptable here.
Step 2. Lay the sawdust mixture, prepared according to one of the recipes described above, in layers, thoroughly leveling and compacting each layer. If you plan to use the sauna only in summer, then the thickness of the insulating layer can be 5 centimeters, while for winter use you will need at least 15 centimeters.
Insulating the ceiling in a bathhouse with sawdust
Step 3. Upon completion of installation, wait until the insulation layer dries. If cracks appear on the surface after this, seal them with the same mixture. By the way, to keep the number of cracks to a minimum, add salt to the solution before installation (5-6 tablespoons per 10 liters of water).
Step 4. Once the mixture has dried (which can take up to a month), pour a thin layer of lime on top of it and lay a vapor barrier. Then, if desired, you can cover the surface with boards.
In addition, both methods of insulation can be used for both horizontal and vertical surfaces
But in any case, special attention should be paid to the insulation of electrical wiring. Hide all the wires in high-quality metal corrugated hoses, and seal the ends of the latter with fire-resistant material (for example, fire-resistant polyurethane foam PENOSIL Fire Rated)
This will protect the wooden structure from fire in case a short circuit occurs.
Manufacturers offer various membrane films that protect materials from high humidity. Experienced builders recommend purchasing vapor barrier upholstery with a reflective foil layer that does not allow heat to escape. The following types with a foil layer are distinguished:
- polypropylene;
- kraft paper;
- roofing felt;
- membrane;
- foil;
- coating
This film is installed with a large overlap (10-15 cm), and the joints are taped with foil tape for construction work.
In specialized departments of stores there is a wide selection of waterproofing products - foil-coated kraft paper, construction membrane and other products. Although you can save money and purchase regular plastic film or roofing felt.
To achieve the main goal - accumulation and “saving” of steam, you need to make 2 layers of PIP and 1 additional layer for thermal insulation. This measure will make the room warmer and more comfortable.
We invite you to familiarize yourself with the technology of insulating a house outside with polystyrene foam
Experts advise placing layers perpendicularly. This arrangement will increase the strength of the entire structure and help avoid severe deformation. If you use mineral wool and clay, the process will take place in several steps:
- take an unedged board (5 cm) and attach it to the bottom of the beams;
- to support the filing, we fix the flooring along all the bases;
- tongue and groove slats made of aspen are attached to them (taking into account the gap for ventilation);
- We lay vapor barrier material on the outside of the roof;
- spread mineral wool 15 cm wide over the laid mixture;
- then we lay polypropylene film;
- We place boards on top of the resulting structure; this is the future floor of the attic.
If everything is done correctly, the end result should be an excellent steam room. All the steam will remain inside for a long time, and the steam room will not cool down for a long time.
Pros and cons of the method
This material is inconvenient to use, but it is often used for thermal insulation of ceiling surfaces due to the following advantages:
- completely safe for health. During operation, it does not emit harmful components and does not cause allergies in people. Ceiling insulation with sawdust is based on the preparation of special solutions containing natural substances;
- budget cost will allow you to save a lot on vapor barrier materials if you have limited financial resources;
- The work does not require specific skills and knowledge. It is enough to observe the proportions of the components and follow the instructions;
- this is a good insulation material that conducts heat poorly, preventing it from leaving the room;
- the material has a long service life.
However, sawdust has significant disadvantages. In connection with this, many people prefer to use other more expensive but reliable methods of insulating ceilings:
- sawdust is applied in a thick layer. If, for example, in your house the attic space is equipped as a living room, or there is a second floor, the insulation will constantly be subject to a large load, which over time will lead to its deformation and worsen its thermal insulation properties. It is not advisable to use a small layer of sawdust, as this will affect the functionality of the material;
- fire hazard. Despite the protection of sawdust with special impregnations, they are highly flammable. Since insulation is carried out on the ceiling, the possibility of a short circuit in the electrical wiring cannot be ruled out;
- afraid of moisture. If water gets on the thermal insulation layer, mold and mildew will appear on it very quickly. Therefore, if you are deciding how to insulate the ceiling in a private house using sawdust, carefully select materials for vapor and waterproofing and their installation. Poor sealing of these layers will quickly ruin the insulation;
- sawdust has lower efficiency compared to other heat insulators.
Formation of the rough layer
Sawdust provides reliability to the plaster mortar. If they are not available, in order to apply the rough composition to the gypsum surface, you will need to attach a reinforcing nylon mesh. It is better to fix it directly with a solution; when used to secure nails, the integrity of the wall is compromised and the strength deteriorates. It is practical to treat clay walls with plaster with an assistant who will point out places that need improvement. The process includes the following steps:
- To work, you will need a grater board or spatula.
- Two or three mounds of plaster are applied to the working tool.
- The tool with the solution is pressed tightly and distributed over the surface.
- The direction of movement is from bottom to top. You should try to distribute the plaster as evenly as possible.
- The flat surface of the wall is checked using a building level. Identified irregularities are eliminated immediately after detection.
If the wall is relatively flat, a starting layer of 1 cm is sufficient. If there are significant unevenness on the clay surface, the plaster layer can increase to 3-5 cm.
Advice! When processing large areas of clay walls with your own hands, it is much more convenient to apply plaster using beacons. This will speed up the entire work process and increase the quality of the finish.
After applying the rough layer of plaster solution, time is required for it to dry completely. The entire process takes on average 4-6 weeks. The approximate drying period for a 1 cm thick layer at room temperature is 5 days, and it is not recommended to speed up the process using a technical hair dryer or heaters. Therefore, it is better to plan the work for the warm period. It is optimal when the initial finishing begins in late spring - early summer, although it all depends on the region where the house with clay walls is located. Professional steps for applying plaster to walls can be seen in the following video:
Features of insulation
Not all products are used for insulation. Plastic products will deform from high temperatures. If you use plywood or fiberboard, then from the hot air they will begin to expand and change shape, accumulating moisture. These products are definitely not suitable. The best way is to finish in several layers:
- The first step is to use an insulating material that prevents water from penetrating.
- Place a second layer of insulation (for example, mineral wool).
- The third level is aluminum foil.
This “multi-layering” holds heat well and does not allow steam to escape for a long time, so heat losses are reduced.
Insulation materials can be divided into the following types:
And depending on the composition they distinguish:
- Organic such as ecowool.
- Inorganic - mineral wool.
- Expanded polystyrene.
- Other insulation materials are such as technovent and technoblock.
Preparation of heat-insulating composition
To insulate the ceiling in a wooden house, you can use two methods of preparing the solution. The composition of these solutions includes lime, cement and clay. To prepare the solution according to the first recipe, you will need the following components:
- 10 parts of well-dried sawdust;
- 1 part lime;
- 1 part cement;
- 5-10 parts of water;
- a small amount of copper sulfate, which acts as an antiseptic. During the preparation of the solution, lime is mixed with cement. Sawdust prepared in advance should be placed in a clean container of the required volume. As one of the possible options, you can use a concrete mixer as a container for sawdust. A mixture of lime and cement is added to the mass of sawdust, after which the contents of the container are thoroughly mixed. In order for the insulator to have antiseptic properties, it is necessary to add a solution of copper sulfate to its composition. To prepare this solution, add 3 tablespoons of the substance to a bucket of water.
When preparing an antiseptic, you should not forget about precautions, using a mask and protective rubber gloves. The copper sulfate solution is slowly added to the prepared mixture of sawdust, cement and lime. The starting components should be mixed until the experimental sample of the mixture taken into hand disintegrates in the open palm
At the same time, excess moisture should not drain from it. The second recipe for preparing insulation based on sawdust and lime is most often used for the ceiling of bath rooms. Copper sulfate is not applicable for the preparation of this composition, since at elevated temperatures it is capable of releasing unsafe fumes into the surrounding space.