The village bathhouse is a place that has been bringing pleasure to all village residents and their guests for several hundred years. In it you can feel the smells of freshly steamed brooms and the contrast between hot steam and cold water. The bathhouse is a real joy not only for the soul, but also for the body.
It must be said that such a bath is the most useful and accessible spa procedure, and its secrets are passed on from one generation to another. No analogues existing in our time are capable of conveying that unique atmosphere of the Russian steam room.
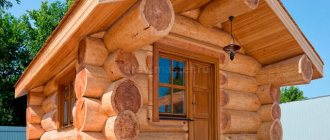
Exterior view of the building
How to choose wood for village bathhouses built by yourself: instructions with photos
Country baths are made from natural wood, the type of which has a direct impact on health.
Important! Coniferous wood will provide a subtle aroma in the steam room, which can harm people with diseases of the cardiovascular system. Combined with high temperature and a large amount of steam, pine needles are dangerous; even a healthy person in such a steam room can increase blood pressure.
Therefore, the bathhouse is made mainly from hardwood; choose timber or rounded logs. The last option is very expensive, and we will focus on timber.
What is the best way to heat?
The question of what kind of firewood should be used to light a bathhouse has been and remains very relevant. Traditionally, birch wood is considered the best raw material. In the old days, bathhouses in the villages were heated black and only birch logs were used, since they practically do not leave soot on the walls, and in addition, they emit a pleasant aroma of smoke.
In white baths, it is not so important which types of wood are used, so the choice is characterized by great variety. Firewood offered for free sale differs in price level, degree of heat transfer and amount of smoke emitted
The most common are products processed from deciduous wood. Oak and ash are distinguished by good heat transfer, pleasant aroma and high cost. Linden produces beneficial phytoncides that strengthen the immune system and are considered the most effective prevention of colds and viral diseases.
Many people prefer to use softwood, but due to the high resin content, the concentration of substances released is so high that it can cause blockage of the airways and difficulty breathing. That is why, despite the large amount of thermal energy released, coniferous firewood is rarely used in bathhouses.
Fruit woods emit the greatest amount of heat and smoke little, but they burn rather slowly. That is why, if you prefer these particular varieties, you should first light some deciduous wood in the firebox - this can compensate for the slow ignition of fruit wood.
Plan and classic project of a rustic bathhouse with your own hands with photos
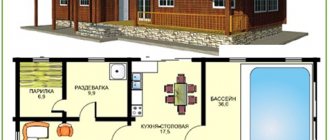
Do-it-yourself village baths have a classic layout of premises:
- A dressing room where you leave your clothes and relax after the steam room. A real village bathhouse should have a dressing room, which is a relaxation area.
- The village bathhouse is equipped with a sink in which anyone can wash themselves. Washing after the steam room is especially useful to rinse the body from sweat and salts.
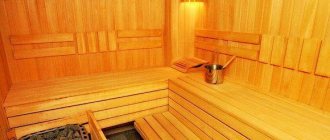
- Steam room with shelves and benches, this is where the temperature is highest.
Of course, the bathhouse can be “equipped” with a shower, a terrace, and a swimming pool can be located next to or inside. We invite you to view the drawings and photos that will help you design and build a bathhouse in the village with your own hands:
Scheme 1.
Scheme 2.
Scheme 3.
Scheme of a stove for a bath.
Drawing of a bathhouse.
Important! The main feature of the bathhouse for the village is the pouring floor, which ensures unimpeded drainage of water at any time of the year.
Furnace structure
You can make a wood-burning stove for a sauna yourself or buy a ready-made model. The stove must be designed and located in such a way that all rooms in the bathhouse are heated.
Among the ready-made options you can purchase the following designs:
Steel. This device is the cheapest option. A steel stove heats up quite quickly, but cools down just as quickly, so you will need a large amount of firewood for kindling.
To better understand the structure of a wood-burning stove, you need to familiarize yourself with the manufacturing technology of the device.
An iron stove can be made as follows:
- A pipe with a diameter of 50 centimeters is cut into pieces of 90 and 60 centimeters. A large piece of pipe is used to make a heater stove, and a small piece is used to make a heating tank for water.
- A hole 20 by 5 centimeters is cut in a long piece of pipe. A round steel plate needs to be welded above the cutout. The thickness of the plate must be at least 1.2 cm.
- For the manufacture of fuel grates, sheet cast iron is most often used. The grate is installed in the blower chamber.
- To install the combustion chamber in the pipe, you need to cut a niche. The combustion door is made of a metal plate. The door size will be 25 by 30 centimeters.
- A container for pebbles is made from a piece of pipe 35 centimeters long. Approximately half of the volume is filled with pebbles and covered on top with a circle of steel.
- A coupling 5 centimeters wide is made from a steel tire. Its thickness should be at least 5 millimeters. The product must be welded to the body and a water tank must be attached.
- To make a tank you will need a steel circle about one centimeter thick. A hole with a diameter of 15 centimeters is made in the circle for the chimney pipe. The chimney must be welded to the base of the circle, which is the bottom of the water tank.
- At a distance of 35 centimeters from the water tank, a platform made of steel sheet 30 centimeters wide is attached.
- At the bottom of the tank there will be a hole for water supply. Opposite it it is necessary to weld a faucet with a water valve.
- The last step will be to install the door into the combustion chamber.
Do-it-yourself sauna without special expenses: myth or truth?
When building a bathhouse, you need to know exactly what you can and cannot save on. So, let's look at budget options for building a bathhouse with your own hands:
- Choose purchased stoves without a remote firebox. The device is inexpensive, and heats up the steam room very quickly, which saves firewood.
- Mount the water tank on the chimney.
- Make a strip foundation for a light one-story bathhouse. Massive buildings filled with modern devices require a columnar foundation.
- Pay attention to insulation. The better the bathhouse is insulated, the more comfortable you will be, and you won’t have to “heat the street.” In winter, cover the windows of the entire bath house with regular packaging film, which will save up to 60% of heat.
- The shower can be replaced with a classic tub, into which you can fill with water of any temperature.
Preparation for construction: drawings and dimensions
When drawing up a bathhouse design, you should not forget that the steam room and washing room will be used by several people at once. Therefore, the area and dimensions of the bath should be determined without making serious mistakes.
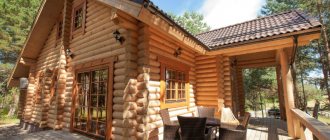
The second version of the bath differs in the arrangement of the shower
In order for each user to be comfortable in the bathhouse, he needs to allocate at least 1.8 m² in the dressing room and 1.5 m² in the steam room. The average total usable area of a bathhouse for a family is 10 m². In this case, the most space should be in the dressing room, and less in the steam room and washing department.
So that people of any height can wash in Russian, the ceiling should be built at a height of 2.4 meters.
When determining the height of the ceiling, it is taken into account that the building will soon settle
At the construction planning stage, it is necessary to reflect in the drawing the area for arranging the vestibule. This room may be needed as a place to block the path of cold air from the street.
For a vestibule, 2.32 square meters is enough. m
DIY construction: laying the foundation with photo
The foundation is laid with your own hands in the following order:
- Installation of a columnar base to ensure normal air circulation. A monolithic concrete foundation is suitable if the bathhouse is equipped with a relaxation room, sauna or swimming pool.
- For marking, the top layer of soil is removed by installing support pillars at a distance of 1 m or more.
- Before laying, concrete products are treated with bitumen mastic, which will ensure good stability and protect the base from moisture.
- The prepared holes are filled with a sand-cement mixture and compacted well. Then they install reinforced concrete products, sprinkling them with construction waste (rubble). Finally, the pillars are filled with concrete mixture at the base.
That’s it, 6 months are allotted for the shrinkage of such a base, and then the installation of the grillage remains. Before installation, it is recommended to reduce the piles to the same height using a circular saw.
How to make a pouring floor with your own hands: tips with photos
A bathhouse with a pouring floor is very convenient to use, and the type of structure of such a floor directly depends on the type of soil. For example, for soils with good moisture absorption rates, a drainage pit is constructed under the bathhouse. If the soil practically does not absorb moisture, then the drainage system is built at certain angles.
How to make such a floor for a bathhouse in the village? See instructions with photos:
- The logs are laid at a slight angle in the direction where the pit is planned.
- Before laying, the logs are treated with 2 layers of waterproofing compound.
- Floorboards are laid on top of the joists and are not secured with nails.
When laying the correct pouring floor, you should comply with the following requirements:
- The water intake is laid before the installation of the flooring.
- All boards are laid with a gap of up to 5 mm so that water can drain freely. When the gap is less than 2-3 mm, the board swells and water can no longer pass through.
- A 40 mm thick hardwood board is used. Coniferous species are not used due to their resin content.
Advice! This type of floor insulation is not performed, and all boards are attached to the structure with special bars. That is, if necessary, the floor board can be removed and taken out to dry.
See the photo for a diagram of the structure of a leaking floor:
Scheme 4.
Scheme 5.
A look into history
The history of the traditional Russian village bath goes back more than 10 centuries. The first mention of the bathhouse in the traditional life of the Slavs can be found in the famous “Tale of Bygone Years,” but some historians argue that bathhouses could have appeared as early as the 5th – 6th centuries.
However, whatever the exact date of the appearance of the bathhouse in Rus', we can confidently state the fact that visiting a real village bathhouse is one of the few original Russian traditions successfully practiced today. Bath rituals and accessories, rules for visiting the bathhouse, associated signs and healing systems - all this is passed down from generation to generation with an unchanging love for the bathhouse.
Interesting! For many peoples, the bathhouse is a special sacred place, with its own energy. And the Russian bathhouse is no exception. According to legends, various evil spirits live in the village bathhouse, both evil and friendly towards people. An unheated bathhouse is considered a haven of evil spirits who are afraid of the sign of the cross, so icons cannot be brought into the bathhouse, and bathing utensils cannot be taken from the bathhouse into the house.
Traditionally, village baths were located next to a pond, or in their own courtyard. The whole family went to wash and steam on Saturdays. This is where the name Saturday came from as “bath day.” Centuries fly by, but baths still accompany the life of a villager - almost every yard has its own bathhouse, sometimes not so modest, but large and comfortable, but still built with soul and in accordance with traditions.
Construction of walls for a bath
To build the walls of the bathhouse, 2 methods are used:
- The base is made of a frame crown, which is wider than the other layers. In this case, you ensure high stability of the bath.
- The subfloor is laid onto the joists, after which the walls are raised, secured with dowels.
Advice! When constructing walls in the old way, each crown must be covered with jute, which will prevent the finished building from being blown through.
Steam room: tips for comfort
Family Russian bath: 1 - steam room; 2 — shelves; 3 — retractable benches; 4 - water tank; 5 - oven; 6 - dressing room; 7 - hallway.
The formation of the temperature regime in the bath is influenced by two factors - hot water and steam formation. When the water heats up, steam fills the space of the steam room and then cools, thereby increasing the humidity.
This creates excessive dampness, which requires increasing the amount of heat. Tip: 20 minutes before using the steam room, evaporate the water on warm stones with the stove closed.
Now about the technical specifications.
Attention! The doorway to the steam room is made 1.6 m high. The threshold is high
The shelves are 80 cm wide, 2 m long.
A distance of 1 meter must be maintained between the shelves and the ceiling. It is better to make the seats and shelves removable. To prevent the walls of the room from rotting, do not cover the space under the shelf and seat. because The needles secrete resin, try to do without it to avoid burns. Aspen is an ideal option in this matter.
Rafter system for a bath
This type of roof construction is lightweight, so even inexperienced craftsmen can use it:
- For construction, a beam is taken, which is sawn so that in the upper part it converges at a certain angle. But the ends of the sawn timber should ideally lie on the Mauerlat.
- The pediment is installed with a shield; it is pre-assembled directly on the ground.
- The roof will have to be insulated, so the distance between the sheathing elements is about 55-60 cm.
- After lathing, the roof is covered with a finishing crown, and the roof is covered with insulation and the selected roofing material, for example, metal tiles or budget slate.
Scheme 6.
Scheme 7.
Advice! A practical gable roof is installed in a classic country bathhouse, ensuring unhindered slope of seasonal rainfall.
Connecting destinies
Village soap shops also served as a special place for weddings. Actually, baths of this kind can be divided into two large groups: a wedding bath for the bride in her father’s house and a joint bath for the newlyweds on the second day of the wedding.
Wedding bath
For the bride, this bathhouse served as a farewell to her native nest. Especially for her, the room was scraped clean, decorated with flowers and wreaths, and covered with fragrant herbs. The solemn procession of the campaign was led by the bride's brother; in the absence of one, in some places of the Russian North he was successfully replaced by a village sorcerer, surrounded by a fishing net. Second, a close friend walked in front of the bride, who “swept the bride’s path” with a new broom, clearing the path of bad and obscene things. The bride herself ritually cried and wailed, saying goodbye to her girlhood.
Here the ritual unbraiding of the braid took place, symbolizing farewell to girlhood.
Bathhouse for newlyweds
It is a mandatory ritual and in the old days, ignoring this procedure caused active public condemnation.
The bathhouse for the newlyweds was heated in the groom's house by a groomsman; in some areas, a matchmaker was allowed to participate in this procedure.
Naturally, the village bathhouse was richly decorated and cleaned for such a special occasion. During the steaming procedure, guests positioned themselves around the room, tapping cast iron and frying pans, thus scaring away unclean and evil spirits
Very often, after the newlyweds, the guests also tried the bathhouse, and what is important, also in pairs - a man and a woman. https://www.youtube.com/embed/Bc3CPPNUoAY
A young wife always takes an embroidered towel as a gift to the bannik in order to appease him and enlist support and protection during future childbirth.
How is insulation and waterproofing performed?
The bathhouse is insulated from the roof, and you can choose modern mineral wool or fiberglass as the insulation material. Of course, it is cheaper and more practical to take what is available in abundance on the farm - sawdust or slag, which is placed in the gaps of the sheathing. You can see what it looks like in the diagram:
Scheme 8.
Scheme 9.
Advice! If the bathhouse was built on a light foundation, then the materials for finishing and insulation should not have a significant weight.
For waterproofing, the simplest rubber in rolls, roofing felt, is used, and in winter a film is added here. A classic wooden bathhouse does not need wall insulation, because wood is famous for its excellent heat retention properties. But you can’t do without caulking wooden walls, and here the first place is free moss, which is used to caulk the building outside and inside.
Important! Moss does not disturb air exchange, lacks moisture, but reliably protects the steam room and other rooms of the bath from drafts.
Facing
When the building is ready, you can begin interior and exterior decoration. When cladding walls, floors and ceilings, you can use different materials - lining, tiles, siding, etc.
Internal
The inside of wooden baths is often lined with clapboard. This is a simple option, but the wood must be soaked in antiseptics in advance. The second option is tiles. For wooden walls, this is an expensive option because the surfaces need to be properly prepared.
External
Externally, it is enough to coat the tree with antiseptics to protect it from moisture and parasites. For buildings made of foam and gas blocks, you can use siding, decorative brick, and special plaster.
Let's sum it up
We still have instructions for building a bathhouse with photos; all that remains is to calculate the savings on self-construction. Perhaps it’s worth starting with a project that will cost 30 thousand rubles. The cost of building a turnkey bathhouse from rounded logs amounts to 250,000 thousand rubles. (22 thousand rubles per 1 sq.m.), if you add construction and finishing here, you get about 500 thousand rubles.
From this amount you can safely subtract 50%, which goes to pay for the work of builders and their markups for materials. For independent construction, from 100 thousand rubles are spent. and more, of course, the price depends on the size, materials used and the filling of the bath itself. In any case, it turns out cheaper than ordering from a construction company, and see what you get in our gallery!
General understanding of prostatitis
The prostate gland is an internal organ of the male reproductive system. It is located around the opening of the urethra at the exit from the bladder. This small, glandular formation performs the most important function - the production of prostatic juice, which is part of sperm.
The normal prostate is small in size, communicating through ducts with the urethra, it does not impede the passage of fluid through the urethra.
This entails the following symptoms:
- soreness in the perineal area;
- frequent urination;
- difficulty passing urine;
- false urge to urinate;
- decreased potency;
- problems in the sexual sphere.
Acute inflammation without proper treatment often takes a chronic form.
Prostatitis occurs when microbes enter the gland; the success of its treatment directly depends on the correct, timely selection of appropriate antibacterial and anti-inflammatory drugs.
Adenoma involves the replacement of glandular tissue with poorly differentiated cells that are no longer able to return to their function. Therefore, treatment of adenoma often comes down to a surgical solution.
Men over the age of 30 are at risk for inflammatory and tumor diseases. With prostatitis in men, a bath is not something forbidden - life does not stop. The question is the following: during what period of the disease you can go to the bathhouse, and when you can’t, it has a bad effect on the condition of the prostate, or steam procedures are useful and correct.