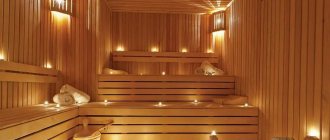
Saunas built using Finnish technology became incredibly popular in Russia in the 90s. Many years have passed since then, but the popularity and demand for the Finnish bath are still very serious. Part of the love of our compatriots for the sauna can be explained by its serious similarity with the classic Russian bath.
Finnish bathhouse projects
Before the bathhouse project is made, it should be taken into account that the steam room is usually built in a small size, and it has an area of about 5–10 square meters. The total space of the bathhouse can reach 40–45 square meters.
The shower or rinsing room is made small - up to 5 square meters. It is customary to combine the locker room, vestibule and rest room and allocate more space, usually at least 20 square meters.
If there is a lake or river near the bathhouse, then the pool does not need to be built. Particular attention must be paid to the choice of stove. Since the Finnish sauna is a dry steam room with a high temperature, it is better to opt for an electric one. But if you are a big fan of natural fire, then you can make a wood-burning one.
Therapeutic effect
- There is such a thing as ''artificial heat'', which refers to the accelerated production of white blood cells in response to the high temperature in the sauna. This helps to significantly strengthen the immune system and destroy harmful microorganisms.
- It has been scientifically proven that people who regularly visit the sauna produce much more interferon than other people. This protein reduces the chances of cancer several times.
- Thanks to the abundant secretion of sweat glands (on average, from 0.5 to 1.5 liters at a time), waste and toxins are released along with them.
- The condition of the skin improves, it becomes more elastic and smooth
- The condition of the kidneys improves significantly
- Recognized as an excellent prevention of arthritis, myositis and radiculitis. It is very helpful for chronic forms of runny nose, bronchitis and other nasal or throat diseases.
- After all, this is a great rest for the body. Frequent sauna visitors experience an increase in the quality of sleep, appetite, and overall stamina. In the steam room you can perfectly relieve stress and tension accumulated throughout the working day.
Building materials for a Finnish bath
You can build a Finnish sauna from wood, stone or brick, but the interior decoration must be wooden. So, let’s find out what material will be needed during the work process:
- To waterproof the foundation, you will need a double layer of roofing felt (from 250 rubles per roll).
- Log and frame walls best cope with the function of thermal insulation. Wooden posts and beams with a section of 80x80 - 120x120 mm (from 4,500 rubles per cubic meter) are suitable.
- For the walls of the steam room, you can use linden, birch, and aspen boards with a thickness of 20–30 mm (from 4,500 rubles per cubic meter).
- For vapor barrier you will need foil, parchment or polyethylene (foil from 50 rubles per square meter).
- Thermal insulation must be carried out on the inside with mineral wool, felt slabs, foam concrete (from 300 rubles per roll of mineral wool).
- Felt will be needed to insulate doors (from 130 rubles per kilogram).
- For the floor - concrete (from 2000 rubles per cubic meter) and tiles (from 20 rubles per piece).
Tips and tricks
Before installing a sauna in a wooden house, it is necessary to prepare the floor. All beams and boards that will be used in the construction of the sauna must be treated with water-repellent compounds. By the way, it makes sense to use larch for flooring.
A heat-resistant cable must be laid along the walls - a channel in which the electrical wires will be enclosed. They must be insulated to withstand water.
Laying the foundation of FB
If your bathhouse is a free-standing building, first of all you need to take care of building the foundation. To do this, you should determine the type of soil where construction is planned, and also take into account the future size of the bathhouse. When choosing a foundation, consider the following recommendations:
- If the soil is moist with alternating layers, a strip or monolithic foundation will be suitable, which will lie below the freezing level of the soil.
- If the soil is clayey, it is better to use a columnar foundation.
- Screw piles are suitable for uneven terrain.
Construction of a home sauna
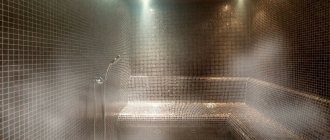
A wooden house with a sauna will give the owners of the house a lot of pleasure from the possibility of taking water procedures. The owner of the steam room will enjoy constant respect among friends and relatives. It can have two versions - dry or wet. In the first version, the air will heat up to 120 degrees, with a humidity of 20%; in the second version, the temperature will not rise more than 70 degrees, and the humidity can reach 100%.
Before you build a sauna in a house or apartment, you need to understand where it will actually be installed. If we are talking about a city apartment, then it would be optimal to place the sauna in the bathroom, of course, if its size allows it. If we are talking about a country house, then it can be arranged in any place convenient for the homeowner.
The selected room must be suitable for efficient ventilation, electrical wiring and tiling.
If there is no such room, then you will have to build a separate building. That is, to complete the full scope of construction work, and then equip it with equipment, utility networks, etc.
Construction of walls and floors of a Finnish sauna
The frame of a Finnish sauna must be strong and reliable so that the high temperatures to which it will subsequently be exposed do not damage its integrity:
- The best option for the frame is a wooden beam. It’s easier to buy ready-made ones and then assemble them according to the numbering. IMPORTANT: We treat the lower crown with an antiseptic. In this way, we will protect the capillary system of wood from moisture. The foundation should also be treated with bitumen mastic.
- After the walls are erected, we put a thermal insulation layer on them. To do this, we line the inside with heat-reflecting foil.
- Great attention should be paid to tightness. Hot air flows will be directed upward, and it is for this reason that it is necessary to double vapor barrier the ceiling or use double foil for thermal insulation.
- The floor is considered the coldest and wettest place in the sauna, so it is not advisable to make it wooden, since it will quickly become unusable due to dampness. The best option would be a three-layer floor: bitumen felt, concrete screed, tiles with an anti-slip effect. We put a wooden lattice on top to prevent our feet from freezing.
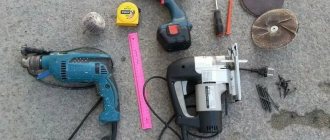
Do-it-yourself Finnish sauna in the garage: step-by-step instructions
Step #1. Determining the area for the future sauna.
To set up a Finnish sauna you will need two rooms. One will serve directly as a steam room, the other as a relaxation room. In the dressing room, in addition to a table for drinking tea, there will be a small shower compartment.
After the layout of the future sauna is completed, it is necessary to translate all the ideas on paper by making a sketch of the sauna with the actual dimensions of the room.
Step #2. Wall arrangement
Let's start making wall frames.
To do this, take a board 50 mm thick and cut it into slats.
After this, we make markings and fasten the frame with self-tapping screws.
In order not to damage the strip when screwing in the screws, you must first drill a hole for the screw, then the strip will never split.
After all the frames are ready, we mount them in place of the walls of the future sauna and fasten them to the floor and existing walls with dowels.
Next, we lath the existing walls. To do this, we attach wooden slats to the wall with corners.
You can purchase special fasteners in the form of perforated corners, or you can use mustaches for drywall. It will be much cheaper, but no less reliable.
We take the mustache, break it in half, and then with a slight movement bend the strip in the form of a corner, as shown in the photo.
Step #3. Electrical wiring device
We lay wires to the installation site of the stove and lighting fixtures. To connect the electric heater and provide lighting, it is necessary to lay cable lines in the room of the future steam room. Due to the fact that the temperature will exceed 100 °C or more, you need to choose a heat-resistant cable, and sealed lighting devices with a power of no more than 60 W.
A classic example would be two or three core cables AVRG and VRG and
fiber optic lights and
LED lights. The cost of this equipment is high, but they will provide high-quality power supply and 100% safety.
Step #4. Ventilation
Air exchange in a Finnish sauna plays an important role. Air replacement should occur at least twice within an hour.
https://youtu.be/OS2JZ07J7Cw
Therefore, in our sauna it is advisable to use a universal ventilation scheme that will give an effective result. The flow of fresh air into the steam room is carried out under the stove through the supply duct and under the door, where a gap of 2 - 3 cm is necessarily left. For exhaust, we lay a ventilation duct in the wall from a corrugated aluminum pipe and install two ventilation valves. One is under the ceiling, and the second is at 1 meter from the floor.
Let's consider three operating states of the ventilation system.
Warming up the sauna
In this case, the inflow is open, and both outlet valves are closed. Then the steam room heats up more intensely, using less energy.
Acceptance of the procedure
During the park, the inflow remains open and the air, entering the heated room, becomes hot and rises. The upper exhaust valve is closed and the lower one is open. Then streams of warm air begin to circulate in the steam room, some of them leave through the open bottom valve, and some, falling, mix with colder air masses, heat up again and rise.
Ventilation of the steam room
At the end of the procedure, both exhaust valves open and all the hot air is removed outside, we no longer need it.
Gate valves are used for installation on outlet ventilation ducts. Made from hardwood. Installed under the ceiling and above the shelf.
The corrugated pipe consists of flexible wire and aluminum foil, which acts as a shell. The length of the corrugated channel is 10 meters and Ø 100 mm. A prerequisite for installing a corrugated pipe is its stretched state. If it is insufficient, a loss of pressure occurs in the pipeline, which reduces draft. The size of the pipeline must correspond to the length of the ventilation duct. The corrugated pipe must be installed so that the direction of the air flow is in a spiral. During installation, care must be taken not to deform the corrugated pipe, otherwise it will need to be replaced due to unsuitability.
Like valves, they are made of linden or alder. The installation location is the area of the heater to ensure air flow.
The material used to make the valve is alder. Serves for installation on the exhaust duct.
The components for laying the ventilation duct ensure uniform heating and drying of the steam room room, as well as saving heat coming from the stove.
We proceed to the installation of ventilation ducts from corrugated pipes, followed by the installation of exhaust valves and supply grilles. The pipes are attached to the wall, subsequently insulated and covered with clapboard.
Step #5. Wall insulation
We use mineral wool as insulation for the walls in the Finnish sauna.
After installing the slabs, they must be covered with foil or foil paper.
The ideal material that will reduce the installation time of insulation and make the steam room a kind of thermos is the innovative material Rockwool foil plates Sauna Butts.
In the rest room, instead of foil, we attach a vapor barrier.
After the foil is secured with a stapler, all corners and joints must be glued with special foil tape.
Step #6. Insulation of ceiling and floor
OLYMPUS DIGITAL CAMERA
We insulate the ceiling in the same way as the walls. The garage has a concrete floor, so it is advisable to install heated floors and lay floor tiles. The simplest option, both in terms of labor intensity and cost, is a film infrared heated floor. Due to the fact that there is already a screed in the garage, laying a heated floor is simplified.
Preparation
First, we prepare a place for mounting the heating regulator and floor sensor. In our case, it is advisable to take it into the rest room and install it on the wall, at a height of 30 cm to floor level. We make a hole in the wall for installing the regulator and a 2x2 cm groove in the floor for laying the cable lines of the heating section, temperature sensor and power cable.
Cleaning and priming
We thoroughly clean the floor surface before installing the heated floor and apply a layer of penetrating primer for better contact of the surface with the adhesive mixture.
Marking
We mark places where underfloor heating is not needed, under the flow and in the area of the electric heater.
Checking the functionality and laying out the heating mats
We lay out the heating mats according to the shape of the heated area. When laying, it is important that there are no overlaps of fragments or intersections of the heating cable, and that the temperature sensor is located at the same distance between the turns of the heating cable.
Checking integrity after installation
We bring the ends of the cable to the distribution box of the heating regulator. After checking mechanical damage, check the resistance values of the mat and temperature sensor. Their performance must meet the standards; this will confirm the performance of the heated floor.
Sensor Installation
Now we install the temperature sensor and thermostat. We place the temperature sensor in the tube supplied in the kit. The sensor itself is placed at the edge on one side, and the connecting cord comes out of the other.
Place a special plug on the edge of the tube located in the floor so that when pouring the adhesive mixture, it does not get on the indicator.
We lay out the tube along the groove to the junction box. It is not advisable to bend the tube as much as possible; the minimum bend size is 5 cm.
Now fill the groove with tile adhesive mixture.
Connection and performance check
We service the ends of the heating wires and connect them to the terminals of the temperature controller. After which we briefly apply the load and check the functionality of the system.
Laying tiles and checking the functioning of the heated floor
Apply the adhesive mixture. Its layer should be 8 - 10 mm, all voids should be filled. We lay ceramic tiles on top.
After the tile adhesive has completely hardened, we once again check the functionality of the heated floor system.
In the rest room, the floor system is performed in a similar way.
Step #7. Covering wall and ceiling surfaces with clapboard
We choose hardwood paneling, preferably linden.
We start nailing from the ceiling. The lining is attached very easily.
It can be secured using clamps - special staples
or in a reliable and proven way with small nails.
After finishing the ceiling, we move on to the walls.
Here it is necessary to nail the counter batten. It will be needed to attach the shelves. It should be taken into account that the strip for attaching the sun loungers should be wider than the slats for attaching the lining. See photo.
Similarly to the steam room, we cover the ceiling and walls in the relaxation room with clapboard
Step #8. Lounger equipment
First, we measure 92 cm from the floor and attach the main beam 50x50, on which the entire shelf will be supported. We control the horizontality of the beam using a building level. It should be remembered that we screw the timber to a specially prepared wide strip behind the lining.
We screw the main beam around the perimeter to the walls to which the sunbed will be adjacent
Then we make the frames. The shelves will be angular, so we make a frame along one and the second wall. The width of the shelf depends on the available space in the sauna. If distances allow, it can be made lying down; if not, then only sitting. In our case, the shelves along the long wall of the steam room will be equipped for receiving the procedure while lying down, and along the short wall only while sitting.
Due to the fact that the length of the lounger is large and it will bend under the weight of a person, for reinforcement we install jumpers and support posts at intervals of 50 cm.
To cover the deckchair we use a board 30 mm thick and 80 mm wide. You should either buy an already sanded board with rounded edges or process it yourself.
Next, we cut the board to size and lay it on the shelf frame.
To ensure that the distances between the deck boards are the same, use a template. In our case, this is a piece of lining.
It is necessary to take into account that the last board from the free edge should protrude from the beam by its thickness, in our case by 3 cm. This is necessary in order to subsequently cover the beam with a shelf board.
The boards need to be attached to the frame only from below, otherwise they, when heated, will cause a burn to the person receiving the procedures.
We fasten the boards with 3.5x75 wood screws, having previously drilled a hole for the screw.
After all the boards on the lounger are screwed, we make a shelf for the legs in a similar way. First we build the frame, and then we cover it with a sanded board.
Now all that remains is to close the space between the shelf and the footrest. Here we use linden trim, having previously cut it to the required size.
Fastening is carried out from the inside; during installation we use a template.
Step #9. Installation of an electric heater.
This is not a difficult stage in the construction of a Finnish sauna, but it requires some knowledge of electrical equipment.
Preparation
First, remove the mounting frame attached to the rear side by unscrewing the bolts.
Mounting the frame on the wall
Using the fasteners provided with the stove, we attach the frame to the wall. Along with the fastenings behind the clapboard, there should be a mounting board to which the frame will be mounted. Installation of the stove on the wall is carried out so that the mounting hooks extend beyond its lower edge, and the groove of the upper part of the stove is installed on the stand.
Furnace installation
We install the heater on the frame.
Connecting the oven to power supply
We connect the electric heater to power. In our case, this is a single-phase connection to a 220V network. First of all, you need to remember that the connection of the electric heater must be carried out by a specialist familiar with electrical equipment:
9.4.1. The cross-section of the cable line must correspond to the power consumption of the furnace.
9.4.2. The device must be grounded.
9.4.3. All contacts are cleaned and tightened firmly and securely.
9.4.4. When connecting the control panel, you need to remove the top cover and fix it on the wall.
9.4.5. To make the connection easier, remove the magnetic starter.
9.4.6. Connect all wires in strict accordance with the terminal designations on the magnetic starter.
9.4.7. First we connect the power wires.
9.4.8. It is necessary to install copper jumpers at the input of the magnetic starter.
9.4.9. You also need to install jumpers made of copper cable at the output of the magnetic starter.
9.4.10. We connect the wires from the heater.
9.4.11. We connect the grounding cable.
9.4.12. We install the magnetic starter in place in the control panel.
9.4.13. We connect the temperature sensor.
9.4.14. Reinstall the front cover.
9.4.15. We check the operation of the heater and control panel.
Step #10. Safety fence
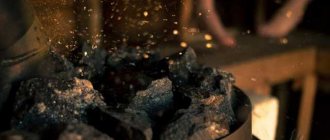
Step #11. Laying stones
Fill the heater with stones.
Next, we make a reliable fence for the electric heater from wood. We use the remains of the board and limit the approach to the stove. We hide the metal fasteners inside the wood, having previously drilled blind holes Ø10 mm.
Step #12. Door installation
We install glass doors at the entrance to the steam room and relaxation room. Instructions for installing doors can be found here.
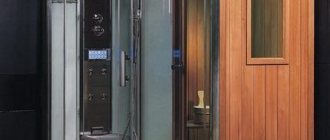
The steam room in the Finnish sauna and the relaxation room are ready. Now we move on to the installation of a shower cabin, which is a mandatory attribute of a dry-air bath from Finland. Detailed instructions for installing a shower with your own hands can be obtained from the link.
Which doors to choose for a Finnish sauna
It is preferable to install a wooden or glass door in a Finnish bathhouse.
When installing doors, it is necessary to pay attention to its thorough sealing. To do this, it is necessary to fill the existing gaps with a felt plate, and if there is a vestibule or dressing room, the doors do not need to be insulated additionally. It is worth noting that Finnish wooden baths have a low ceiling, just over 2 meters high. This plays a certain role when installing entrance doors. The classic sizes 2000x600–900 mm may not be suitable. You will have to make a door to order or purchase a special one - for Finnish baths. Remember that the door must open outwards!
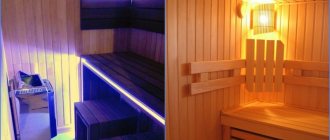
Note! Considering that the construction of a Finnish sauna implies the absence of windows, the lighting problem needs to be solved. In this situation, the best option would be to install corner or wall lamps that will not be too bright and will not cause discomfort to vacationers.
Doors, windows and ventilation
The door to the steam room can be chosen from glass or wood. The glass may be frosted.
When installing doors, special attention should be paid to sealing them. For these purposes, it is recommended to lay the gaps between the doors and the door frame with a felt gasket. If the sauna design includes a vestibule, then additional insulation of the doors is not necessary.
If desired, the sauna can have a window, which should preferably be located low so as not to increase heat loss. The recommended window dimensions for a bathhouse are 500x700 mm.
Such premises are unthinkable without ventilation, which should reduce the likelihood of oxygen burnout. Ventilation is organized in this way: air was taken from the rest room, entered the oven, then into the steam room, and again moved to the rest room, outside or to the shower room.
For such organization of ventilation, one should resort to the forced method (by using special fans).
It is advisable to place the ventilation duct under the lower bench, where the air is at a lower temperature.
When lighting a room, work should be done on the frame before finishing the room. In this case, the lighting fixtures must be of a closed type, and the cables must be hidden in a metal corrugation.
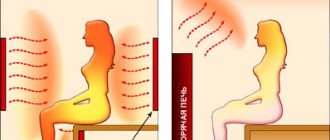
Features of the ventilation system of Finnish baths
To build a Finnish sauna correctly and then enjoy pleasant procedures, you need to carefully consider the ventilation system. Ventilation in the bathhouse should be as close to natural as possible, because any forced ventilation can cause discomfort. Therefore, for proper air exchange, it is necessary to make 2 vents, which are made in opposite walls. The air inflow point is located at a level of 30 cm from the floor, and the hood opening is 30 cm from the ceiling. The first vent must be equipped with a valve so that it is possible to regulate the incoming fresh air into the bathhouse.
Equipment for a sauna in a wooden house
In a Russian bathhouse, steam is produced independently. The saunas used in modern homes are packed with so many electronics that independent steam generation is impossible.
For independent steam, use a heated heater. That is, they pour water on it on the stones placed in it. In a Russian bath, the stones are kept in a closed oven, and this allows them to be heated to a temperature of 800 degrees. In a sauna, the stones are heated in the open state.
Selection and installation of a Finnish sauna stove
A Finnish sauna with your own hands is a great pride, but what is a sauna without a good stove?
An important attribute of any bathhouse, its heart and hearth, is the stove. When choosing an electrical appliance, it is necessary to take into account the size of the room and pay attention to the ratio of kW to square meters. If you like a wood-burning stove, then you need to provide space and consumables for it - firewood, fuel. Please note that the stove should be positioned so that the human body is not exposed to high temperatures that can cause burns. To protect visitors to the bathhouse, it is recommended to protect the stove with protective railings.
We present to your attention a video about the construction of a Finnish sauna:
The construction of a Finnish sauna is a labor-intensive and creative process, requiring a serious approach, thorough calculations and error-free execution. But the game is worth the candle, since a bathhouse built with your own hands is not only pride, but also a way to improve your health.
History of the origin of the Finnish sauna
The appearance of the Finnish sauna happened so long ago that it is unlikely that anyone will undertake to confirm the exact date. There is an opinion that this happened more than 2 thousand years ago. At that time, the Finns were a nomadic people and were in contact with other tribes that inhabited the Earth. This theory is confirmed by the fact that the sauna is a product of a symbiotic relationship with the Slavs and the Irish.
A beautiful explanation of the origin of the sauna is a legend. Drops of rain that fell on the stones of the home through an accidentally leaking roof evaporated and created a pleasant atmosphere of warmth and steam in the room. And then the person decided to turn chance into a pattern, artificially repeating the natural process. Thus, the Finnish sauna appeared.
A dry air sauna from Finland has a beneficial effect on the human body, bringing benefits to it. However, you need to remember not only the positive impact, but also the sense of proportion and contraindications of paired procedures. You can find out more about this here (the benefits and harms of the Finnish sauna).
The Finnish sauna is often confused with a Russian bath. Yes, we can say that some similarities are observed, but still the differences are fundamental; you can read about this in this article on our website.
Finnish sauna lovers can build one with their own hands in a house, garage, apartment, or even on the balcony and enjoy the delights of steam treatments. Detailed recommendations are presented in this article.
Recommendations for installing a sauna in a wooden house
After that, the insulation is installed in its place. The walls must be covered with a special foil material. Moreover, the mirror side should be facing inward. When laying foil, the joints of the strips must be secured with aluminum tape. Thanks to the properties of this material, the heat will not escape outside the sauna, but will remain indoors. In addition, the steam room will warm up much faster and maintain a high temperature longer.
Arrangement of sauna walls
It is advisable to use lining for covering wall surfaces. It can be made of pine, linden or alder. Each of these types of wood has its own advantages. Linden has a pleasant appearance and, thanks to its properties, it has a positive effect on human health. This tree has long been used for the construction of baths. Lining made of alder is capable of retaining heat well, however, it does not heat up so much and this reduces the risk of getting burns when coming into contact with it. But it has a significant drawback. Alder is soft wood and even a slight blow will leave dents on it.
Pine is most often used for arranging saunas and baths. During the heating process, pine releases many substances beneficial to humans.
The process of finishing a steam room is as follows. The lining is cut to a size corresponding to the height of the steam room. To extend the service life of the lining, it can be treated with special compounds.
Furnace installation
In modern saunas, electric stoves are most often installed. You can buy them in a specialized store or assemble them yourself. But in fact, it must be installed and connected correctly.
The oven is selected based on the parameters of the steam room, that is, its volume. Calculations carried out by specialists from sauna equipment manufacturing companies show that for high-quality heating of one cubic meter it is necessary to spend 1.4 kW of energy. A simple arithmetic calculation shows that, for a steam room with a volume of 5 - 9 cubic meters. m, it is enough to install a stove with a power of 6 kW. Such a stove can operate on a 220 V network. Furnaces with higher power must be connected to a 380 V network.
In addition, there are certain restrictions on installing a stove in a steam room. So a 6 kW oven must have safety zones - at least 70 mm on the sides, 100 mm in front. To connect it, you will need to install a 35 A fuse.
Insulation of sauna walls
The walls of the steam room are insulated from the inside. A vapor barrier material is laid on a pre-prepared base; it can be bitumen paper or other material with similar properties. Vapor barrier sheets are laid with an overlap of 150 mm. To increase the reliability of fastening these sheets, either clamping slats or stapler staples are used.
The frame for installing thermal insulation is made of timber with a section of 50x50 mm. The pitch between the slats determines the size of the insulation. In order for it to fit into the cell as tightly as possible, the dimensions of the latter should be somewhat smaller than the size of the insulation mat.
By the way, holes must be made in the slats that are installed in the frame to create hidden wiring and ventilation.
A dry pipe (fire extinguishing agent) is placed in the hole and stretched along the entire perimeter of the steam room.
Shower room
As a rule, a shower room is a small room measuring 1000 mm by 2500 mm, which is located near the steam room. If the room allows, then the washing room can be made more spacious to accommodate not only a shower stall, but also a bench, containers for cold and hot water, as well as cabinets and shelves for storing detergents and other accessories.
Washing room in the bathhouse
All this can fit into an area of 4-6 square meters. In this case, the sauna will be much more comfortable.