Sometimes you want to take a break from all the hustle and bustle and go to the countryside to relax. Do things you love that you enjoy. One of the most favorite things to do at the dacha is, of course, a bathhouse.
View this publication on Instagram
Publication from Wooden Houses from SBK (@dom_iz_brusa_sbk)
You can entrust the construction of a bathhouse to professionals. But you can build on your summer cottage and landscape it on your own. You are freed from unnecessary costs and the money you save you spend on landscaping and finishing your desires and preferences. A self-built sauna will be more enjoyable.
Video description
The following finishing materials are used for exterior finishing:
Insulation materials, vapor barrier
External insulation of baths is required if there is year-round living in it, that is, when building a house and a bath under one roof. If the bathhouse is a separate building and is used strictly for its intended purpose, then only internal insulation is carried out.
When building a frame bath, insulation is already built into the structure. In all other cases, it is necessary to install insulation; mineral wool is most often used.
Vapor barrier is carried out to protect the insulation and wooden structures of the building. Without it, the insulation will eventually become unusable, the wood will become saturated with moisture and become deformed.
Wall decoration with insulationSource parki48.ru
Sewage and floor installation
The floor in the bathhouse can be of two types: wooden and concrete. The wooden floor in the dressing room is made solid, insulated, in the steam room and washing room - pourable, with the collection of water flowing between the floor boards.
Algorithm for installing an insulated floor:
- Installation of lag.
- Installation of subfloor.
- Securing the vapor barrier.
- Laying insulation.
- Installation of waterproofing.
- Installation of finished floor.
The poured floor has its own tricks and difficulties in installation - it is almost impossible to do it correctly on your own, especially without construction skills.
Collecting water from the surface of a pouring floorSource beton-stroyka.ru
The concrete floor is made at a slope to collect water in one place, where a sewer hole is installed to remove water from the bathhouse. To prevent the concrete from getting wet after each use of the bathhouse, it is lined with ceramic tiles. To keep your feet from getting cold when walking barefoot, use wooden gratings.
>Concrete floor lined with tilesSource mdv63.ru
Roof structure
Regardless of the type of roof and roofing material, the ceiling is insulated and waterproofed, otherwise the vapors rising into the attic will condense on the roof beams, gradually destroying them.
The type of roof depends on the terrain and technical parameters of the building:
- A high gable roof is used in the construction of a bathhouse in densely built-up villages, where the influence of winds on the roof will be minimal.
- When building a bathhouse in steppe areas exposed to strong winds, the roof slope is kept to a minimum.
- The roof for the bathhouse extension is made pitched.
Finishing
Finishing work begins after the structure has settled. First of all, all surfaces inside the bathhouse are coated with an antiseptic composition.
Interior finishing involves performing tasks such as:
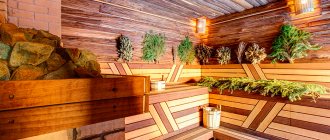
Lining is laid on the ceiling and wall
If the most popular construction raw material for the interior decoration of a bathhouse has become only lining, then many materials are in demand for cladding the external walls of a building:
The material extends the service life of the structure
Finding stones for a sauna room
It is customary to use igneous rocks in the steam room. Formed during a volcanic eruption, they are resistant to extreme heat. Igneous rocks that have a positive effect on human energy include:
In addition to benefits, this stone gives aesthetic pleasure
Metamorphic rocks can be placed on the stove, which tend to normalize blood composition and improve well-being. We are talking about stones such as:
This stone goes perfectly with brickwork
To create steam in a bathhouse, you can use fully crystalline rocks, for example:
These stones are able to regenerate cells of the nervous system, increase immune strength and have a beneficial effect on the functioning of the thyroid gland.
The length of such a stone is about 20 cm
If you want to break away from tradition, then it is better to use cast iron stones - balls produced by industry - as steam generators in the bathhouse. They instantly heat the room and retain heat for many hours. True, cast iron stones are subject to rust after a short service life and carry no useful properties for humans.
Video description
Several interesting projects on video:
Economy options
Small summerhouses save space on your garden plot, combining all the characteristics of a traditional bathhouse. They are perfect as temporary buildings when there is no money to build a large bathhouse, but you want to take a steam bath right now.
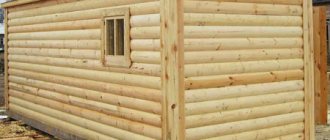
Economy bathhouse lined with imitation timberSource bane.guru
Frame bathhouseSource line-home.ru
Bathhouse 2x3 m covered with sidingSource plotnic.ucoz.ru
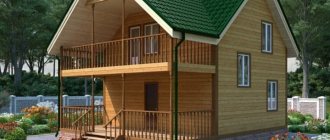
One-story baths
One-story bathhouses with a terrace are popular because the recreation area can be moved to fresh air in the spring and summer.
Compact bathhouse with a seating area located on the terraceSource market.sakh.com
An interesting option for a bathhouse with a terraceSource parki48.ru
Sauna made of rounded wood with a terraceSource topfonpack.ru
Baths with attic
For those who like to relax with a large group, bathhouses with an attic floor are ideal. A large recreation room on the ground floor allows you to accommodate a sufficient number of guests, and the presence of bedrooms on the second floor will relieve the owners of the question of where to put everyone for the night.
Bathhouse with an attic floor and two gazebos at different levelsSource teremgrad35.com
Bathhouse with attic and gazebo for barbecueSource www.domamo.ru
Non-standard designs
Rounded lines are the main idea of a non-standard bathhouse interior. Source archdaily.cn
Mini sauna on wheelsSource vw-bus.in.ua
Onion sauna in FinlandSource termalfurdo.hu
Country baths are becoming one of the main attributes of homestead development. Thanks to economical options for building small baths, everyone can become the owner of an inexpensive steam room, and lovers of noisy companies and active recreation will find options with a large relaxation room and a terrace.
Conclusion
The construction of the sauna house is almost complete!
A wooden bathhouse retains heat well and has a cozy and pleasant atmosphere. The technology of its construction has been proven and tested by more than one generation of builders. The video in this article will display information about this more clearly, watch it!
Did you like the article? Subscribe to our Yandex.Zen channel
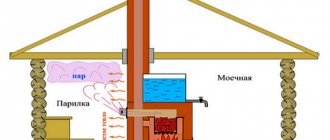
Bathhouse layout
The entrance to the bathhouse is located on the south side. This is prudent, since in winter snowdrifts from this position accumulate in the smallest quantities and melt at an accelerated pace. In order for the room to be illuminated by the sun to the maximum, it is advisable to place the windows from the west.
Planning the location of the front door and windows
When a place for building a bathhouse is chosen near a body of clean water, it is advisable to locate the building no further than 20 m from the water body. This way you can get a huge supply of water and avoid saving fluid during water procedures.
Bathhouse with swimming pool
If it is possible to add a swimming pool, you will get a full-fledged bath complex. You can build such a structure with your own hands. A special bowl is purchased at a hardware store, and a separate place is equipped for it. All that remains is to supply and drain the water. Having shown their imagination, many owners carry out designer mosaic decoration and equip bright lighting, which creates a fabulous effect at night.
View of the pool from the panoramic window of the steam room
The pool can be placed in the room adjacent to the bathhouse, if you equip it with a polycarbonate canopy or roof in advance; options with glass walls look beautiful. The pool is also convenient if it is located in a room adjacent to the steam room. The pool is designed to immediately plunge into cool water after a hot steam room.
Options for arranging a bathhouse with a swimming pool
Creating a “cascading pool” is the most fashionable idea at the moment. This is a kind of cascading waterfall, which is found only in natural areas. A closed water circulation system is created, and the edges of the structure are lined with special stones, which are usually used for alpine slides. To create a real beach atmosphere, you can create a 3D drawing on the walls that will depict your favorite beach or a beautiful tropical area. At the design stage, it is necessary to provide for a developed electrical network, large-scale water sources with the possibility of continuous water supply and drainage.
Walling
Wood is a traditional material for building a bathhouse, therefore we do not consider options for constructing walls from cinder blocks, bricks, foam blocks and other materials within the scope of this article. To build an ideal wooden bathhouse, you need to select a special log - after harvesting, the wood is “seasoned” for about 2 years.
Dried wood does not contain “excess” moisture, and therefore does not deform and is resistant to cracking.
A wooden substrate 50-60 mm thick and at least 150 mm wide, filled with tar or bitumen, is laid on the waterproofing.
Before installing the trim crown tow , dry moss or strips of mineral felt is spread on the lining . And between the logs an inter-crown seal .
Logs for external walls are hewn on one side, for internal and partition - on both sides to a depth of 2-3 cm. The cutting begins with the first (cladding) crown, it is made from a log hewn on both sides at an angle of 90 °. The bottom surface of the wood is laid on the foundation, and its side becomes the beginning of the inner wall.
Detailed information about log houses is in our material - assembling a log house from rounded logs with your own hands.
Utility and other premises
Utility and other rooms of the bathhouse
Detergents and other household chemicals are stored in such rooms. The walls here are covered with washable finishing materials up to a height of 1.8 m. Hot/cold water is supplied. Dirty and clean linen are stored separately.
Also in the bathhouse you need to think about places for a medical kit and a room for massage. If desired, you can arrange a solarium. The area of the massage room is calculated as follows: 7 m² for each massage table. Sources of UV radiation are installed in the solarium. The area of the solarium is determined at the rate of 6 m² per seat, the height must be at least 3 m.
Tea, kvass, beer and excesses are bad
As is well known, in a steam room there is an active loss of moisture from the human body, and since the human body itself consists of 80% water, the losses must be restored.
The best option is herbal tea. It is herbal tea, since Indian, Ceylon and other overseas teas, in company with domestic tea - Krasnodar tea, provokes activation of the heart rate, which is useless in the relaxing atmosphere of a cool dressing room. In addition, the heart already worked actively in conditions of high temperatures. Linden tea, tea with oregano and thyme herbs are wonderful.
Classic village bread kvass quenches your thirst well. When baths appeared in Rus', this wonderful drink appeared around the same time. Bread kvass is rich in microelements, B vitamins, enzymes, which, in turn, are rich in one of its main components - grain malt.
Beer. Well, what is a Russian bath without this intoxicating, fragrant, foamy drink. When consumed in moderation, beer can provide some benefits, or at least not cause a devastating blow to your health. Excessive use is harmful. It is clear that everyone has their own norm, but practical and pedantic Germans calculated that a liter beer mug is the ceiling norm for a person of average build.
The whole truth about the Russian bath cannot fit into the volume of one article; it is a huge, interesting, original and practically inexhaustible topic. Many interesting facts were left outside the scope of this essentially review material. It is impossible to tell everything. But we will try very hard.
Laying the foundation of the bathhouse complex
Construction of the foundation is one of the main stages of building a bathhouse. The strength of the entire structure of the structure and its service life largely depend on how well this work is done.
Therefore, it is extremely important to correctly carry out all calculations and construction work
In addition to the building material, the type of foundation is also influenced by the topography of the site and the type of soil. Since structures made of wood are lighter, a strip foundation is suitable for arranging a foundation on even terrain (with any type of soil, even heaving). If the difference in relief exceeds 1 m, as well as for buildings made of brick and other materials (brick, wood concrete or gas blocks), bored piles are more suitable.
If it is determined that in a given area it is better to build a bathhouse on a strip foundation, you can begin work. First, the plan is transferred to the area using a theodolite. If this construction device is not available, pegs with cords are quite suitable for this purpose - they also allow you to draw almost straight lines, so the breakdown of the axis will be accurate.
After marking, they proceed directly to the construction of the foundation. First you need to make trenches, the depth of which is determined by the type of soil and the depth of freezing in the region. For heaving soil, the length of the trench should be 15-20 cm greater than the freezing depth. The latter indicator varies depending on the climate zone; the exact figure can be found in specialized literature.
A layer of sand up to 15 cm thick is poured into the finished trench, then wooden formwork is installed. In addition to wooden panels, you can use any sheet material for this purpose: slate, wide boards, plywood, etc. Next, lay a layer of waterproofing for the foundation. To impart rigidity to the structure, the foundation is reinforced using a frame of 14 mm rods connected with wire.
Then a concrete mixture is prepared and poured into the trench. After 3-4 days, the formwork can be removed.
Do-it-yourself bath step-by-step instructions
Step I - preparing the place you have chosen
You will need to remove all debris, bushes, stumps and anything else that will get in the way when working on the foundation.
Step II - building the foundation
If you have a bathhouse made of timber, then a columnar foundation is suitable for it; it is not expensive and is excellent for the construction of small wooden and frame structures.
To create it, you need to dig a certain number of holes for installing supports. We will now calculate how many holes we will need as follows - supports are placed in the corners and at the intersections of the walls of the structure and with a certain step along the perimeter.
View this post on Instagram
Publication from HOUSE.BATH.STAIRS.SYNDICAT (@syndicat_individual)
To choose the right step, you need to take into account the type of soil and the total load of your structure. The depth of the hole should be 1-1.5 m; the depth of freezing in your area also depends and it can affect the depth of the funnel. The material you need is asbestos-cement pipes and fittings.
Fill the bottom of the funnel with a mixture of sand and gravel about 10-15 cm. Then install an asbestos-cement pipe of the required length into the hole vertically and secure it. Place the reinforcement rods inside the pipe and secure them.
Then prepare a cement mortar and pour it into the hole and into the pipe itself. After you have poured the concrete solution, wait about a couple of days for the concrete to completely harden. Then lay out a wall about half a brick thick between your pillars.
View this post on Instagram
Publication from Vladimir STROY/Building houses. (@vladimir.stroy)
Step III - Construction of walls and roofing
The standard material for the construction of walls is timber measuring 150x150 mm. Before installation, you must install waterproofing. You need to treat the lower part of the beam with an antiseptic. Often laying timber is the “Into the paw” method
You need to make the first installation even to the geometric parameters - all your angles must be strictly 90 degrees. When you lay out a wall, do not forget about the future of windows and doors, do not forget to insulate each row of timber with heat-insulating material. Use metal or wooden pins to connect the beams to each other.
After the walls have been erected, proceed to the roof. You need to fix the rafters, which are attached to the upper crown with brackets.
If you are installing a single-pitched roof, then the supports are secured either with two external ones, or with one external and one internal support. When choosing a gable roof, you need to fasten the rafters so that all support is on the wall, and connect them together from above.
You mount boards across the fixed supports (lathing), then lay insulation, waterproofing, and vapor barrier. The final stage of our roof is that all that remains is to lay the roofing material you have chosen.
Step IV - Interior work
The first step in interior decoration is to start with communications - water, sewerage, electricity.
It is necessary to lay the sewer system at the stage of drawings or construction of the foundation. Next to your future bathhouse, you need to dig a drainage well into which a sewer pipe will be laid at an angle from the bathhouse to remove wastewater from the washing compartment.
After completing installation work with the sewerage system, we make a finishing floor; it is usually made of wood or concrete. A concrete floor will last longer and is most often covered with tiles or porcelain tiles.
If you choose a wooden floor, then such a floor must be made to leak, the boards must be made with a small gap so that the water can drain, or a small drain must be made in the floor. Make the floor with a slight slope towards the drain.
Then you need to insulate and vapor barrier the walls and ceiling using the materials you have chosen. Make high-quality wiring and plumbing.
Next, we install windows and doors, and perform final finishing using lining or other materials. After completing the interior decoration, install the necessary electrical appliances that you have chosen.
Step V - Installation of the Oven and Shelves
There are many ways to place shelves, keep the correct dimensions, they need to be made from hardwood. Installation is easy - create a frame from timber and attach boards to it.
The installation of the stove must comply with all fire safety regulations. Wooden devices should not be exposed to the high temperature of the stove and chimney. If the stove is heavy, it needs a foundation.
You choose the oven according to your preferences. This is a standard stove on stones and wood, an electric or even a gas stove for a bath.
Material
The material from which the bathhouse will be built will determine the quality of the construction and its durability. The right choice is the key to the functionality of the premises. Nowadays, expensive environmentally friendly materials are being replaced by more budget-friendly options. The implementation of such projects significantly simplifies the process of constructing a bathhouse on the site.
Aerated concrete
As soon as the planning is completed and the drawing is made, proceed to the selection of building materials. Traditionally, wood is used for construction. However, do-it-yourself baths made from blocks, the designs of which take into account the characteristics of the material, are no less popular. Laying walls when building a bathhouse requires certain skills.
This makes it difficult to use wood to build them. Nowadays there are quite a lot of materials, the use of which can reduce construction time, even in the absence of professional education as a mason. In addition, they allow you to make an economy sauna with your own hands; the projects, in the case of using blocks, are quite simple. There are up to 10 different types of blocks.
A do-it-yourself aerated block bathhouse is the most popular project. Essentially, it is an artificial stone. It has high strength.
It can be used for the construction of load-bearing walls and partitions.
In order to save money, when building a bathhouse from an aerated block, the project takes into account the fact that the aerated block is laid on its edge.
This allows you to significantly reduce material consumption.
The thickness of the wall with this installation method is small, which is not critical, since the walls are subsequently insulated.
If you want to build a budget sauna with your own hands, choose a project from aerated concrete blocks - they are very light, easy to use and process. Another advantage of a do-it-yourself aerated concrete bathhouse is that this material does not burn.
Over time, their strength increases. Among the disadvantages, it is worth highlighting the high price of the blocks themselves and hygroscopicity. To avoid excessive moisture absorption, special compounds are introduced into this material. The blocks are laid on special glue.
Information. It is better not to use cement in such structures, since the water contained in the solution is absorbed into the aerated concrete. This deteriorates the thermal insulation properties of the bath.
cinder block
If you have chosen a small do-it-yourself sauna, a 3x5 project, the material described below will be more suitable for you.
A cheaper option for construction would be to use cinder block. Blocks are made from products formed during the combustion of various materials. They can release toxic substances. Therefore, before using them as a building material, it is necessary to let the cinder block sit for at least a year.
To enhance the thermal insulation of the walls, filler is poured into the hollow holes of the blocks. The most suitable option is sawdust.
When building a cinder block bathhouse with your own hands, the project must be designed for this.
Cinder block can be processed with almost any available tool. Protected from fire.
Conducts heat twice as well as brick. Light weight is also an advantage. The downside is that it absorbs a lot of moisture.
The undoubted advantage of a cinder block bathhouse over a do-it-yourself aerated concrete bathhouse is the price.
Attention! When using cinder blocks, try to isolate the structure as much as possible from the aggressive effects of water. Before laying sawdust, treat it with a water-repellent solution.
Bathhouse made of logs
Initially, you need to select the required material. The lower and upper diameters should not differ by more than three centimeters. The wood should not have any cracks, large knots, or blue stains.
Log sauna project
The construction process itself involves laying logs on logs, with notches made at the ends to fit tightly. This design is called a crown. Where the window is planned, five crowns are made at the bottom and two at the top. On the door sections there are two at the bottom, five at the top. The crowns are fastened together with wooden brackets approximately every 1.5 meters. The bottom ball of the logs is called the frame. The hardest and best types of wood are chosen for it.
Often, to protect against getting wet, a gasket is made from a board, which is treated with various antiseptics or wrapped in several layers of roofing felt.
A trim crown is placed on the gasket, which is pressed together from below to make the fit tighter. Crushed stone or bricks are placed under another log, which naturally stands a little higher, thereby eliminating the gap above the ground. Next, the crowns are laid one after another. On the upper logs the joints are made oblique.
An example of laying logs for a bathhouse
After the walls are erected, they are caulked. This can be done in two stages. The first time was when the frame was built, and the second time after drying and shrinking the logs - about a year and a half later. Caulking a house is laying insulation made of fibrous material - tow, moss - between round pieces. The insulation is driven in using special tools so that its edges protrude at least 50 mm on both sides of the wall.
Advantages and disadvantages of self-building
Building a bathhouse with your own hands in the garden is a complex, but creative and constructive process. Self-construction is quite popular. Among the main advantages of doing work on your own are:
- the ability to use a project developed in accordance with personal needs, taking into account the preferences of all family members;
- saving money, the owner manages the allocated budget himself, rather than paying the amount announced by the contractor;
- it is possible to build in stages, investing small amounts;
- confidence in the quality of purchased building materials;
- gaining and accumulating experience, it will be useful in the construction of other buildings;
- pride in a structure you built yourself, which you can show off to your friends and relatives.
The disadvantages of building a bathhouse yourself include:
- the need to study existing projects, draw up your own scheme;
- acquisition, transportation of building materials and equipment, costs of purchasing tools required to perform the work;
- low speed of construction; experienced builders will build a steam room much faster;
- full responsibility for all stages of work, from the poured foundation to the construction of walls and roofs, installation of windows and doors;
- complexity in the location of heating equipment and utility wiring;
- You should be completely confident in your abilities; if you don’t have enough time, patience, and funds, then as a result, an unfinished object may appear on your personal plot.
Bathhouse made of beams
Again, we initially select good material. The timber should not have wormholes or traces of being eaten by beetles, it should look perfectly even and smooth. The easiest way to build is to order a ready-made project with detailed drawings and numbered beams. It will be a little harder to do it with your own hands, but the joy from constructing the structure will be greater. The foundation, as in the version with logs, must be finished with various waterproofing materials.
Slats are laid on it, the purpose of which is to protect the base from subsidence and the timber from rotting. The space between the foundation and the tree is filled with foam. After this, the first crown is laid. For it you need to choose the thickest and most reliable materials. So, if our main beam measures 150 mm by 150 mm, then it is better to take 200 x 200 mm for the lining. The following crowns are stacked one on top of the other, strictly maintaining a horizontal level. There are three ways to fasten the beams together:
- Nails without heads;
- Wooden quarter-deck;
- A spring unit called “Strength”.
The top balls of the crowns are not attached, since they will need to be removed to lay the floor. If desired, each level can be caulked for better heat retention.
Toilet
Toilet in the bathhouse
At least two toilets must be installed in the bathhouse:
- one of them is connected to the shower;
- the other is more expected.
Each booth must have:
- toilet;
- wash basin;
- mirror;
- box for toilet paper;
- hanger hook.
The height of the cabin must be at least 1.8 m, all surfaces are finished with light-colored and easily washable material. The floor is made with a traditional slope; the presence of cracks and holes is unacceptable. A washbasin is installed in front of each cabin.
Bathhouse project with toilet
Forced ventilation is installed.
How to make ventilation in a bathhouse Ventilation system for a bathhouse
Steam room in the house: pros and cons
One of the popular options for a steam room is a do-it-yourself sauna, a 4x4 project, since not many people can financially afford a sauna with a 6 6 or more project. A Russian proverb says: “Every man must build a house...”.
Many perceive these words as a guide to action. They want complete control and management of the construction process. Now there are a huge number of forums that can help anyone fulfill such a desire. There is a lot of information on these sites that really helps people fulfill their long-standing dream of building.
Information. Remember that the design of a bath house with your own hands must be thought out to the smallest detail. This is necessary in order to protect your life and maintain the health of visitors to the steam room.
As in all other cases, building on your own has a number of advantages:
- Saving money;
- Opportunity to buy higher quality materials;
- Independent selection and modification of the bathhouse;
- Full control of construction;
- Construction of high quality buildings;
- Acquiring new knowledge;
- An investment of funds that occurs in stages.
And that's not all. In addition to the advantages, it is worth noting the disadvantages of a bathhouse in the house with your own hands, projects, photos and drawings of which were found on the Internet:
- Visiting a huge number of authorities;
- Possibility of making mistakes in costs;
- Delaying the construction process;
- Limited selection of projects;
- Low quality of individual parts of the building.
Important! Any work requires a responsible approach and high-quality execution. If you are not confident in your knowledge and skills, seek advice from a professional
Even compact steam rooms, for example, a do-it-yourself sauna, project 3x5, require considerable builder skills.
In black
If the desire to work with your hands haunts you, and you don’t have much knowledge in construction, you can build a simpler version of a bathhouse. There will be no additional premises there. This will make the construction of the building much easier. There are baths that are as simple as possible to perform. These are “black” baths. In the black sauna, the designs do not have a chimney. Due to the absence of a chimney in them, the smoke, circulating inside the room, warms it up.
Then he leaves through the cracks in the ceiling, the half-open door to the outside. The walls and ceiling are covered with soot, hence the name.
The building itself is a wooden hut, with a combined steam room and washing room.
The heat in the room comes from the fireplace. It is a fire lined with stones.
Such a bathhouse heats up very quickly. It takes 2-3 hours for it to warm up completely.
In a DIY bathhouse, the projects are simple, construction is economical in terms of wood consumption, especially if it is buried in the ground.
And no one can resist the aroma of pre-arranged herbs in the steam room. As a rule, they have such do-it-yourself baths, 3x3 projects or a little larger. From a “black” sauna you can always make a white version. To do this, it is enough to equip the stove with a roof and remove the pipe. Despite the fact that black-style bathhouses, projects, photos and drawings of which are widely distributed on the Internet, are the cheapest option, professionals still do not recommend building them.
Preparing for the construction of a wood-burning sauna
Before designing a bathhouse, it is necessary to determine a place for it on the site. It must comply with sanitary standards, fire safety rules and not create problems for neighbors. The relevant documents can be found on the Internet.
For ease of use, the future building is oriented with its entrance to the south and windows to the west. This will reduce snowdrifts at the doorstep in winter and save energy for indoor lighting in the evenings.
It’s a good idea to think about draining contaminated wastewater from the bathhouse. They are transported to a sewer or drainage ditch. To facilitate this process, build a bathhouse on a small hill.
Plan in advance the installation of utilities. These include water supply, sewerage, ventilation, heating and electrical systems.
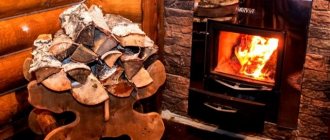
The choice of stove is also a very important point in planning a sauna construction. They come in gas, electric and wood. Only the latter are good for a Russian bath, as they emphasize its traditions and efficiency. Choose to install a metal or brick wood stove at your discretion.
Should traditional approaches be followed completely?
Understanding the principles by which a proper bathhouse was previously created and operated, you can decide which of them should be used today, starting from the design stage and ending with the regular use of the structure. What was the place where our ancestors washed and steamed?
First of all, it was a “black” bathhouse - a log house, which was heated directly by stove smoke. The log structure did not have an outlet pipe, so the combustion products of wood were discharged directly into the room, and then through open window and door openings, and special holes in the walls. During the preparation of the structure for use, from the outside it might seem that a fire had started, however, if certain rules of kindling were observed and proper control was carried out, the process was quite safe.
The smoke heated the wood of the building structures, and most importantly, hundreds of kilograms of stones from the stove, which could maintain the required temperature from a couple to ten hours
It was this secondary heat that was important, since before using the Russian bath, it was thoroughly ventilated, washed and the stove firebox was cleaned of ash. The results of such training had both their positive thermophysical characteristics, healing efficiency, and some negative aspects
Advantages of a black firebox
- Uniform distribution of heat due to infrared radiation from black, soot-covered walls and ceilings, the developed surface of a huge mass of hot stones (up to 700⁰C). On the contrary, modern compact ovens create superheated air currents that can burn or dry human mucous membranes.
- The favorable temperature and humidity conditions of the air (t=40-70C, φ=90-100%) in a Russian bath are much closer to the natural human environment than in modern saunas (t=90-110C, φ=10-25%), therefore, it has a “mild” shocking effect on the body.
- Sterilization of a steam room with substances contained in smoke. Phenols, formaldehydes, acidic components - perfectly disinfect rooms, killing pathogenic microflora, preventing wood rotting. Later, before the start of the procedures, the atmosphere is cleared by ventilation.
- A pleasant aroma combining the smell of smoke and steamed wood.
Disadvantages of the “black” firebox
- It takes quite a long and troublesome time to prepare Russian black baths for use.
- High risk of fire if heating technology is violated.
- There is no possibility to automate basic processes.
Despite these shortcomings, today the tradition of steaming “black” has begun to attract more and more fans. Therefore, you have to make a choice - completely follow the classic approach or install a “white” bathhouse (with a chimney), in which there will be no smoked walls, but the unique aroma of steamed wood, birch brooms, herbal infusions and other of its traditional attributes will remain. For the most part, both options differ only in the method of removing flue gases, but otherwise the principles of their construction are similar.
"And in the end I will tell…"
And a few more rules for constructing a Russian bathhouse:
- It is better to build a bathhouse away from a dusty road.
- The ideal option is a steam room complex near a reservoir. The optimal distance is 40 m. An important point is that the area should always be dry and not subject to periodic flooding.
- The windows of the building should face west. Don't make the windows big. In the old days, openings were made very small; it was believed that the heat was more generous in the dark.
- Make the entrance on the south side.
- Do not neglect fire safety requirements. When burning “black”, ensure a distance from the bathhouse to another building of 12 m. If you have built a “smoke-free” steam room, then the safe distance between buildings is 7 m.
Connecting a bathhouse and another outbuilding helps save area.
Bathhouse layout: recommendations.
At the beginning of construction, it is highly advisable to make a project that should, among other things, determine the optimal area of construction.
It is believed that the estimated area for 1 person should be approximately 5 sq.m. Thus, if the expected number of visitors to the bathhouse is 4 people, its total area should not be less than 20 sq.m.
The minimum composition of the premises is as follows: steam room, washing room, relaxation room and dressing room
It is important to determine the most convenient location of these rooms relative to each other, as well as their geometric dimensions
First you need to complete several diagrams and drawings:
— general plan of the building; — drawings of each room separately; — diagram of the foundation; - roofing diagram; - plan for fastening and laying out timber; — plan for the installation of the floor and ceiling of the bathhouse; — installation diagram of the furnace, taking into account its design features.
All the necessary drawings can be completed independently, and can also be found in many open sources. As a rule, bathhouses made of timber have similar designs and you can easily choose the most suitable one. If you wish and have the necessary budget, you can entrust the design to a professional architect or builder.
Designing a wood-burning sauna
After understanding the above, you can begin to develop a project for a wood-burning bathhouse.
The project takes into account how many people the bathhouse is designed for and what tasks it should solve. It’s one thing to just take a steam bath or wash, and quite another to organize a full-fledged vacation in it with a pool, tea party and many guests. When planning a family steam room for 5-6 people, you can limit it to a small volume and take procedures in 2-3 sessions.
A large bathhouse is considered to be a building on two floors, with a steam room of 10-12 m2, a twenty-meter relaxation room, two swimming pools and showers, a billiard room on the second floor and a jacuzzi. To take care of such a bathhouse you will have to hire a person.
Today you can find a standard bathhouse design for every taste. If you take it as a basis, you can develop your own project for building a wood-burning bathhouse, taking into account your wishes.
Roof of the bathhouse
Even at the design stage of a Russian bathhouse, you should decide on the type of roof that is planned. There are only a few options:
- roofless;
- attics.
Designs that include an attic space will look more presentable, and they will initially have a higher level of thermal insulation. They are very convenient to use in winter, while roofless ones are recommended to be installed in summer cottages, which are visited exclusively during warm periods of the year. You can always place a water tank in the attic, which will free up a lot of space on the ground floor. Most roof elements are load-bearing parts of the main structure (purlins, rafters). Roofing includes waterproofing and sheathing.
Floor beams will be laid on the top row of walls, fixed exclusively in a horizontal position. Rafters are installed on their surface, which are logs whose diameter is at least 12 cm. If beams are used, their cross-section should be equal to or greater than 65 cm. Metal brackets and ridge beams are used as fastening for the rafters (as a retainer between them ). Next, the installation of solid wooden flooring or sheathing is carried out. And only after this can you begin work aimed at installing the ceiling.
Building a foundation for a bathhouse
Construction begins from the foundation. Under a Russian bathhouse, which is built from heavy solid logs, a columnar or strip foundation is most often installed. The latter is more reliable, but quite labor-intensive and expensive (video).
Columnar is good if you are building a small bathhouse. The pillars that serve as support for the structure are installed at the corners and load-bearing walls of the building (video).
When the foundation is poured, the base for the furnace is immediately built. It will be quite heavy, so it must be installed on a solid foundation. It is important to choose the right place for the stove: it must heat all rooms at the same time.
A real Russian bathhouse and its features
Structurally, the Russian bathhouse is not very different from the Finnish one or other structures of a similar nature
It is worth noting that if you do everything correctly, you can stay in a hot room for a long time without harming your health. A special feature can be called a special stone stove, which can maintain a high temperature of nearby stones, which ensures timely supply of hot steam to the steam room
A niche with stones opens only to splash water on them. The resulting steam is finely dispersed and is therefore extremely well tolerated by the body.
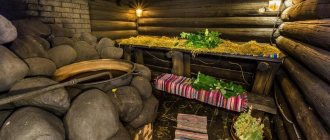
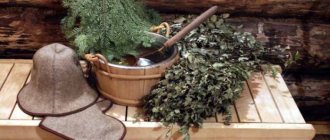
At the same time, the air masses in the room are heated more evenly, which allows you to independently regulate the level of humidity and temperature in the steam room. You cannot do in a real Russian bath without a fragrant fir or birch broom. But to use it you will need a certain level of humidity, otherwise the broom will dry out quickly. Therefore, first you should take care of a high-quality stove, and only then think through the interior decoration of the premises.
Features of operation
Only a steam room provides the healthiest and only correct ratio of humidity and heat. But even there there are extreme values. This is also confirmed scientifically. The best state of health at a certain combination of humidity and temperature is graphically expressed by a homeothermal curve. Below the first curve is the optimal combination of temperature up to 90° and humidity up to 80%, which is what the Russian steam bath provides.
Homeothermal curves can be considered an indicator of well-being in the bath
While in the steam room, the body is washed with hot, humid air, especially when exposed to it with a broom, due to which everything warms up. In this case, there is a constant flow of oxygen to the tissues.
Air circulation in the steam room provides a healing effect
After being in the steam room, you need to plunge into the ice plunge pool.
Fonts in a washing Russian bath should be filled with cool water
How to make a steam room in a bathhouse correctly
The main part of the bathhouse is the steam room, it is needed to take a steam bath, so making the steam room in the bathhouse correctly should be the main goal of the builder. The most common area of a steam room is 2X2.4 m, height – 2.2 m. As a rule, there are no windows in it; heat escapes through them. It is necessary to provide effective ventilation in the steam room and the entire bathhouse, otherwise fungus and mold will firmly establish themselves on the wooden elements of the interior, and you will have to fight it, and this is just improper ventilation.
Insulation is carried out by covering the ceiling, walls and floor with boards 40 cm thick. It is advisable to use good, thick insulation with foil.
Features of the steam room design include the use of ceramic floor tiles, since there are constant high temperatures and humidity. It is better to make furniture from aspen, which does not release resin at high temperatures. To save space, the benches are fixed against the walls.
The main element is the stove. Brick, metal and electric are used. They are usually installed in the corner closest to the door. The door itself should have a high threshold and a low frame. This protects against drafts and heat loss.
Installing a stove for a wood-burning sauna
The centerpiece of a Russian bathhouse is a well-made stove.
Its location should ensure heating of all rooms of the bath: steam room, dressing room and washing department. To create a comfortable temperature regime, a metal stove is quite suitable. Its heat output practically corresponds to the power of heat release inside the firebox. The physical properties of a brick oven and fire safety regulations do not allow it to emit more than one hundred degrees of temperature. A separate foundation is installed for the heating device in the bathhouse. The chimney is installed so that the walls of the pipe are at a distance of at least 40 cm from the roof rafters.
You can make a metal stove yourself in this way:
- A one and a half meter pipe with a diameter of 500 mm is cut into two parts - 90 and 60 cm. A stove-stove is made from a long section, and a tank for heating water is made from a short section.
- A 200x50 mm hatch is cut out at the base of the long section. A round plate with a thickness of at least 12 mm is welded above it.
- The grate is made of a metal sheet and installed in a cut-out ash pit.
- A niche is cut out in the pipe to accommodate the combustion chamber. A 250x300 mm door is made from pipe cuttings.
- A blank for the hopper is welded above the chamber. It uses a part of a pipe 350 mm long with a welded back part. The stone hopper is equipped with a door 300 mm wide. Half of its container is filled with pebbles, and the top is closed with a metal circle.
- A coupling 50 mm wide and 5 mm thick is fixed at the top of the stove. It is made of steel tire.
- The coupling is welded to the furnace body so that one half of it protrudes above the device. The tank is attached to this part.
- A container for water is being prepared. A circle 8-10 mm thick is welded to the lower end of the tank. A hole with a diameter of 150 mm for the chimney is cut in advance. The lower part of the chimney is welded to the bottom of the water tank to prevent water from flowing into the firebox.
- The top of the water tank is covered with a steel circle. A chimney is welded to its hole. At the top of the water tank, a hole is made for filling it, which is equipped with a lid with a handle.
- A platform 300 mm wide is welded 350 mm from the water tank.
- A faucet with a valve is welded opposite the hole for filling water.
- The furnace door is installed.
How to build a wood-burning sauna - watch the video: That's all! Agree, the science is not complicated, and you already understand how to make a wood-burning sauna. By following the rules, the project and our guidance, in the near future you will be able to enjoy the healing power of your own bathhouse. Good luck!