The strength of a roof is the total strength and quality of all its constituent elements: rafters, beams, ridge girder and sheathing. And also how tightly and competently these elements are connected to each other. After all, almost every one of us is capable of understanding the cross-section and calculation of the roof load, but how can we secure the rafters so that the roof serves faithfully for at least half a century?
In fact, this is a whole science, and each type of roofing assembly has its own pros and cons, and the same type of fastening can have a very different effect on the strength of different roofs. Therefore, let's approach this issue with all responsibility!
Types of rafter systems according to the level of load on the nodes
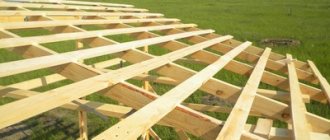
There are two types of rafters - layered and hanging. Main design features:
Hanging rafters are distinguished by the fact that their upper ends always rest against each other and there is no support under their junction. And in order to balance the load from the roof, the lower part of their rafters is connected with another element - a tie.
The result is a regular triangle, in which only the lower element works to stretch. Another beam in the roof, where the rafters also need to be attached, is called a beam. It is located horizontally and supports the ridge girder.
Peculiarities
A gable roof, unlike a single-pitch roof, requires a more detailed calculation, since along its center line (and not only) these slopes rest on each other, delimiting and balancing the load from their actual weight. Rafter-gable structure - boards, pieces of timber and individual beams of different shapes and cross-sectional areas. For installation, mainly coniferous timber (for example, pine) is used - unlike larch, it can withstand significantly greater loads. This beam with a side of 15 cm (square section) is laid along each of the load-bearing walls of the building. Fastening is achieved using anchors, rods with “self-tapping” threads and studs with a diameter of 16 mm. This is the Mauerlat - it transfers a uniform load from the rafters to the walls of the building.
Types of support units by level of rigidity
It is those places where the rafters are attached to the roof elements that are called the support unit:
The support unit is not always static - sometimes it has to be made movable if some structural element is subject to unstable loads. It's like a car wheel that compresses, spins, squeezes and turns.
Something similar is realized in support nodes, only the degree of freedom in them can be different - from zero, when the node itself is already motionless, to triple, i.e. maximum:
- Support node with zero degree of freedom. Both ends in this case are rigidly fastened with corners on both sides. A rafter on a beam or mauerlat with such a knot cannot move at all.
- Hinge joint with one degree of freedom. In this case, the beam has the ability to rotate in a circle.
- Hinge joint with two degrees of freedom. Now, in addition to circular rotation, there is also the possibility of displacement. This provides special fastening of the rafters to the mauerlat or beams, and you only need to install the sliders or slides.
- A hinge joint with three degrees of freedom allows the beam to move both horizontally and vertically. True, circular rotation may or may not happen here.
Installation Standards
Installation of a hard roof is carried out with an overlap. For a durable installation, you need to install an overlap in one wave of 10 cm. The pattern is calculated in the opposite direction from the slope and rafters. During design, be sure to take into account that roofs with a slight slope should be secured at the joints with sealants based on silicone or thiokol. In this case, it is more logical to arrange ventilation of the under-roof space using a sealed ridge pipe.
Installation of a wooden rafter system is carried out only after you are convinced of the processing of the beams. The boards must be treated with special compounds that minimize the likelihood of fire
This is very important, otherwise you will not be able to comply with construction and design standards. It is also advisable to paint the wood with a special varnish to prevent the appearance of fungi and pests.
Installation is not recommended during winter; in warm regions (for example, in Kazakhstan) this rule may be abolished. Several times a year, the roof and under-roof space is cleaned of leaves, dust, and dirt.
Photo - SNiP corrugated sheets
Any construction, repair, screeding and reconstruction must be carried out only taking into account the SNiP of the roof and its connection to the wall or foundation. Be sure to think through the design of the development project, its drawing and execution - this will help reduce the work time and costs of drawing the roof.
Comparing fasteners
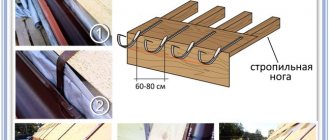
These metal corners are used for attaching rafters to the mauerlat, beams and walls:
Types of metal plates
Note that there are two types of such plates: nail and perforated.
Perforated ones have many holes for bolts and screws, and it is with their help that such plates are attached to wood. The advantage of perforated plates is that they are able to connect the necessary elements of the rafter system at almost any angle. Moreover, such plates can be easily cut to the required size. Install perforated plates on both sides of the connections.
Nail plates do not have nails themselves. This fastener is used only in factory conditions, or in the presence of a special press. The fact is that you cannot hammer such a plate into the rafters with a hammer - you need proper, uniform pressure.
Additional items
Sometimes, in addition to the same metal corners and nails, support bars are additionally used:
And also like this:
Some valuable tips
If you use flat or shaped steel fasteners in joint connections, then:
- The thickness of the wooden elements should not be less than 5 cm. All because of the screws.
- Secondly, simple nails cannot be used here - only screw or rough nails, which simply won’t come out. Especially if the wood for the rafters has a moisture content of more than 18%, i.e. not completely dried, and after this material dries, the nodal connections are always weakened.
- Thirdly, take nails with a diameter of at least 4 mm and a length of at least 40 mm.
- Always use two angle irons per assembly if possible. Just place them symmetrically.
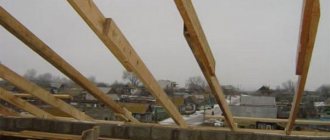
Stage #6 - performing overhangs
The last stage is the gable overhangs.
I decided to make them external, 60 cm wide, in the “chalet” style. I had to build an external frame with outriggers (cantilever girders). Since working with the outriggers from the side of the house turned out to be completely inconvenient, I made some kind of scaffolding. And from them he carried out further installation.
First, I laid 200x50 mm boards flat along the gables. I placed supports under them - beveled boards of the same section with a pitch of 60 mm, so to speak, I formed a pediment in this way.
The beginning of the formation of gable overhangs
I secured the overhang over the ridge (a board protruding beyond the gable to the width of the overhang - 60 cm). I lifted and secured the gable boards to the sides of the overhangs. I mounted outrigger boards across it. I installed frontal (eaves) boards 200x50 mm along the length of the slopes.
Rafter system with wide gable overhangs
Now the rafter system is completely ready for roofing work. Next comes the sheathing, OSB sheathing and, as a finishing coating, the laying of bitumen shingles.
That’s what I did, and I think you can do it just as well if you want. However, I do not consider my design to be the only possible one. Any task, especially a construction plan, has several solutions. And this is only one way to construct a rafter system. Probably one of the simplest and, as a result, the most reliable.
Alexei
Attaching rafters to floor beams
Floor beams sometimes act as a kind of alternative to tightening. Most often this happens during the construction of light attics - it’s more convenient. But you can only attach the rafters directly to the floor beams if you are confident in the reliability of the walls of the house. Because in this case there is no Mauerlat, and, as a result, the load on the walls is not distributed evenly - now it is point-loaded. And this is worse, of course.
By the way, it is not necessary to take thick beams for floors; a section of 5x15 cm is enough. Your main task is to make such a fastening so that the rafters do not begin to slide along the beam.
By the way, there is a big difference in how to attach the same rafters to the floor beams of single-pitched and gable roofs. So, the greater the load the roof experiences, the fastening should be done with a double tooth, while for single-pitched roofs one is enough. By the way, a double tooth usually has two spikes.
The most durable fastening is obtained if you make a notch, and with an additional tenon, which will also prevent lateral shifts of the rafters due to loads. On the other hand, it is important not to weaken the beam itself at the same time. Therefore, the cutout for the rafters should be made no closer than 25 cm from the edge (this will also help to avoid falcons), and only 1/3-1/4 deep from the thickness of the beam itself:
To ensure that the rafter leg does not slide off the mauerlat, a special recess is made in it. And in the Mauerlat itself, sometimes they make another one, a counter one - this is only more reliable, and the stubborn lock turns out to be strong.
True, the Mauerlat itself will be significantly weakened by this - take this into account. You can do something like this with it only when the Mauerlat is made of hard hardwood and has good strength.
The grooves alone will not hold the rafters in place, so be sure to additionally use metal fasteners. If your connection is stationary, it will be enough to drive nails at an angle, and for more unreliable structures, use clamp connections and metal plates. Forged wire, which is mounted into the wall for these purposes, will also help.
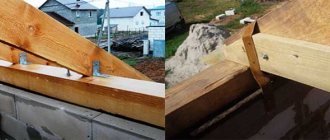
Another type of fastening of rafter legs to beams is bolted:
- Step 1. At the end of the beam that protrudes, make a triangular cutout. The hypotenuse of the cutout should be at the same angle as the angle of the rafters.
- Step 2. We also saw the lower part of the rafter leg at the same angle.
- Step 3. We place the rafter on the beam with a cut and fix it with nails.
- Step 4. Perpendicular to the rafter leg, we drill a hole for the bolt - through, so that the bolt can be entered from below through the cutout in the beam.
- Step 5. We put a washer on the bolt and tightly fix the entire assembly with a nut.
Upon completion of fastening, be sure to check the strength of all connections.
Corrugated roof standards
There are special requirements for corrugated sheet coverings. This material is durable, affordable and lightweight. It can be installed on industrial and domestic buildings; in addition, the construction of free-standing utility rooms is often carried out from profile sheets. Corrugated sheeting is made using cold rolled steel rolls. This coating has a guarantee of durability and strength, in addition, this technology can be used in all weather conditions.
Special requirements are also put forward for the production of corrugated sheets, because Failure to comply with these standards results in substandard material that is not suitable for construction. The galvanized steel material is treated on both sides with special anti-corrosion and antibacterial compounds. Often the profile is coated with polymer substances; this technology significantly extends its service life.
The main advantage of such a roof is that it does not require special maintenance, just periodically clean it of leaves (and even then, it depends on your preferences). While very serious operating rules are put forward for slate roofing, a coating made of solid material needs to be fire-resistant, because... slate “shoots” from high temperatures; The lathing must also meet special requirements. The wooden beams of the rafter system must withstand a load of up to 50-70 kilograms (weight of slate, snow, rain).
Attaching rafters to the wall
But not all rafter structures use a Mauerlat. Then how to attach the rafters to the wall itself? It’s simple: we find a replacement for the Mauerlat and work with it.
For example, in frame construction, the frame beams act as a mauerlat, onto which the cladding is made:
If for some reason you have to attach the rafters directly to the wall, without a Mauerlat, then you definitely need to make a tightening - a board or beam that will connect the rafters into one and take on part of the tension.
Such fastening is not always possible at all. For example, foam and gas blocks are bad not only because they easily transfer their moisture to wooden beams. They don't hold fastenings at all. You can easily pull out the same nail, driven 10 cm into a block, with your hands - then how to secure the rafters? Plus considerable pressure from the roof rafter system on such fragile walls. Therefore, there is no way to do without a Mauerlat.
Our works
Construction of a frame house in the Ryazan region
Installation of composite tiles in the village of Krasnye Orly
Installation of ceramic tiles in Magadan
Reconstruction of the roof in the village of Gorodishche
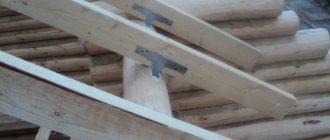
We attach the rafters to the mauerlat
In any roof truss structure, the rafters are placed with the lower end on the mauerlat, and the upper ends are connected at the roof ridge. Mauerlat is a special beam that is laid along the perimeter of the external walls. It is designed to support load-bearing rafters.
Now let's figure out when the rafters rest on the mauerlat, and when - only on the walls:
- If the walls are made of concrete, brick or foam block (in principle, any materials that are capable of transmitting moisture), then the rafter legs cannot be rested on them. Otherwise, the entire roof will quickly begin to rot. That’s why we use timber, called Mauerlat, and separate it from the wall itself with any roll waterproofing.
- In log and cobblestone houses, a Mauerlat is no longer needed for the rafters - it is enough to make notches in the top beam and use additional fastening in the form of metal corners and brackets.
And depending on whether the house shrinks, they make a rigid and sliding fastening of the rafters to the mauerlat.
Method #1 - rigid mount
To provide a rigid, immovable fastening to the unit, you have two options. The first is to use special corners with hemming bars and special cuts on the rafter leg. The rafter here is fixed with corners on both sides, and therefore can no longer move:
In the second method, which is more common, you need to hammer the nails at an angle to each other. In the Mauerlat they are crossed, and the third nail is driven vertically:
Two nails on the sides keep the rafter leg from moving left and right, and the top nail already pulls the rafter to the mauerlat itself.
Or use long screws instead of nails:
Method #2 - fastening with one degree of freedom
But in this design, a certain movement of the rafters under the pressure of the entire roof is already allowed:
But let us immediately note that if we are talking about the ability to move horizontally, we are not at all talking about the fact that the rafter will literally “ride” along the beam. This is just a small opportunity to move by millimeters due to dynamic loads and temperature and humidity changes. Moreover, the slider will move only under maximum permissible loads, and you will not be able to see such changes with the ordinary eye.
The possibility of some movement remains even when fastening the knot with nails - if there are not many of them. But those hammered in a checkerboard pattern with a certain force will no longer allow the rafters to move.
Finally, to secure the rigid fastening of the rafters to the mauerlat, additionally use wire or anchors. You just need to think about this in advance:
Or here's another great visual example:
Method #3 - sliding mount
A sliding mount is a mount that has two degrees of freedom. That is, in simple terms, one of the two elements has the possibility of displacement:
And this makes sense. Thus, those rafters that rest against the mauerlat with a notch, and against each other from above, evenly transfer the load from the roof and the snow on it to the walls. But those rafters that are supported by horizontal notches on the mauerlat and on the ridge girder are called a non-thrust structure.
As we have already said, a sliding mount, even with three degrees of freedom, does not actually mean that the rafter will move loosely back and forth on the support. All this is only for invisible physical laws.
Method #4 - fastening with a large degree of freedom
This is the most rarely seen in practice fastening rafters to the mauerlat:
It is usually used only under severe dynamic loads on the roof.
general information
Building codes are requirements that are put forward in relation to any building for government, industrial or domestic purposes. It should be noted that each building has its own standards, and failure to comply with them can be fraught with consequences. Depending on the severity of the violation, you may pay a fine, rebuild the building according to GOST standards, or even lose property (a common practice when the design of utility rooms is violated).
Photo - corrugated roofing
What is taken into account in SNiP:
- The size of the roof, its slope, the principle of laying building coatings, components;
- Thermal insulation, waterproofing, vapor barrier;
- The material from which this coating is made directly depends on the previous factors;
- Purpose of seam, mansard, gable and other roofs;
- Climatic features of a certain region.
Wind load accounting
Due to the wind, the roof experiences a lateral load, and the wind flow is divided into two branches - upper and lower. All these nuances require mandatory consideration, otherwise the roof will not last long. It happens that the wind can even tear off the roof or seriously damage it. In this case, minor repairs will not help, so it is best to protect yourself from financial losses in advance.
Especially for these purposes, there is such a term in construction usage - the aerodynamic coefficient of the roof. This parameter is directly dependent on the degree of slope of the roof slopes. As the angle of inclination increases, the wind load also increases, which can lead to the structure tipping over. As the angle decreases, the lateral load on the roof also decreases, but in this case the wind begins to put pressure on the eaves from below. With significant lifting force, the roof can be torn off, similar to how a strong wind tears an umbrella out of the hands of a passerby. Taking these considerations into account, they try to make roofs in regions with strong winds flat, with a minimum eaves length. Hanging rafters are not used in such cases.
In addition to the direct influence of wind, such areas are also dangerous because the roof experiences frequent mechanical impacts from falling branches and other objects. Moreover, high roofs are more susceptible to such loads. When scratches appear on metal roofing material, the corrosion process is set in motion, so it is best not to use it in such regions. It should also be taken into account that when laying the Mauerlat, it is recommended to make a certain indentation from the edge of the outer wall, in order to avoid it being torn off by strong gusts of wind.
Why is cutting necessary, and when can it not be done?
Cuttings are cuts in the rafters, a quarter or a third of the board deep and half the width of the ridge beam. They follow the shape of the ridge beam and are needed to prevent longitudinal sliding of the rafter legs along the ridge girder.
According to traditional technology, fastening the rafters to the ridge is always done with cutting. In addition to the reliable fixation of the rafter legs on the ridge beam, thanks to the cut, the rafters rest on the ridge not along the edge line, but adjacent to it along the entire width. Consequently, the load is distributed not along a thin line, but over a much larger area.
Connection of rafters with ridge with cutting
Now about how to cut down the ridge on the roof. It is important to understand that cutting is done only on the rafters. Under no circumstances should the ridge run be weakened by cuts. Cutting on rafter legs is usually done on the ground according to a prepared template.
The cutting template is made from a short section of the same board that is used for the rafters. The section is applied to the end of the ridge girder and positioned in the same way as the rafters will be installed: at the same angle, at the same cutting depth. Use a pencil to mark the contours of the ridge beam on the board and make a cutout along this line. Then the board with the notch is applied again to the ridge to make sure that the cut fits tightly to the purlin and the slope is the same as the rafters should be. If everything is correct, then the template is ready.
Despite the difficulties associated with making cuts, this method of attaching rafters to the ridge girder is still used quite often. Although this is mainly due to roofing traditions - now there are alternative methods for fixing rafter legs. Moreover, these methods are often even more reliable: cutting reduces the width of the board, which naturally reduces its strength, and any fastening method when sawing is not needed is free from this drawback . For example, installing a ridge board and fastening rafter legs using metal corners and plates allows you to securely fix the connection without weakening the rafters by cutting down.
But keep in mind that when building houses from rounded logs, it will most likely not be possible to make a rafter system without cuts. It is difficult to secure the rafter boards well on a round ridge using only metal fasteners.
For round ridges of log houses, cutting is almost always done
If you decide not to cut down, follow the rules when attaching the rafters to the ridge:
- The rafter legs must be connected to each other and secured to the ridge beam. There is one exception: the hinged fastening of the rafters.
- The wood for the rafter system must be well dried, otherwise the rafters may lead if fastened tightly.
- The rafters should rest on the ridge beam, and not hang on screws or nails and fasteners.
The last rule must be observed for any method of fastening. Even if the rafters are connected by hinged metal strips, they must still lie on the ridge beam, transferring the load to it.
Let's sum it up
The article describes in detail how to properly attach rafters to a ridge, starting from an overview of the types of fasteners to a detailed description of each fastening method. You can attach the rafter legs to the ridge:
- With cutting - the traditional method, and without it - a simpler installation method, which became possible thanks to modern metal fasteners.
- Butt -joint is a more reliable, but also more complex method of fastening, which is suitable for houses made of aerated block, brick, concrete, or overlap is a simpler method that is good for log houses and houses made of timber.
- Nails and staples are an outdated method that is less reliable than other fastening methods.
- With the help of wooden overlays , which securely connect the rafters and the ridge beam into one knot.
- Using metal fasteners is the optimal fastening method for today, which provides a strong connection and is very easy to implement.
- Half-timbering is a very labor-intensive method, which is usually used when installing a rafter system using traditional technology.
- Joining a ridge beam is a fastening method originally from North America. Rarely used, since it does not have any special advantages over standard methods of installing rafters, and the complexity of the work is high.
- Hinged - not one, but several methods of connecting rafters, which have one thing in common: a movable fastening that can withstand changes in the slope of the roof during the shrinkage of a log house or house made of timber.
All of the above fastening methods are reliable and tested. Therefore, for an ordinary house that is being built in the south and central Russia, we recommend choosing the method of attaching the rafters to the ridge girder based on the criterion of ease of installation. In most cases, this is a connection of the rafters with a perforated plate, and the rafter legs and ridge with metal corners. Wooden houses require hinged joints, and for buildings in northern regions with heavy snow loads, reinforced methods of fastening rafter legs that can withstand hundreds of kilograms of snow load are needed.
Source
Material selection criteria
When deciding what is the best way to cover the roof of a house, and how cheap it is to make the final estimate, you have to explore many options. When choosing a roofing material, evaluate the following parameters:
Weight
The first parameter you should pay attention to. Additional weight increases the load on the roof structure, which will require strengthening the rafter system and sheathing; the total cost will increase
Reliability. The material must be practical and durable, so weather factors are taken into account when choosing it. Different types of roofing material behave differently in difficult conditions (frost, heat, heavy snow or wind). Failure to comply with the rules will shorten the service life of the coating.
Decorative qualities. The roof is an important decorative element of the design of the house. The color and texture of the selected material can be emphasized with additional details. Forged elements are suitable for a metal roof, and ceramic elements are suitable for a tiled roof.
Decorative roof elementSource pinterest.com
Economical. If you are planning a roof of complex shape, you cannot do without a team of specialists capable of performing complex installation. This can significantly affect the cost of work. Also, on complex roofs the amount of waste increases.
Physical qualities. When choosing, evaluate the flexibility of the material. If the roof is metal, the choice will be affected by the type of metal and its thickness. In areas with snowy winters, it is necessary to remember that snow comes off differently from different materials (it lingers and cakes on a rough surface).
The issue of sound insulation is relevant for all types of roofs. Noise can become a problem not only due to the characteristics of the roof covering (metal tiles or metal sheets). Incorrect installation results in the structure resonating even with small gusts of wind. To prevent rain noise from becoming a problem, several techniques are used:
- A soundproofing layer is installed. In most cases, this function is accomplished by mineral wool insulation 200 mm thick.
- Roofing materials with a noise-absorbing effect are used.
- Set up an insulated attic.
Roof with attic spaceSource dukesroofing.com