- Installation
- Is a Mauerlat needed if there are beams?
- Fastening sequence
- How to secure
Many homeowners strive to build their country houses themselves. There comes a time when they are faced with the question of whether it is possible to build a roof with their own hands and how to do it. In any case, it is important to remember that this work is quite labor-intensive and requires a competent approach and strict adherence to a certain sequence.
One of the important stages of roof construction is the correct installation and fastening of the murlat. This is a specific support that absorbs part of the force created by the roof structure.
Features of creating a roof project
Errors when creating a rafter system can lead to roof collapse and leaks. At the design stage, it is important to correctly set the angle of the roof so that it can withstand the load from snow and other precipitation. In addition, you need to consider the distance between the elements so that the roof has an optimal weight.
When preparing your project, pay attention to the following points:
- roof shape;
- roofing material used;
- locations of internal supports;
- rafter system;
- at what angle the roof slope will be located;
- distance between walls.
The appearance of the future roof will depend on these points. The use of such a structural element as a Mauerlat depends on the material of the walls of the house and the distance between them. If it is less than six meters, then this beam does not need to be laid.
Briefly about the main thing
When choosing a method for attaching beams, it is necessary to take into account the material of the walls and the design of the roof truss system. It is preferable to cut or cut them into chopped walls; on frame walls, they should be laid with support on the top frame. If the building is brick or made of blocks, the beams are laid at the required height, after which the masonry continues, caulking them into the walls. In all cases, it is necessary to make calculations based on loads or choose a method with a large margin of safety.
Ratings 0
How to fasten rafters if a Mauerlat is used
You can do without a Mauerlat in frame and wooden houses, but sometimes it is a mandatory part of the structure. For example, when using foam concrete blocks and similar materials for walls:
- transfer of moisture from the walls to the rafter system;
- features of the material due to which the fasteners do not linger in it;
- fragility of walls;
- inability to support the roof without using a Mauerlat.
If the house is built from a material that does not shrink, it is advisable to use a rigid fastening, otherwise the connection may have a degree of freedom. The rafter system is first attached to the mauerlat, and at the free ends it is connected to the floor beams.
Extension of rafter legs
The following methods are used to splice rafters and lengthen them with fillets:
overlap The length of the overlap is at least a meter, the nails are driven in a checkerboard pattern;
end-to-end The parts are cut down at right angles, joined and secured on both sides with wooden plates. These two methods apply to a flat board;
with an oblique cut. The ends of the square beams are cut down diagonally, connected, and fixed through with a pin. When drilling a hole for a stud, make sure that there is no play left, which will cause unnecessary bending load.
This is how the rafters are attached.
If you are not confident in your own abilities or you do not have time to do this, contact us at STM-Stroy. We will install a rafter system for you or perform a complete roof installation quickly, inexpensively and efficiently.
+7(495) 241-00-59
Installation and repair of roofing and facade coverings from economy to VIP class
Calculate online
my experience is your saved money and nerves.
I advise everyone who contacts me, even if you later leave to join another brigade. Ask questions, don’t be shy, I answer everyone - it’s free
+7(495) 241-00-59 I am available for calls 7/24 - I will be happy to help you, please contact me!
Rigid mount
For a rigid connection, you will need to cut out a rafter beam or use a retaining strip. This type of fastening is used both to create a shed roof and for other types of construction.
The step-by-step execution of the cutting method is as follows:
- Cut out all the blanks according to the template. To begin, install the beam for the future rafter leg with a certain angle (laid in the project), and then mark the location of the notch. Its depth should be no more than a third of the height of the bar. After making one rafter leg, use it as a sample. You will need to make the rest identical. It is important not to make a mistake at this stage.
- Place each rafter leg with a saddle on the Mauerlat and secure with nails. First, hammer two at an angle to each other, from the sides of the rafter system. The third one must be driven vertically - it ensures the strength of the structure.
This way you will get a rigid rafter connection that can withstand any load. Remember that cutting cannot be done in the Mauerlat, as this will weaken it. Look carefully at the photo to understand how to correctly cut and assemble rigid fasteners.
There is another method of rigid fastening: when using it, meter-long bars are hemmed to the rafter legs, which rest against the mauerlat. They must be secured with metal corners.
Rafter Fasteners
Wooden elements and metal products are used to assemble the truss structure. Wooden fasteners include: bars; triangles; dowels, etc.
Metal fasteners include nails, bolts, angle iron, screws, studs, clamps, staples, special rafter devices called skids or sliders, and more.
Fastenings for WB beams are used when installing load-bearing beams for wooden structures in the construction of wooden houses. Its advantage is that it does not require cutting into the beam, and fastening is done using nails, screws or anchor bolts.
Sliding type mount
The movable joint is used for houses made of timber, logs and other materials that shrink. If in such a house you make a rigid joint between the rafter legs and the mauerlat, over time the entire structure may collapse. When there are errors in construction, deformation begins from the walls of houses and is transmitted further.
For a sliding connection, it is a good idea to purchase a special fastener called a “sled” from any hardware store. You can also purchase corners with unusual holes for connection (oblong shape). The rafters are attached to all roof elements using clamps and brackets.
Some recommendations
Whatever method you use, there are some rules to keep in mind. The rafters will be securely fastened if:
- High-quality materials were used during installation. Moreover, this applies not only to the rafters and beams themselves. The materials you use for fastening (bolts, staples, clamps, screws, etc.) must also be of high quality.
- There is no need to rush. The installation of rafters and their fastening must be carried out strictly in compliance with technology.
- All cuts used must be done carefully and this must be done so that the protrusions on the rafters strictly coincide with the recesses on the floor beams.
To make the work easier, it is better to make a template. It is performed when attaching the first joint of the rafters. Further, according to this template, all the recesses and protrusions will be identical. As a result, it will be easier to fasten and the work will go faster.
It is worth remembering that building a roof is a difficult job. Experience is important here. If you are doing this for the first time, it is better to consult a specialist in advance. And if you have no experience at all in working with wood, then it is better to entrust the fastening of the rafters to the floor beams to a professional. In this case, the roof of the house will be reliable and durable and will not cause you any trouble during operation.
Video on the topic:
How to make a mount with floor beams
Attaching the rafters to the floor beams, which protrude 40 centimeters from the walls, can be done by cutting down using the double tooth method. This is quite simple to do: at the end of each rafter leg, cut out something like a step. The same lock needs to be cut out on the beam. Tighten the connection of these elements using a bolt and a clamp.
There is another way to install the junction of rafters and floor beams - using overlays made of boards. They are secured using self-tapping screws or nails with special notches. Distributing the load from the rafters between the mauerlat and the floor beams makes the roof more durable.
Rigid or flexible connections: what to choose
So, we noted that the support nodes connecting the Mauerlat to the boards can have different degrees of mobility: from “0” to “3”. Zero degree - these are rigid fastenings that exclude any changes in the position of the beams.
Rigid connections: when they are needed
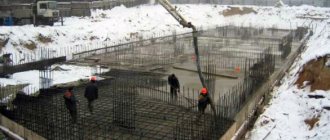
The Mauerlat is installed when it is necessary to transfer the thrust load from the rafters to the load-bearing walls. This is done mainly in houses made of bricks, panels and blocks. In this case, they try to eliminate deformation and shrinkage of the roof in order to prevent changes in the load on the supporting walls. This is where the need arises for a fixed connection of the rafter system with the Mauerlat.
Fixed units secured with a notch
Many experts recommend making appropriate cuts at the point where the rafters are attached to the floor beams for greater strength and immobility of the connecting nodes. These cuts should fit tightly with the Mauerlat. Additionally, such units are strengthened with bolts, anchors and metal plates:
Or with long screws:
And one more important point: the size of the cut of the bar should not exceed 1/3 of its cross-section. Otherwise, the rafter system may lose its load-bearing capabilities:
Hard knots without notching rafters
The fastening method using a hemming block is used in layered rafter systems. The rafters are cut according to a template and beveled (to give the roof the desired slope) at the point of contact with the mauerlat. From the inside, such rafters are reinforced with support bars and reinforced with corners on both sides to the base frame:
Features of the construction of the rafter system during frame construction
In the construction of light frame structures, rafters can be attached directly to the floor beams without a Mauerlat. Step-by-step instructions for carrying out this work are as follows:
- When you start working with the rafter system, you must have walls and a rough ceiling erected. Install additional supports during the work.
- Connect the ceiling beams and the top trim. Secure them.
- Install the rafters. To strengthen their block, you can use double vertical posts.
- Using racks, attach the rafter legs to the walls. After this part of the work, you can begin lathing and installing the roof.
It is best to watch a video on the construction of a rafter system on frame houses without a Mauerlat before starting construction. It will help you understand how to carry out the work so that the rafters can withstand even the heaviest loads.
When building frames, you will need a tightening. It will take on part of the load and make the structure unified. To tighten, it is not necessary to use timber; a board will do.
Connection with reinforcement pad
In some cases, a connection using a reinforcing lining is used. The lining is a block that is laid on top of the Mauerlat in the places where the rafters are attached and is securely attached to it. In this case, a cut is made in the rafter leg according to the shape of the lining for a reliable connection with it.
The rafters, when connected using a backing, can be secured using a tensioned steel wire attached to a steel spike driven into the wall. Also, rafters are often fastened to the mauerlat using steel brackets. Strengthening the rafter system is shown in the following video:
Arrangement and installation of floors on wooden beams
Published: 04/13/2013 Category: Construction
745
Arrangement and installation of floors on wooden beams. Wooden beams
Floors are one of the most important structural elements of any private or country house. In this article we will try to consider in as much detail as possible the features of the design and installation of floors on wooden beams.
What are the requirements for floors?
Floors must first of all have the necessary strength . to withstand their own weight and the loads acting on them (uniformly distributed or concentrated).
According to SNiP 2.01.07-85 LOADS AND IMPACTS (or rather, in a more current version, the set of rules SP 20.13330.2011 “Loads and Impacts”), floors in residential buildings must withstand a uniformly distributed load of at least 200 kg/m² . However, in practice, interfloor floors in a private country house are usually designed for a higher load, and attic floors for a lower load. Special calculations are needed when concentrated loads of significant magnitude are expected - a large-volume bathtub, spa pool, boiler, piano, etc.
Another requirement is that the overlap must be rigid . that is, not to sag under the influence of loads (the permissible deflection is from 1/200 of the span for attic floors to 1/250 of the span for interfloor), and also not to be unsteady, that is, not to fluctuate when furniture is moved or people move.
To increase the rigidity of the floor, wooden beams are reinforced with spacers
Wooden beams are reinforced with spacers, which increase the rigidity of the structure
Beams made of unlaminated wood often have a high percentage of moisture, which is why they can become deformed during the operation of the building. Non-glued beams can cover a span of no more than 6 m in length.
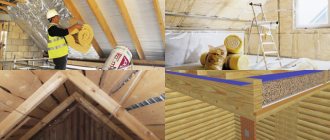
In addition, the ceilings are designed to protect the room from the penetration of airborne and impact noise from rooms located above or below. In the design of the beam floor, to dampen noise, slabs of mineral wool insulation are provided, installed in the gap between the supports. The noise level in the room depends on the thickness of the insulating layer. Typically, an insulation layer 150 mm thick is created.
There are cases when floor beams must partially remain in the interior, and the thickness of their parts hidden behind the ceiling lining is not sufficient to lay the slabs between them required to ensure a good thickness of insulation. Then you can install a frame made of wooden blocks on top of the beams, also filled with mineral wool slabs. The most effective solution in terms of sound insulation is a floor consisting of two contours of wooden beams (optionally, multidirectional) that have no contact with each other. Each circuit is filled with soundproofing material.
The ceiling must be thermally insulated when it separates rooms with temperature differences
Many homeowners strive to build their country houses themselves. There comes a time when they are faced with the question of whether it is possible to build a roof with their own hands and how to do it. In any case, it is important to remember that this work is quite labor-intensive and requires a competent approach and strict adherence to a certain sequence.
One of the important stages of roof construction is the correct installation and fastening of the murlat. This is a specific support that absorbs part of the force created by the roof structure.
Installation ↑
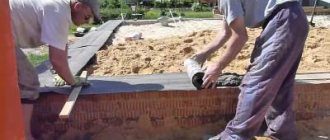
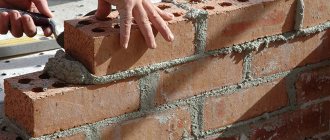
To construct the murlat, wooden beams are used, which are laid in a plane parallel to the future ridge. They begin to install it during the construction of walls. For example, in the case of brickwork, you can do the following:
- closer to the top, approximately 4–6 rows below the edge, lay a thick wire at intervals of 1 m; the wire is firmly fixed inside the masonry in the center; the length of the free ends should be sufficient to subsequently wrap around and tie around the support beam without any problems; after construction is completed, visible parts of the fasteners are hidden, for example, by applying a layer of plaster.
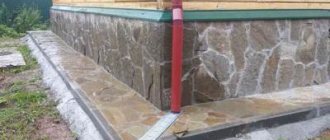
To prevent rotting of the murlat beams, they are waterproofed by laying rolled material such as roofing felt.
When arranging the Mauerlat along the perimeter of the walls, it is necessary to check not only the reliability of the fixation, but also the horizontalness of the support beam.
Is a Mauerlat needed if there are beams ↑
When hanging rafters rest on floor beams that are laid directly on the wall, then with this arrangement serious point forces arise that affect the building structures. As a rule, a similar approach is practiced when constructing a wooden house. In this case, this is justified, since due to the horizontal arrangement of the logs and beams used in the construction of the walls, the loads they experience are evenly distributed.
For brickwork or when using cellular blocks, undistributed pressure can be disastrous - in places where the floor beams are located, the walls begin to crumble at the edges. It is for this reason that the pressure should be dispersed. To do this, it is recommended to lay murlat on its ridge, which is made from thick wooden beams. Thus, the positive answer to the question of whether a Mauerlat is needed for floor beams in such structures is beyond doubt.
If the roof structure involves the connection of rafters and floors, then it is first necessary to ensure reliable fastening of the floor beams to the mauerlat. The latter will actually be assigned the unloading function.
What is a Mauerlat
The word Mauerlat arose as a derivative of the German “wall” and “crossbar”. This perfectly describes the essence of the design. Mauerlat (mother log, matitsa, uterus) is a power frame made of beams, which are located along the perimeter of the load-bearing walls, taking on the load of the roof and distributing it evenly. If we consider the crossbar in the overall design of the roofing system, we can see that it has rather modest dimensions (shown in brown in the photo).
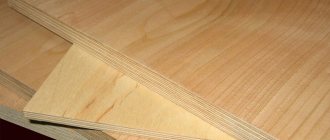
The support is made entirely of wood. For this, a beam with a cross-section (thickness) of 150x150 mm is used. You can replace it with three boards 150x50 mm thick, nailing them together in such a way as to form a beam of the required thickness. Other parameters are also acceptable, but the ones indicated are optimal and are more common. For example, a roof with a thickness of 100 mm will not support it, and a beam of 250 mm will not be able to support a wall.
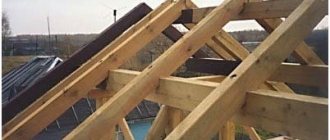
Mounting sequence ↑
After arranging the murlat, they proceed to laying and fastening the ceiling beams to the Mauerlat.
- Parameters such as the cross-section of the structural beams and the installation pitch are calculated when designing a house based on the optimal cross-section and pitch of the rafters. For example, if the rafters are supposed to be made from boards 5 by 15 cm, then the distance between these elements is chosen to be 0.6 m. This is the best option, especially since the width of the heat-insulating material is also 0.6 m.
- Most often, they have a cross-section of 200 by 100 or 150 by 100. The final length is selected taking into account the width of the future cornice. The offset is about 0.4–0.5 m. As a rule, they are installed in one direction - mainly across the room. On the fixed Mauerlat, small grooves are made (a sufficient depth of 20–300 mm) for the ceiling elements. First, the outermost ones are installed, located at opposite walls, retreating from their inner edge by 0.5–0.6 m. Next, a rope is pulled between them and the remaining beams are laid out at the calculated distance from each other according to the obtained level. By following this rule, you can ensure an even horizontal plane of the ceiling. It is imperative to check the places where the beams are attached to the Mauerlat. If necessary, they can be slightly cleaned, trimmed with murlat, or, conversely, small dies made from pieces of plywood can be placed. Then the cross beams are installed in 1 m increments.
Additional “chair” structure for supporting rafters on beams
In cases where the rafter leg needs to be unloaded, struts or racks are installed, as a rule, not on the floor beams, but on a beam that is laid on load-bearing walls. This design is called layered.
Structures supported on load-bearing walls are called layered
But, there are cases when the building has neither internal load-bearing walls nor columns. As a result, the structure can only be made hanging.
The classic hanging system involves resting the leg on only two points - the mauerlat or floor beam and the ridge girder. However, if the building is large or the roof is flat with long slopes, it may be necessary to strengthen the structure to prevent deformation of the slopes.
Diagram of the hanging system
In such situations, racks and struts installed on the floors come to the rescue. Let me remind you that struts, unlike racks, are installed at an angle. Most often they are mounted on both sides of the post supporting the ridge girder, but there are other options for their location.
The posts are attached to the rafters using serrated plates
The connection between the post and the beams is usually done using serrated or perforated plates. The installation of slopes will also be carried out, the only thing, as when installing rafters, is that the ends are cut at an angle equal to the angle of their inclination.
A private house can be used for decades, and a situation often arises when it is necessary to repair elements of the rafter structure. The condition of the roof frame and roofing must be constantly monitored, since their destruction leads to great trouble. If defects are detected, emergency measures must be taken.
Problem: the end of the rafter leg, resting on the mauerlat, began to rot. In such a situation, a log is placed on the floor of the attic; it must rest on several beams (the installation of the floor beams must be reliable). Place struts under the rafter leg being repaired so that they rest against the log.
Problem: Wood rot was discovered in the middle of the rafter. In order to strengthen the truss structure, wooden overlays made of boards 50-60 millimeters thick are nailed on both sides of the damaged element. Nails for fastening are driven along their edges into the undamaged part of the rafters.
Problem: the power plate is damaged. When this is a small area, experts advise installing struts with a rafter leg attached to them using brackets. The struts are mounted with support on the undamaged part of the mauerlat. If the area of damage to the Mauerlat is significant, then an overlay of boards is nailed to the rafter leg, which in turn is attached to a new Mauerlat, which is installed slightly lower than the damaged one. Mount an additional Mauerlat into the wall using pins, while
Mauerlat installation
carried out in accordance with the project.
Problem: a crack appeared in the rafter leg, causing the roof to sag. To carry out the repair, you need to prepare 2 boards, one of them will become a squeezing rack, and the second will be a support for it. The support board is attached perpendicular to the load-bearing beams of the attic floor. The squeezing rack is installed on a previously fixed support and brought under the deflection of the leg.
Between the end of the squeezing stand and the support board, 2 wedges are driven in, one towards the other. They continue to be driven in until the deflection is eliminated. At the place where the crack is located, two boards are placed, the length of which is at least a meter longer than the size of the damaged area. They are secured with bolts.
Sometimes installing rafters on floor beams is a rather complicated undertaking, in which the beams themselves serve 100% as support for the entire roof, and it is important to do all this as competently as possible.
Essentially, the “chair” is the struts that support the girder to its full height. Those. such a “chair” usually contains vertical posts, inclined posts and short struts. With its lower end of the stand, the chair is cut into the lower chord of the rafter system or lies perpendicular, or immediately into the floor beams. There are also different types of such chairs, depending on whether they rest on purlins or directly on the rafters.
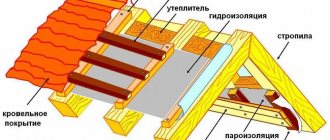
Main elements of the rafter system
The wooden roof frame is assembled from the following parts:
- Mauerlat - a kind of base for roofing elements, attached along the entire perimeter of the building to the upper edge of the outer walls in order to disperse the pressure of the roofing pie;
The Mauerlat serves as the basis for the roof frame
The ridge girder is located exactly in the middle of the building
Tightening and struts are necessary for proper distribution of the load on the Mauerlat
Racks can support not only the roof ridge, but also the rafters
The bench is located on the inner wall parallel to the mauerlat beam
The ridge is formed in the highest zone of the rafter system
The fillies lengthen the rafter legs
The eaves overhang is constructed to protect the walls from rain
Sheathing boards are laid perpendicular to the rafters
How to create a reliable foundation for rafters?
The first step you need to take is to build a solid foundation for these rafters. For example, if the floor beams do not have any support (at least in the form of an intermediate wall of the house), then the trusses on it need to be organized only according to the hanging principle. If there is support, the rafters can be safely supported directly on the beam without any auxiliary elements.
-The simplest classic support consists of a tie, one support beam and struts. The puff is suspended in the middle. Such suspension systems are used today most often for large spans.
-Double support consists of a tie, hangers, two struts and a crossbar, which serves as a spacer between the boards.
-There is even a triple support, which is a separate three hanging systems, or one double hanging system and one simple. This is already a complex rafter system.
Ideally, you can also calculate such beams for deflection and tension, to what extent they are ready to support the entire roof. There are special online calculators and formulas for this, although it will also be enough to invite an experienced carpenter for your own peace of mind.
Main connecting nodes
The main components of the rafter system are:
- rafter truss - connection of a pair of rafters, braces, as well as racks and braces;
- ridge knot - combination of two opposite rafters;
- a link made of a mauerlat and a rafter resting on it;
- a module including a run, a stand and a bench;
- connection of the rafters with the strut and the stand.
The most complex element of the roof frame, according to the author, is the roof truss, which is distinguished by the fact that:
- assembled on the ground, and then transported to the roof, since this is the only way to successfully fit one wooden part to another;
The roof truss consists of at least three elements
The ridge knot also has several features:
- formed as a result of connecting two opposite rafters due to special cuts or notches;
There are many methods for creating a ridge knot.
The rafters and mauerlat become a single link, which is characterized by the following:
- the connection occurs due to cutting in each rafter leg, corresponding to the shape of the element that serves as a support for it;
The rafters are secured to the mauerlat so that they do not move to the side
A module of purlins, racks and beams is formed by driving construction brackets, steel dowels or overlays made of steel strips into the places of their connections.
An assembly of a beam, a rack and a purlin allows you to divide the load between the external and internal walls of the building
Struts, racks and rafters are assembled into a single module, creating cuttings. To prevent their connection from being weak, construction staples are used.
An assembly of struts, posts and rafters allows you to soften the pressure on the internal wall of the house
What materials can it be made from?
The structure is often made of wood, using wooden beams or boards fastened together. Often a steel profile is used. The choice depends on the weight of the roof.
Wooden beam
The timber is placed under the rafters along the perimeter of the roof. With this arrangement, the load is evenly distributed to each point on the walls of the house. There should be no knots on the timber, and if there are any, their size should not exceed 2/3 of the thickness of the wooden product. When arranging the Mauerlat, knots will interfere with the main structure, so it is better to avoid them. If there are many knots on the beam, then a break may occur in the places where they form.
Boards fastened together
In frame construction, when the roof is light in weight, boards fastened together can be used. This design is not suitable for a heavy structure - the boards will not withstand the high load. This material is suitable for roofing without insulation and additional elements that increase weight. The boards are attached around the perimeter of the building. For the Mauerlat, it is advisable to use durable material that will not crack during use and exposure to external factors.
Steel profile
Instead of wooden products, steel structures are often used. This material is more durable, as it can withstand increased loads. The steel profile is represented by a square section or round metal pipes. The use of steel as a support for the roof implies the presence of metal lining around the perimeter of the external walls. The device is suitable for a gable roof, and beams can also be used. The harness is secured to the outside of the wooden belt.
Methods of fastening rafters
In the lower part, the rafters can be connected both to the Mauerlat and to the floor beams. Sometimes, for example, during frame construction, they are fixed directly to the wall. And in the upper part, the rafter legs are combined with the ridge. Each designated node can be created in several ways.
Connection with Mauerlat
Rigid fastening of the rafters to the Mauerlat ensures that there are no displacements of the assembly elements. It is performed by cutting in a certain sequence:
- To speed up the work, make a template from a piece of board or thick cardboard. A line is drawn on the workpiece, departing from the side edge at a distance equal to 1/3 of the rafter width, and then the point of contact with the mauerlat beam is marked, along which a second line is drawn, perpendicular to the first.
If the rafter width is more than 200 mm, then the cut is made at a depth of 70 mm
A triangular cut allows the rafters to rest against the mauerlat
Builders without experience can take note of the technology of attaching rafter legs to the mauerlat with a stripe of a thrust block. With this method of creating a node, as the author of the article noted, it is possible to change the position of the rafters until it becomes completely correct.
To connect the main elements of the roof frame to the Mauerlat with a stripe of a thrust bar, do the following:
- On the roof, rafters are first installed to form gables. They are fixed with metal corners for a while.
The support beam allows you to fix the rafter without cutting
The rafter and support beam are fixed to the Mauerlat with metal corners
When building a roof frame for a wooden frame, which always shrinks, they prefer to use the sliding method of attaching the rafters to the mauerlat. Thanks to it, it is possible to avoid deformation of the rafter structure and deterioration of the stability of the top row of logs, which replaces the Mauerlat.
The choice of sliding rafters is justified only when a ridge beam is provided for the main elements of the roof frame, into which they could rest with their upper part.
When the rafters are fixed to the mauerlat using the sliding method, certain steps are taken:
- The store buys clamps designed specifically for fastening sliding rafters on both sides. These are called floating metal mechanisms or sliding rafter supports.
When is it beneficial to rest rafters on beams?
Of course, building a roof with a Mauerlat is more understandable and logical, because
This method has been practiced for a very long time and has been studied, but you need to study the support of rafters on beams, and you will not find as much useful information as our website provides anywhere. - the construction site has rather fragile walls and it is difficult to lay the mauerlat on them;
- the roof of the old house is being rebuilt anew, and the bench is already old;
- the rafter system is quite complex and it requires intermediate supports, but there are no such supports inside the house;
- for someone who is building a house, this method in itself seems more acceptable.
Convinced? Believe me, this technology has as many advantages as the classic one.
Today, this version of the roof is also practiced, which consists of several especially strong trusses located at a distance of 3-5 meters from each other, and the gap between them is filled with construction pairs.
In simple terms, several powerful main trusses, two or three, are installed on the roof, and they support the entire run. And already in the space between the main trusses, ordinary rafters rest on such purlins, according to a simpler scheme.
In fact, the whole secret of such a combined system is that here the layered rafters are laid directly on the triangular hinged arches. In this cunning way, bending stresses completely disappear from hanging rafters, and only tensile stresses remain. And this suggests that here it is possible to significantly reduce the cross-section of the rafter elements. In other words – save money!
As you probably already guessed, in your case, the method of supporting the rafters on the floor beams will depend on what kind of object you are building: a garage, a bathhouse, a country house or an entire country complex. In any case, all these methods have been tested, are actively used in practice today and deserve attention no less than the more familiar use of the classic Mauerlat.