If you have now come close to the issue of choosing the design of the rafter system, the first thing you need to decide is how exactly you will transfer the load from the roof to the house. For example, in the classic design of a rafter system, the rafters are evenly supported by their ends on the walls or the mauerlat, along the entire perimeter or on both sides, depending on the shape of the slopes. But often today, rafters are attached directly to the attic floor beams, and not to the mauerlat, and this technology has its own valuable advantages.
We will now tell you how to correctly install roof rafters on floor beams, what technical solutions exist and how to make such fastening units.
How to fasten the rafters?
When erecting a roof, it becomes necessary to securely fasten the rafters to the base to transfer the resulting snow and wind loads.
Otherwise, deformation may occur, requiring new repair costs. As a rule, when building a light roof for country buildings (bathhouse, house, etc.), a structure with layered or hanging rafters is chosen. Let's see how to properly attach rafters to beams so that the structure will serve for many years, reliably protecting the building from snow, rain and gusts of wind.
On a skate
When constructing roofs, modern craftsmen use several types of fastenings for the rafter system on the ridge:
- joint to joint;
- for a run;
- overlap onto the upper ridge run.
Butt-to-butt connection . At the top, the rafter segment is cut at an angle (which is equal to the planned roof slope). And then they rest on the opposite leg, where circumcision is performed in the same way, but only in an asymmetrical direction. It is better to do this using preliminary templates. In some cases, the cut is performed during installation, and the cut is made through 2 beams.
The installation for the run is similar to the above variation. The differences will be in the installation of the ridge beam itself. This design is highly reliable, but it cannot always be abused, since it will require additional installation of support beams. As a result: the attic is not very convenient for further use. This method will allow you to complete the installation of pairs of rafter legs on site, without any preliminary “curtsies” or templates. In this case, the upper segments of the legs rest against the ridge beam, and the lower segments rest against the mauerlat.
Overlap on the ridge run. Here, the installation is carried out in the same way as in the previous version, only the upper joints of the rafters are overlapped, touching from above not with their ends, but with their sides. In this case, the fasteners will be bolts (or studs as an option).
Calculation of the rafter system
First you need to find out what rafters are. These are load-bearing structures of a pitched roof, made of rafter legs, which are placed at a slope, inclined struts and vertical ones.
If necessary, they can be “tied” from below with horizontal rafter beams.
The loads perceived by the rafter system can be temporary or permanent. The first include such phenomena as people going onto the roof to repair or maintain the roof, snow and wind loads, as well as special loads, such as seismic vibrations affecting the building.
Constant loads are the weight of the roofing structure as a whole.
Table of wind load values on the rafter system
Calculation of load indicators on the rafter system is performed as follows:
- The snow load indicator is determined by multiplying the calculated value of the weight of the snow cover per square meter of horizontal surface and the conversion coefficient from the weight of the snow cover of the ground to the snow load on the roof. The value of the multiplicand is taken according to special tables depending on the area where the building is located, while the multiplier (coefficient) is taken equal to 1 when the slope of the roof slopes is less than 25 degrees and 0.7 when the slope is 25-60 degrees. If the slope is over 60 degrees, the coefficient is not taken into account.
- The average wind load parameter is calculated by multiplying the value of the wind load characteristic of a certain area (also taken according to the tables) and a coefficient taking into account the change in wind pressure with height, which is taken according to the table and depends on the type of terrain.
Run
Characteristics of wooden I-beams in rafter systems
An additional support beam for supporting the rafters is located parallel to the matrix and the ridge. According to construction technology, the optimal distance between the purlin and the matrix (ridge and purlin) is 4-5 meters. If the rafters are extended to 6 meters, then the joint (bow) should be located above the purlin so that both ends of the rafters rest on it. Sometimes it happens that the rafters are composite (6+3) meters, and the width of the run is 4-5 meters. Then the joint is positioned in relation to the purlin in a checkerboard pattern.
The run itself is done like this. The support posts are set up and the purlin is laid on them; the rafter will rest on it. The purlin can also be supported on a wall longitudinal to it. Then horizontal expansion beams are laid between the upper purlins. Their purpose is to prevent the roof from folding inward. They are laid so as not to burst the purlin.
What you might need
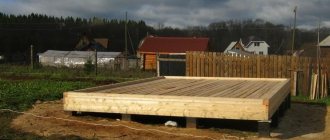
Installing rafters on floor beams is, most often, a necessary measure. As mentioned above, it is best to attach the rafters to the Mauerlat. In this case, the entire load will be evenly distributed around the perimeter of the wall, which will increase its service life. But if the roof rafters are still attached to the floor beams, then you should prepare for this.
First of all, you should stock up on mounting hardware. For such work, the following materials and elements are most often used:
- steel corners;
- self-tapping screws;
- thick wire ties;
- plates;
- bolts with nuts;
- WB brackets;
- LK fasteners.
- types of reinforced corner KR;
- perforated mounting tape TM.
When purchasing, you should be very careful about your choice. Rafters are an important element of the roof. Therefore, their fastening must be reliable. In this regard, when choosing devices and materials, you need to pay attention to their quality. Metal elements must be free of rust. Also, fasteners must be of high quality. It’s better to pay a little more, but get a reliable and durable mount.
Of course, you shouldn’t forget about the rafters themselves. Here you need to approach the selection of material responsibly. First of all, you need to calculate the rafter system to find out what section you will need. You can use special programs for this. They enter data on the roof area, materials used, loads, and so on. The result of the program calculations is a cross-section of materials and an approximate drawing of rafter attachment points.
After this, the material is selected - it can be either wooden beams or boards. Here you need to carefully “study” the material. Boards or timber should not have signs of rotting, large knots or cracks. In addition, the wood must be aged. In this case, there will be little moisture in it, which means that the rafters will not begin to warp over time.
We use bolts
The methods of attaching rafters to beams are quite varied. One of these involves the use of a bolted connection. In this case, work on fastening the rafters is carried out in the following sequence:
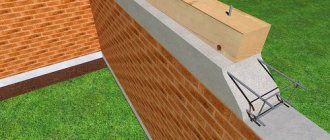
- First of all, a triangular cut is made on the edge of the beam protruding beyond the wall. In this case, its hypotenuse should be located at the same angle as the notch on the bottom of the rafters;
- Next, the connection is assembled. To do this, install the rafters on the floor beam in the previously made cut. The attachment point is reinforced with nails driven in at an angle; at least three of them must be used;
- For the next step you will need a drill and a thick wood bit. Its cross-section should be slightly larger (a few millimeters) than the cross-section of the bolt used. Using a drill, a through hole is made. It is placed at an angle of ninety degrees relative to the plane of the rafters;
- After this, a bolt is inserted into the hole. In this case, it must pass from bottom to top. You need to put a washer on it. After this, the bolt is secured with a nut.
Additional support
In cases where the rafter leg needs to be unloaded, struts or racks are installed, as a rule, not on the floor beams, but on a beam that is laid on load-bearing walls. This design is called layered.
Structures supported on load-bearing walls are called layered
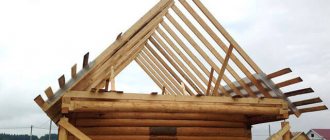
But, there are cases when the building has neither internal load-bearing walls nor columns. As a result, the structure can only be made hanging.
The classic hanging system involves resting the leg on only two points - the mauerlat or floor beam and the ridge girder. However, if the building is large or the roof is flat with long slopes, it may be necessary to strengthen the structure to prevent deformation of the slopes.
Diagram of the hanging system
In such situations, racks and struts installed on the floors come to the rescue. Let me remind you that struts, unlike racks, are installed at an angle. Most often they are mounted on both sides of the post supporting the ridge girder, but there are other options for their location.
The posts are attached to the rafters using serrated plates
The connection between the post and the beams is usually done using serrated or perforated plates. The installation of slopes will also be carried out, the only thing, as when installing rafters, is that the ends are cut at an angle equal to the angle of their inclination.
Fastening parts
Wooden and metal parts are used for the installation of rafter systems. The first include: block, triangle and dowel, etc. Metal in fastener parts is quite widely represented: nails, angles, bolts and screws, clamps and brackets. As well as special devices for installing rafters, which are called “sleds”.
Fastenings of this kind are used during installation work on load-bearing floor beams during the construction of wooden buildings. Their main advantages: no cutting into the beams themselves is required, and fastening is carried out using bolts with screws of large nails.
Design
Design is an extremely important stage of construction. It is on it that drawings are made, materials are selected and fastenings of rafters to floor beams are selected. It is very important at this stage to correctly calculate the wind and snow load. The weight of the entire system will depend on the calculations performed.
At the stage of designing the roof and attaching the rafters to the floor beams, it is necessary to take into account the load-bearing capacity of the walls. If you make the roof too heavy, the entire building may collapse in one moment.
There are a number of factors that need to be taken into account when designing the roof and rafter attachments to the floor beams:
- roof shape,
- roofing material,
- layout of internal supports,
- rafter system,
- roof slope angle,
- length from one wall to another.
Conclusion
Now you know how to attach rafters to floor beams, and in which cases it makes sense to use this method of installing the rafter system. If any of the above is not clear to you, ask questions in the comments and I will be happy to answer you.
Did you like the article? Subscribe to our Yandex.Zen channel
December 28, 2021
Roofing works, Roofing, Structural elements
If you want to express gratitude, add a clarification or objection, or ask the author something, add a comment or say thank you!
Principles for calculating beams and rafters
At the pre-construction stage, rafters and floor beams are calculated. When designing a roof frame, one should take into account the climatic features of the region, first of all, the characteristic snow and wind loads. Based on the tabular data and the requirements of SNiP regarding permissible deflection values, the sections of the elements of the rafter system are calculated - roof beams, rafters, truss parts. Among other things, it is necessary to perform structural calculations to determine the spacing of beams. The distance between the beams determines the installation pitch of the rafters.
Horizontal beams are laid on walls or mauerlat perpendicular to the length of the building. When designing, it should be taken into account that the beams on both sides must extend at least 40 cm beyond the plane of the wall. To ensure the necessary accuracy, the outer beams are mounted first, and then their ends are connected in pairs with tensioned cords, relative to which the remaining beams are laid. Closer to the ends, special grooves are made in the beams for secure fastening of the rafters.
What are the connections?
Before moving on to the intricacies of installing rafter fastenings to floor beams or mauerlat, you need to talk a little about the types of these fastening elements. It is worth recognizing that over the millennia of development of the construction industry, many materials, engineering structures and building construction technologies have been created.
Nevertheless, as a result of constant progress, in most cases only three types of fastenings of rafters to floor beams are used:
- fastening rafters that were previously lengthened using a special technique;
- fastening the rafters to the mauerlat;
- the use of special elements for better fixation of fasteners.
The latter type of fastening the rafters to the floor beams allows for higher reliability of the entire structure. When choosing a fixation method, the main task of the designer is to distribute the load evenly.
We also need to dwell on the second point in more detail. Beginners in the construction craft will immediately have a natural question about the meaning of the term Mauerlat. In fact, this is a thick beam that is laid parallel to the ridge. In this case, this is done along the axis of the wall. Simply put, it is on it that the entire rafter system rests.
Most often, timber is used as a mauerlat. A section of 15 by 15 centimeters is considered optimal. When selecting timber, you must take into account that it will support the entire weight of the roof.
The Mauerlat must be securely fastened to the wall. It is best to use hairpins for this. They need to be embedded in a reinforced concrete belt. You can also use a wire of sufficient thickness to securely fix it.
Is a Mauerlat needed if there are beams ↑
When hanging rafters rest on floor beams that are laid directly on the wall, then with this arrangement serious point forces arise that affect the building structures. As a rule, a similar approach is practiced when constructing a wooden house. In this case, this is justified, since due to the horizontal arrangement of the logs and beams used in the construction of the walls, the loads they experience are evenly distributed.
For brickwork or when using cellular blocks, undistributed pressure can be disastrous - in places where the floor beams are located, the walls begin to crumble at the edges. It is for this reason that the pressure should be dispersed. To do this, it is recommended to lay murlat on its ridge, which is made from thick wooden beams. Thus, the positive answer to the question of whether a Mauerlat is needed for floor beams in such structures is beyond doubt.
If the roof structure involves the connection of rafters and floors, then it is first necessary to ensure reliable fastening of the floor beams to the mauerlat. The latter will actually be assigned the unloading function.
How to make a gable roof yourself?
The main purpose of this article is to consider the process of self-construction of a gable roof for a private country house. Why gable? The fact is that this form is the most convenient both in terms of financial costs and ease of installation compared to other configurations. Another option is a shed roof, however, it is practically unsuitable for low-rise construction and is usually used only for extensions, garages and other similar structures. However, you can find very successful solutions with pitched roofs.
Construction crews may construct the same roof in slightly different ways. Probably, some method can be called more reliable and simpler than the one presented in this article, but this is a topic for another discussion. There are two types of gable roof trusses: in the first case, the rafters are laid on the mauerlat, in the second, the rafters are laid on the floors of the previous floor. This article discusses the second option.
Calculations hereinafter are given for a brick box measuring 8x8 meters and 3 meters in height. As with other roof construction options, the first step here is to install the Mauerlat. The Mauerlat should be mounted on the inside of the walls, and the outside should be covered with bricks for aesthetic reasons. During installation, it is necessary to ensure that the upper part of the Mauerlat does not protrude beyond the facing brick by 2-3 cm. This is necessary so that the load of the roof falls on the Mauerlat, otherwise it will be transferred to the facing brick, which is fundamentally wrong.
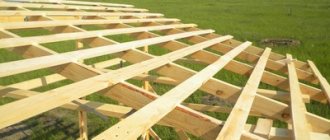
Floor beams
The next step is the installation of beam floors. First you need to install the outer floor beams. Their removal will determine the width of the cornice. The width of the cornice, depending on the wishes of the customer, can be 40-50 cm. The beams are special beams, the cross-section of which must be calculated separately, taking into account various aspects (snow load, wind load and other factors).
First of all, we install the beams indicated by the numbers 1,2,3,4.
For the specified brick box measuring 8x8 meters, the cross-section of the beam is chosen to be 100x200 mm. When the outer beams of the section are installed, it is necessary to tighten the lace along the top and align the other beams. In this case, it is usually necessary to either trim the Mauerlat under them, or lay thin plywood. What is noteworthy is that this has to be done often, especially considering that the ordered timber may be slightly different in cross-section. If you order 200 mm timber, they can deliver 190-210. This is the kind of equipment used in sawmills in our country.
The pitch of the beams must be taken into account based on the pitch of the rafters that will be laid in the future. For example, if you take floorboards 50x150 mm, then it would be good to choose a pitch of 60-70 cm, even better to stop at 60 cm, taking into account that roofing insulation usually has this width. After installing long beams, you need to install short ones. The step for them is most often 1 meter.
To attach beams to the mauerlat, 150-gauge nails are suitable. Sometimes the use of self-tapping screws and metal rafter corners is allowed. Basically, if builders use a variety of fasteners, the result is an easier job. The variety of fastening elements makes life much easier for an inexperienced builder, because there is no need to bother with creating nicks and cuts.
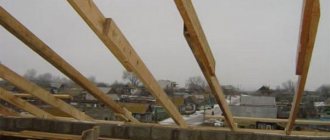
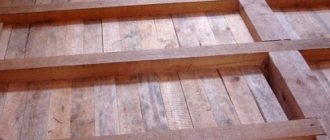
Flooring boards
The next step is laying the boards. It is acceptable to use inches and floorboards. There is no need to fasten them, they are only necessary so that you can walk normally. Next, you should install the ridge beam. To do this, you first need to install 50x100 mm posts using a level or plumb line and strengthen them with temporary spacers. It would be optimal to choose a step for racks in the region of 3 meters. First of all, the outer posts are installed, then the laces are pulled between them, then the intermediate ones.
Methods of fastening rafters
In the lower part, the rafters can be connected both to the Mauerlat and to the floor beams. Sometimes, for example, during frame construction, they are fixed directly to the wall. And in the upper part, the rafter legs are combined with the ridge. Each designated node can be created in several ways.
Connection with Mauerlat
Rigid fastening of the rafters to the Mauerlat ensures that there are no displacements of the assembly elements. It is performed by cutting in a certain sequence:
- To speed up the work, make a template from a piece of board or thick cardboard. A line is drawn on the workpiece, departing from the side edge at a distance equal to 1/3 of the rafter width, and then the point of contact with the mauerlat beam is marked, along which a second line is drawn, perpendicular to the first.
If the rafter width is more than 200 mm, then the cut is made at a depth of 70 mm
A triangular cut allows the rafters to rest against the mauerlat
Builders without experience can take note of the technology of attaching rafter legs to the mauerlat with a stripe of a thrust block. With this method of creating a node, as the author of the article noted, it is possible to change the position of the rafters until it becomes completely correct.
To connect the main elements of the roof frame to the Mauerlat with a stripe of a thrust bar, do the following:
- On the roof, rafters are first installed to form gables. They are fixed with metal corners for a while.
The support beam allows you to fix the rafter without cutting
The rafter and support beam are fixed to the Mauerlat with metal corners
When building a roof frame for a wooden frame, which always shrinks, they prefer to use the sliding method of attaching the rafters to the mauerlat. Thanks to it, it is possible to avoid deformation of the rafter structure and deterioration of the stability of the top row of logs, which replaces the Mauerlat.
The choice of sliding rafters is justified only when a ridge beam is provided for the main elements of the roof frame, into which they could rest with their upper part.
When the rafters are fixed to the mauerlat using the sliding method, certain steps are taken:
Butt splicing with plywood
It is much more convenient to do the work on the ground; prepare a flat area. Place the bars on the ground - the rafters will have to be trimmed, you need clearance for the circular saw. Before splicing, find out exactly the length of the rafters. You need to measure it on the building; use any thin long boards, rope or construction tape. If there is an error of a few centimeters, no problem. When connecting the rafter legs on the roof, this error is eliminated without problems.
Preparing everything you need
Step 1. Place one board on the bars, cut the end exactly at a right angle. It is better to cut with a hand-held electric circular saw.
The end of the board is cut off
Rafter boards are quite heavy; when cutting, position them so that they do not pinch the saw blade or break prematurely during cutting. Prepare the second board in the same way. Make sure that the cut is only at a right angle. The ends of the spliced boards should fit tightly against each other over the entire surface; this is necessary to increase the strength of the spliced rafters.
We suggest you read: Which lining to choose for a bathhouse
Step 2. Place two prepared rafter boards side by side. Prepare a board for the overlay. We have already mentioned that its length should be approximately four times the width of the board. If the roof slopes have a slight slope, the distance between the rafters is large, and the roof is insulated with mineral wool, then the bending loads increase significantly. Accordingly, the length of the board for splicing must be increased.
Two boards are installed side by side
Step 3: Place the overlay on two side-by-side joiner boards. Quite often, the thickness and width of boards, even from the same batch, differ by several millimeters. If this is the case, then level the boards on the side to which the sheathing will be nailed.
Cutting boards for jointing
The overlay is laid on the boards
Step 4. Drill holes for the studs in a checkerboard pattern and at standardized distances. To ensure that the individual elements do not move while drilling holes, they need to be temporarily secured to each other. Use long and thin screws for these purposes; nailing is not recommended.
The boards are tightened with self-tapping screws
Step 5. Drill holes, do not place them on the same line, otherwise the boards may crack during use.
Drilling holes
Holes are ready
You may find recommendations to separate the boards after drilling the holes and lay jute between them to prevent the appearance of cold bridges. This is not only wasted work, but also harmful. Why? Firstly, no cold bridges arise at the splice points; on the contrary, they have the greatest thickness and, accordingly, the lowest thermal conductivity.
But even if they appear, there will be no negative consequences; this is a roof truss system, and not an indoor window or door. Secondly, jute reduces the friction force between the splice elements, and this has a very negative effect on their strength. Thirdly, if condensation gets on the material, which is very likely, then it will take a very long time to remove moisture from it. There is no need to tell what consequences long-term contact of wooden structures with moisture leads to.
There is no need to lay jute
Step 6. Insert the studs into the prepared holes, put washers on both sides and tighten firmly with nuts. It is recommended to tighten until the washers are pressed into the wood. The excess length of the studs can be cut off using a cylindrical grinder with a metal disc.
Studs get clogged
The nuts are tightened
The excess length of the studs is cut off
All other rafters are spliced in the same way.
We invite you to familiarize yourself with: Project of a bathhouse with a gazebo under one roof
Electric drills
Clamps
One of the methods of splicing rafters helps to save boards and rationally use waste of various lumber. In this case, cuttings of sheet plywood one centimeter thick are used.
Step 1. Lay the rafter boards evenly on the site, close the ends, pay attention to the parallelism of the side edges. The boards should be extremely equal in thickness, the ends should be cut exactly at right angles.
The ends of the boards are closed
Step 2. Using a brush, generously coat the surface with PVA glue.
PVA glue is applied
Step 3. Place the prepared piece of plywood at the joint, press it firmly with clamps. While fixing, make sure that the plywood does not move from its original location.
Laying a piece of plywood
Clamps are used for fixation
Step 4. Using long, strong self-tapping screws in a checkerboard pattern, screw the plywood to the boards. The length of the screws should be 1–2 times shorter than the total thickness of the boards and plywood; their ends cannot protrude from the reverse side. Be sure to place large diameter washers under the screws. Before tightening the screws, drill holes in the rafters. Their diameter should be 2–3 mm less than the diameter of the threaded part of the hardware.
Drilling holes for self-tapping screws
Screws are tightened
Step 5. Turn the board over with the back side up, place it under the ends of the stand, they should not hang in the air. Carefully remove all installed clamps one by one.
The clamps are removed
Step 6. Spread the surfaces with glue and place the second piece of plywood on them. Clamp it again with clamps.
Surfaces are coated with glue
The workpiece is clamped with clamps
Step 7. Tighten the screws with great force.
Self-tapping screws are tightened with great force
Step 8: Remove the clamps. To strengthen the splice assembly, tighten it with through pins. They should be placed in the same way as with conventional butt splicing.
Through pins become clogged
During its hammering, the first few turns of the thread are crushed by strong blows of the hammer, which makes it very difficult to screw on the nut. To avoid problems, tighten the nuts before driving in the stud; now let the thread on the end jam, it is no longer needed. Before installing the rafters in place, check that the glue is dry. In good weather, it takes about 24 hours for it to completely harden.
The final touch is applying glue