At all times, ceramic tiles have been considered the best roofing material, due to their high consumer characteristics, aesthetic beauty and unsurpassed durability.
However, today, natural tiles, as a roofing material, have lost most of the construction market ( the share of ceramics in the modern market does not exceed 15% ).
This trend is observed in connection with the constant development and improvement of modern materials for roofing. In modern construction conditions, ceramic coating has occupied its stable niche and is used in accordance with its advantages and disadvantages.
We bring to your attention alternative types of tiles:
- polymer-sand;
- flexible (soft);
- cement-sand;
- metal tiles;
- composite.
Calculation and design of a tiled roof
The calculation of the roof begins with drawing up a drawing of the roof in plan. If necessary, draw drawings of all slopes separately (this is useful if the roof has a complex shape with many individual elements). The area of each section is calculated and the total area of the entire roof is found, from which the number of elements is calculated. You need to know the usable area of the tiles (cement-sand tiles are available in two sizes, but ceramic ones have more varieties).
Typically, for each type of material the number of elements per 1 m2 is indicated. This helps to calculate the amount of material, but this is only the number of basic, ordinary elements.
It is also necessary to calculate the total length of the ridge line, cornices, count the number of end sections of the ridge and other elements. These values are needed to determine the number of additional elements:
- skating
- lateral
- hip
- half
These elements are used to decorate the transition areas of planes (ridges and valleys), as well as to finish the eaves of the roof. When purchasing tiles, you need to make a reserve of 10-15% for ordinary material, and for additional materials, the reserve can be made less - 3-5%. Extras are expensive, their number can be calculated with sufficient accuracy, therefore, it is not advisable to make unnecessary expenses.
If independent calculation seems too complicated, it is better to use the services of professionals! Our construction bureau “Vayatel” performs turnkey roof installation: from design to a lifetime guarantee after installation. Certificates and our projects.
Tips and tricks
To build a beautiful and high-quality roof, you should listen to the advice of professionals:
- the weight of 1 m2 of ceramic tile covering must correspond to the load-bearing capacity of the roof in order to avoid its destruction from overload;
- the color of the ceramic tiles is selected so that the roof harmoniously combines with the facade and other buildings of the architectural ensemble;
- ceramic tiles are purchased after accurate calculations, allowing for a 10% margin for trimming and breaking;
- It is better to calculate additional elements with an experienced roofer.
Ceramic tiles made from fired clay are considered an eternal material. After careful dismantling of the old roof, the entire elements are suitable for reuse in small buildings. Old ceramic tiles can be used to cover a canopy, gazebo, or outbuilding.
Roofing pie composition
A roofing pie is a layer of thermal insulation packed in a cocoon of vapor barrier film and vapor barrier membrane. Layers are usually laid in the following order (in order of installation):
- steam-waterproofing membrane. Has one-way permeability, capable of releasing moisture from the inside, but not from the outside
- insulation
- vapor barrier film
Sometimes the roofing pie has a more complex structure, but the above option is the most common. It is noteworthy that this design is used only for mineral wool. Polystyrene foam or penoplex can be laid without steam-hydroprotection, since they are absolutely impermeable to water in any form (especially penoplex).
Ceramic tile roof construction
Ceramic roof coverings are quite heavy (40–70 kg/m2), and the elements are fragile compared to metal tiles or other roofing coverings. These features are taken into account during installation and affect the construction of a ceramic tile roof. The roof structure for laying tiles must meet the following features:
- the roof slope should be in the range from 10 to 90°;
- with a roof slope of up to 22°, a double waterproofing layer is required;
- if the roof slope is more than 55°, then the tiles must be additionally fixed with clamps or screws;
- To install ceramic tiles, a reinforced frame is required, which is achieved by reducing the pitch between the rafters in the range from 60 to 90 cm.
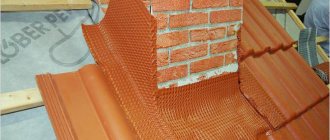
A standard roofing tile with all the necessary ventilation gaps is laid under the ceramic tiles.
When constructing a roof under ceramic tiles, well-dried wood with a moisture content of no more than 15% is used. This helps prevent deformation of the structure, which can lead to cracks in the finish coating. This material is used to construct a frame, that is, a rafter system, which is the basis of the roof. The general structure of the roof assumes the presence of the following elements:
- rafter system;
- vapor barriers;
- insulation;
- battens and counter-battens;
- waterproof film;
- roofing tiles.
Rafter system
The design of the rafter system must be optimized for the installation of tiles at the design stage. To do this, you need to take into account the large weight of the roof and choose the correct section of rafter legs (from 50 × 200 mm). In addition, it is necessary to select a rafter installation step that corresponds to the size of the heat insulation slabs. This will speed up the installation of insulation and avoid loss of material during fitting.
The rafter system for laying tiles must be reinforced. As a rule, additional rafter legs are used or struts are installed (additional supports to support the central part of the rafters). This is especially important on roofs with long slopes and low slope angles.
Another important point is the accuracy of the planes . There should be no sagging or curvature - all flaws will affect the appearance of the roof and greatly complicate installation. Therefore, before starting to lay the vapor barrier membrane, it is necessary to check the rafter structure using a long straight batten and carefully correct all detected distortions.
Other jobs
Using special materials produced by Brass, additional work is also performed, such as:
- Arrangement of connections between the roof structure and walls and other elements located on the roof.
- Installation of attic roof fracture.
- Installation of snow retention elements and safety elements for movement on the roof.
- Installation of a passage hatch for access to the roof when laying flexible tiles.
- Installation of various attachments in the plane of the tiles. This is necessary for the output of ventilation elements and antennas.
- Installation of decorative elements to decorate the roof.
Installation of thermal insulation, vapor barrier and waterproofing
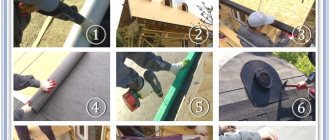
Installation of thermal insulation elements and protective sheets is carried out in the following order:
- hydro-vapor barrier membrane. This is a rolled material capable of transmitting water vapor in one direction. It is attached to the outside of the rafters, checking that the installation is correct - the canvas should allow steam to pass out, and not vice versa
- heat insulator Usually slab basalt mineral wool is used, as this is the cheapest and most effective option.
- vapor barrier film. This is an ordinary polyethylene sheet laid in horizontal stripes, starting from the bottom and overlapping. The joint lines are glued with tape, ensuring complete tightness of the canvas.
The membrane is installed externally, attaching strips of material parallel to the ridge (or eaves) line, starting from the top. The joints on both sides are taped with tape so that draining condensate cannot get into the cracks.
The heat insulator is installed from the inside, placing the slabs tightly between the rafter legs and fixing it with a perforated metal strip or polyurethane foam.
The vapor barrier is installed last, laying strips of polyethylene in rows starting from the bottom. The joints are overlapped and sealed with tape.
Arrangement of the valley
Waterproofing at the junction of the slopes is done more carefully: first, a roll is rolled out along the gutter from top to bottom, then the film rolls are overlapped from one slope to another.
In addition to the main lathing, two more types of it are packed on top of the film:
- diagonal sheathing - along the valley gutter;
- rapid - parallel to the main one.
Aluminum valley elements are installed along the gutter from bottom to top with an overlap of 10 cm and are attached to wooden blocks using staples. Foam rubber seals are installed along the valley elements.
depositphotos
Ventilation and aero elements
Ventilation of the under-roof space is ensured by the ventilation gap between the tiles and the waterproof (diffusion) membrane. It is formed by strips attached to the rafters on top of the membrane sheet. The minimum gap thickness is 40 mm. Air moves freely in it, allowing condensation to evaporate and be discharged outside.
Natural tiles are considered a “breathable” roof. It is impossible to lay the elements so tightly as to form a completely sealed canvas. However, you should not count on self-ventilation of the roof - over time, all the small gaps between the individual elements will become clogged with dust and small debris. The permeability of the roof will be weakened, and it will become impossible to do without a ventilation gap.
Aeroelements are used for additional ventilation. These are special components that have holes for air to pass through the roof. They are designed in the form of protruding pipes or ordinary holes, covered with a protective cap.
When choosing the appropriate type, you should take into account the angle of inclination of the slopes and the amount of snow in winter - if there is a lot of it, it is better to install pipes. Their height is about 50 cm, which prevents a layer of snow from blocking the ventilation of the under-roof space.
Advantages and disadvantages
The first and undoubted advantage of this type of roofing material is its naturalness and environmental friendliness. After all, this is clay with some additives, fired in an oven at a very high temperature. That's all the technology and composition. But there are other advantages:
- Fire resistance and fire safety. This is very important in such a fire-hazardous facility as a bathhouse, where the temperature of the flue gases often exceeds 200-300°C and sparks often fly out.
Ceramic tiles can have different profiles - Long service life. For some types of ceramic tiles, manufacturers provide a guarantee of 50 years or even more. Some varieties can withstand up to 1000 cycles of freezing and thawing. The figure is simply amazing, so 50 years is clearly not the limit.
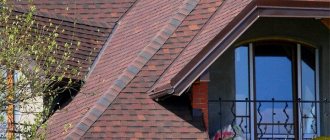
- Highly decorative. The roof looks very attractive and can be used for buildings of any style.
- Low thermal conductivity. The ceramic layer is an excellent heat insulator, which means less insulation is required. Due to the high thermal inertia, there are no sudden temperature changes in the under-roof space, and condensation rarely occurs on the inside of the tiles. These properties make tiled roofing the best when installing an attic floor.
- When it rains, falling drops do not produce any significant noise.
- Low hygroscopicity. Only 5-6% of the total mass is absorbed.
It was not for nothing that ancestors laid tiles on the roof. She has a lot of excellent qualities. But there are also disadvantages, and you need to know them:
- Heavy weight. This leads to the fact that the rafter system must be made of more powerful timber, and supports must be installed more often. In addition, the significant mass makes transportation more difficult. The mass of the tiles must also be taken into account when designing the foundation.
- Laying is possible only by hand, without the possibility of using machinery. Although new tile models have made the installation itself much easier.
- The slope should be steeper so that the water drains quickly.
- For painted tiles (by any method), the natural color is visible in places where they are chipped.
There aren't many downsides, but there are some. How significant they are, everyone decides for themselves.
Lathing and counter-lattice
Sheathing is a system of wooden planks to which shingles are attached. It is laid parallel to the line of the ridge (or eaves) with a step corresponding to the size of the roof elements.
The counter-lattice is bars attached to the rafters on top of the waterproofing membrane. They form the ventilation gap. The sheathing is attached to them in the transverse direction.
Particular attention should be paid to the installation of sheathing elements, since the possibility of installing the roof depends on their location. It is recommended that you already have tiles (or at least samples) at the time of installation so that you can check the correctness of the chosen sheathing pitch . This will avoid rework and corrections, which can be a very labor-intensive task on large rooftops.
In addition, we must remember that a thickened (sometimes continuous) sheathing is installed along the eaves and valleys. This is done to ensure high-quality design of cornices and valleys as the most important and loaded elements of the roof.
2. GENERAL PROVISIONS
The tiles are attached to the sheathing with nails, staples, clamps, wire passed through the holes of the tiles, or held by their own weight. Flat strip tiles are usually nailed or secured with clamps. The clamp fixes two tiles at once. The horizontal flap of the clamp lies on top of the already attached tile, and the adjacent tile is placed under the vertical flap.
Clip hooks are nailed to the sheathing from the attic side. At the top, the clasp flaps are closed by the row of tiles located above. All tiles located on the eaves and gable overhangs, on the ribs and on the ridge are secured with wire. Eaves and gable tiles can be attached with special brackets.
On roofs with a slope of 35-45° or located in regions with strong winds, the tiles are tied in one row. For slopes greater than 45°, each tile is secured with wire. A tiled roof has a pattern in which the tiles of adjacent rows are tied together, like bricks in a wall, i.e. the junction of 2 tiles of the row above falls on the middle of the tile of the row located below.
To achieve this, all odd-numbered rows begin and end with whole tiles, and all even-numbered rows start with half-tiles. The direction of laying the tiles is from bottom to top (from eaves to ridge) and from right to left (for groove tiles), from left to right (for grooved tiles) or from any pediment (for flat tiles).
Laying is carried out in 3-4 rows at the same time and is carried out in the following sequence (Fig. 1): two whole tiles are laid in the cornice row; in the second - first half, and then whole; in the third row - one whole tile. Then they return to the first row and lay one more tile in all rows already started (first, second and third).
Fig.1. Laying sequence
In order for the load on the walls of the building from the roof to be uniform, it is advisable to lay the tiles simultaneously on both slopes. The tiles are fastened with wire or nails passed through the appropriate holes. 3-4 months after laying the tiles, it is recommended to coat the transverse seams on the attic side with lime mortar with the addition of fibrous materials (tow, chaff), and paint the top with oil paint.
Gutter installation
Kapelnik
Installation of drainage elements is carried out before laying the roof. First, a drip is installed. This is a profile in the form of a corner with a wide vertical shelf. It is attached directly to the rafters even before installing the counter-lattice and placed along the eaves line. The drip tray is used to remove condensate from the diffusion membrane into the gutter.
Hooks
After installing the sheathing, hooks for the gutters are attached. The trays themselves can be installed later, the main thing is the supporting elements for them. The position of the hooks is chosen so that water from the outermost (lower) row of tiles flows directly into the gutter. As a rule, the overhang of the bottom row corresponds to 1/3 of the width of the drain.
Cornice strip
In addition, it is necessary to install a curtain rod. Different elements can be used here - a special metal profile or a perforated strip for free air access. The choice depends on local climatic conditions or the personal preferences of the owner.
Installation of gutters
The final stage is the installation of gutters. They are placed on supporting elements (hooks) and fixed in a regular manner. It is necessary to provide a slight slope towards vertical drains. It is necessary to take into account that each drain is capable of receiving water from a maximum of 150 square meters. m of roof.
You can increase the number of elements, but you cannot reduce them - the system will not cope with the load, and the water will begin to pour directly onto the ground. Puddles will appear, and drainage may penetrate into the basements.
Verification as part of the preparation phase
https://www.youtube.com/watch?v=O9CYhuxWHIk
In order to avoid any errors during the construction of the sheathing system, such as those associated with misalignment of the material, the parameters of the installed rafter system must be measured before the actual installation begins.
- First, the direction in which the horizontal laths are located is adjusted, placing them according to the fan principle. In this case, the space left between the slats should increase towards the larger gable.
- Any deviations in the vertical direction should be removed using the same fan principle, forming a slight backlash of parts in the desired direction.
How to lay ceramic tiles?
The technique for laying tiles depends on its type (locking, groove, flat, etc.). Before starting work, it is necessary to study the installation method for the existing material, acquire tools and devices for performing installation work.
Safety precautions
In addition, you must use personal protective equipment - a safety mounting belt. The work is carried out at heights; if you are careless, you can fall off the roof and suffer serious injuries.
Tools
You should also consider how to place your tools. Carrying a large bag or box with you is impossible, and making scaffolding or scaffolding of the required size is a difficult and time-consuming task. It is recommended to use cordless power tools and get a special work belt to which the main tools are attached - this way you can free your hands and always have the necessary accessories at hand.
To perform installation you will need:
- grinder with cutting disc for stone
- screwdriver with bit set
- tape measure and ruler
- building level
- thin twine for installing mooring lines
- rubber or plastic hammer
Only the most important tools are listed. Not all of them may be required, or there may be a need for additional devices - it all depends on the complexity of the roof, its configuration, and the presence of additional roofing elements.
Laying tiles on slopes
The tiles are laid in accordance with the design and location of the locking elements. As a rule, installation is carried out in horizontal rows in the direction from right to left. Laying begins from the cornice and gradually rises to the ridge.
If the tiles are of wave type, all elements are laid one above the other. On a flat roof, the elements alternate - in even rows the outer parts are whole parts, in odd rows - halves. This must be taken into account when purchasing material and immediately purchase the required number of half elements. Otherwise, you will have to waste time cutting during installation.
In order to organize the process with maximum productivity, all the material is lifted up at once and distributed in stacks (5-6 pieces) over the entire area of the roof (or section thereof).
This allows you to save time on delivery, not be distracted from the installation process and perform the work with the best quality. Tile is a fragile and rather heavy material, therefore, it is better to lift it in an organized manner, with the assistance of assistants and insurance against possible falls.
If you have no experience, you need to work slowly, constantly checking the instructions for laying tiles (as a rule, they come complete with the material). It is better to spend a little time on self-control than to redo all the work - it is much more difficult and takes more time.
Methods for fastening tiles
The method of fastening roofing elements depends on their type. There are different options:
- laying tiles with the element protruding from the inside resting on the sheathing
- fastening with self-tapping screws
- wire fixation
- conventional laying on the lathing with a hook on the lower protruding element
- combined installation methods
Fastening the material with screws is used on almost all types of tiles. However, not all elements are fastened with screws, but only the lower and upper rows. In addition, all cut parts are secured with screws.
The garter with a wire attached to a loop on the wrong side of the material serves as an additional element of fixation and is almost always duplicated with screws. This fastening is used when laying material on slopes with a small angle of inclination. In such conditions, a strong gust of wind can lift the tiles and destroy the roofing sheet. Additional fixation eliminates this possibility.
In addition, laying on “wet” mortars is sometimes used. This occurs rarely, only when laying tiles on a dense, rigid base.
Cost of installation of roofing units on ceramics
In appearance, the tiles must meet the requirements given in Table 4.1.
Table 4.1
Basic requirements for the appearance of tiles
| Index | Norm |
| Curvature of the surface and edges of the tiles (warping), mm, no more | 3 |
| Depth of grooves (rebates) of tiles, mm, not less | 5 |
| Surface roughness | Minor |
| Color | Plain |
| Lime inclusions causing spalls and cracks | Not allowed |
Certain requirements are imposed on the sizes of spikes and holes, which must ensure reliable fastening of the product to the roof (Table 4.2).
Table 4.2
Dimensions of tenons and holes for fastening tiles
| Index | Norm |
| Height of spikes for suspension, mm, not less: | |
| – for stamped tiles | 10 |
| - at the tape | 20 |
| Hole diameter, mm, not less: | |
| – in the middle part of the tongue of the strip tile | 1,5 |
Endova
The valley is the line connecting two adjacent roof planes. It is the most loaded element. Runoff from two slopes flows here, and in winter snow accumulates here. In addition, leaves and small debris brought by the wind often accumulate in valleys.
Installation of the valley is carried out in two stages:
- gutter installation (done before laying the main roof)
- laying roofing with trimming along the valley line
First, a reinforced sheathing is made. It is attached to diagonal counter batten strips installed on adjacent slopes 10 centimeters from the line connecting the planes. After this, a continuous sheathing is laid at a distance of 30 cm from the line of intersection of the planes. This will help securely secure the gutter and prevent the roof elements from sagging under snow pressure in winter.
Laying the valley begins from the bottom. The gutter is assembled from individual elements, which are attached to the sheathing using screws. Sometimes, instead of ceramic parts, a metal gutter is used as part of the components for metal tiles. The installation process is almost the same, only you first need to bend the edges and bend the gutter according to the angle of connection of the roof slopes.
The procedure is completed by laying ordinary roofing elements on adjacent slopes. The outer parts are trimmed, forming straight lines along the edges of the valley gutter.
Valley waterproofing
The endova is an area where moisture drains from two adjacent slopes. This makes it particularly dependent on the quality and effectiveness of the waterproofing. Therefore, the valley section is equipped with a triple layer of diffusion membrane:
- a strip of material laid along the entire valley line
- the edge of the canvas from one slope laid on top of the first strip (with a transition through the valley to the second slope)
- edge of the canvas of the second slope (in the same way, only in mirror image)
This waterproofing makes it possible to eliminate the formation of leaks. In addition, if a blockage occurs in the valley, formed by the accumulation of debris and leaves, the risk of leakage of drains is reduced - they fall on the triple waterproofing and flow into the gutter.
The membrane is fastened to the rafters and counter-lattice strips using a stapler. You can also use wide headed nails (we recommend choosing aluminum or brass fasteners).
Trimming tiles for valley joints
Trimming the outermost elements of the tiles is done as the roof is laid on the slopes adjacent to the valley. For greater accuracy, two straight lines are drawn along the gutter line with chalk, along which the cutting line of each extreme element will be marked.
The recommended overlap of the trimmed elements on the valley gutter is 8-10 cm. Sometimes you have to use half elements if too large a piece needs to be cut off from whole ones.
In addition, many specialists perform pruning in 2 stages:
- rough trimming is performed and the element is tried on at the installation site
- make the necessary adjustments and trim the tiles clean
The tiles are cut using a grinder. Install a cutting wheel for the stone. It is not recommended to cut tiles directly on the roof; it is better to install a workbench in the attic. This will allow you to avoid going down to adjust each roof element.
Construction of the lower roof.
• If the slope angle is less than 16 degrees or increased demands are placed on waterproofing due to the complexity of the roof or climatic conditions, then a lower roof must be installed under the tiles: a continuous deck of edged or tongue-and-groove boards and roll polymer-bitumen or polymer waterproofing.
• To make a waterproof bottom roof, fill a trapezoidal counter-lattice with a thickness of 40...50 mm over the decking, and only then fuse the waterproofing.
• When installing a lower roof, be sure to leave ventilation gaps at the ridge and ridge, similar to the film.
9. Laying the valley groove
• Bend the edges and profile the groove along the block. No special roofing tools are required for this operation.
• Start laying the gutter from the eaves (bottom to top). Place the groove on the flooring or thick sheathing and trim it along the contour of the inner square with a margin of 3...4 cm.
• The overhang aerial element or leveling bar must reach the visible valley line (13...15 cm from the axis of the groove) to securely support the first cut tile.
• Secure the groove to the substructure with six brackets using 2.8x25 mm galvanized roofing nails. You cannot nail the groove itself along its length with nails.
• Stepping back 1...2 cm from the top edge, nail the groove to the flooring with two nails to prevent it from sliding longitudinally.
• The minimum overlap of the next groove on the bottom is 10 cm; when laying, align the transverse ribs of the grooves.
The junction of the valleys below the ridge
• Lay the grooves with a gap of approx. 1 cm, secure them with nails and seal the joint with sealing tape of the appropriate color, profiling it along the edges of the groove.
Installation of joints at the same level for multi-gable roofs
• Lay and secure the grooves with nails. • Equip the ridge with aero elements or Figarol. • Seal the joint of cut ridge tiles with sealing tape or Wakaflex.
Bird and leaf protection
• The best protection against birds, dirt, snow and leaves getting under the tiles is provided by self-adhesive foam strips with water-repellent impregnation.
• If a foam strip is not used, then nail the eaves grille along the edge to the decking with galvanized nails.
The second way to lay the groove is on top of the thick sheathing
• This option is used when installing valleys of dormer windows or valleys over wide pipes, when the groove is released onto the tiles.
• In this case, nail the brackets to additional bars, otherwise the brackets will interfere with the even laying of the tiles. Bend the edge of the groove inside the valley. The foam strip can be trimmed to a height of 30...40 mm.
Release unit for the groove on the ramp
• Glue the outlet of the groove with Wakaflex and begin laying a groove 70...80 cm long with an overlap of the groove on the tile of at least 12 cm. • Use scissors to round the bottom edge of the groove and shape it to the shape of the tile using a hammer handle or a rubber mallet. • Construct valleys in the same way using grooves made of copper, zinc and galvanized steel.
Bypasses and junctions
Bypasses of elements protruding from the roof, as well as areas where the roof abuts the walls are critical areas of the roof covering. This is where most leaks occur due to inept or sloppy installation.
To decorate these elements, special additional elements are used - aprons. They are part of the components for metal roofing, but also work quite effectively in conjunction with natural tiles.
In addition, a special tape for junctions is used for sealing. This is a strip of elastic material, the upper part of which is glued to the apron using its own adhesive layer. The lower part of the strip is profiled along the surface of the tile and glued to it, forming a dense and sealed transition unit.
Window bypass and waterproofing of junctions
Bypassing attic windows is a complex roofing element that is performed in two versions:
- two valleys and a ridge element without vertical walls
- vertical walls and two small slopes adjacent to the main roofing sheet
The first option is carried out in the standard way - the valleys are formed, the tiles are laid and trimmed accordingly. Sometimes, instead of valleys, a simpler transition method is used, when water flows from the window slopes onto the main roof without assembling the lower gutter.
The second design option requires the installation of junction units. On the vertical walls there is a groove into which the edge of the apron is inserted - a metal profile from the components for the metal roof. The apron itself is attached to the wall with screws.
Lay the tiles, adjusting the elements so that the gap between them and the vertical surfaces is no more than 20-25 mm. After this, it is covered with an elastic tape for the junctions. It is equipped with its own adhesive layer and attaches well to the metal element and to the tiles.
Connection to chimneys and ventilation
The design of the area adjacent to the chimney is done in the same way as to vertical walls. The only difference is the need to surround the chimney on all sides.
To do this, you need a complete set of accessories for bypassing chimneys, which comes complete with metal tiles:
- top apron
- bottom apron
- side aprons
These elements are cut to the width of the corresponding sides of the chimney and installed on it, having previously made a groove. Fireproof sealant is used to seal the top. When the procedure is completed, they begin laying the tiles, adjusting the adjacent elements in length and width (depending on their position in the row).
When a section of the canvas is laid around the entire chimney, an elastic tape is glued to the junctions.
Installation of connections to pipes and walls using self-adhesive tape BRAAS Vakaflex.
Technical characteristics
Material: polyisobutylene mastic (PIB) with a reinforced aluminum mesh, adhesive tapes made of synthetic rubber 2 cm wide are applied on the reverse side along the edges of the roll. Size: length 5 m, width 28 cm. Temperature resistance: - 40...+100 C to DIN 52 133. Colors: red, brown, black, green. Weight: 5 meter roll approx. 5 kg. UV stability: complies with DIN 16 726.
Tool for working with Wakaflex • Roller • Folding meter • Pencil • Scissors
• Operating procedure
1. Arrange the bottom of the pipe. 2. Make side connections. 3. Glue the top of the pipe. 4. Install a Waka strip with heat-resistant dowels around the perimeter of the Wakaflex. 5. Apply sealing compound K.
• Lay the tiles around the pipe with a gap of 2...3 cm. If necessary, cut the tiles under the pipe to continue the row line and secure them to the leveling bar with 5x50 mm screws.
• IMPORTANT! Tiles and wall surfaces must be clean and dry. If you work at air temperatures less than +5 degrees. C, then use a technical electric hair dryer to warm them up.
Bottom of pipe
• Cut off the bottom strip of Wakaflex (length of strip = pipe width + 5 cm extra on each side of pipe).
• Fold the Wakaflex strip into a corner.
• Remove the middle protective film.
• Remove the protective film from the adhesive strip and glue the top part of the Wakaflex.
• Roll the adhesive strip to the pipe and the entire surface with a metal roller.
• Remove the film from the bottom edge of the Wakaflex and glue the roll only along the top of the waves of tiles.
• Glue Wakaflex onto the entire surface of the tiles using a roller.
• Cut the upper non-adhesive part of the Wakaflex at an angle of approx. 450, without cutting 1 cm to the point of intersection of the slope and the pipe line.
• Glue the cut sections onto the pipe and tiles.
Pipe side
• The side roll of Wakaflex should start from the bottom edge of the already glued strip and end 10...15 cm above the top of the pipe.
• Glue the side roll of Wakaflex to the pipe and tiles, roll it up with a roller.
• Stepping back 2...3 cm from the pipe line, make a cut to the point of intersection of the slope and the pipe. Do not extend the cutting line approximately 1 cm to this point.
• Cut the side parallel to the water drainage line. This piece will be useful to you later.
• Use scissors to round the bottom edges of the side strips to reduce the effect of wind.
• Glue the bottom of the roll and roll it with a Waka roller.
• Cut the top of the side roll towards the point where the line of the pipe and the slope intersect. Do not extend the cutting line to approx. 1 cm to this point.
• Glue the cut pieces onto the pipe and tiles and roll them with a Waka roller.
• Glue the left and right corners of the pipe in the upper part (remaining from the side strips) with pieces of Wakaflex to protect against sliding snow and ice.
• The overlap of the bandage strips on the side of the pipe should be approx. 2 cm.
Top of the pipe
To protect the roof from melt water, make the top roll of Wakaflex double.
• Cut two strips to the required length.
• Remove the protective film from the top strip and apply it to the bottom strip with an overlap of 5 cm. Roll the joint with a Waka roller.
• Place the double roll in the groove with a slight slope in any direction and glue Wakaflex to the pipe.
• Remove the protective film from the top strip and glue Wakaflex to the waves of the tiles.
• Glue and roll Wakaflex over the entire surface of the tiles, with the exception of the lower area (adjacent to the pipe and not covered by tiles) to drain rainwater and dirt.
• Make a cut down parallel to the pipe line, stepping back 2...3 cm from it. Do not bring the cutting line approximately 1 cm to the slope line.
• Cut off the bottom of the roll and use scissors to round the bottom edge.
• Glue the cut pieces onto the pipe and tiles and roll them with a Waka roller.
• If a snow bag may form above the pipe, then to protect the roof from the penetration of melt water during a thaw, bend the upper edge of the Vakaflex in the form of a bumper by 2...3 cm.
• Lay the tiles on Wakaflex.
Working with the Waka bar
Bottom of pipe
• Cut the bottom strip to the required length: The length of the strip is equal to the width of the pipe + 5 cm outlet in both directions.
• Cut the upper part 1 and bend it along the line of the pipe.
• Cut the lower part 2 and bend it along a line 1 cm away from the corner of the pipe.
• Bend the upper flange of part 1 with a hammer to the pipe.
• On the bottom 2, cut a corner parallel to the slope line.
• On the top part 1, mark and drill holes for dowels d 6mm
• Mark along the strip and drill 6x40 mm holes in the pipe.
• Secure the strip to the chimney with heat-resistant dowels and screws.
The fastening step is no more than 20 cm!
Pipe side
• Place the side strip parallel to the slope line and mark on it the outline of the bottom strip and the pipe line at the top.
Top edge of the side bar
• Cut part 1 along the pipe line.
• Cut part 2 along a line 1 cm away from the corner of the pipe.
• Secure the side strip with screws.
The fastening step is no more than 20 cm!
Top of the pipe
• Cut the top strip: Length of the strip = pipe width + 2 cm outlet on both sides.
• Mark the outline of the installed side strips on the top strip.
• Mark the upper part 1 and bend it along the pipe line. To do this, make sequential cuts u and v.
• Bend the lower part 2 along a line 1 cm away from the pipe. To do this, make cuts x and y.
• Cut off the raised edges w and z at the rake angle.
• Mark along the strip and drill 6x40 mm holes in the pipe for dowels.
• Attach the top strip to the pipe.
• Using a construction syringe, apply Sealant K into the flange of the plank along the entire perimeter of the junction.
Appearance of the finished junction
• The upper edge of the Wakaflex is protected from precipitation by a Waka strip, secured to the chimney with heat-resistant dowels and corrosion-resistant screws.
• Sealant K is applied to the flange of the strip - a one-component synthetic rubber that does not contain silicone.
Installation of ridge tiles
Ridge tiles are a set of elongated elements with a semicircular cross-section. They are installed overlapping and secured with screws.
To do this, you need to install a ridge bar, the height of which is determined experimentally - one element of the ridge tile is applied to the laid roof and the height of the bar is determined. It is necessary to ensure tight fastening, to prevent the occurrence of a large gap between the ridge elements and the roof.
At the same time, it is necessary to avoid the appearance of a gap between the top of the block and the top of the ridge element - when screwing in the screw, it may crack. The last tile (called the initial tile) is secured with screws and sealant.
Installation of a gable overhang.
• For sheathing pitches less than 33.5 cm, use side tiles with a cutout of 11 cm, and for larger pitches, with a cutout of 8.8 cm. Secure each tile with two galvanized screws 5x50 mm.
• The gap between the ends of the sheathing and the inner surface of the side tiles should be 1 cm.
• Another option for constructing gables is using lightweight side tiles made of painted aluminum. In this case, lay the row tiles on the gable overhang flush with an additional 50x50 mm bar.
• Place the side piece over the shingles and secure it to the gable beam with a roofing nail at the top and a screw and sealing washer near the bottom edge. The next element will cover the place of fastening with a nail.
Do not fasten the two lightweight side tiles with an overlap with a screw!
Additional roofing elements
Additional roofing elements are areas for ventilation, antennas and other communications. For this, there are special parts that are installed in a standard way in the right place.
Snow guards
As a rule, snow retainers are not used on tiles - the specific nature of the roof is such that snow does not melt off on its own. In addition, snow guards will have to be attached taking into account the height of the wave and the thickness of the material. This will cause the tiles to crack and break, which is unacceptable.
Why should you contact MosStroyKrovlya for installation?
- You can contact us at any convenient time. A weekend or holiday is not a reason to postpone the installation of a roofing system. In addition, our specialist can take measurements even in the evening, so you don’t have to change your plans or take time off from work.
- You don’t have to worry that the master from MosStroyKrovli will not have experience in working with the roofing material you need. For each type of roofing system, our team has a separate specialist who guarantees the quality of the service.
- You can get a favorable discount on our work. When ordering our services during the holidays, you have a chance to place an order 5-10% cheaper than usual.
Important: You can order the service of installing a finishing ceramic coating on the roof from our company for 690 rubles per sq. m.
m. This price applies when working with a simple roof, and in other cases it increases to 890 rubles. DESIGN
Coating care
Maintenance of tiles is minimal. The only necessary procedure is to remove debris and fallen leaves from the valleys. In addition, you can periodically water the roof with water from a hose, washing away dust and sand brought by the wind.
When the roof becomes old enough, moss may appear. This is an undesirable phenomenon that should be dealt with. Moss is removed from the roof surface on your own or with the assistance of specialists. You can apply a protective impregnation (hydrophobicize the roof) to prevent the re-growth of moss.
Additional materials on the topic
Reviews about ceramic tiles
More details
Roofing units made of ceramic tiles
More details
Ceramic tiles koramic
More details
Your feedback, comments, questions
Dear visitors! We will periodically answer your questions in the comments as we are busy. In order for us to respond to you promptly (within an hour), you can: call, write a personal message or leave a request for a free consultation by phone.
How to calculate the amount of material for your roof
To calculate how much metal tiles you need for your roof, you need to measure the roof itself. There are many services on the Internet that allow you to quickly calculate the amount of tiles needed. But if you want to do the calculations manually, follow the instructions below.
When taking measurements, take into account all protrusions and other structural elements. Try to calculate so that all the scraps of metal tiles are used.
First you need to determine the number of rows. To do this, the width of the slope (for example, 6 meters) must be divided by the useful width of the profile (for example, 1.11 m). Please note that the calculations only use the usable width, not the actual width! Its manufacturers sometimes call it effective. So, divide the width of the roof element by the width of the profile, round up, and you will get the number of rows.
Next you need to determine the appropriate length of the sheets. To do this, measure the length of the slope (from the eaves to the ridge) and add the length of the overhang (4–5 cm is optimal). If you plan to lay tiles in several horizontal rows, add another 15 cm for horizontal overlaps.
There is a maximum length limit of 8 meters. Metal tile sheets 4–5 m long are considered the most convenient to use.
Materials and tools
To lay metal tiles on the roof with your own hands, you will need the following tools:
- a tool for cutting steel sheets (a grinder will do);
- screwdriver;
- roulette;
- marker for marking;
- fasteners - self-tapping screws with EPDM rubber gasket, galvanized nails.
Tools you will need:
- cornice strip;
- lower elements of the valley, junctions with pipes, walls, ventilation outlets;
- metal tile sheets;
- end strips;
- upper elements of the valley and junction points;
- ridge strip.
Triangular and trapezoidal slopes
- When installing metal tiles on these types of slopes, additional counter-battens are installed along the ridges of the slopes.
- Further steps are similar to the installation of standard roofs. Then the cornice board, cornice strip, drain hooks and drip line are installed.
- The sheet of metal tile is cut along an oblique line so that the distance to the sheet of the next slope is 60-80 mm.
- Installation of ridge strips is also carried out from the bottom up.
It is important to ensure that the axis of the ridge strip runs clearly along the axis of the ridge. The junction of the two ridges and the ridge can be formed with a plastic Y-shaped tee.
Tips for those who lay metal tiles with their own hands
Here are some tips on how to do the work with your own hands faster and better and evenly cover your roof with metal tiles:
- Start fixing the sheets from the bottom - it’s easier.
- If you accidentally damage a part, the defect can be hidden using aerosol paint.
- Do not join profile sheets under the ridge - this will improve ventilation and the integrity of the coating will not be affected.
- Lay metal tiles evenly and alternately on both sides of the roof.
- If you live in a snowy region, you will need an additional element - snow guards. These are cross strips that are attached on top of the shingles. Installing them is not necessary, but they will help extend the life of your gutters.