One can only envy the ingenuity and ingenuity of the Russian people. Domestic craftsmen will go to great lengths to save their money. It is unlikely that a resident of any Western European country would think of using plastic or glass bottles as insulation. Russian people have found a worthy use for used containers. That's right, why should good things go to waste? Of course, such know-how for a residential country house is not the best option, but for a log bathhouse, insulating the floor with bottles is an excellent way to insulate a steam room for practically nothing. Maybe for some this option will seem original, but ineffective. However, according to reviews, the bottles provide fairly good thermal protection for the bathhouse.
Working principle of bottle insulation
If you approach the issue of floor insulation with used glass containers from a scientific point of view, then this method will not seem so strange, and for some even ridiculous.
The fact is that in empty bottles an air gap forms, which completely fills the container. As a result, a thermal barrier is created that prevents cold masses from entering the house, and also protects the lower part of the log house from freezing in winter.
The first question that comes to mind is: where to get such a quantity of glass and plastic containers. But we think that for a Russian person who is puzzled by insulation with bottles, this is not such a big problem. As a last resort, there are always neighbors around who have plenty of this stuff.
A more difficult issue is storing non-standard insulation until it is used. You will need quite a lot of bottles, so you need to take care of this in advance.
Reviews from know-how owners
From owners of bathhouse floors made of bottles, you can hear the following:
- “The neighbors, when they found out that I made the base from empty glass bottles, first laughed at me, and now they themselves are building the same floors” (Igor A.)
- “In my dressing room, under the cover, there are plastic containers with a volume of 1.5 liters. The result was a wonderful warm floor, which cost me pennies” (Alexander T.)
- “It makes me so funny when someone says that the base is made of glass bottles. They create cavities under a strong reinforced concrete screed” (Yuri P.)
- “Calling such a design a full-fledged heated floor is difficult and incorrect, since bottles are not capable of generating heat, but you must agree that other thermal insulators cannot do this either. Their task will be to minimize heat loss. This works great with empty and unnecessary containers” (Mikhail N.)
- "And what? I have a lot of bottles, why spend money on any other materials? To begin with, I thought about insulating the floors with this material only in the bathhouse. It so happened that there was a break in construction, but I regularly did not throw out the containers, but stored them inside the basement. It was enough to eventually make thermal insulation for the concrete ceiling” (Alexey I).
We hope that after these reviews, your doubts about the advisability of using empty containers as insulation material have been dispelled. The insulation process will not be anything complicated.
The advantages of this method of insulation
- Of course, the most important advantage of this insulation option is its almost zero cost.
- Good thermal insulation characteristics of the material. Bottles perfectly retain heat inside the steam room.
- Sufficiently high speed, as well as ease of work. You can make a strong and reliable base from glass containers with your own hands in almost one or two days.
- Glass bottles are very durable and can withstand extreme mechanical loads and impacts.
Results
What other materials can be used for insulation, besides bottles (glass and PET)? For this procedure, you can also use glass jars, if, of course, you can set everything according to the thickness of the ceiling. True, it will be more difficult to save them, and equipping such containers with a sufficient number of lids is not so easy. There is an option to take dishes with screw-type necks. Cans can be installed together with bottles with the bottom up, providing a relatively flat base for the screed. It is not contraindicated to make thermal insulation from dishes with different volumes, as well as containers made from heterogeneous raw materials. The main thing is that it fulfills its task - to keep the heat in the bathhouse.
Floor thermal insulation algorithm
Preparing glass containers
Insulation can be done using bottles with tightly sealed necks. If the seal is broken, the air inside the container comes into contact with the external environment, which increases its thermal conductivity and reduces the thermal insulation characteristics of the insulation.
The bottles must be warmed up before corking. After cooling, the air becomes more rarefied, and accordingly its density decreases, which helps reduce thermal conductivity.
Insulation is best done in warm sunny weather; this will allow glass containers to heat well and quickly.
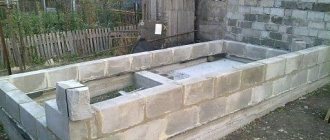
Installing bottles on a finished base
Pouring concrete screed with bottles
You can insulate a finished floor with bottles in a log house or in a bathhouse. But you must immediately take into account that the height of the room will decrease. To reduce this indicator, when thermally insulating the finished base, bottles are laid only in a horizontal position.
The work is performed in the following sequence:
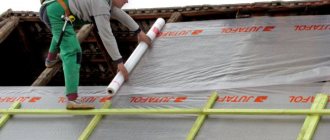
- The subfloor boards are covered with roofing felt. The sheets are laid overlapping each other, and also placed on the walls to a height of 10-15 cm.
- The joints and edges of the waterproofing material are coated with bitumen mastic.
- The gaps between the bottles are filled with dry sand.
- Another waterproofing layer is laid, and then it is covered with a reinforcing mesh.
- The structure is filled with a concrete screed on top, after which it hardens, the installation of the finishing coating begins.
Thermal insulation of the floor during construction
Horizontal stacking of bottles
This option is more preferable, since it is possible to lay glass containers at the required level from the zero mark. When building a log house or bathhouse from logs, insulated floors made from bottles are installed directly on the ground. Bottles can be stacked both horizontally and vertically.
In the second case, significantly more containers will be required, but the thickness of the air gap and the strength of the structure itself increase. Such a base requires a smaller layer of screed, while its thermal insulation characteristics are higher.
Stages of work:
- It is necessary to remove the top layer of soil. If you plan to place bottles horizontally, it is enough to go 20-25 cm below the zero mark. When installing vertically, you need to deepen the pit by 30-40 cm. After removing the soil, the base is well compacted.
- Make a drainage layer. For these purposes, you can use sand, crushed stone, gravel or screenings. After backfilling, the bottom must be leveled and compacted tightly.
- A reinforced metal mesh is laid on a flat base.
- Bottles are placed on top of the mesh. When positioned vertically, the necks of the containers should be facing down and recessed into the ground. When laying horizontally, the containers are placed in parallel rows with a tight fit to each other.
- Another layer of reinforcement is laid on top of the bottle layer for strength.
- Concreting of the insulated base is carried out. The height of the cement screed when laying bottles horizontally should be 6-8 cm. To prevent the concrete from cracking, it is necessary to remove air. To do this, the screed is pierced in several places.
- To strengthen the base, sprinkle the wet fill with a thin layer of dry cement.
To make the floor even warmer, you can lay two rows of bottles. In this case, a reinforcing layer is laid between the bottles.
Complete drying of the concrete takes at least 3-4 weeks, after which you can begin laying the finishing coating. Tiles can be laid directly on a concrete base, while a wooden floor can be laid on a frame base.
Materials
You will need the following materials:
Medium-sized crushed stone mixture or screenings;
Mesh frame with steel wire 7-8 mm and cells 50-80 mm;
Concrete mortar to which we add cement, sand, crushed stone in a ratio of 1:3:5. Mix all the ingredients and dilute with water to obtain a creamy consistency;
Tile or wood flooring.
Follow this sequence of actions when performing work:
It is necessary to remove the layer of soil around the perimeter of the planned bathhouse using a bayonet shovel;
It is necessary to ensure a deepening evenly throughout the entire area by 25-30 cm if the container is laid horizontally and by 35-40 cm if vertically;
Using a tamper, compact the layer;
Pour the crushed stone-sand mixture or screenings into the base of the recess and compact it;
With the help of reinforcing mesh it is necessary to strengthen the surface and prevent discrepancy during use, so we lay it in the next layer;
Next, you need to lay out the filled bottles horizontally and parallelly in rows on the resulting surface, so that there is no empty space left. The material should be laid as tightly as possible. In turn, placing the bottles vertically will ensure greater filling and thermal insulation;
It is necessary to install a mesh reinforcing frame along the edges to ensure greater strength and reliability of the building;
Next step: pour the solution prepared in advance over the entire area and 7-8 cm thick;
It is necessary to get rid of air cavities using steel reinforcement. This will prevent pores from forming or cracking;
Thanks to the cement screed poured on top of all layers in a wet form, it is also possible to increase strength and prevent the formation of cracks;
The resulting base must be completely dry before further work is carried out.
The finish can be different depending on preference: tile or wood.
Recommendations for using plastic bottles
Some are afraid to insulate the floor with plastic containers, considering them not strong enough for this. In addition, everyone knows that plastic dishes are subject to rapid deformation. However, PET bottles are used for floor insulation no less often than glass bottles.
Below are recommendations that you can follow to create a strong and reliable foundation:
- To prevent bottles from deforming and add strength to the future floor, it is enough to fill them with sawdust, sand, dry clay or other bulk materials.
- Work on preparing the base and laying plastic bottles is carried out similarly to installing a floor made from glass containers.
- Installation of an insulating structure made from PET bottles is best done at an air temperature of 20-25 degrees.
- When preparing a concrete solution, the cement-sand mixture must be diluted with heated water, which helps to slowly cool the air inside the plastic container. As a result, optimal pressure is created on the walls of the dish, which helps to strengthen them until the solution begins to harden.
- The screed must be reinforced, and the size of the mesh cells should be no more than 150x150 mm.
Theoretical basis for the use of glass containers in construction
The physical properties of glass do not change over time.
A tightly sealed bottle is a good thermal insulation material , so the use of glass containers for the construction of building elements is completely justified.
It has been proven that a panel constructed from 1 row of bottles retains heat no worse than a brick wall about half a meter thick.
Structures made from glass containers have good light transmittance. Wall panels can be designed in any color scheme, imitating elements of various architectural styles.
To build houses from glass containers, 2 methods are used:
- frame;
- wall
The resulting design will compare favorably in cost - you will get the bottles for free or at a purely symbolic price , and the main cost item will be the components for preparing the solution.
Further in the article we will talk about how to build from bottles with your own hands, from the practical side of this issue.
Floor in a bathhouse made of bottles: how to insulate and fill, photo
Bath procedures always bring benefits and health. Especially if the steam room is designed and built correctly. In this case, the temperature in the steam room is constant and comfortable. But what to do if there is a cold feeling from the floor in the steam room and there is little pleasure from being in such a bathhouse? You will have to insulate the underground using improvised means. In our case, this will be the floor in a bottle bath.
Are you surprised? But in vain. The principle of insulating a room with simple glass or plastic bottles lies in the air gap that fills the cavity of the bottle. As a result, a kind of thermal barrier is formed, which does not let the cold into the room. In addition, glass in the form of a bottle is highly durable. It will be very difficult to damage such a floor even with the mechanical impact of a large impact force.
The use of such readily available material as bottles is unusual, but very profitable. Since heated floors made from empty glass or plastic containers have the following advantages:
Important: you can use both glass and plastic bottles for warm pilaf in the bathhouse. But in both cases, the container needs to be properly sealed on a dry sunny day.
This way, each bottle will be filled with warm air. In addition, you can pour sawdust or expanded clay into a plastic container. But this is at your discretion.
In order to make a heated floor in a bathhouse with your own hands, you will need:
Important: if the depth of the soil, the space and the number of free bottles allows, then they can be installed vertically close to each other, as shown in the photo. This will make the warm floor even denser.
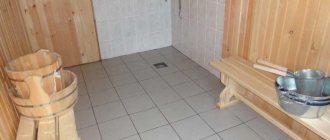
For those who prefer a tiled floor in the steam room, all that remains is to simply lay the tiles on top of the concrete layer.
Installation technology
Depending on the base material, it is practiced to install a wooden, polystyrene, or concrete heated water floor.
Concrete
It is widely used in Russian latitudes, it is based on a concrete screed with a flexible pipe; it also uses insulation in tandem with polyethylene film. Mineral wool and penoplex are optimal as thermal insulation materials. Concrete is mixed with special additives (they are also used in the construction of swimming pools), which prevent cracking of the dry mass under conditions of frequent temperature changes.
Preparing the base:
- the screed is made with an inclination corresponding to the direction of drainage of water, the maximum angle is 10°;
- the completely dried layer is covered with a polyethylene vapor barrier;
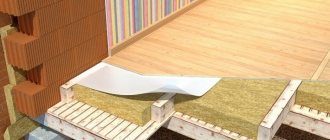
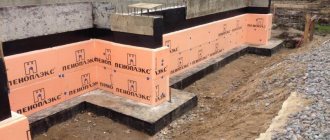
- insulation is laid on top - mineral wool, penoplex;
- holes are formed in the material into which beacons for future screed are placed;
- The top of the “pie” is covered with a metal reinforcing mesh with a cell size of 10x10 cm.
Polyurethane foam tape is fixed along the perimeter along the walls: a soft membrane compensates for the potential expansion of concrete and prevents it from cracking when heated.
The pipe is laid in a spiral taking into account the following recommendations:
between the turns you need to leave gaps no wider than 40 cm, a distance of 25 cm should be maintained from the outer pipe to the walls; When laying a pipeline, the permissible radius of its bend should be taken into account - this is five times the diameter. The product is sold in the form of reels, they are unwound as they are used, fixed with clamps so that there is space for pipe expansion; the pipes are combined into a circuit in a manifold cabinet.
After trial testing, the concrete screed is poured again. It is important that the ambient temperature is kept in the positive range; a vibrator is used to compact the mass
After trial testing, the concrete screed is poured again
It is important that the ambient temperature is kept in the positive range; a vibrator is used to compact the mass
The optimal layer thickness allows you to leave 2 cm of concrete above the pipes; usually it ranges from 7-8 cm. If a tiled floor covering is planned, 5 cm is enough.
Wood
The flexible pipe is placed in the grooves left between the slats; this space should be wider than 2 cm. Chipboard panels are considered the most budget-friendly base material. Operating procedure:
- The base is leveled and debris is removed.
- A sheathing is formed from timber with a cell side of at least 60 cm, and fiberboard or plywood is stuffed onto it.
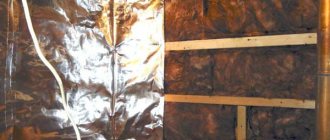
- The finished raised floor is covered with a vapor barrier and insulation on top.
- Lay out the boards, in the gaps between which the pipe will be placed. Their height should exceed 2 cm.
- The grooves are insulated with foil to prevent heat leakage downwards, and pipes are placed on it.
- All ends are connected to the manifold cabinet.
- A finishing layer of cladding is formed.
To fix the foil in the gaps, you can use small nails or a stapler. If the raised floor is assembled from fiberboard, foil is glued to the smooth surface of the slabs using double-sided tape.
From polystyrene plates
The base is assembled from segments with ready-made grooves; pipes are inserted into them. Plates are inserted into the gaps to promote more uniform heat distribution. A low and light structure is formed that does not “eat up” the usable space in the room. No labor-intensive concrete screeds are needed here. Polystyrene does not allow moisture to pass through and retains its heat-insulating properties throughout its entire service life.
Installation features:
- the first layer is laid insulation in the form of mineral wool;
- polystyrene foam is installed starting from the far corner, the plates should be placed so that their grooves coincide;
- distribution plates are placed in the holes;
- A flexible pipe is fixed on top.
Polystyrene boards
After checking the functionality of the system, a clean floor covering is formed.